Flex your painting muscles in this scenic course featuring a seaside villa along the coasts of Laguna Beach, California. You can follow along as artist William "Bill" Dunn uses common watercolor techniques to show how to paint like a pro. Interested in more? Watercolor courses like this are available to members of Beeblys WatercolorPainting.com.
Materials Used In This Watercolor Class:
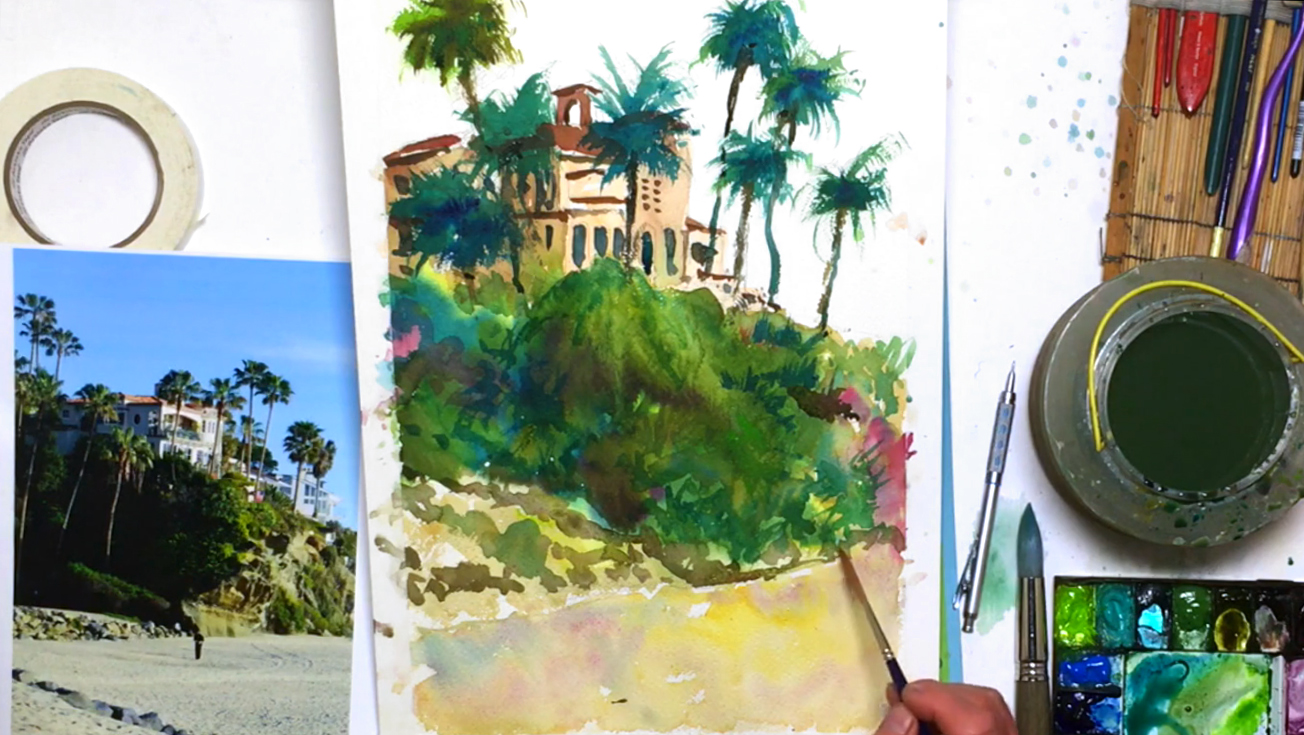
- Reference picture of a seaside villa in Laguna Beach
- A block of Fabriano rough watercolor paper (140lb, size 16″ x 12″)
- Pentel Graphgear 1000 automatic drafting pencil, 0.7mm lead size with B lead
- Kneaded eraser
- ¾" Artist's tape
- Painting palette for watercolor paints
- Auxiliary plate or palette for gouache paint
- A container of water
- Paper towels or a rag
- Spray bottle with clean water
- A tabletop easel or a box to prop your painting on
Paints (Holbein Artists' Watercolors)
- Brilliant Orange
- Cadmium Red Purple
- Cobalt Violet Light (a.k.a. "Lavender")
- Mineral Violet
- Olive Green
- Viridian
- Leaf Green
- Peacock Blue (a.k.a "Cerulean Blue")
- Cobalt Blue Hue
- Quinacridone Gold
- Yellow Ochre
- Burnt Sienna
- Burnt Umber
- Neutral Tint
Winsor & Newton's Professional Watercolors
- Permanent Carmine
- Permanent Mauve (or Sennelier's Cobalt Violet Deep Hue watercolor paint)
- Oxide of Chromium
- French Ultramarine
Holbein Artists' Gouache
- Permanent White
Brushes
- Neef Rigger Supreme Taklon Series: Long handle rigger brush (no. 6)
- Neef Rigger Supreme Taklon Series: Long handle rigger brush (no. 8)
- Neef Rigger Supreme Taklon Series: Long handle rigger brush (no. 12)
- Escoda Perla Joseph Zbukvic Series: Round brush (no. 20)
- Winsor & Newton's Cotman Brush Series 333: Rigger brush (no. 3)
- Princeton Mini-Detailer Brush Series 3050: Fan brush (no. 12/0)
- Old toothbrush
Step 1: Starting Off With A Focused Sketch
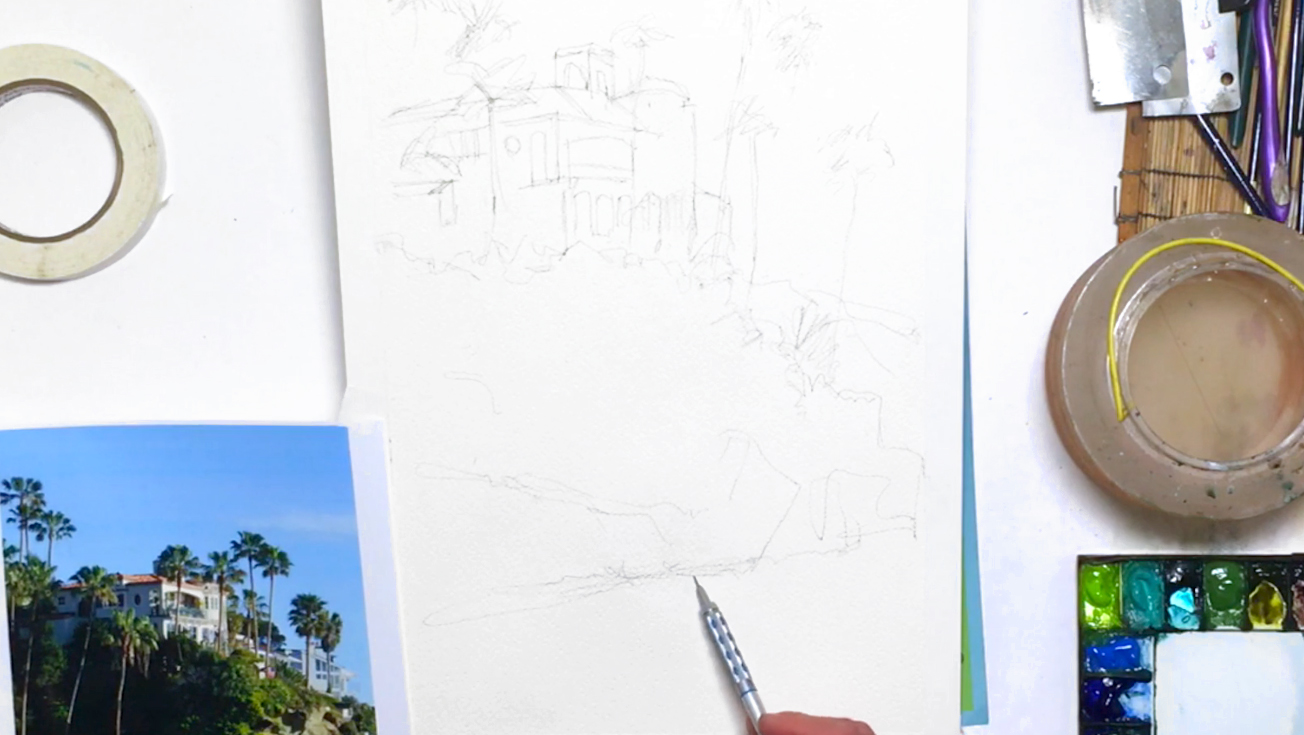
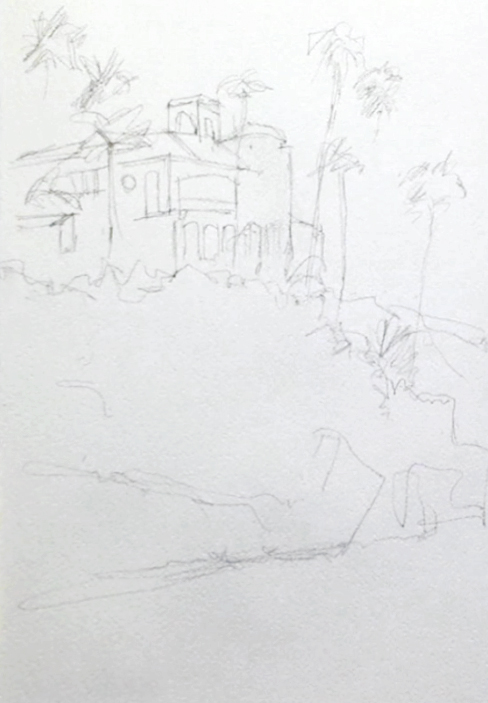
To start off, tape the borders of your paper using the ¾" artist’s tape. This gives the resulting painting a clean white frame, which will help with future framing purposes. After this, you can spray your paints to prepare them for later, then begin translating the reference photo into a sketch. Begin by planning your composition. Bill gives a handy tip on shooting your photos at the angle you'd want to paint, so the composition is already prepared for you. For this course, you can print and use Bill's photo for practice. Start your drawing with the seaside villa, working on the rooftops before drawing the walls and other structural details. As you'll be painting over these lines, don't worry too much about erasing mistakes or getting light lines for your sketch. In terms of composition, try not to place the villa dead center, and take out unnecessary details like the extra buildings to the right. Continue onward with outlining the cliff below the villa, and break up the line of sight by adding some palm trees. Lastly, finish off your sketch by drawing the area between the cliff and the beach. Keep your lines simple, and don't forget to mind the perspectives and proportions of the overall scene. For an extra challenge, you can exaggerate the perspectives (a.k.a. "pushing the perspective") for a more dramatic painting. Once you're finished, it's time to move on to the actual painting! Below is a close-up of Bill's sketch:
Step 2: Painting A Seaside Villa Using The Wet-On-Dry Method

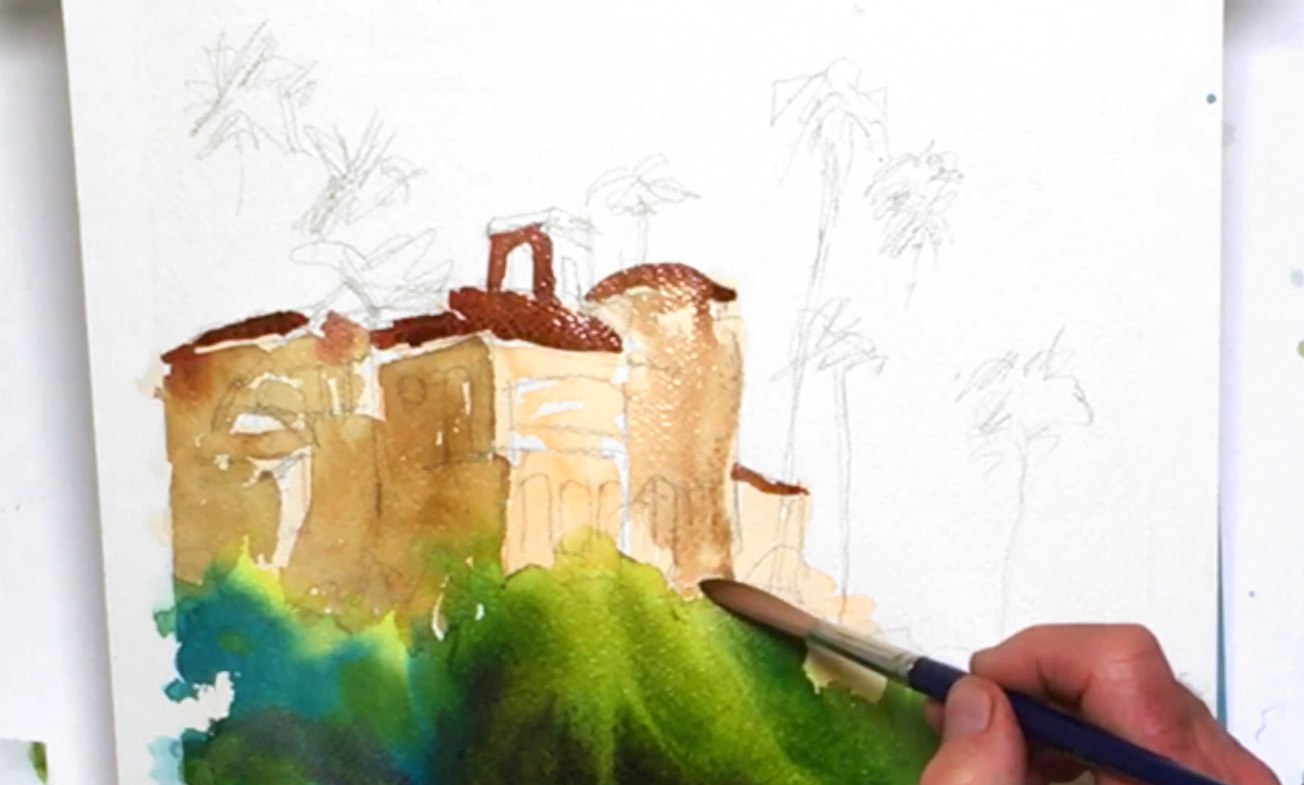
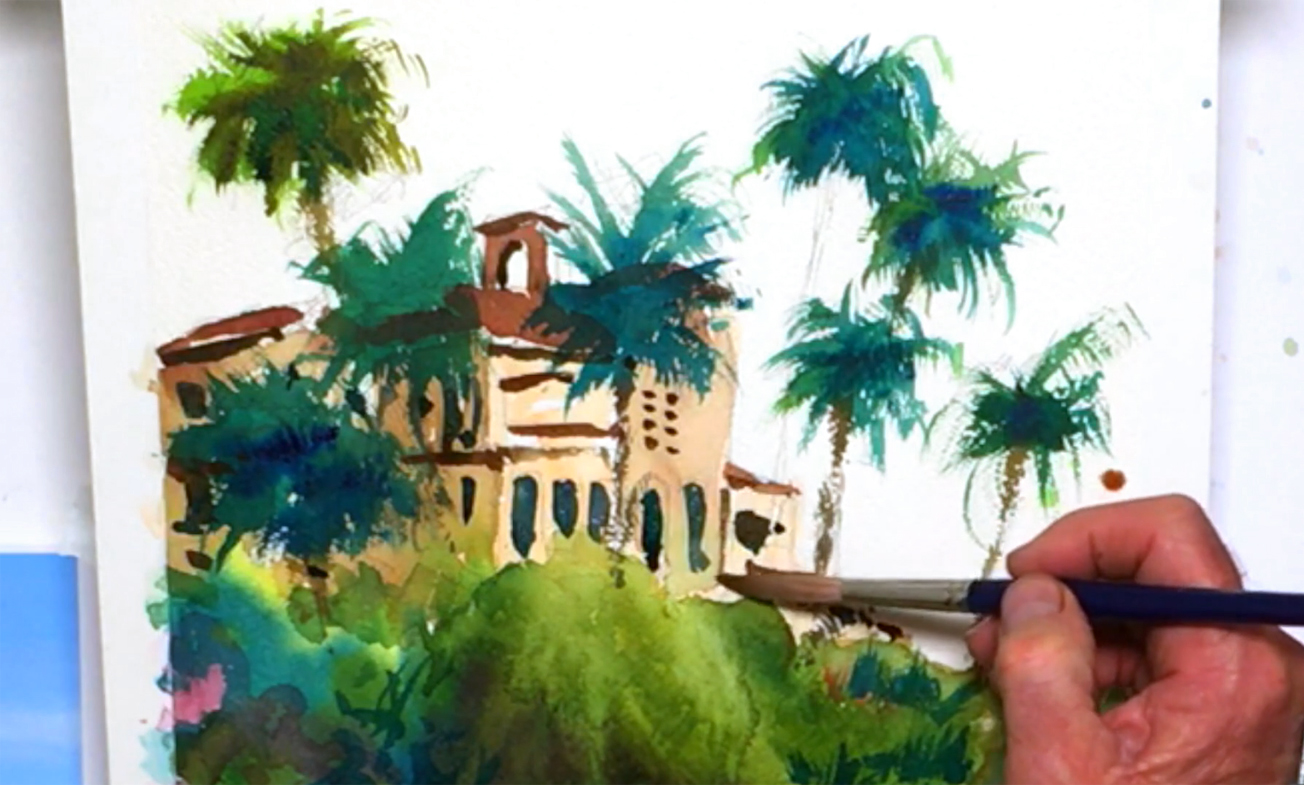
There are two basic methods you can start this painting with. Starting at the villa again, Bill opts for the “wet-on-dry” technique, where wet paint is applied on a dry surface. Wet the Neef rigger brush (no. 12), and mix Cadmium Red Purple with a touch of Brilliant Orange. Tone the color down with Burnt Sienna, then lighten it by adding more water. Use this color to paint the whole villa without being overly careful, as you're trying to get an impression of the scene. Leave some windows and edges white to keep the painting bright, and don't worry about running into the foliage below. Remember that the paint will dry lighter than you see, so don't make it too light or your painting won't have as much of an impact. Shadows and details will be added later as well, so just block in the base layer for now.
Step 3: Creating Coastal Cliffs With The Wet-On-Wet Technique

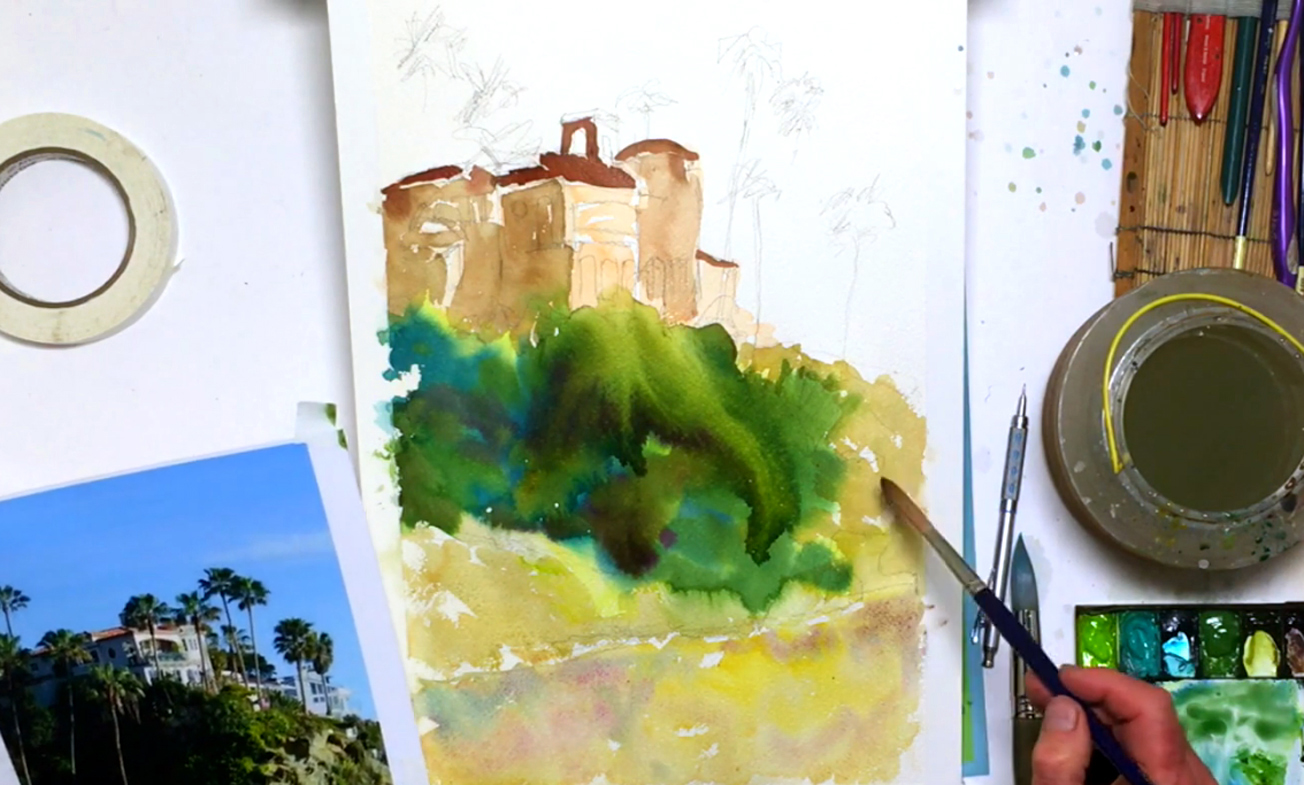
After completing the seaside villa's base layer, clean your brush, then begin brushing pure water over the cliff area. This is the first part of the "wet-on-wet" technique, where you create softer blends by painting onto a wet surface. Start with the lightest green - Leaf Green - and drop it into the cliff area. Feel free to cover more than the highlights, as you can layer more colors on top. Use Oxide of Chromium for mid-light tones, and add in Cobalt Blue Hue or Viridian to darken where necessary. The blue will mix with the yellowy greens to produce a dark green, but don't overdo the blue! Because you're using the wet-on-wet technique, the colors will spread out quickly. They also won't dry as strong due to the extra water, so don't worry about using more paint than usual. The best method is to anticipate what your paint will look like when dry, which will come easier with practice. Add Olive Green to change it up, placing all these colors in a way that gives shape to the cliff's structure. Keep in mind that you can change the composition of the colors while painting, as your aim is to capture the feeling of a coastal scene. With the blues and greens in place, add pure Permanent Mauve to the darkest areas so it mixes with the wet paint on your painting. This will help blend the colors together more effectively than if you had pre-mixed them on your palette. Try not to get too regular with your brushstrokes, and soften any hard edges with pure water. Oversaturating the paper may also cause unexpected results, but if you like them, feel free to keep them as "happy accidents"!
Step 4: Adding Shadows To A Seaside Villa
While you're waiting for the cliff to dry, you can focus on adding some details to the house. Prepare Burnt Sienna with a touch of French Ultramarine and Cadmium Red Purple, and paint the shadowed left side. This will act as a second layer, which you can overlap slightly with the foliage so the edges aren't too hard. Too many hard edges will make your paint look pasted on and unnatural, unless you're intentionally going for a collage look. For the roofs, add Brilliant Orange, Cadmium Red Purple, more Burnt Sienna, and a touch of Cobalt Blue Hue to the mixture for a darker brown. Remember you can always test the mixed color on a piece of scrap paper before deciding to use it or not. Be steady when painting the smaller areas, as you don't want the roof to bleed into the walls. Again, don't overwork your painting, but don't get sloppy either as you still need to have a sense of the building's structure. Dilute your paint mixture with more water, and paint the right section of the seaside villa so the middle section ends up being the lightest area.
Step 5: Getting Creative With Foliage Details And Adding A Beach
Next, move back to the now-dry cliff foliage to add some details with the wet-on-dry technique. In this case, most of these details are too dark to see the reference photo, so you'll need to get creative. Mix Yellow Ochre with a hint of Oxide of Chromium, then fill the rightmost side of the cliff to complete this section. Paint the bottom left side as well, in the area just above the beach. You can leave some white parts for more "sparkle", and cover any "rind" textures if you see them. The rind or watermark texture is created when paint floods the paper too quickly, causing a jagged edge to form (like the edges of a fruit peel). Mix Quinacridone Gold and Yellow Ochre for a bright tan color, then paint the beach. Touch in Cobalt Violet Light for extra color and to tone down the yellow towards the left side. While sand is usually a very monotonous color, you can use a greater variety of colors to bring the beach to life. Add Peacock Blue near the Cobalt Violet parts on the beach, as adding too much blue to the yellow areas will make your beach green. In addition, dilute the paint as you go so they're not too dark for the beach.
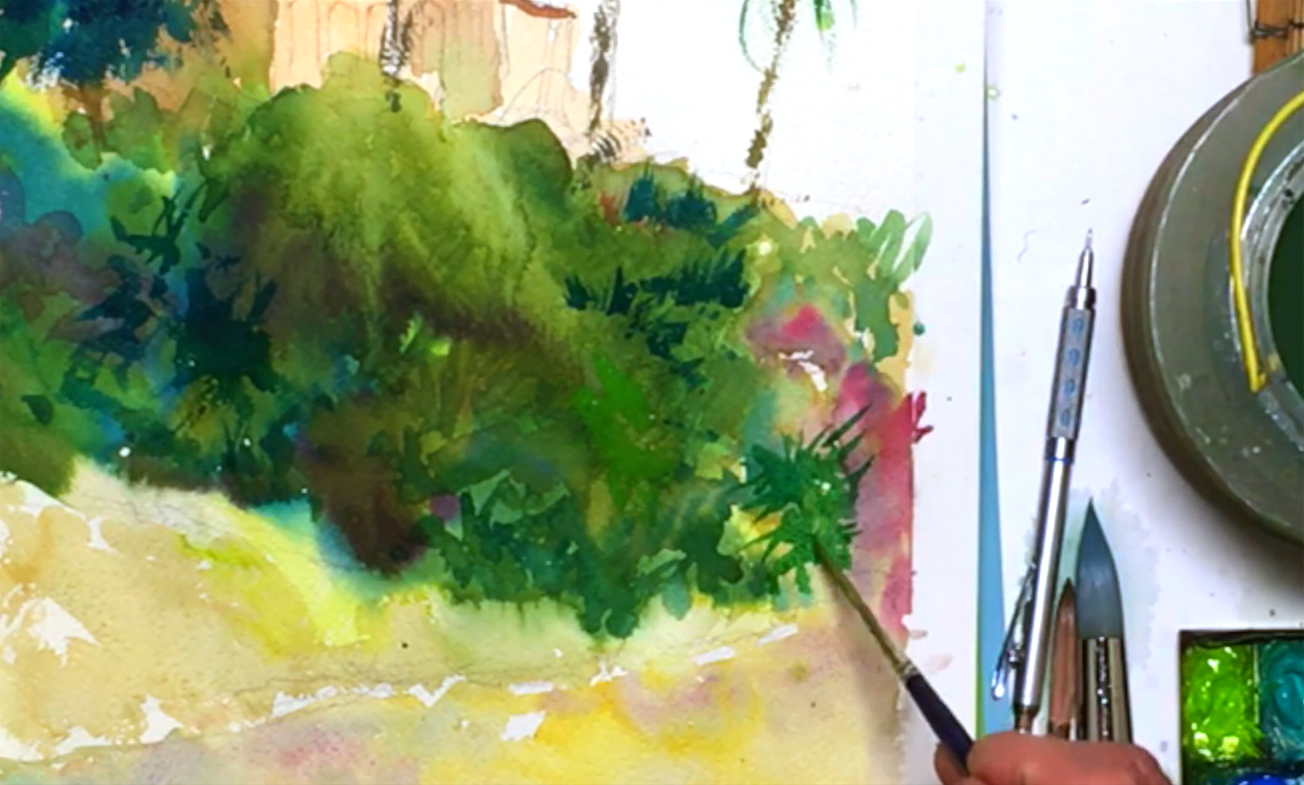
Step 6: More Foliage And Brushstroke Details
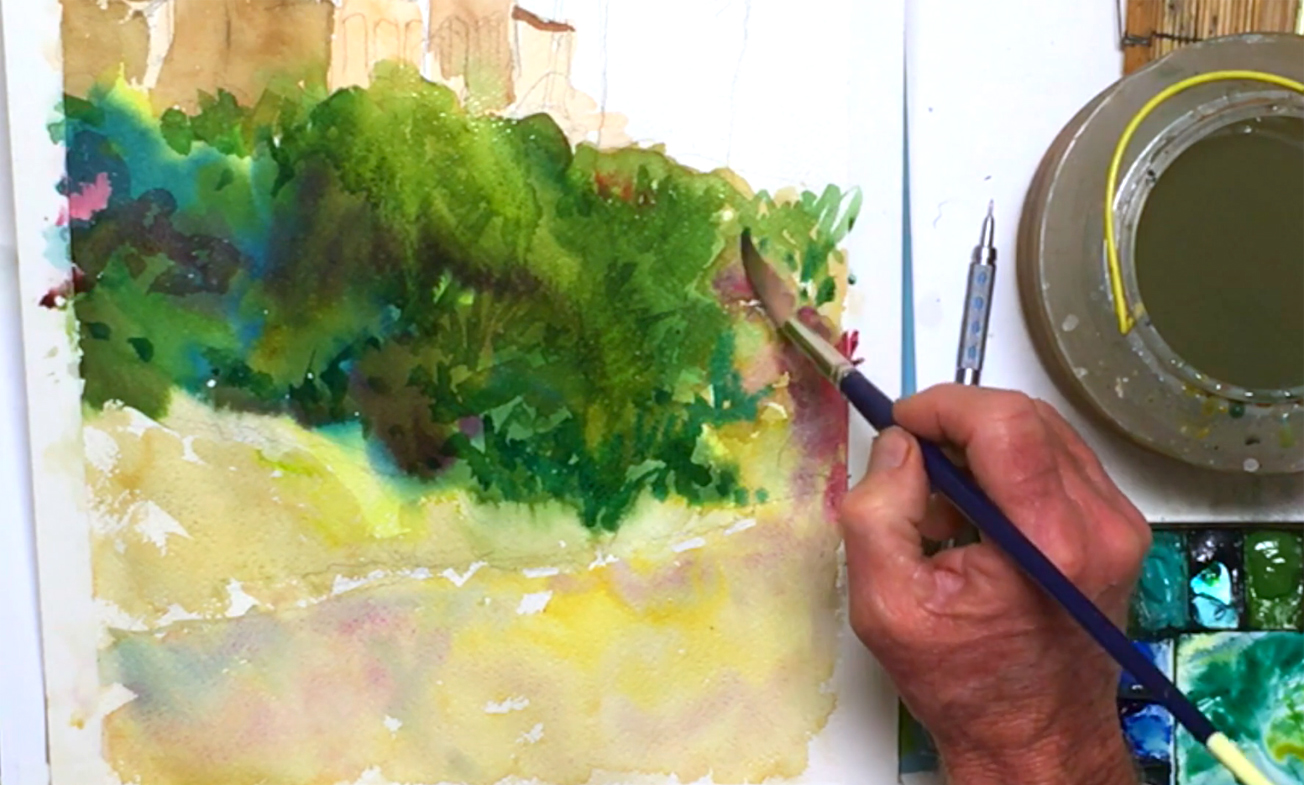
With the beach taken care of, paint more greens into the rightmost side of the cliff. Add Permanent Mauve and Carmine to the shadows of this section to liven up the overall painting, and for some reddish flowers. Repeat the same process to the main foliage area that's closer to the seaside villa for more color harmony. The rest of this step focuses on using a mix of Olive Green, Viridian, and Quinacridone Gold to add details throughout the cliff. Use the wet-on-dry technique here, as you don't want these brushstrokes to bleed into the wet areas of paint. Try to make your brushstrokes short and thin, tapering the ends so they look like blades of grass. Add French Ultramarine for darker details, and do your best to stimulate the cliff with all these different colors.
Step 7: A Fan Brush For Palm Trees
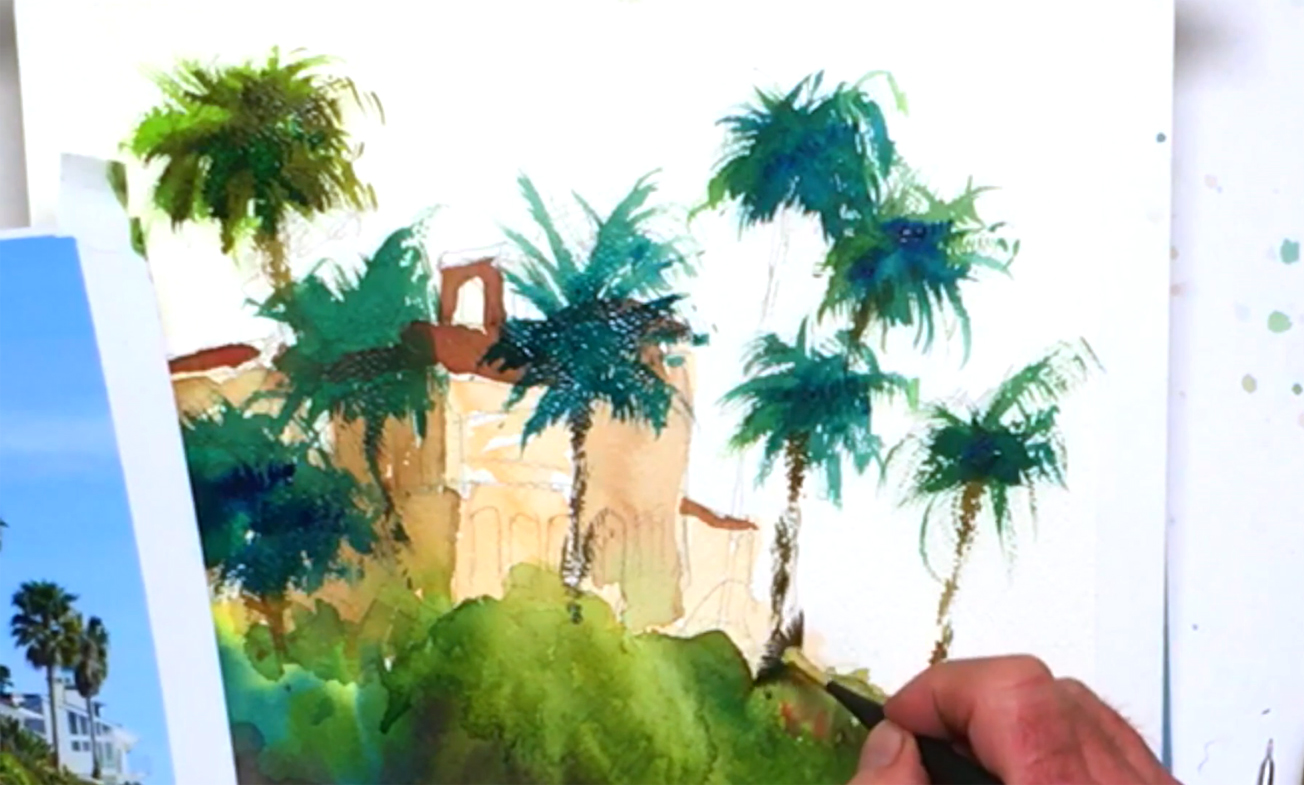
For this next step, it's time to introduce a new tool: the fan brush. This brush is perfect for painting palm trees without having to paint all the individual leaves. Before you start, observe a few palm trees, whether in real life or in the reference photo. Again, you're trying to capture the feeling, rather than reproduce them leaf for leaf. Even after wetting your fan brush, it should be spiked out so the bristles aren't too clumped together. To further prevent this, you can pre-mix the greens you need on your palette beforehand; namely Olive and Leaf Green, Mineral Violet, and French Ultramarine. NOTE: Be careful when painting, as you only get one chance to do this right! Using the wet-on-dry technique, start from the middle of one of the palm tree's fronds, and flick outwards. At the same time, twist your brush slightly, and curve each frond in a different direction. Repeat this process for the other palm trees surrounding the seaside villa. You can also add French Ultramarine or Viridian for the underside of the fronds to get more depth. For a more natural look, mix the greens at different ratios, or drop in a different dark color for the shadows. You can also vary the shape and size of the palm trees, and try not to form regular patterns with your brush. Mix Burnt Sienna and Viridian, and add this color to the area just under the leaves of each palm tree. This is for the brown area where dead leaves are hanging off or have fallen off. Use the same color to paint the rough texture on the tree trunks, keeping each trunk as thin as possible for contrast. You can even use the fan brush on the cliff foliage, but again, don't overdo it.
Step 8: Wet-On-Dry Details
For the last layer of cliff foliage, switch to your rigger brush (no. 6), and use the French Ultramarine and Viridian mixture to paint more grass. Feel free to experiment with different brushstrokes here for a more interesting painting. Continue layering more details, and add some extra foliage to the right-most side of the cliff. Once you're content with your cliff, leave this section to dry.
Step 9: A Rocky Bottom
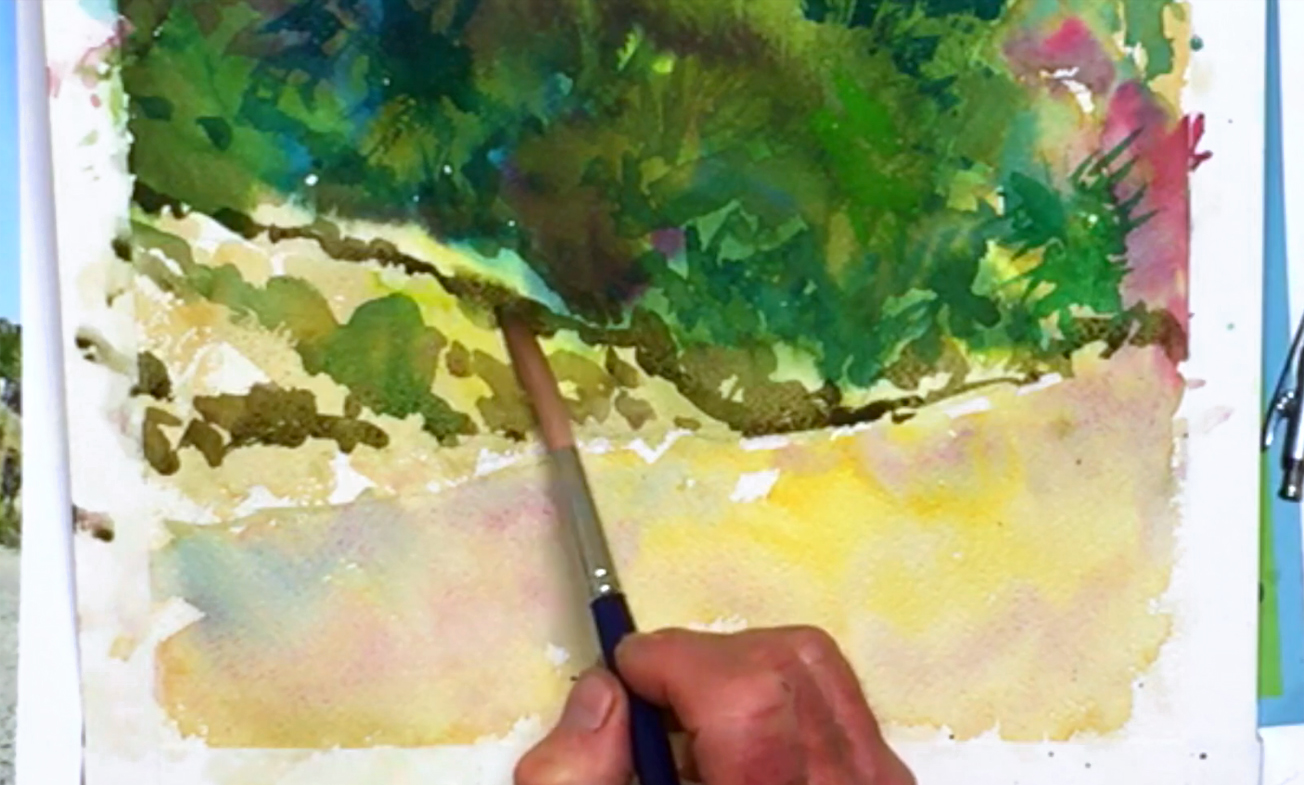
Going back to the no. 12 rigger brush, blend Viridian with the Yellow Ochre mixture that's already on your palette. Add a touch of Cobalt Violet Light as well to create a grayish brown color. Use this to paint the feeling of rocks near the bottom left corner of your painting. You can add more Burnt Sienna and Cobalt Blue Hue for a grayer tone, and experiment with other color mixtures for more interest. There are many ways to mix different shades of gray and brown, so don't hesitate to try! Soften areas that are too strong, and make sure to get a good dividing line between the cliff and the beach.
Step 10: Painting Windows And Shadow Details
Next, add Neutral Tint and French Ultramarine to your previous mixture to paint the windows and other details of the seaside villa. If the paint starts puddling, wipe your brush on a rag or paper towel to take out the excess paint. Dilute the color for some lighter windows, and for variety. You can also drop in French Ultramarine into the still-wet windows as an additional color to add depth and interest, and lift out wet paint if it gets too dark. Go back to the dark brown paint used for your tree trunks, and darken it with Burnt Sienna, Cadmium Red Purple, and Brilliant Orange. Paint the eaves of the roofs, and any shadows or canopies for more architectural details.
Step 11: One-Shot Tree Trunks And Touch Ups
Solidify the tree trunks using a no. 8 rigger brush and the brown/gray mix. Keeping your hand relaxed, paint thin trunks for your palm trees, following the previous texture lines you made in step 7. Again, you only get one chance to get this right! Make sure the angles of the trunks are different, and break up any spaces that look too empty. You can also drop in a darker color in different areas of the trunks while they're still wet, or add this color to the cliff to touch it up. Add more details to the seaside villa with diluted brown paint, such as shadows around the windows or other architectural details. Use the green for some plants along the top of the cliff, and once you're done, leave your painting to dry. If you don't want to wait, you can use a hairdryer to speed up the process.
Step 12: Opaque Details With White Gouache Paint

When you're ready for the next step, squeeze some Permanent White gouache paint on your auxiliary palette. You can get opaque white details with gouache paint, which will add contrast and depth to the seaside villa. For this step, use the Cotman rigger brush (no. 3) to paint some thin window frames. Attention to these kinds of details will also help draw the viewer's eye, which in this case should be the house.
Step 13: A Wet Ending For A Wet Sky

The final step of this entire painting is deciding what to do for the sky. While it's possible to leave it white for some paintings, Bill decides it would look better painted. As for the colors, Bill goes with his artistic instincts here, which you can also build over time and practice. Like the cliff area, use the wet-on-wet technique here to achieve soft blends and edges for the clouds. So wet the sky area with water and the no. 20 round brush, being careful not to brush too much when you paint over the palm trees. You can overlap the house or foliage area a little as well for continuity. Then, switch to the no. 12 rigger brush, and drop Cobalt Violet Light onto the wet surface. Work quickly before the water dries, and leave some white areas for clouds. Add some Peacock Blue as well for the clouds' shadows and for color variety, and vary the shapes of your brush dabs so the cloud formation looks natural. Again, you only get once chance at the sky, so once you're happy with it, leave it alone to dry. After that, the last thing to do is to add your signature. Use the no. 3 rigger brush and Burnt Umber paint to do this, and sign in one go. This part is optional, but it's good practice to finish off a painting that you're proud of!


