Materials Used In This Watercolor Study:
- Reference picture of Magritte’s Clear Ideas
- A block of Hahnemühle’s Cornwall cold press watercolor paper (210lb, size 9.4″ x 12.6″)
- Pentel Graphgear 1000 automatic drafting pencil, 0.7mm lead size with 2B lead
- Painting palette for watercolor paints
- A container of water
- Paper towels or a rag
- A tabletop easel or a box to prop your painting on
- A spray bottle with clean water
- Kneaded eraser
- Auxiliary plate or palette for gouache paint
Paints (Holbein Artists’ Watercolors)
- Brilliant Pink
- Cerulean Blue
- Cobalt Blue Hue
- Prussian Blue
- Phthalo Blue
- Raw Sienna
- Burnt Sienna
- Neutral Tint
- Ivory Black
- Ultramarine Deep
- Cadmium Red Deep
- Royal Blue
- Indigo
- Leaf Green
- Bright Violet
Daniel Smith’s Extra Fine Watercolors
Holbein Artists’ Gouache
- Permanent White
Brushes
- Escoda Perla Joseph Zbukvic Series: Round brush (no. 20)
- Escoda Perla Joseph Zbukvic Series: Round brush (no. 12)
- Escoda Perla Joseph Zbukvic Series: Round brush (no. 8)
- Princeton Snap! SH Gold Taklon Round brush (no. 4)
- Winsor & Newton Sceptre Gold II Series 303: Short handle lettering/rigger brush (no. 1)
Step 1: A Preparatory Sketch
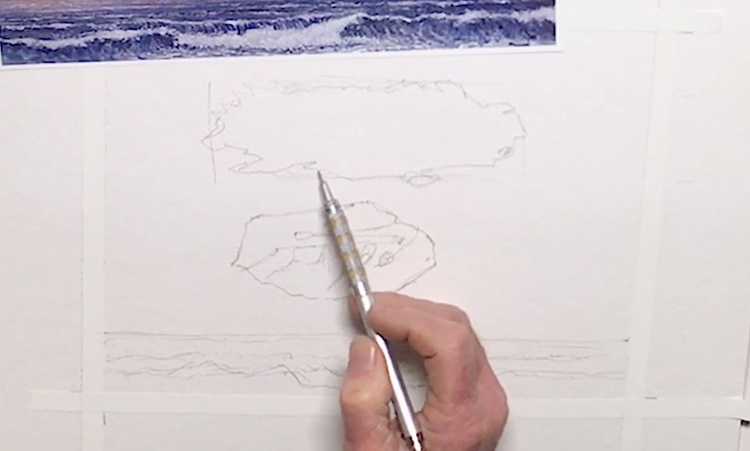 René Magritte was a painter and well-known proponent of surrealism, a cultural movement that promoted creative expression via imagery that's viewed as contradictory or seemingly illogical. His works are popular for their unique and thought-provoking juxtapositions of ordinary subjects, which can be seen in the painting we'll be studying today. Before beginning the sketch, make sure that you have all your tools prepared. Ready your paper by laying down a border of artist's or masking tape in roughly the size of your reference image. Next, study the composition of the painting. Fortunately, like many of Magritte's works, this surrealist painting is simple and straightforward. Bill breaks it down into four major elements: the sky, the cloud, the rock, and the water. Sketch the horizon line first. It's where the water meets the sky, and it sits quite low in this painting. Next, draw in the rock and the cloud. You may add lines to indicate any important value changes in the elements, like the crests of the waves and the planes in the rock. Try to keep details at a minimum, however. You can add those in later when you paint. Here's what Bill's sketch looks like:
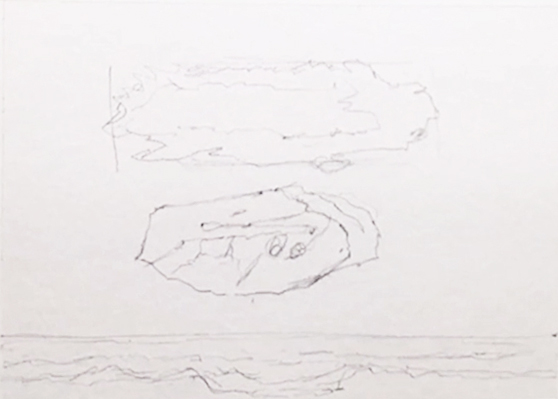
Step 2: Flat Wash Foundation
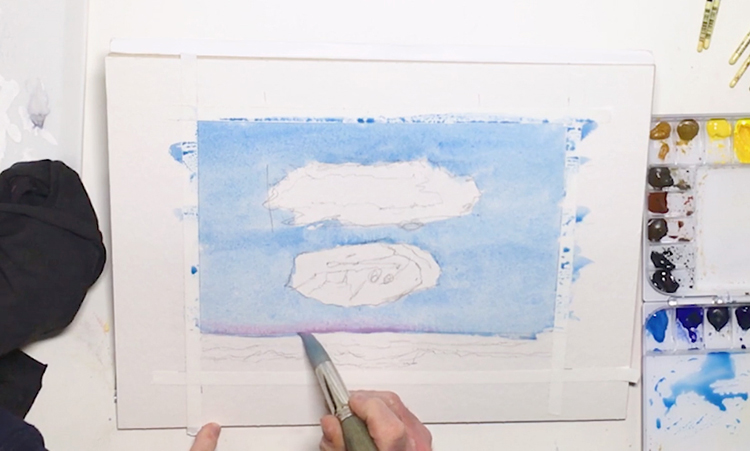 First, let's work on the sky. Since it's the biggest element in this surrealist painting, we'll need several layers to achieve the right depth and gradation as seen in the reference image. Begin by wetting the area with a no. 20 round brush loaded with clean water. Paint around the cloud and the rock; you'll be dealing with those two elements later. Next, pick up Cerulean Blue and dilute it down to a light blue mixture. Lay down a flat wash into the sky, working wet-in-wet (i.e. adding wet paint to a wet surface) and using long horizontal strokes. Because the surface is already wet, it's easier to move the paint around and achieve an even tone. As with before, be mindful of painting around the cloud and the rock. Once that's done, take a hint of Brilliant Pink and add a light strip of paint to the bottom-left corner of the sky. You can strengthen the pink with a diluted Cadmium Red Deep, but be sure to keep the effect subtle. Remember to prepare a large amount of blue mixture so that you don't run out of paint in the middle of a wash. Stopping in between strokes may give the paint too much time to dry, which will result in an uneven-looking wash.
Step 3: Creating Depth with Graded Washes
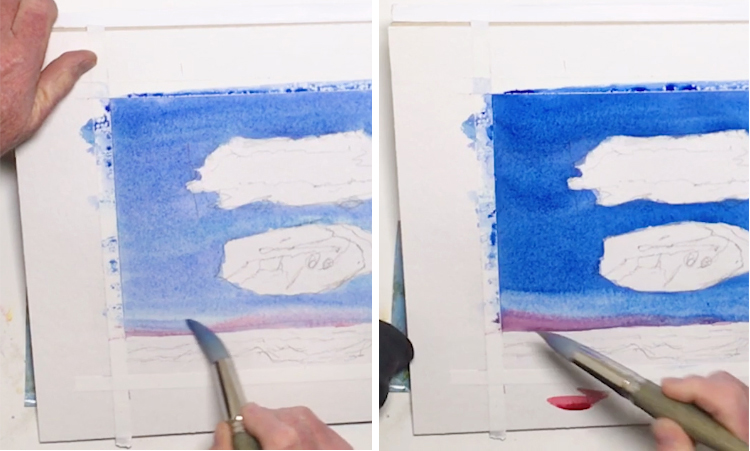 In this step, we'll be adding several layers to the sky to give it an interesting depth. First, add Cobalt Blue Hue to the blue mixture and lay down a second layer to the sky, working wet-in-wet. This time do a graded wash by gradually diluting the paint with water as you reach the bottom. To avoid muddying the colors, allow this layer to dry before adding the next one. Next, add Phthalo Blue to the blue mixture and lay down a third layer to the sky, working wet-on-dry (i.e. adding wet paint to a dry surface). Do another graded wash for this one, and keep your strokes wet to avoid banding (i.e. strips of paint showing up between strokes). If the bottom half of the sky is too dark, lift excess pigment with a dry rag or brush. To finish off the third layer, strengthen the pink tint in the bottom-left corner by adding a streak of Cadmium Red Deep and Brilliant Pink.
Step 4: A Deeper Blue
 For the fourth layer of the sky, add Prussian Blue and Indigo to deepen the blue mixture. Paint via wet-in-wet and in horizontal strokes. Like with the previous layers, do a graded wash by gradually diluting the paint. Add more Brilliant Pink to the bottom-left corner if needed, then wait for this layer to dry. You can use a blow dryer to speed up the process; just be mindful of how close you hold the nozzle to your painting, otherwise it might disturb the paint layers. Finally, combine Indigo with the blue mixture to deepen it even more, then lay down the fifth and final graded wash layer to the sky.
Step 5: Creating Soft-looking Clouds
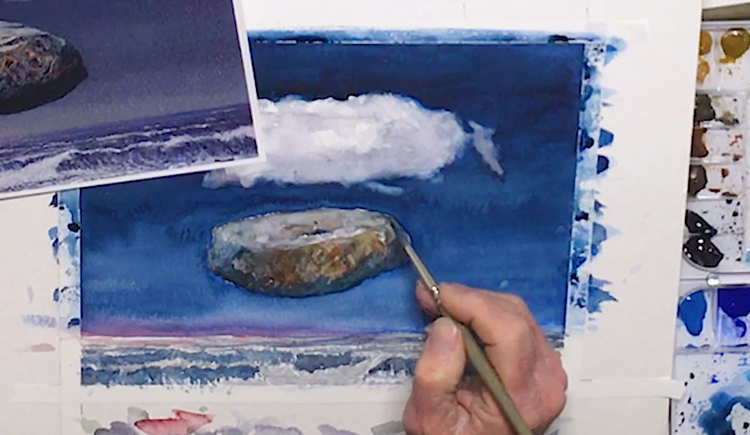
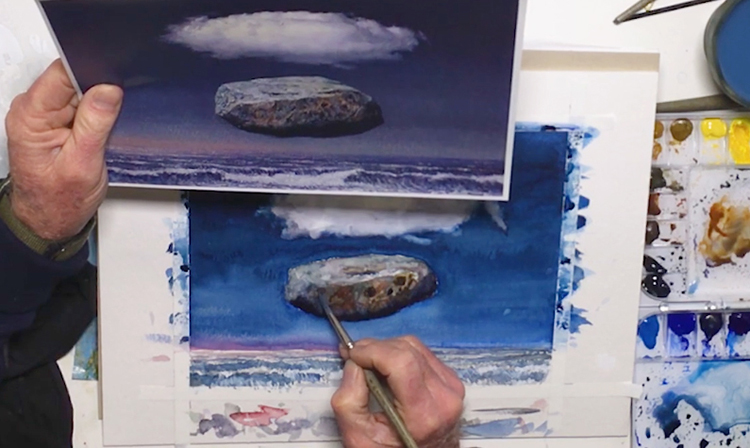
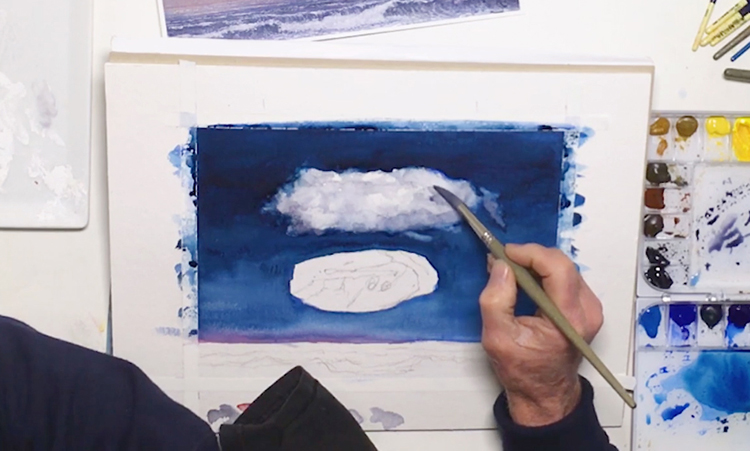 As a major element in this surrealist painting, the cloud needs to be an interesting blend of hard and soft edges. To achieve this effect, apply the wet-in-wet and wet-on-dry techniques, referring to your reference image for guidance. Switch to a no. 12 round brush and moisten it with clean water. Now carefully scrub your brush tip around edges of the cloud to soften them. You can pull some of the blue pigment from the sky into the cloud, but limit this to the outer edges and keep it subtle by diluting the tint with water. If your brush is loaded with too much water, this might cause a back wash into your sky layer, causing it to look uneven. To avoid this, remove excess water by dabbing the bristles into a dry rag. Once you finish, allow the wet areas to dry completely. When the previous layers are dry, pick up diluted Neutral Tint and block in the cloud's shadows, painting around the brightest sections to allow the white of the paper to shine through. Keep your strokes loose and work wet-in-wet when adding more tint to darker areas. You can also use the dry corner of a paper towel or rag to create soft edges by lifting excess paint or water.
Step 6: A Colorful Beginning
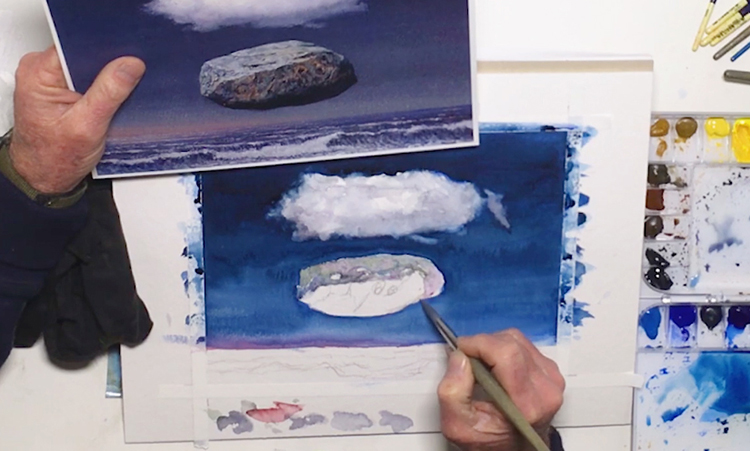 While the cloud dries, let's work on the rock. This element has the most color and texture compared to the other subjects in this surrealist painting, so it should be fun to do! First, pick up the gray mixture from earlier and cover the top panels of the rock in a light wash. Avoid doing a flat wash; instead, move your brush tip around to create interesting textures with short brushstrokes. Next, pick up a diluted Chromium Green Oxide and Cerulean, working the colors into the first layer in a variegated wash, which is done by adding more than two colors to a wet surface and allowing them to blend together naturally. Darken the gray mixture with a hint of Ivory Black and dab it into the same area, then do the same with a Leaf Green and Chromium Green Oxide mixture. Finally, take Bright Violet and block in a light wash on the right side of the rock.
Step 7: A Textured Center
 While the top half of the rock dries, let's shift our focus to the bottom half. Begin by blocking it in with Neutral Tint, starting from the left side. Stop about a fourth of the way through and continue with Cadmium Red Deep then Burnt Sienna, to produce a multicolored graded wash. While the layer is still wet, pick up the blue tint from earlier and dab it into the layer to achieve a variegated wash effect. Next, take diluted Ivory Black and add a few strokes to the bottom-right corner of the rock, working wet-in-wet. Combine Ivory Black with Neutral Tint and a hint of blue mixture, and use the resulting dark tint to block the shadows underneath the rock. While these layers dry, lay down subtle streaks of Ivory Black to the top of the rock, then drop in hints of Cadmium Red, Burnt Sienna, and Neutral Tint to add more texture.
Step 8: Painting a Stormy Sea
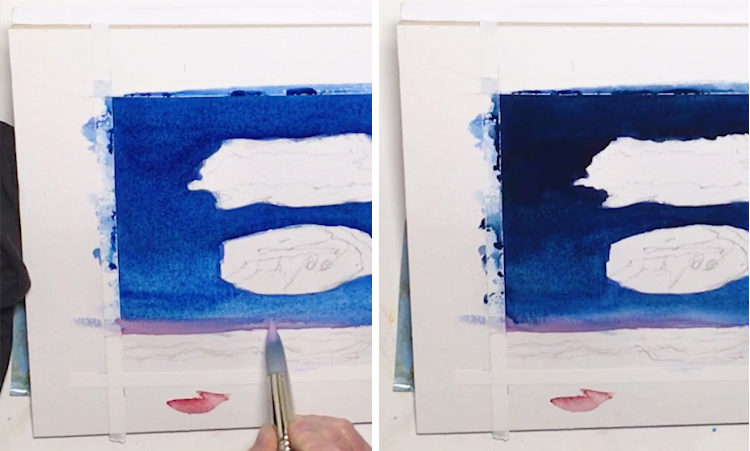
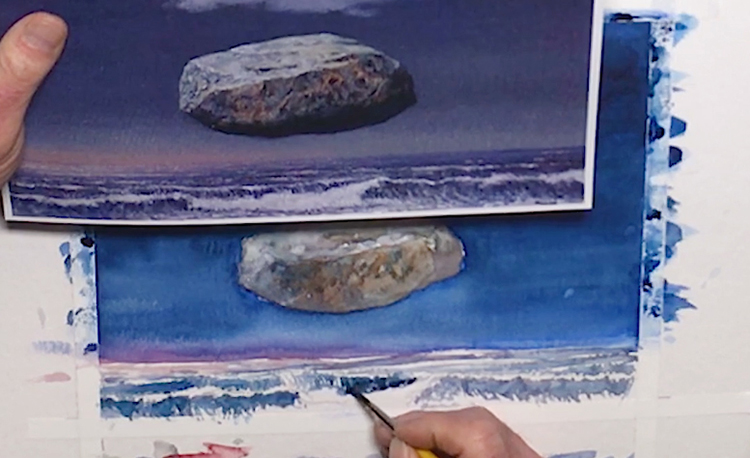
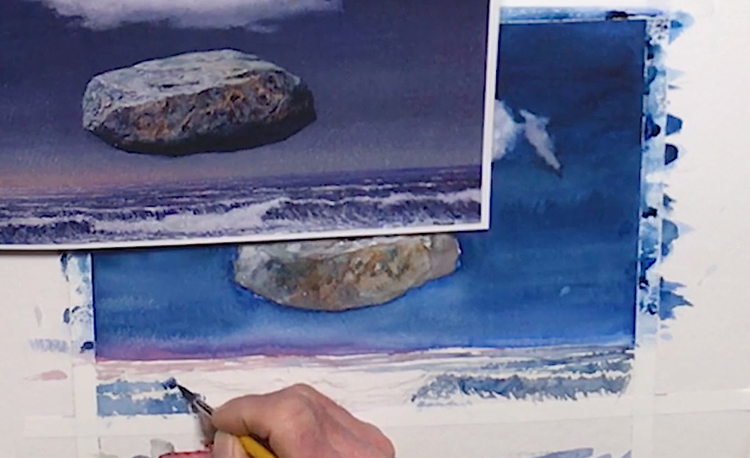 While the rock dries, let's work on the final element in this surrealist painting: the choppy water! First, pick up the Cadmium Red Deep and Brilliant Pink mixture and paint a subtle pink streak on the water from the left side. Next, use Cobalt Blue Hue and Prussian Blue to darken the blue mixture. Add long horizontal strokes to the top part of the water, and remember to paint around the white crests of the waves. Switch to a no. 4 round brush and use the blue mixture to paint the choppy waves. To do this, use short vertical streaks that trace the form of the wave. Again, be mindful of the waves' crests, painting around them to allow the white of the paper to show through, and using your reference image to guide your brushstrokes.
Step 9: Deepening The Tides
 Now that the base layer for the water has been painted, let's focus on improving its values. First, pick up Cobalt Blue and add another layer to the waves, using short vertical strokes like before. Layer in more strokes to shadowed areas in order to create depth. Next, deepen your blue mixture with Prussian Blue and block in the darker parts of the water, working wet-in-wet. Mix together Cobalt Blue and Neutral Tint, then add another layer to deepen the waves. Finally, use Ivory Black to strengthen the gray tint on the right side of the water.
Step 10: A Colorful, Rocky Texture
 Switch to a no. 8 round brush and combine Neutral Tint with Burnt Sienna. Working wet-on-dry, add streaks of paint to the middle of the rock. Do the same with Raw Sienna and the red mixture from before to create a variegated wash. Now load your brush with the blue mixture and block in the shadows under the rock. Add Cobalt Blue Hue to the mixture and dilute it with water before dabbing it into the other parts of the rock. Finally, drop hints of Bright Violet into the wet layers. You can do the same with the red and blue mixtures so that the colors blend together in unique ways. Use your reference image as a guide on where to add these colors.
Step 11: Adding Sparkle To Your Surrealist Painting
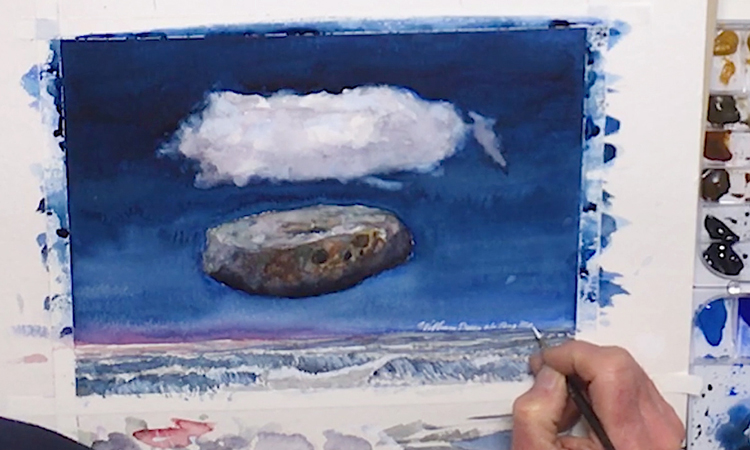
 Now that all the major elements of this surrealist painting are done, all that's left is to touch up your values. To do this, squeeze Permanent White gouache onto an auxiliary palette and dilute it down to a milky texture. Use it to add dabs of white to the cloud and the crests of the waves to give these elements more definition. Remember to keep it subtle! Using too much may cause your painting to look overworked. Next, strengthen the shadows underneath the rock with Ivory Black and Phthalo Blue. Lastly, take Burnt Sienna and dab it onto the rock to give it a speckled, pockmarked look.
Step 12: Signing Off On Your Painting Study!
 For the final step in this study, it's time to sign your surrealist painting! Load a lettering brush with white gouache and carefully sign your name, while also giving credit to the original artist. Wait for the last of your layers to dry before removing the artist's tape. You can use a blow dryer to heat up the tape and make it easier to pull off the paper. With your signature in place and a clean border to boot, your surrealist painting is now fit to be framed and displayed wherever you wish! Good job!


