Capture the "rolling" excitement in this watercolor tutorial where you'll learn how to paint a colorful theme park. Award-winning artist William "Bill" Dunn shows that even a complex subject matter can become easy to paint, and gives several tips to help you along the way. Want to watch the video version? The full tutorial is available to members of our Beeblys WatercolorPainting.com.
Materials Used In This Watercolor Class:
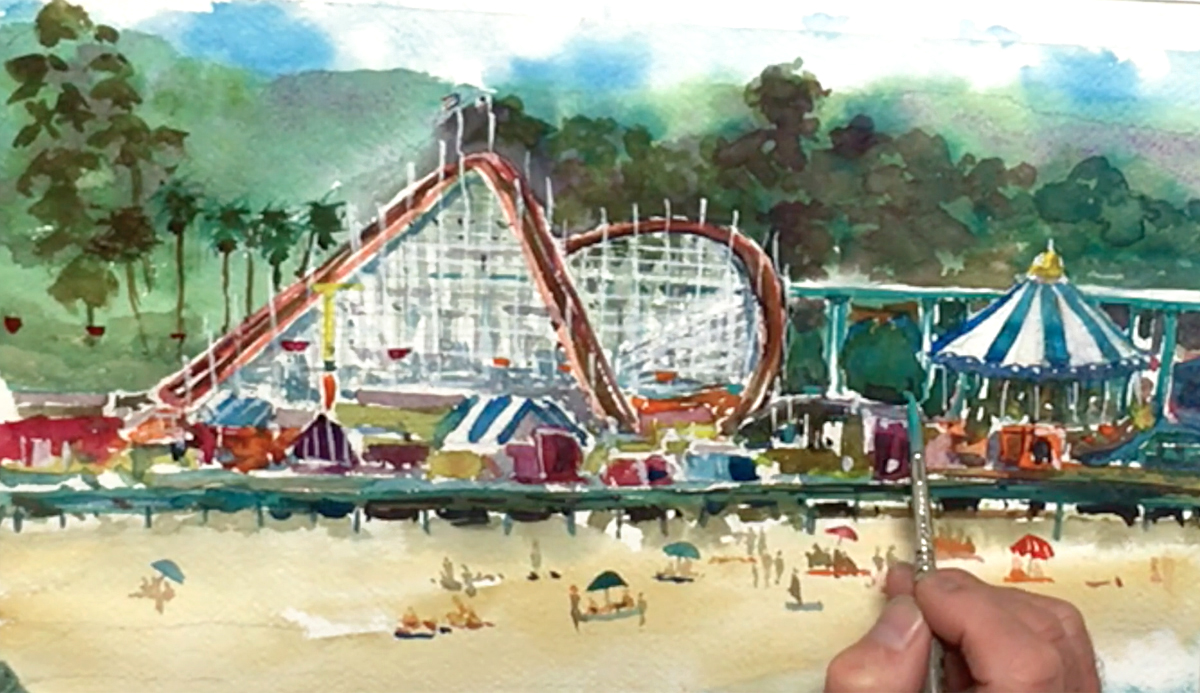
- Reference picture of a colorful theme park in Santa Cruz, California (click here for Bill's picture)
- A block of Fabriano cold press watercolor paper (140lb, size 16″ x 12″)
- Pentel Graphgear 1000 automatic drafting pencil, 0.7mm lead size with 2B lead
- ¾" Artist's or masking tape
- Painting palette for watercolor paints
- Auxiliary plate or palette for gouache paint
- 2 containers of water (optional: Faber-Castell collapsible water cup)
- Paper towels or a rag
- A tabletop easel or a box to prop your painting on
- A spray bottle with clean water
Paints (Holbein Artists' Watercolors)
- Brilliant Orange
- Cadmium Red Purple
- Permanent Alizarin Crimson
- Cobalt Violet Light (a.k.a. "Lavender")
- Mineral Violet
- Olive Green
- Viridian
- Cobalt Green
- Leaf Green
- Peacock Blue (a.k.a "Cerulean Blue")
- Cobalt Blue Hue
- Yellow Ochre
- Burnt Sienna
- Burnt Umber
- Neutral Tint
Winsor & Newton's Professional Watercolors
- Permanent Carmine
- Permanent Mauve (or Sennelier's Cobalt Violet Deep Hue watercolor paint)
- Oxide of Chromium
- French Ultramarine
Holbein Artists' Gouache
- Zinc White
Brushes
- Neef Rigger Supreme Taklon Series: Long handle rigger brush (no. 6)
- Neef Rigger Supreme Taklon Series: Long handle rigger brush (no. 8)
- Neef Rigger Supreme Taklon Series: Long handle rigger brush (no. 12)
- Escoda Perla Joseph Zbukvic Series: Round brush (no. 8)
- Escoda Perla Joseph Zbukvic Series: Round brush (no. 12)
- Winsor & Newton's Series 7 Kolinsky Sable: Round brush (no. 1)
- Old toothbrush
Step 1: Simplifying A Difficult Sketch
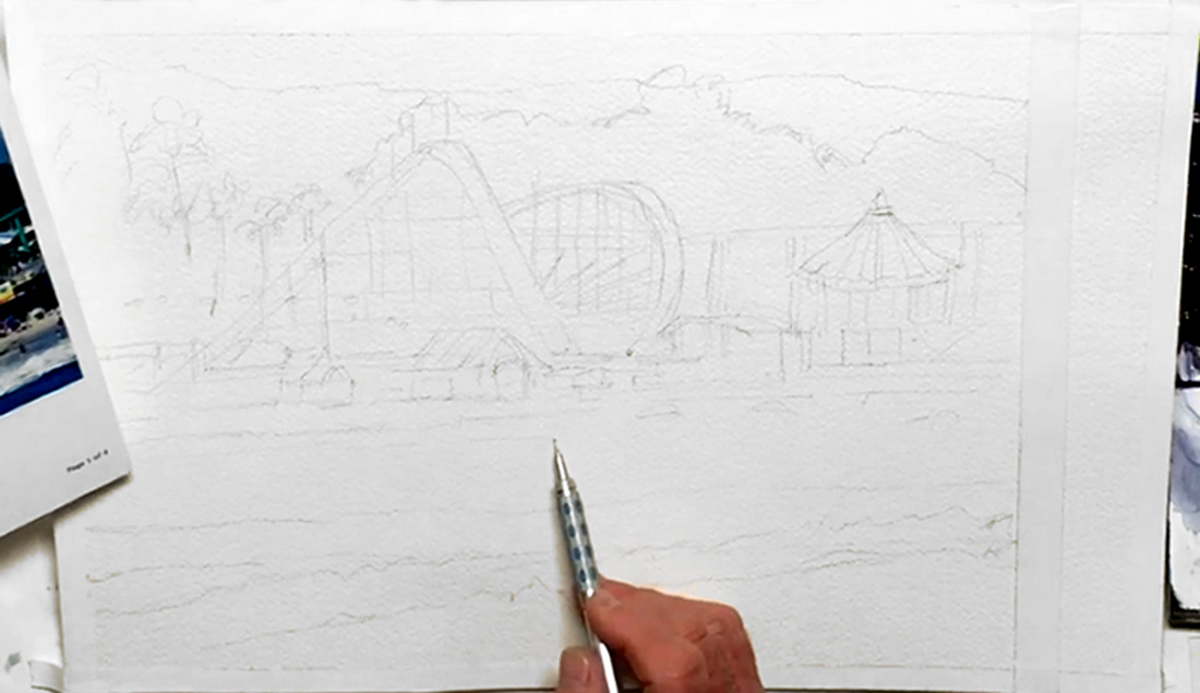 In this tutorial, Bill teaches how to paint a boardwalk and theme park in Santa Cruz, California. So first things first: tape the edges of your paper with the artist's tape. This will give a clean edge around your finished painting for any future framing purposes. Make sure to keep the painting's size to scale by lining up a corner of the reference picture to your paper, then drawing an imaginary diagonal line through opposite corners. The paper will be wider than you need, so use the extra taped-off area as a place to test your colors. With your pencil, start sketching the background mountains and trees, then the beach and ocean. Remember to work from big to small, and measure the distance between each feature. It's also fine to take out any elements that aren't necessary to your composition. Add the wooden roller coaster by marking the important points along the track, then joining them in one go. Don't forget to draw the other side of the track! You can add a few details as well, such as palm trees, flags, support beams, etc. Try not to go overboard with the details though. Your aim is to capture the impression of a theme park, not to reproduce the photo. Be careful when drawing the support beams and their angles. It also helps to reduce objects to simple shapes, such as outlining the treetops or sketching boxes for the booths. Add in the smaller rides on the left side of this colorful theme park, then weave in the boardwalk itself. Lastly, finalize your composition with any necessary touch-ups. Below is a close-up of Bill's sketch:
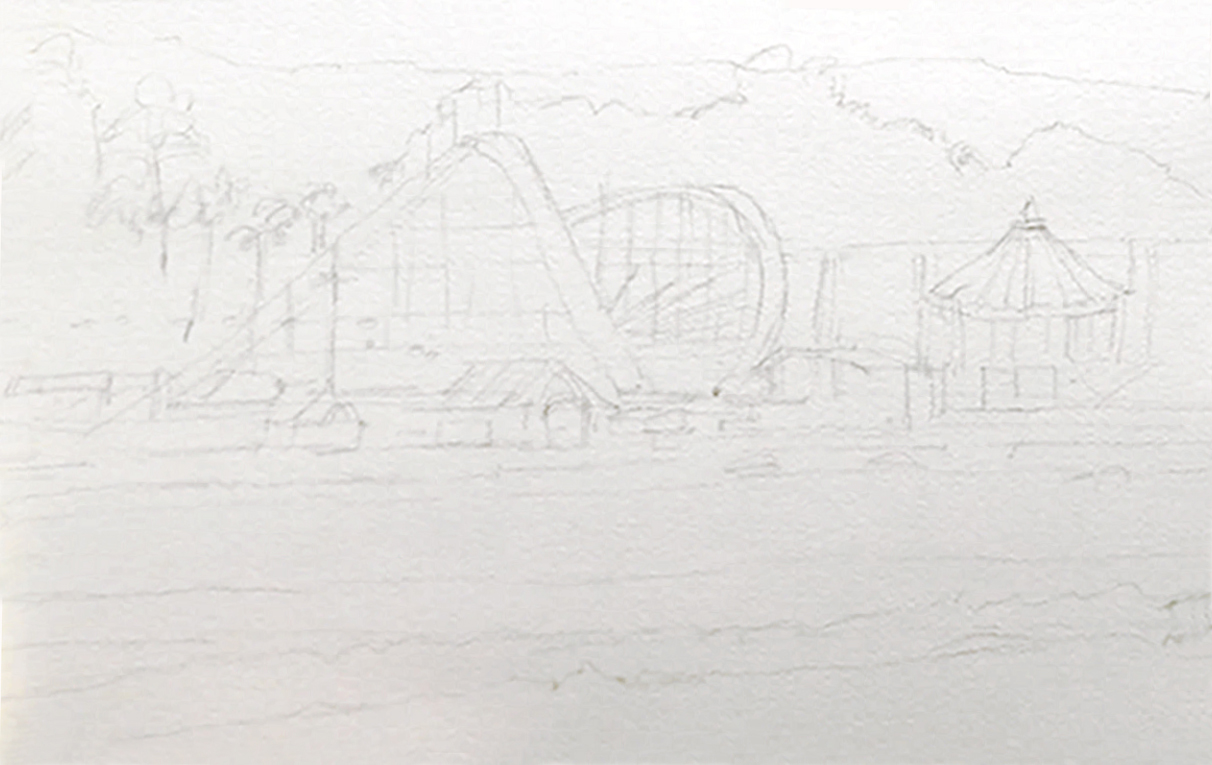
Step 2: A Blended Background With The Wet-On-Wet Technique
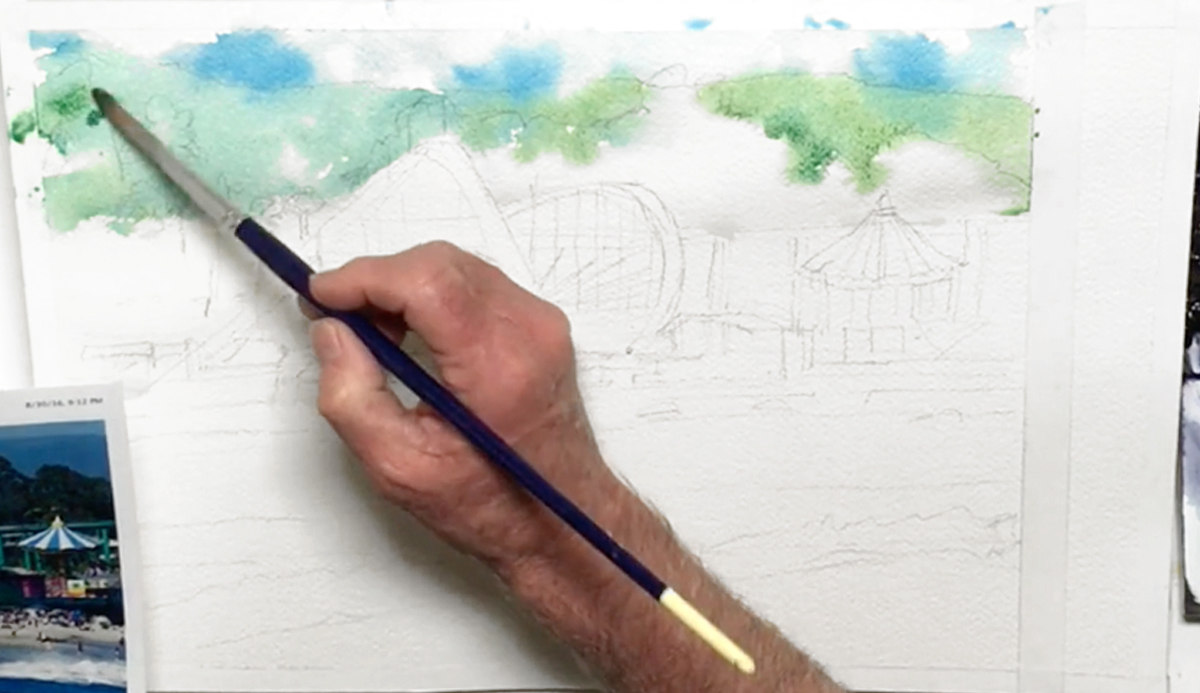 Spray your paints with water to soften them up before you begin painting this colorful theme park. It will help you pick up paints faster, and getting the right consistency of paint will be easier as well. Starting with the no. 12 rigger brush, wet the sky, mountains, and tree area. As you do this, you can plan ahead for the colors you want to use in your composition. Bill decides to change his to a daytime scene, so he uses Peacock Blue for the first layer of the sky. To do this, prep the blue on your palette before dropping it onto the wet surface via the “wet-in-wet” technique. Scrub around the sky area, leaving some parts white for clouds. Add a little French Ultramarine for variety, and work quickly to finish before the paint dries and you lose the soft, blended look. Mix Oxide of Chromium with the blues for a teal color, and apply this to the mountains. Add in Olive Green for a different tone, and pull this color into the tree area to make the color look less "pasted on". In addition, keep the focus on painting an impression of this colorful theme park. The human eye has the tendency to fill in the gaps, plus value (i.e. light vs dark) is always more important than color, as this will give your subject matter the form it needs.
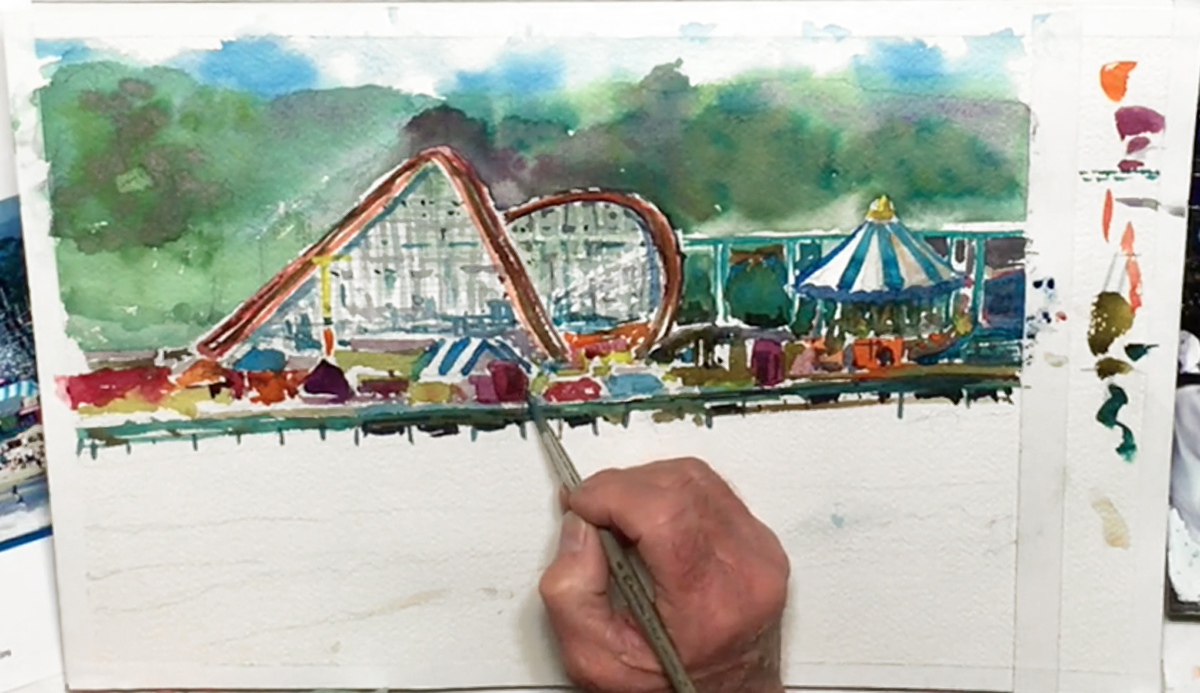
Step 3: Strengthening And Diversifying The Colors
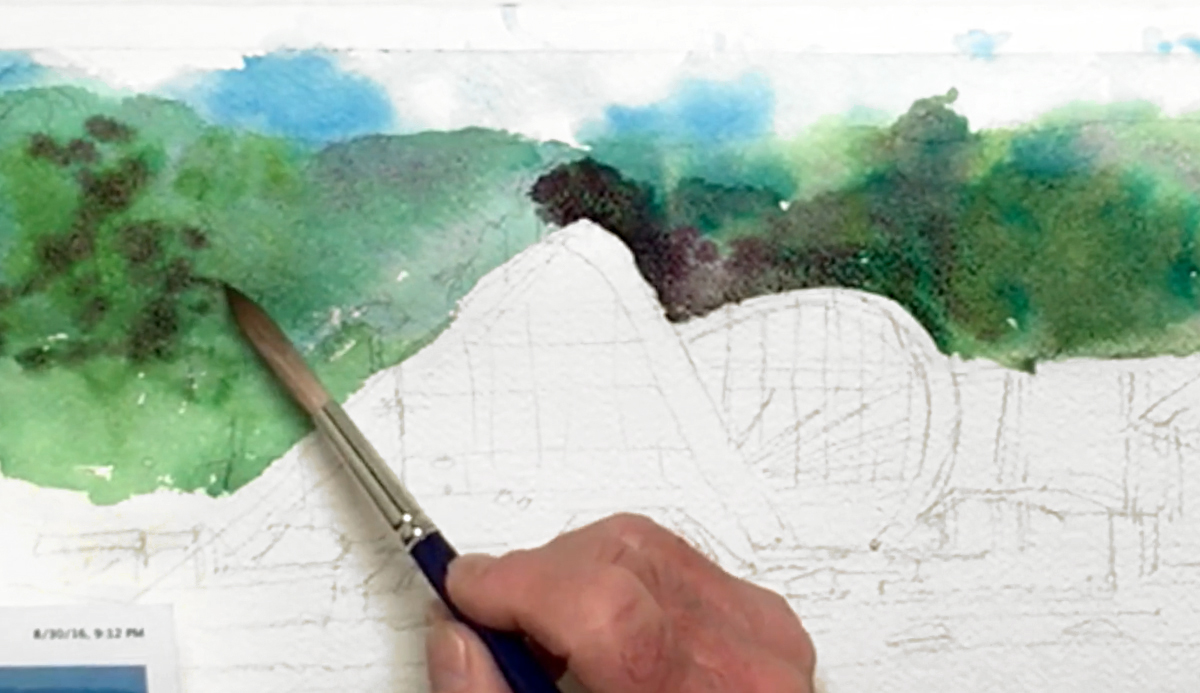 Pick up Cobalt Violet Light and darken shadowed areas within the mountain range so it doesn't dry too light. You should still get soft blends due to the wet-in-wet technique. If the paint starts puddling, use a dry, "thirsty brush" to lift out the excess paint by using your paintbrush as a mop. For the area below the mountains, add more Olive Green to your green mixture, then paint the shape of the background forest. Layer Mineral Violet and Viridian on top to darken, making sure the base color is still green. Dab in small bumps around the edges of the treetops, and try not to overdo the mixing of purples and greens, as they will muddy your colors if you blend too much together. Break up any patterns by using a variety of brushstrokes, and stay aware of what's dry and wet within your painted area. Add Permanent Mauve for the darkest areas, and get a good contrast by laying Mineral Violet next to the white roller coaster. Soften hard edges with a damp brush, and smooth out any bumpy edges around the roller coaster.
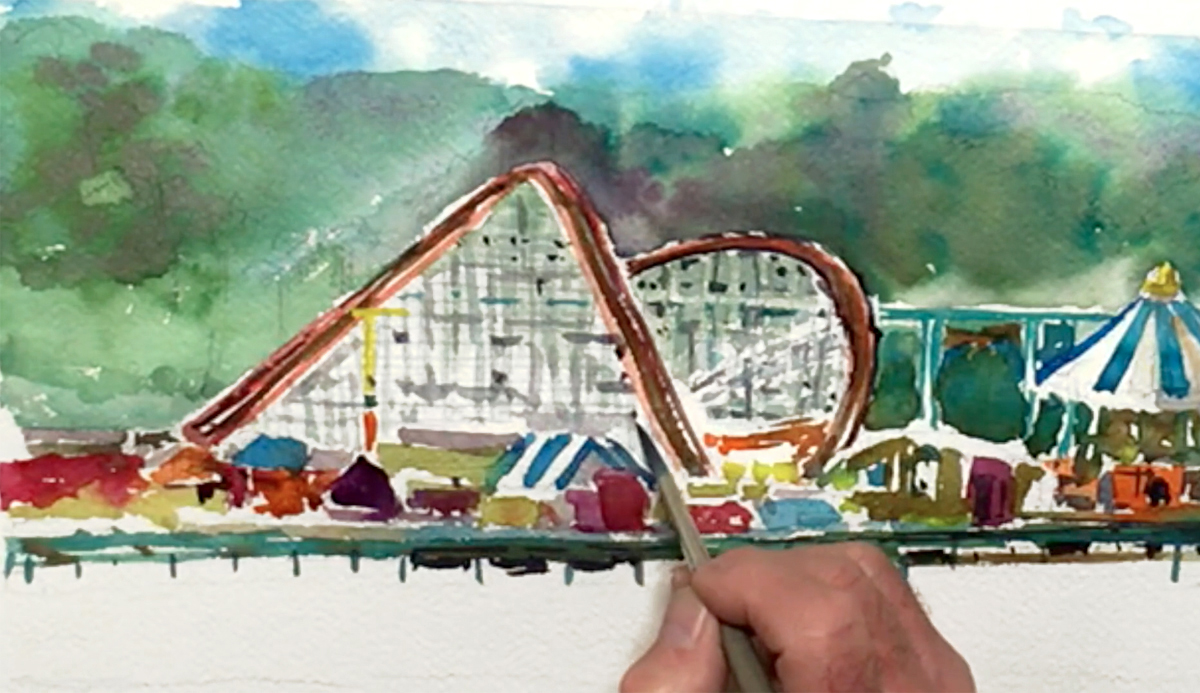
Step 4: Rolling Along With The Wet-On-Dry Technique
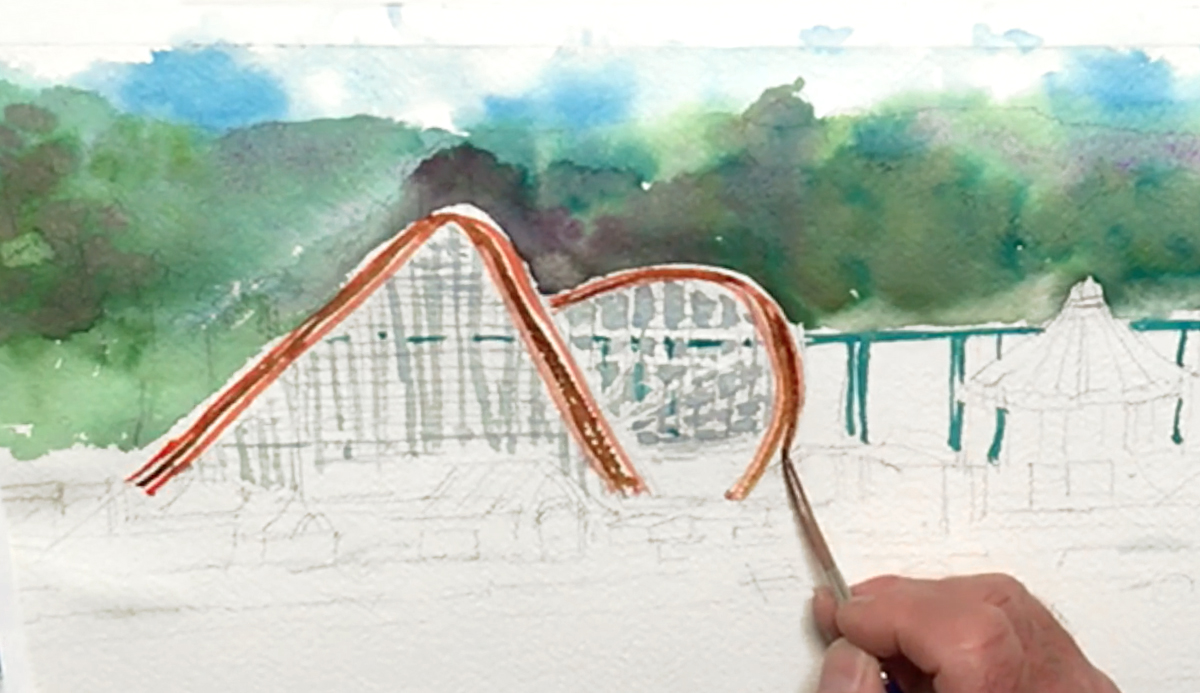 Leave the sky, mountains, and trees to dry, and move to painting the roller coaster area. For this, dilute Neutral Tint and add a hint of Peacock Blue, then paint the gaps between the roller coaster's support beams. You don't have to be too tidy or even; remember you're only trying to get the impression of the wooden structure. You're also using the "wet-on-dry" technique here, as you need the extra control for painting the details for the roller coaster. Switch to the no. 6 rigger brush for the horizontal beams, using the tip of the brush for the thinnest lines. Next, move to the extended area to the right, and paint around the outside of the angled support beams. The main structure should resemble a grid, while the extended area should include the angled beams without being too jarring. Mix turquoise using Viridian and Cobalt Green, then paint in one smooth stroke for the elevated train rails. Avoid painting over the carousel's roof, but make sure to add a hint of the turquoise railway track going behind the roller coaster. Add vertical pillars under this railway line too, extending them to areas they'd be seen in the background. Switch to a no. 8 rigger brush, then prep Cadmium Red Purple on the palette before painting the roller coaster's rails in one smooth stroke. Repeat the process to get two curvy lines to represent the coaster’s twisting path. Next, mix Burnt Sienna and Umber to paint the tracks between the railings, adding more color to this colorful theme park.
Step 5: Adding The Ingredients Needed To Make A Colorful Theme Park
 Moving on, use Lemon Yellow for the tip of the carousel's triangular roof. Then, use a bright French Ultramarine to paint the stripes on the rooftop. The posts underneath will be painted using the previous turquoise mix. For the smaller booths peppering the ground level, change to the Escoda round brush (no. 12), and use any bright colors you want. These splashes of color will help make a colorful theme park while breaking up any rigidness that may form. As an example, Bill uses a mixture of Permanent Mauve, Cobalt Violet Light, and Permanent Carmine to paint several booths. You can do this as well - instead of changing colors after each booth, use one color to paint a few of the booths in random places before changing colors. Use the wet-on-dry technique to get clean shapes for these booths, and feel free to test out your colors in the strip of paper you taped off in step 1. Vary the shapes, sizes, and colors of your booths, and keep to the idea of placing warm colors next to cool colors for more contrast. Use duller colors for the booths further away, and more saturated colors for the booths at the front to create the illusion of depth. Be a little more careful when painting these booths, as you don't want the colors to bleed into one another. You can layer in more colors once the paint is dry, so while you're waiting, use Olive Green to paint the ground, and the turquoise mixture for the boardwalk. Add Burnt Umber in a few places as well to get more of a dirt color.
Step 6: Layering And Painting A Pendulum Ride
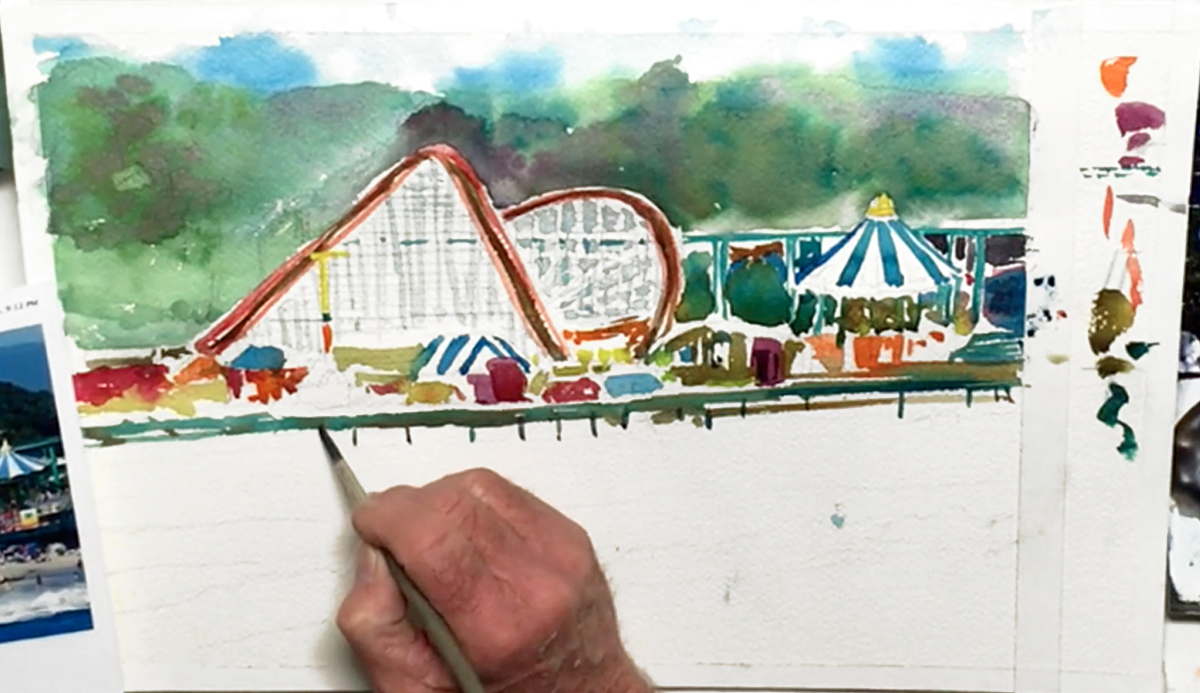 Apply Cobalt Green for more foliage under the mountain range on the far left, then use French Ultramarine to darken a few buildings. Mix the Ultramarine with Burnt Umber, and add an extra layer to the roller coaster's tracks. Go back to the the turquoise mixture to add more filler to the right side of the painting, and use Lemon Yellow to brighten any green areas that need lightening. Change it up by adding Olive Green to the yellow, then apply this to the buildings below the roller coaster. Remember that you're trying to paint the feeling of a lively and colorful theme park, so don't be afraid to use strong colors like Permanent Alizarin Crimson. Try not to oversaturate your painting or get too dark though. For the pendulum ride towards the left side, switch to the no. 8 round brush, and use Lemon Yellow for the swinging pole. Add Viridian for the pivot point, and Brilliant Orange for the supporting pillar. You can also use the small brush to paint other scattered details to touch up the booths and buildings. Feel free to use your instincts to touch up any areas that need it, such as adding Burnt Sienna to the turquoise mix to fill in some background spaces. And like before, keep moving around to paint different sections, using brighter colors to emphasize this colorful theme park. Use Neutral Tint to fill in the last bits of white under the rides and booths, and to paint the pillars holding up the boardwalk. Next, add the Neutral Tint to the turquoise mixture, and paint some shadows on top and underneath the boardwalk.
Step 7: Adding Impact Vs Toning Down
 To add a little “snap” to this colorful theme park, use a more saturated Neutral Tint to paint details on the roller coaster. You don't need to refer to the photo for details like this; give yourself some freedom to experiment. You can even add a touch of Oxide of Chromium and do a light wash over the support beams to soften the effect, and tie it to the background trees. Make sure to leave a few beams white for more "sparkle" as well! If you accidentally make it too dark, you can always come back later with white gouache paint.
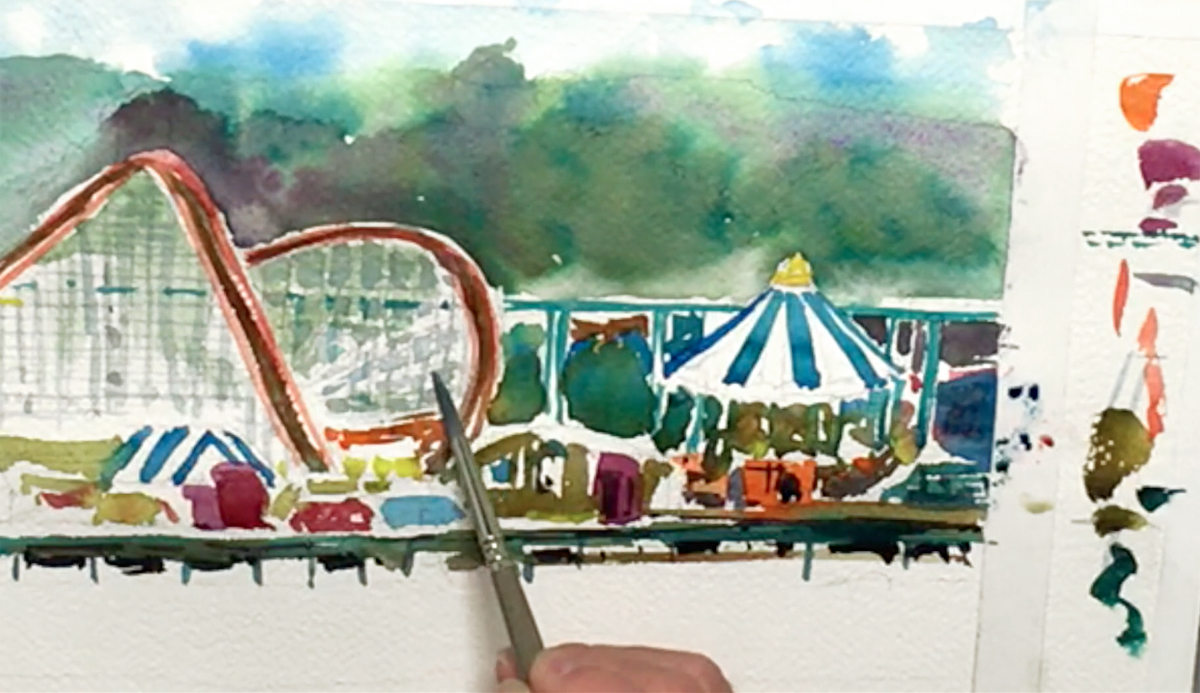
Step 8: More Booths And Shadow Details
 With Permanent Mauve, fill in more booth shapes, then use diluted Neutral Tint for some of the roofs in this colorful theme park. Most of the paint in this area should be relatively dry, which means you can use the wet-on-dry technique to get darker details without colors accidentally bleeding into one another. Try to capture the crowded feeling this way, and remember that there's no need to be too careful. Add the diluted Neutral Tint to create a gradated shadow for the carousel's roof, and touch in Olive Green for a tiny bit of color in the shadow. Also, fill in any jarring white holes left, such as the background foliage below the railway. With more saturated Neutral Tint, paint the areas behind the roller coaster's structure, making small spots. Be confident and instinctual here to bring out the full feeling of the roller coaster! Paint the rails' shadow, the spaces between the support beams, and the shadowed edge of the support beams as well.
Step 9: Adding Details For Increased Contrast
 Tighten and touch up your composition using a few darker colors, adding vague details like doors, posts, carousel edges, roller coaster edges, etc. Everything you do should add to the feeling of a busy yet colorful theme park! With French Ultramarine, paint the underside of the roller coaster (in the areas it can be seen). Continue adding this color to various areas of the boardwalk as well, and feel free to keep a few white spots among the buildings or tweak some details before moving on.
Step 10: A Layer Of Palm And Eucalyptus Trees
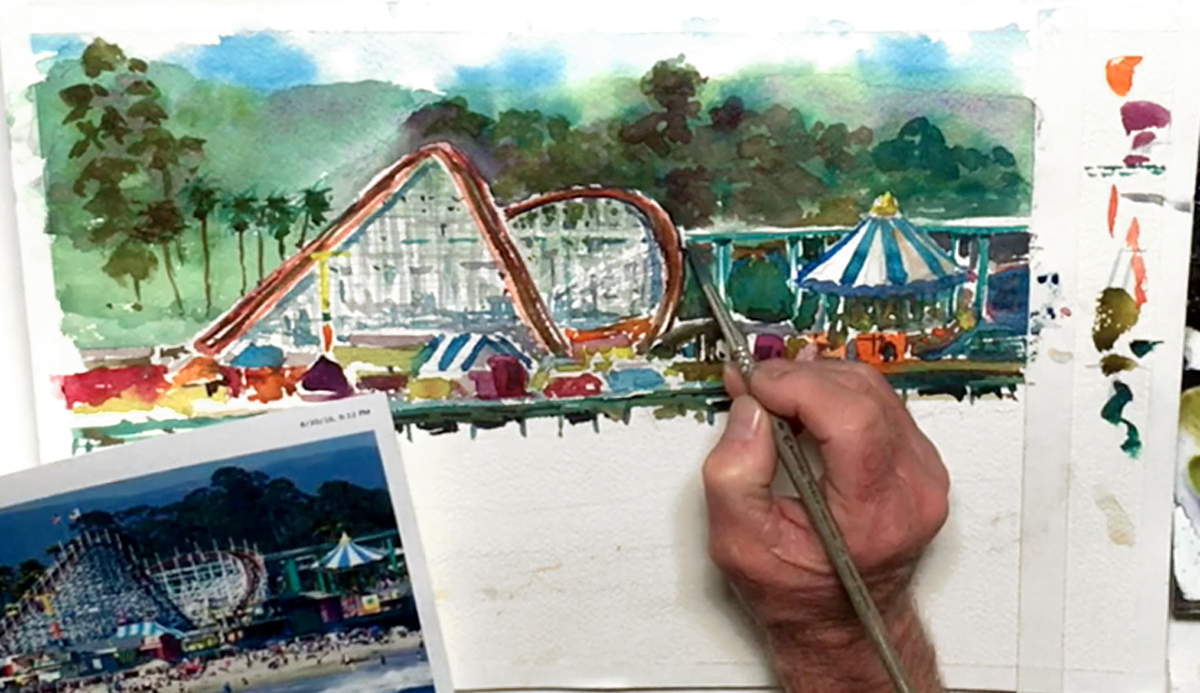 Switch to the no. 6 rigger brush and Cobalt Green paint, then use the wet-on-dry method to paint some palm trees to the left of the roller coaster. While they're wet, you can drop in Olive Green to darken the center. Then, add Burnt Umber for a hint of coconuts underneath the trees. The trunks can be painted with a Burnt Sienna and Umber mix, and keep them thin with varied angles and spacing for a more natural look in this colorful theme park. Go back to the no. 8 round brush, then mix Yellow Ochre, Burnt Sienna, Neutral Tint, and Olive Green for some taller eucalyptus trees. Move to the right side and add Viridian to the previous mixture, getting a different shade of dark green for more trees. Pull this color into the space behind the roller coaster as well for continuity. Apply lighter brushstrokes for trees further away, and add Permanent Mauve for the darkest trees in the front. While the trees' first layer will be done wet-on-dry, adding colors on top will be done with the wet-in-wet process. Keep going with Leaf Green and Viridian for additional trees on the far right, and work fast so you're relying more on your instincts. Lastly, finish off the background by adding a mixture of Neutral Tint and some greens for a layer of cast shadows in front of the trees on the far left.
Step 11: A Beach, Boardwalk, And An Ocean
 Next, it's time to focus on the beach and boardwalk. With the no. 12 rigger brush, wet the beach and ocean area in preparation for the wet-in-wet technique. Then, drop in diluted Yellow Ochre for the beach, working from front to back as you want the paint to fade out towards the back of the beach. Leave the surf white as well to brighten this colorful theme park. Add a shadow under the boardwalk using a mixture of Burnt Sienna and Umber, plus French Ultramarine. In this section, be loose with your brushstrokes without being too sloppy. For the ocean, use Viridian mixed with French Ultramarine, and streak it into the bottom right corner of the painting. Paint around the surf, and a few lines to get a shimmering effect. Streak in Cobalt Blue Hue and more Viridian as well, but don't use too much as these are both strong colors. Next, squeeze some Zinc White gouache paint onto your auxiliary palette. This will be used for touching up areas or highlighting certain elements. For example, use it to paint the frothy surf coming from crashing waves.
Step 12: Highlights With Zinc White
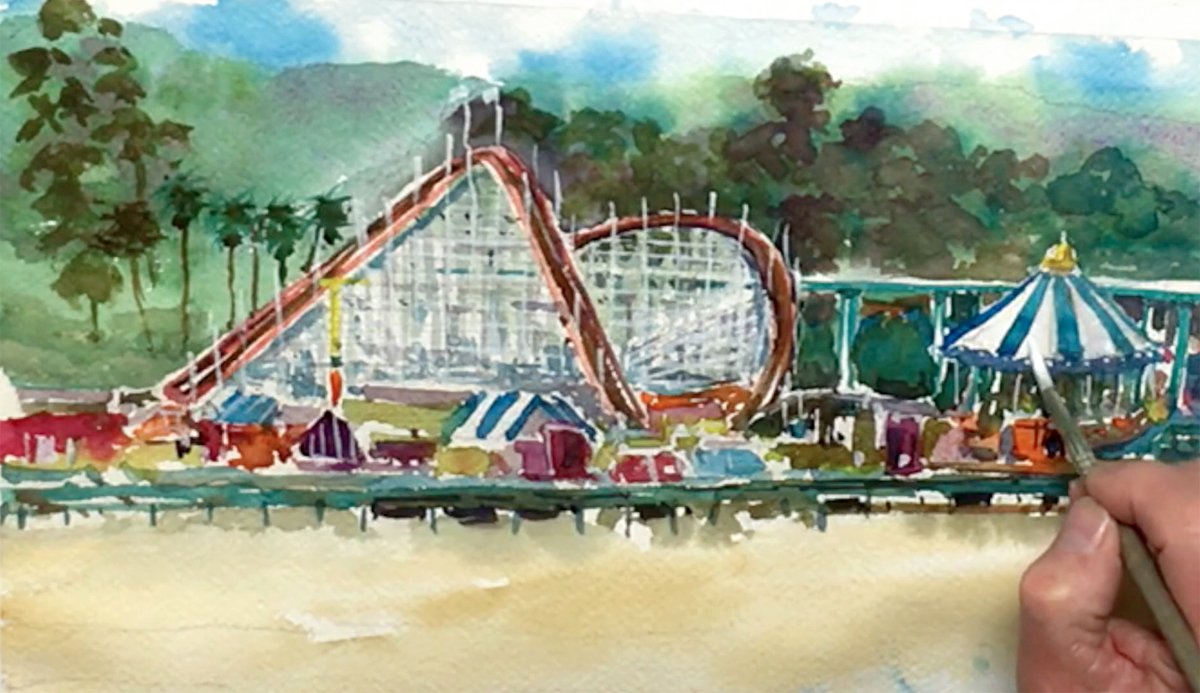 Switch to the smaller round brush (no. 8), and use the gouache paint to carefully add a shiny spot to the carousel's yellow-tipped rooftop. Add the white to the top of the railway, and paint some flagpoles and flags along the top of the roller coaster. The white for the flags will act as a base for the other colors you'll add on top later. Next, add highlights to the coaster's support beams to capture the impression of the entire roller coaster. Once the roller coaster is complete, feel free to add lights along the edge of the carousel's canopy, and to touch up any booths or rides.
Step 13: Bringing A Beach To Life
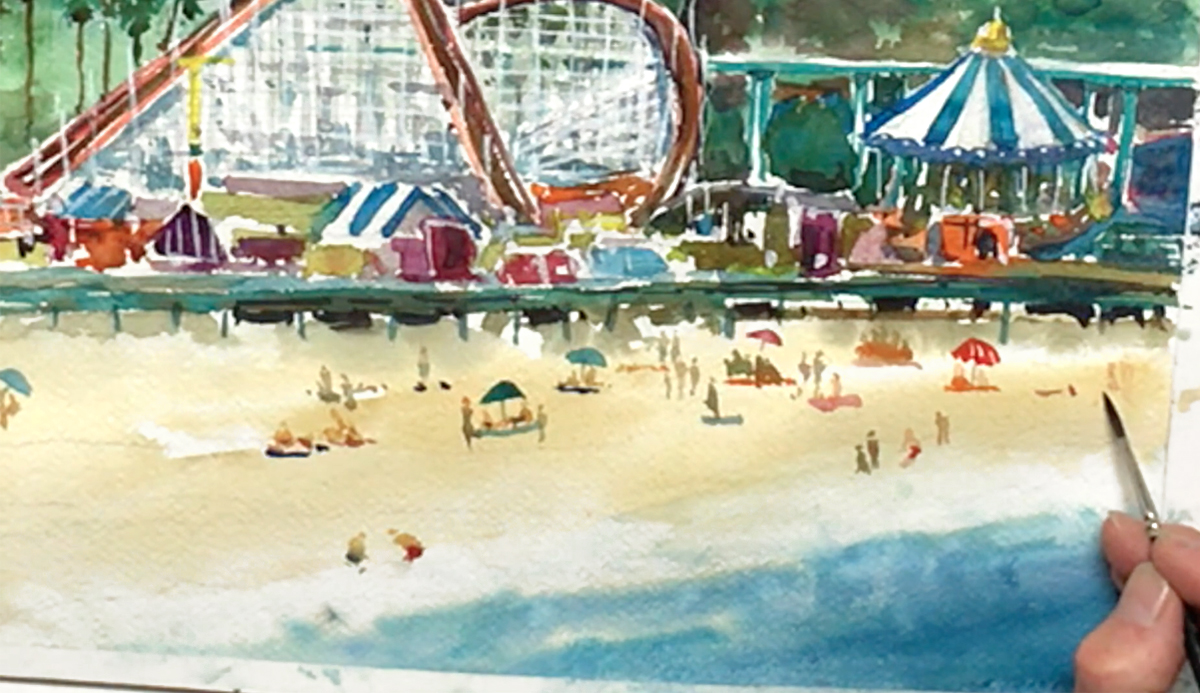 Now it's time for the extra details that will add depth and character to your painting. You'll use the tiny Winsor & Newton brush for this part, and paint the impression of people and objects on the beach with the wet-on-dry technique. Prepare Permanent Carmine, then start painting the crescent shape of an umbrella's top. Remember to make it small; in proportion to the rest of the painting. Then, change up the colors by mixing French Ultramarine with Viridian, and paint another umbrella in another random place on the beach. Switch to different bright colors on your palette and keep repeating the same process, remembering to vary the shape, size, spacing, and angle of the umbrellas. Use a more saturated Yellow Ochre to add people to the beach, placing them under umbrellas, in the water, and so on. Drop in other colors around their torso and/or pelvic area for the impression of swimsuits. TIP: Keep testing your mixed colors, and start small! You can always make a person bigger by painting on top, but it's hard to make them smaller again. Also, tell the stories of different people when painting them, and make their pose match what people usually do on the beach. You can mix Burnt Sienna with red and orange for a more sunburnt skin tone, or dilute it for a lighter tone. Try to place the figures randomly without spacing them out evenly, and remember that capturing the gestures of these people is enough. Give yourself some room to experiment with different poses, and add spots of color around the people for beach towels and toys. Lastly, don't forget to put in umbrella poles with people sitting underneath!
Step 14: Flags To The Finish Line
 One of the last things to cover in this colorful theme park are touchups, such as the flags on top of the roller coaster. Bill paints the American and the California state flag, using French Ultramarine for the blues and Cadmium Red for the reds. You can also take a step back to see if your painting needs anything more, like adding more shadows under the boardwalk. Don't forget to paint in a festive bunting as well by using dots of Permanent Carmine, which changes to Brilliant Orange, then Cobalt Green.
Step 15: Toothbrush Splatter And Final Tweaks
 As a last layer, get an old toothbrush, pick up some white gouache paint, then rub your thumb along the bristles. This is called the “splatter” technique, and provides a mist of white paint that adds more "sparkle" to your painting. In this last major step, use Burnt Umber to paint the horizontal planks along the roller coaster tracks. In addition, tweak or add any details that you feel are necessary to improve your composition. When you're finally done, sign your painting using the no. 1 round brush and the turquoise blue!


