Speed along with artist William "Bill" Dunn in this easy watercolor horse tutorial featuring the famous racehorse, the Secretariat. You will also learn quick and simple tricks to turn something that looks complicated into a fun painting experiment. Want to watch the video version? The full tutorial is available to members of our Beeblys WatercolorPainting.com.
Materials Used In This Watercolor Class:
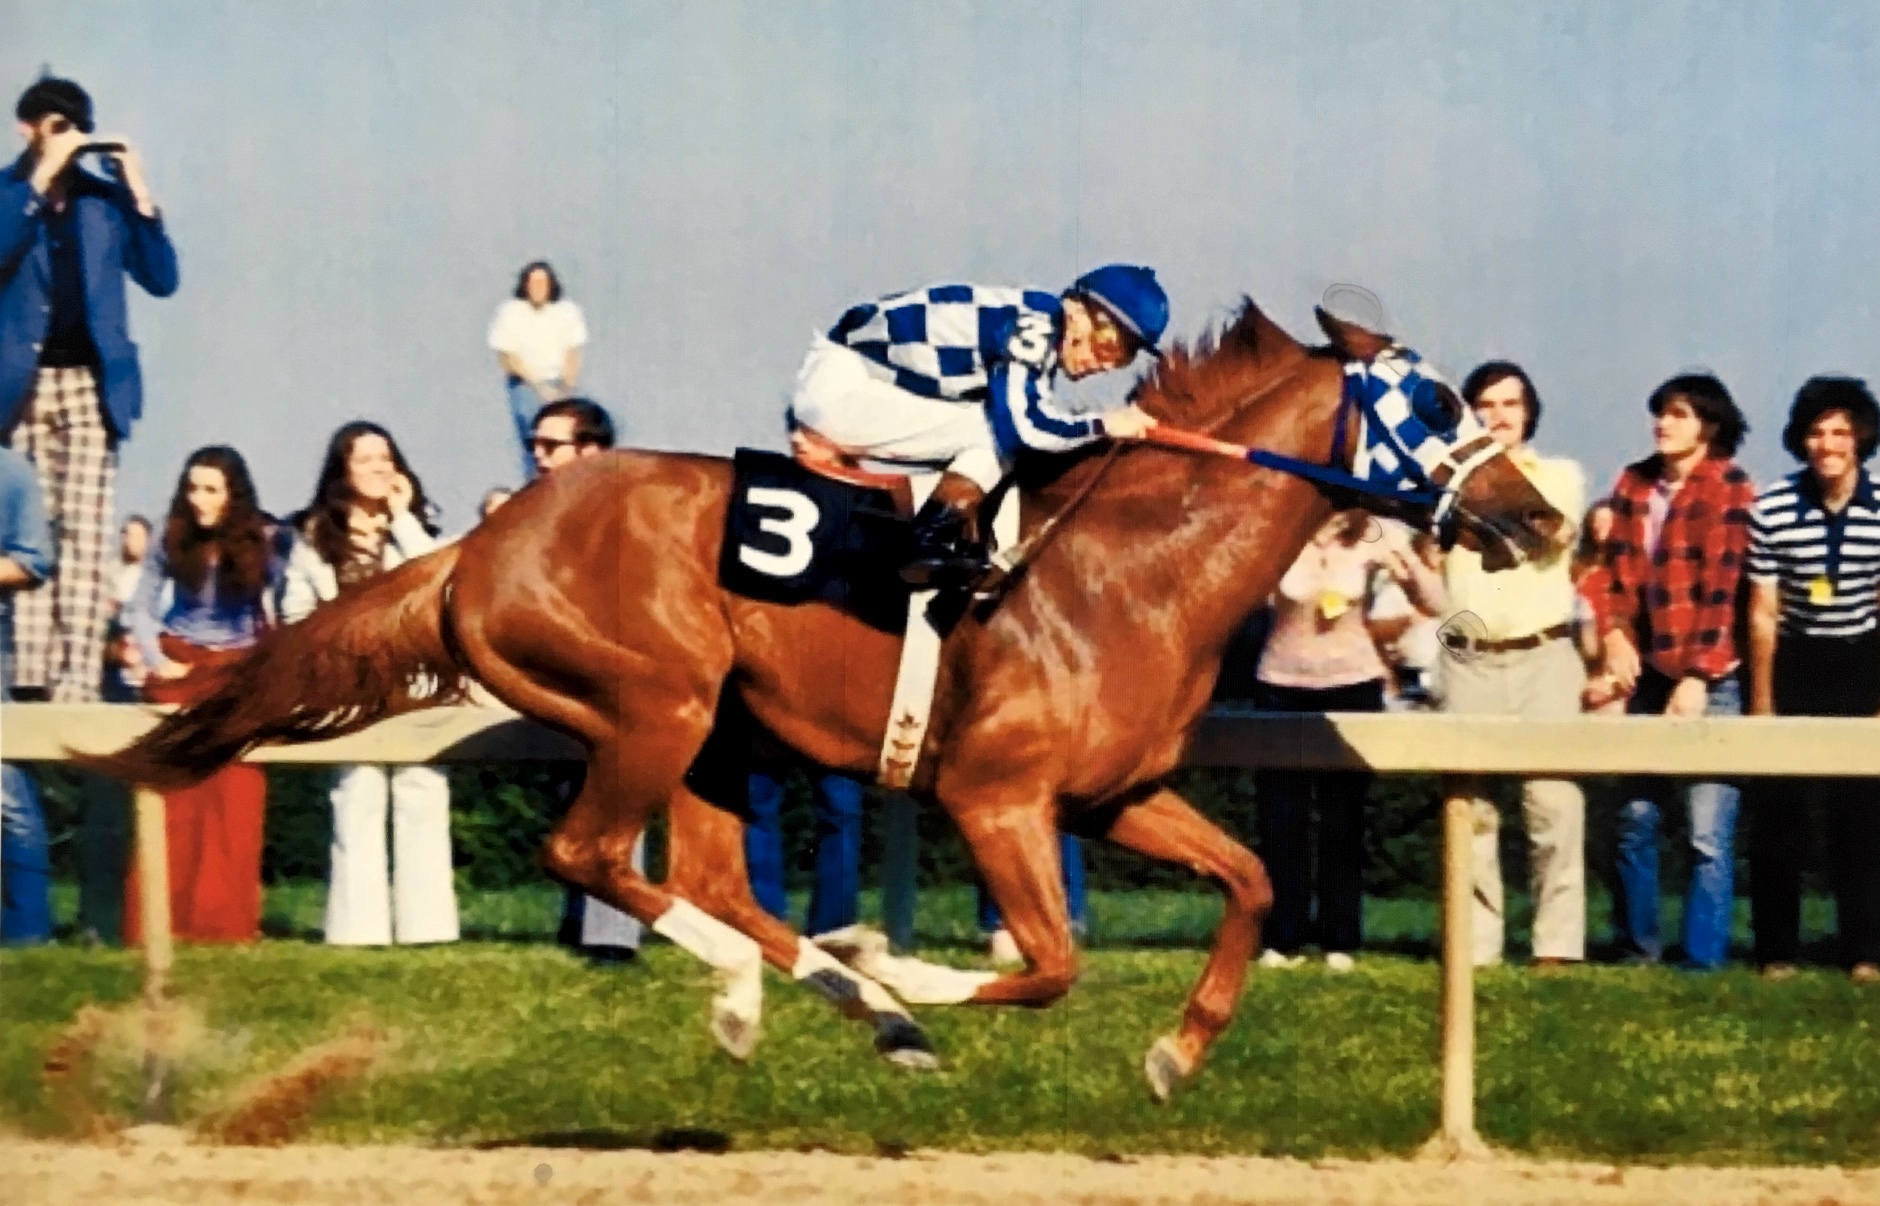
- Reference picture of the Secretariat in action (click here for Bill's picture)
- A block of Arches hot press watercolor paper (140lb, size 16″ x 12″)
- Pentel Graphgear 1000 automatic drafting pencil, 0.7mm lead size with 2B lead
- ¾" Artist's or masking tape
- Painting palette for watercolor paints
- Auxiliary plate or palette for gouache paint
- 2 containers of water
- Paper towels or a rag
- A tabletop easel or a box to prop your painting on
Paints (Holbein Artists' Watercolors)
- Cadmium Red Purple
- Cobalt Violet Light (a.k.a. "Lavender")
- Mineral Violet
- Viridian
- Peacock Blue (a.k.a "Cerulean Blue")
- Cobalt Blue Hue
- Indigo
- Yellow Ochre
- Burnt Sienna
- Burnt Umber
- Neutral Tint
Winsor & Newton's Professional Watercolors
- Permanent Carmine
- Permanent Mauve (or Sennelier's Cobalt Violet Deep Hue watercolor paint)
- Oxide of Chromium
- French Ultramarine
Holbein Artists' Designer Gouache
- Zinc White
Brushes
- Neef Rigger Supreme Taklon Series: Long handle rigger brush (no. 6)
- Escoda Perla Joseph Zbukvic Series: Round brush (no. 8)
- Escoda Perla Joseph Zbukvic Series: Round brush (no. 12)
- Escoda Perla Joseph Zbukvic Series: Round brush (no. 20)
- Winsor & Newton's Cotman Brush Series 333: Rigger brush (no. 3)
Step 1: Proportions Of A Horse And His Jockey
 To start off, frame your paper using artist’s tape. The tape will create a clean white border around your painting, setting it up for possible framing purposes later. When you're done, you can begin translating the reference photo into a simple sketch. Start with drawing the jockey. In terms of composition, try not to place him and the horse dead center. Instead, shift them slightly forward to give room for painting speed lines in later. Working from his head to his body, arms, and legs, make sure to keep his unusual pose in proportion. Remember to include some details such as his goggles and the checkered pattern on his uniform. Next is getting good guidelines for your watercolor horse. Use the jockey’s head as a visual relative to Secretariat’s mane, and for other proportions. Move on to draw his chest and body, then the front legs, taking care to get the joints and angles in proportion. Add the details for the horse’s mask, taking care around the eye area. For the back half, measure the length you need to fit in the tail without drawing off the paper. Note the angles of the back two legs and hooves, where they point, how high each one is relative to the ground and to one another, etc. Finish up the composition by drawing the ground, the railings, and the rest of Secretariat’s racing gear. If you do happen to make a mistake, don't feel as if you have to erase it. Simply draw a new line, and cover the mistake with paint later. Below is a close-up of Bill's sketch:
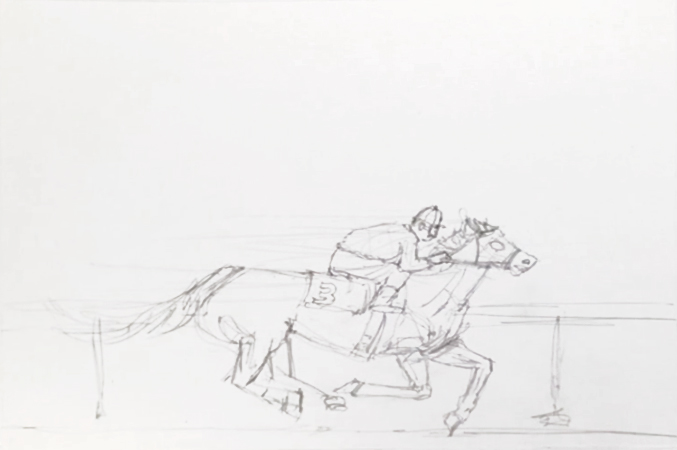
Step 2: Adding Undercoats Using The Wet-On-Wet Technique
 After you're done with the sketch, it's time to start painting. With the Escoda round brush (no. 12), wet the entire horse with clean water in preparation for using the wet-on-wet technique. This means dropping wet paint onto a wet surface, which will produce softer blends. As paint will flow into the area that's wet, work around the jockey, and be careful when wetting the legs. You’ll also notice that the smoothness of the hot press paper means it won't soak up water as quickly, giving you more time to blend yet needing more care as the paint will run faster. Next, prepare Yellow Ochre, which will serve as an “undercolor” (i.e. the horse's first layer). Drop this color throughout the whole watercolor horse, leaving some whites for the lightest highlights, and for the horse's white socks. Avoid painting the mask for now, and refer to the photo when you need to determine the different values and tones. Mix in Burnt Sienna, which will be the second layer. As it's a mid-tone color, it will also be the horse's base color. With it, bring out the mid-tones and shadows to add more depth to Secretariat's muscles. There's no need to be too careful as it's more important to capture the impression of this powerful watercolor horse rather than paint realistically. In this section, the muscles are also essential as they help describe the horse's action. While painting, make sure to use as few brushstrokes as possible when painting with watercolors to maximize your efficiency. This will also help create the “streaky” texture a racehorse would have. Finally, darken with more Burnt Sienna if needed, as watercolors dry lighter than what they look like when wet.
Step 3: Defining Musculature And Details Of A Watercolor Horse
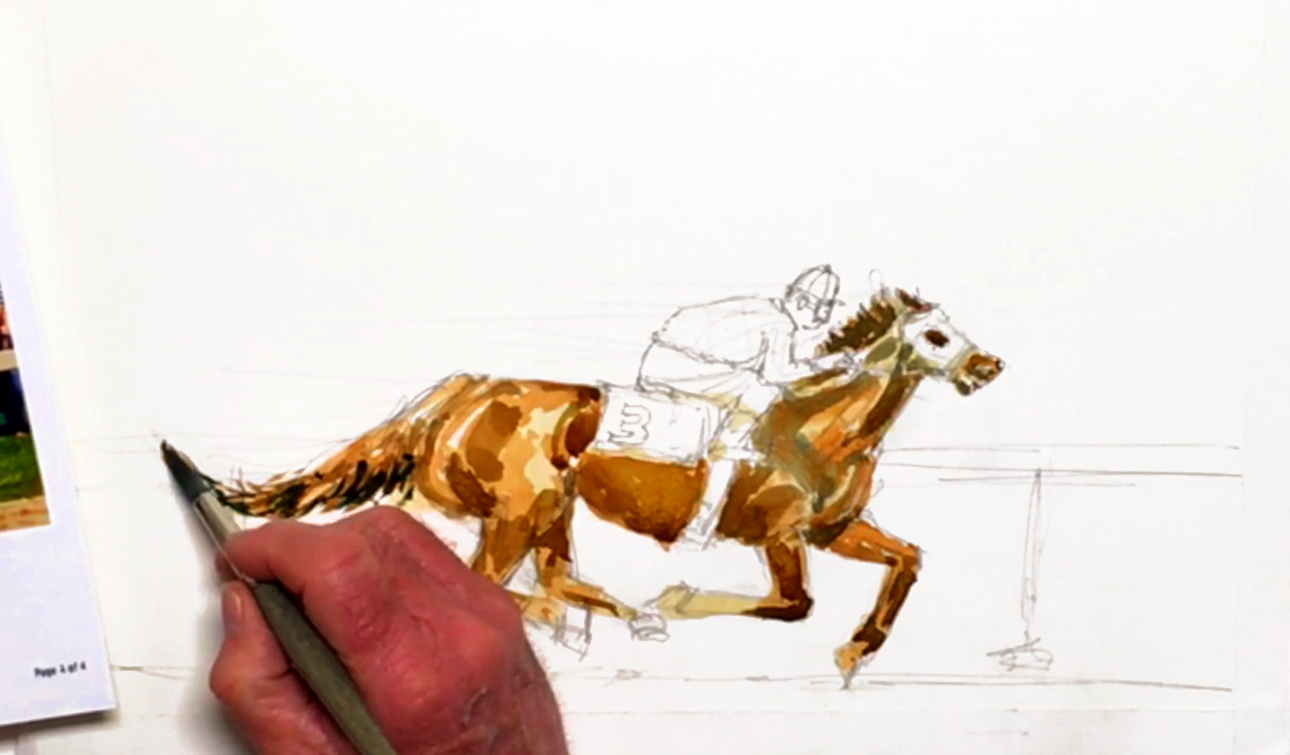 Next, add a touch of French Ultramarine to your Burnt Sienna to get a dark brown color that's suitable for shadows and details. If you find the mixture is too green, make sure you wash off the Yellow Ochre on your brush before adding the Ultramarine. Start at the mane, then near the horse’s mouth. Continue applying this shadow layer on the underside of the horse’s neck, body, and legs. You can also add it to some of the muscles for more contrast and definition. Mix in a touch of Cobalt Blue Hue for more interest, and don't dilute the paint too much for more impact. Work your way towards the backside, adding this shadow layer in the appropriate areas. Keep defining the muscles, tendons, and the tail's hairs. Add details around the eye and hooves as well, and darken the bottom of the hooves for horseshoes. You can also add more of the blues into your mixture for the darkest tail hairs and shadows. Most importantly, stay aware of how wet or dry each area is, as this will help you determine how and where to paint.
Step 4: White Shadows And Minding The Lighting
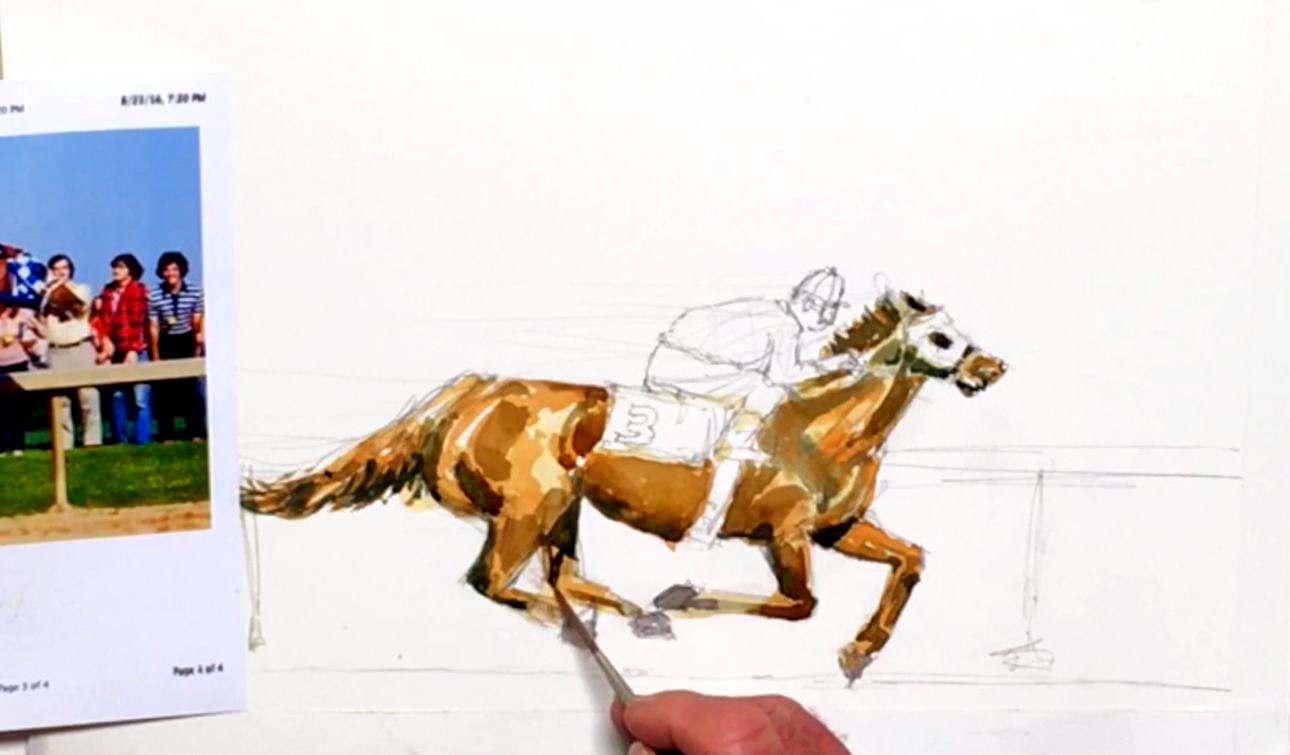 Switching to the Neef rigger brush (no. 6), prepare a mix of Burnt Sienna and Yellow Ochre with a hint of Neutral Tint for a grayer tone. Dilute it so it's not too dark, then apply over the watercolor horse's white socks for shadows. You can add more Neutral Tint to certain edges to establish the position of the legs and to create more impact. Use the lighter gray to darken other areas throughout the horse, and the darker gray for areas that need more contrast. Be selective with these extremes though, as these darker details will pack more punch by adding extra value and power in their visual presentation. Too much will overwhelm the watercolor horse and make it look too dark! Continue painting the undersides, such as under the body, joints, eye, head, and so on. You can even fake in some shadows if it helps your overall painting. Keep in mind where the light source is coming from though, as you don't want too many shadows.
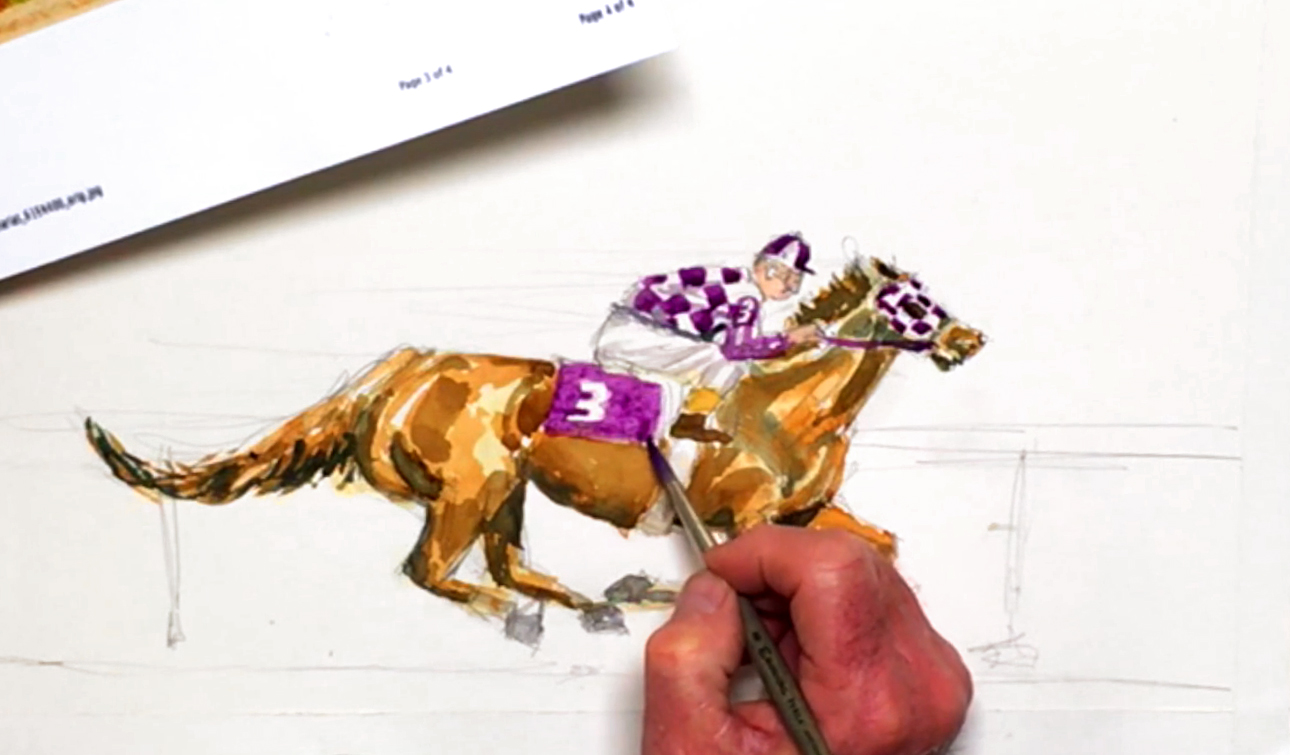
Step 5: Patterns And Designs On A Jockey's Uniform
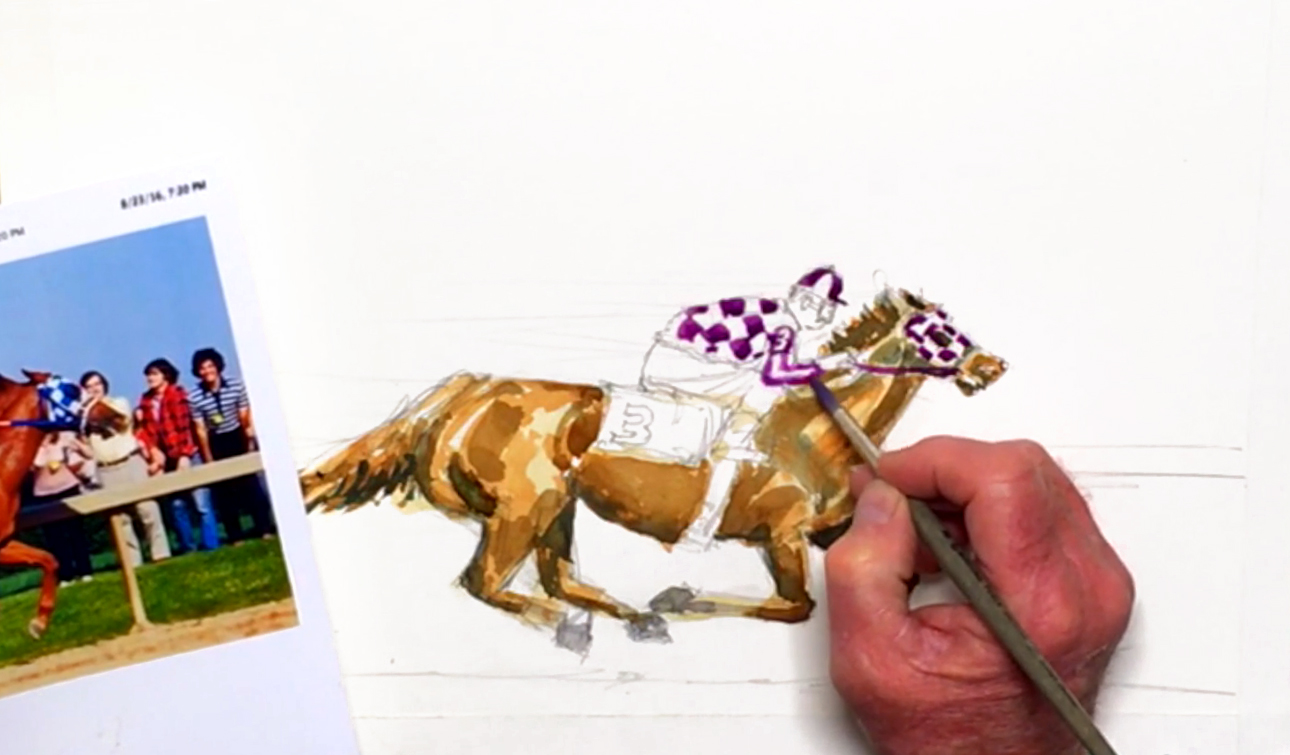 With Secretariat now painted, it's time to shift your focus towards the jockey. You'll be using the wet-on-dry technique here (i.e. wet paint on a dry surface) for the extra control needed to paint the various patterns. For his clothes, it's fine to change some colors to make it stand out more than the blue in the picture. Don't forget to sketch in his armband with the number "3" on it if you haven't already done so in step 1. Switch to the no. 8 round brush, and prep a saturated Cobalt Violet Light on your palette. Use this color to paint the hat, shirt, and armband, painting around the whites to get the 3 different designs. While doing this, be careful not to touch the wet paint on the horse, as this will smudge the paint. Use the same color for the horse’s mask, but be more careful as the horse's head and eye may still be wet. Don't forget the reins and the striped pattern on the jockey's sleeves, and make sure these patterns aren't too straight as clothing needs to look flexible.
Step 6: Painting Skin Tones And Clothing
 For the jockey's skin, mix a Caucasian skin tone, which is a diluted Yellow Ochre with a touch of Cadmium Red Purple. Apply carefully to the man’s face and hand, avoiding any wet paint as much as possible. Next are the boots. Use Yellow Ochre for the top half, then add Burnt Umber for the bottom half. The saddle strap is white in the reference photo, but since it needs a shadow, dilute the blues and Yellow Ochre mix on your palette, and add a gradated shadow. To do this, start from the bottom and brush upwards, then softening the edge of the paint where it fades to white. For the white pants, use diluted Neutral Tint to paint the shadows and folds. You can also add this gray tone for the wrinkles in the shirt too, going over both purple and white squares for consistency. To separate the different clothing, pick up more Neutral Tint and paint the line where the shirt overlaps the paints. The last part to add to the horse and jockey duo is applying a layer of Cobalt Violet Light on the number cloth under the saddle. Like you did for the armband, paint around the "3" to help it stand out.
Step 7: Using The Glazing Technique To Brighten A Color
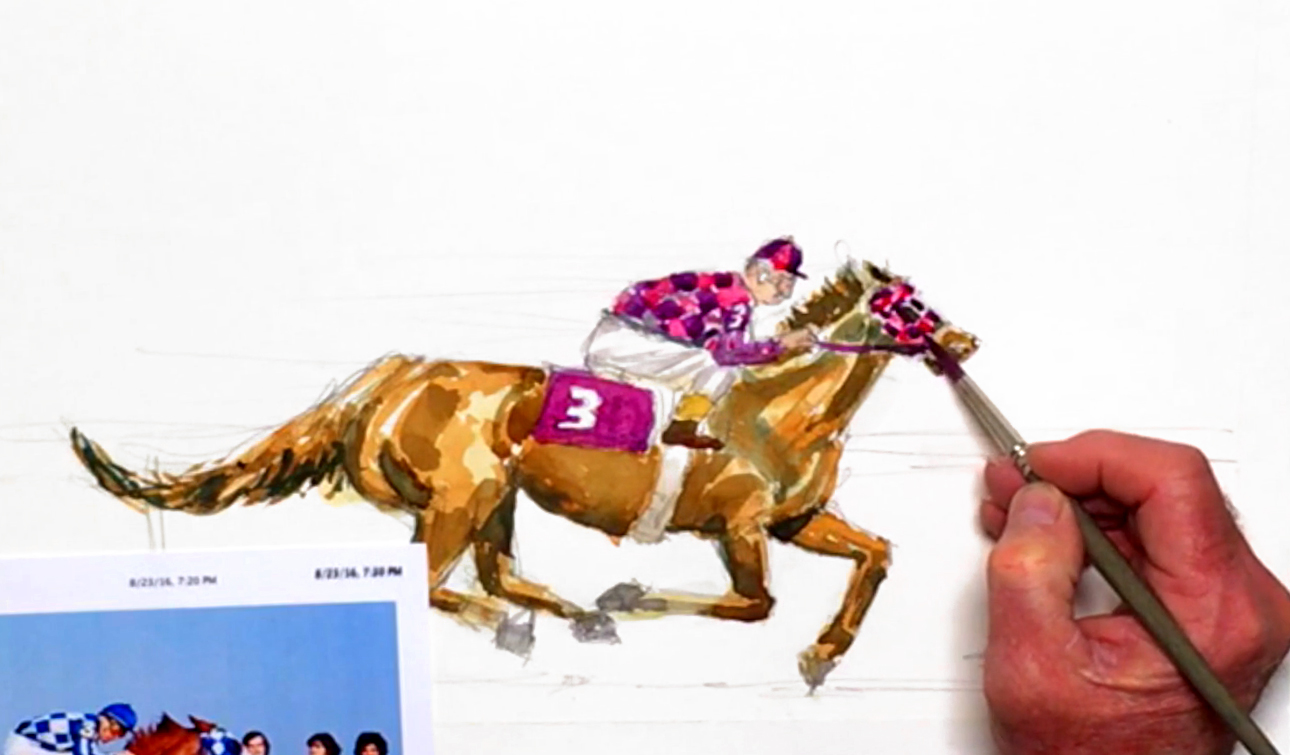 At this point, if your painting is still wet, you can speed up the drying by fanning it, or by using a hairdryer. After it's done, you can add a dark pink to the duo's uniform by diluting Permanent Carmine and painting all the white squares and stripes. You can even glaze it on top of the number cloth to brighten the color. The extra pink tone will also help liven up the entire painting, so in these cases, it's fine to change your composition.
Step 8: Easy Watercolor Background Wash
 Switch back to the no. 12 round brush, then mix Oxide of Chromium with Viridian for a background foliage color. With it, use the wet-on-dry technique to paint the grass behind the watercolor horse and track. Remember to leave the white railings white! Even so, there's no need to be overly careful, and you can pull this color into the watercolor horse a little so it doesn't look pasted on. The ground should be a little uneven as well to make it look more natural. Next, drop in Cobalt Violet Light into the still-wet greens, which will add color variety to the background. You can touch in Peacock Blue as well to prevent the color from becoming too gray. Going back to the Yellow Ochre, add in more blues/greens for a "green ochre", and paint the dirt racetrack. Like you did for the green background, scrub in the paint so it's a little uneven and more natural-looking. While you're painting, remember that you're telling a story with your paints, which will help capture the right atmosphere and impression you want your audience to receive.
Step 9: Vague Crowd And Fluffy Clouds
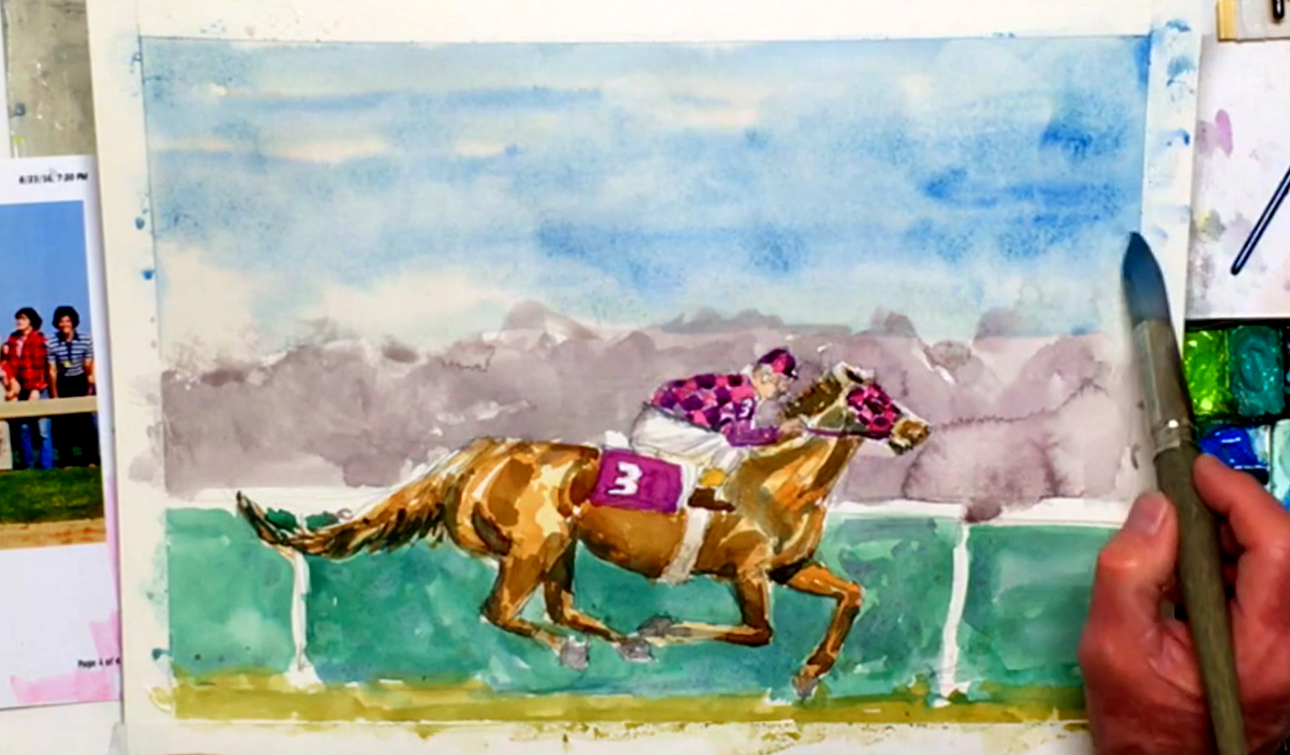 Moving on, take out the no. 20 Escoda round brush as you'll be covering the large background area. Soften the paintbrush with water, then mix Neutral Tint with all the colors already on your palette. You can even add some of the purple/pink mix for a warmer gray tone. Use this gray tone to paint the silhouette of the crowd behind the horse and his jockey. As your painting is about the Secretariat, this crowd should be more ambient than have any real details. For the sky, it's possible to leave it white, but Bill determines it will look better with color. You'll use the wet-on-wet technique again, so like before, wet the sky area with pure water first. You don't want your sky to compete with the watercolor horse and human duo, so a simple blue sky will be best. Streak in diluted Peacock Blue, and touch in some Cobalt Blue Hue for variety. If it gets too streaky, scrub a wet brush over it to move the pigment around. While the paint is still wet, you can lift out any mistakes with a rag or paper towel if necessary. When you're done, wait for your painting to dry before moving to paint the speed lines for the duo. Again, you can use a hairdryer to speed up the process.
Step 10: Speed Lines For Movement
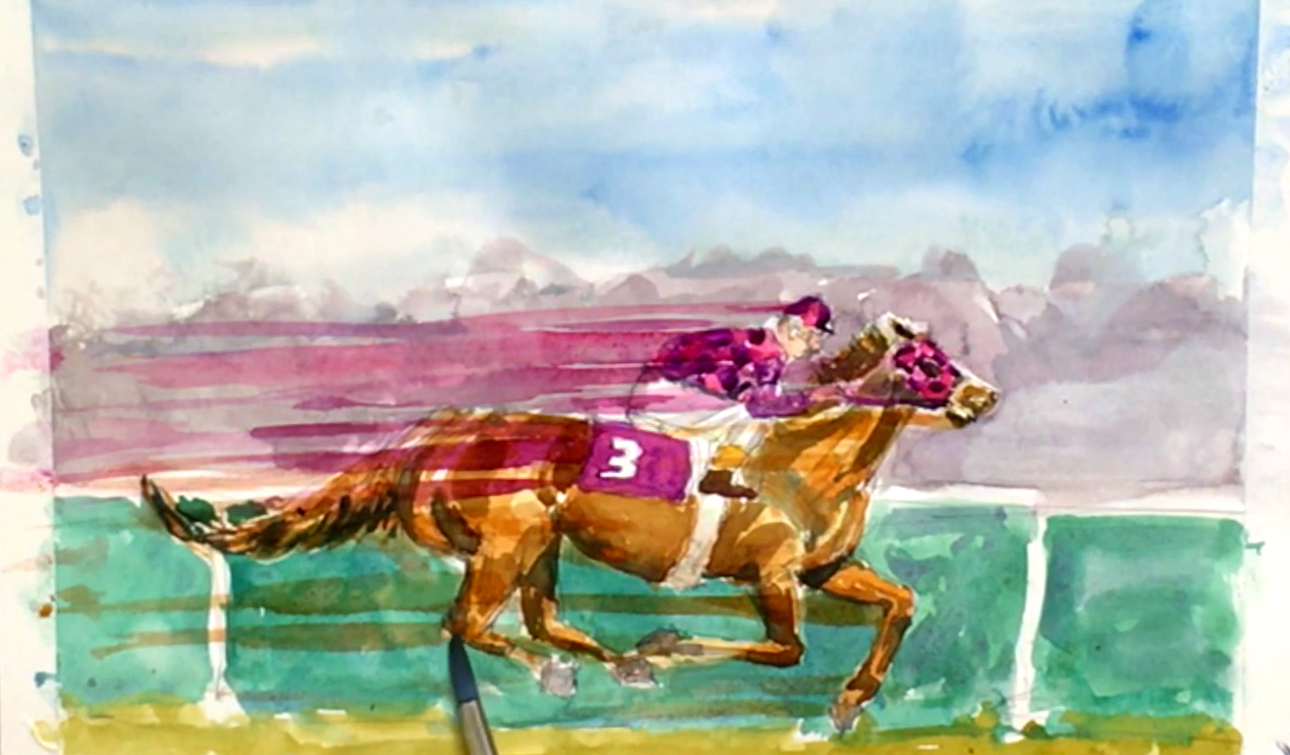 With the entire background finished, you could stop here, but there is one more step to add to this experimental painting: abstraction. While this is a generic term that covers several techniques, the concept we'll focus on here is to introduce speed lines to emphasize the movement of one of the fastest racehorses who ever lived. To do this, take the smaller no. 12 round brush and make a slightly diluted pink using the Permanent Carmine paint. Starting from the pink area on the jockey's hat, streak horizontally from right to left, with the lines getting lighter and tapered as you move away from the starting point. When you're done with the pink speed lines, switch to the Cobalt Violet Light for a few purple ones. For consistency, the starting point of each speed line will always correspond to the color of paint you're using. Following the same vein, dilute Burnt Sienna - the horse's base color - and add speed lines coming from the watercolor horse. Focus particularly around the legs, as they're moving the fastest. Step back once in a while to check the overall feeling of the painting, and vary the lines' thickness to break up any regularity. If the colors get too bold, you can use a rag to lift out wet colors without damaging your paper. However, don't forget the paint will dry lighter than it looks, and don't be afraid to experiment with the different tones and values!
Step 11: Finishing Touches And Signing Off
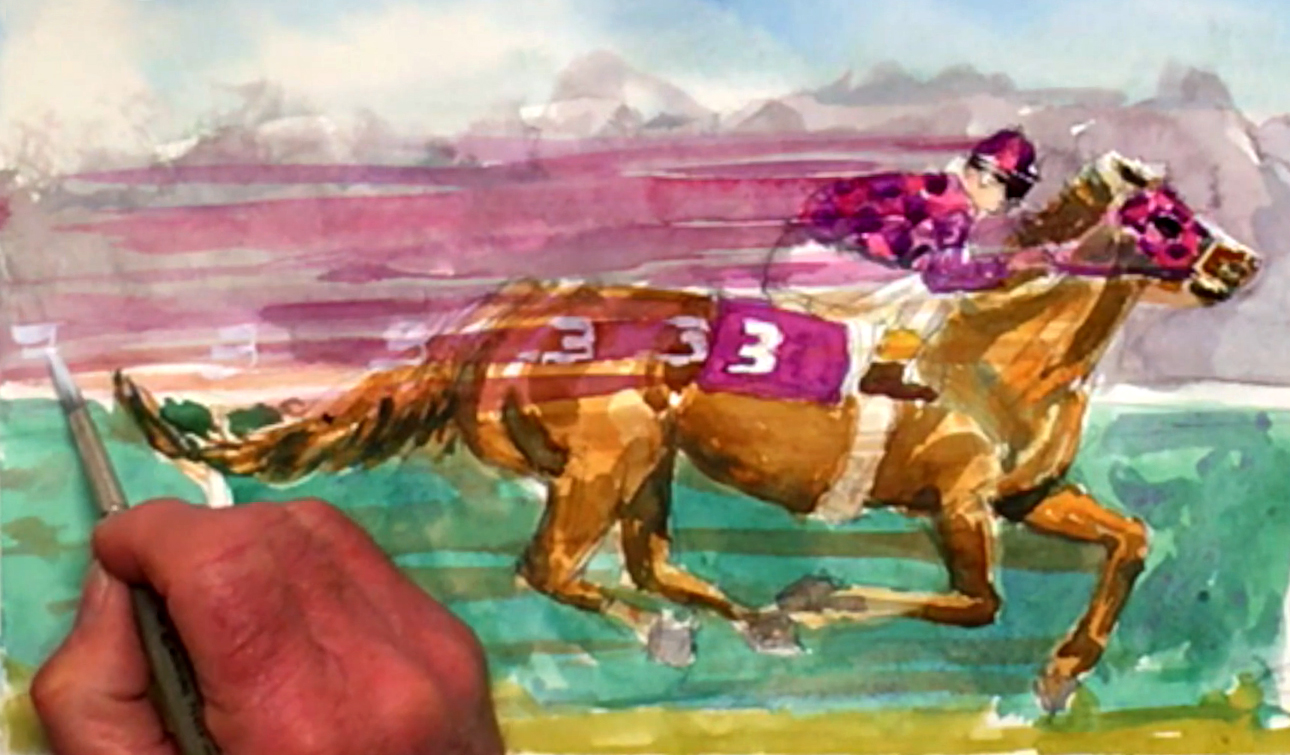 The final step is to add any necessary finishing touches that will help bring the whole painting together. For example, you can use a saturated Neutral Tint to paint the jockey's goggles, and Secretariat’s ear, eye, nose, and mouth. You can even use the Zinc White gouache paint to paint in white number 3's along the same horizontal axis. This will help make the number look like it's moving through space, especially if you make each "3" lighter and further apart as you move away from the actual number. Lastly, use a saturated Burnt Sienna to paint the watercolor horse's cast shadow on the dirt racetrack to make it look like it's flying along. And once you're done, feel free to sign your painting in Indigo with a no. 3 rigger brush!


