It's the Easter season, and you know what that means for arty people: Easter decorations! Join us as we paint watercolor Easter eggs in this easy step-by-step watercolor tutorial. Thanks for sharing the Easter spirit with us, Shoo!
Materials used:
- Any watercolor paper (140lb, size 6" x 9")
- Palette for mixing paint
- Container with clean water
- Dry rag or paper towel
- Rotring Tikky mechanical pencil with 0.5 HB lead (or any HB pencil)
- Rotring Tikky graphic fineliner (0.5mm)
- Eraser
Winsor & Newton's Professional Watercolors
- Cadmium Yellow Pale
- Cadmium Red
- Permanent Carmine
- Winsor Green (Yellow Shade)
- Hooker's Green
- Payne's Gray
Brushes
- Da Vinci Maestro Kolinksy Series 10: Round brush (no. 5)
Step 1: Sketchy Easter Decorations
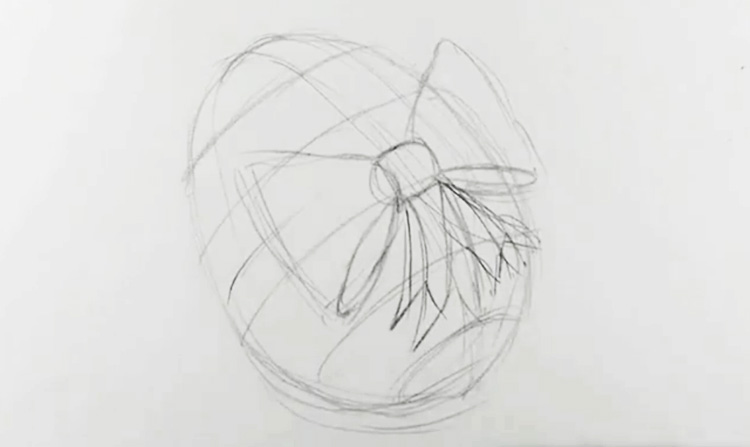
To start off this watercolor Easter special, sketch an Easter egg with your mechanical pencil. Be as sketchy as you like because these marks will be erased later, but remember that less is more. Keep your marks light so that you don't need to erase too much later.
Give egg's oval shape dimension by adding horizontal lines that wrap around its body, then finish it off with a fancy bow. If you want, you can even vary the pattern on the egg to truly make this your own Easter egg!
Step 2: Cleaning Up With A Fineliner
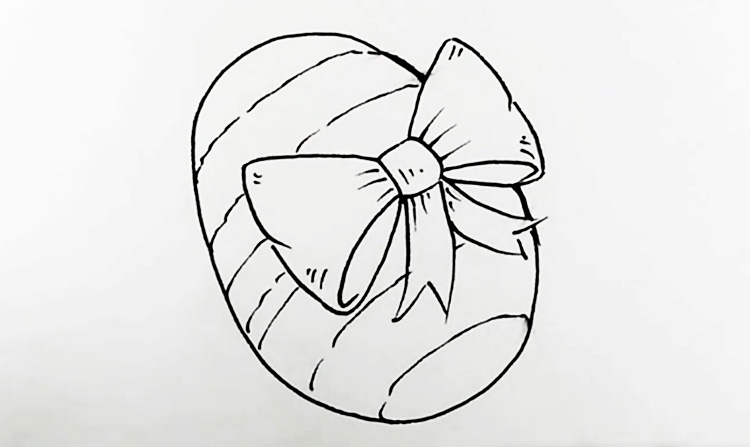
Bring out a 0.5mm fineliner and trace your sketch with black ink lines. Start with the bow, then the outline of the egg, and finally add the details last. Add little lines on the bow - around and on the knot in the middle, along its edges, and on the ribbons sticking out - to give the impression of wrinkles and texture. Once the inked lines have dried, take an eraser (preferably a kneadable one) and rub out those guidelines.
Remember to erase gently when it comes to pencil drawings on watercolor paper. Rubbing too hard might damage your paper's fibers. At the end of this step, you should have a clean line art illustration.
Step 3: As Yellow As Eggs in a Blanket
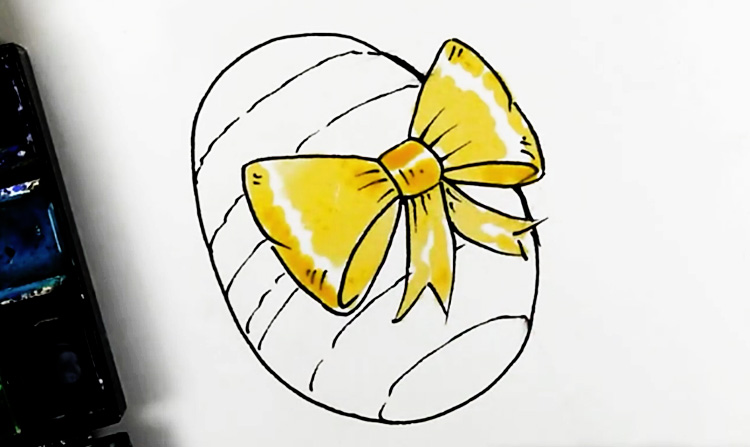
Here we go, it's time for the fun part! Take your no. 5 round brush and load it with diluted Cadmium Yellow Pale. Using the wet-on-dry technique (i.e. adding wet paint to a dry surface), block in that cute ribbon. Give it highlights by painting around squiggly lines of white paper in between each block of yellow tint, as pictured above.
Step 4: Highlights and Shadows
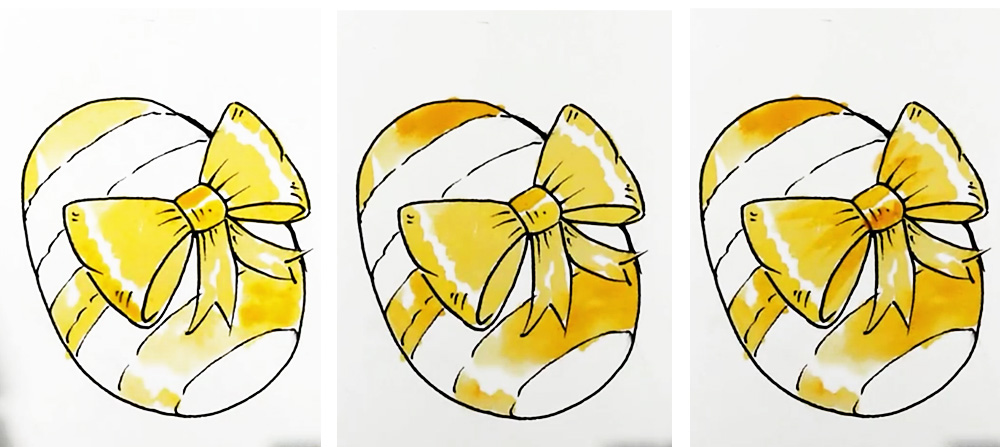
Apply the same yellow to the horizontal stripes on the Easter egg via the wet-on-dry technique. Like with the ribbon, leave out a line of white on the left side of your egg. Keep in mind that this side is where our light is coming from, therefore the opposite side should be in shadow. Now you have to work quickly while the yellow paint is still wet! To capture those shadows, add a hint of Cadmium Red to give the yellow an orange tint. Drop it into the right side via the wet-in-wet technique (i.e. adding wet paint to an already wet surface), and allow the paint to blend together naturally.
Apply some of this dark yellow tint next to the highlights as well to increase contrast and make those highlights pop. Finally, give the yellow ribbon some dark yellow shadows too, to give it more dimension. Wait for these layers to dry (or use a blow dryer) before proceeding to the next step.
Step 5: A Splash of Red and Green
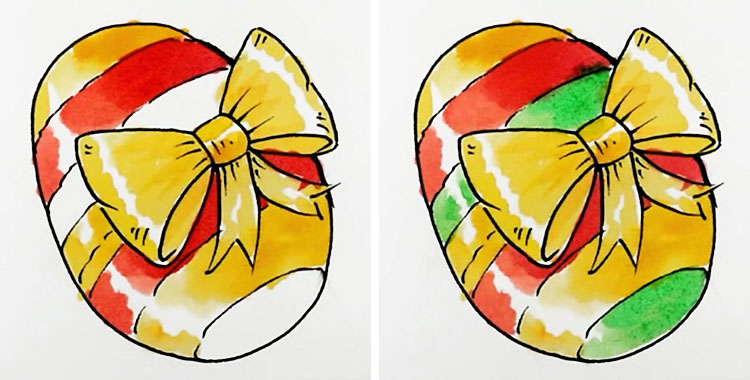
Let's add a splash of more color to your Easter decorations, shall we?
First, pick up diluted Cadmium Red with your round brush, and apply it to the horizontal stripes on the egg. Repeat what you did in the previous step and leave out space for a highlight on the left side. While the paint is still wet, use the wet-in-wet technique and apply a darker red (Permanent Carmine mixed with less water) on the right side for the subtle shadows.
Second, do the same with a green tint! Apply diluted Winsor Green to the remaining horizontal stripes and leave out a highlight. Drop in Hooker's Green diluted with less water on the right side, to darken the green tint. Make sure to wait for the red layer to dry first before adding the green layers.
Step 6: Shadowy Dimensions
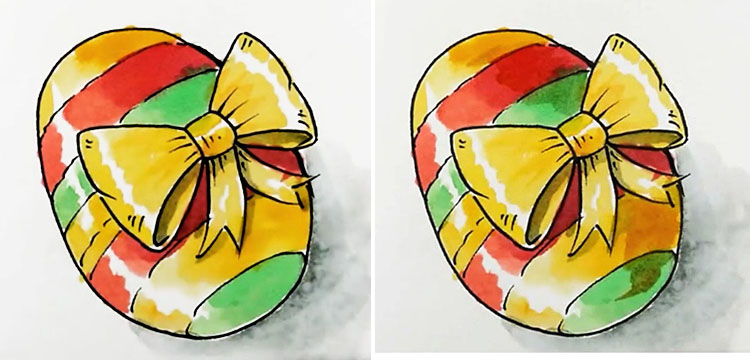
Our final details will involve adding more shadows to give your Easter decorations more dimension! Pick up diluted Payne's Gray and apply it under the egg for its shadow. Do a graded wash by adding clean water to fade out the gray paint, giving it a more natural look.
Use the same gray to add shadows on and under the ribbon as well. Finally, add a hint of Payne's Gray to the yellow-orange mixture to darken it, and add a final brushstroke of subtle shadow along the right side of the egg. Make sure you paint around the ribbon for this so that it stands out.
If you don't have Payne's Gray, you can create a gray tint by combining Winsor Green and Cadmium Red. Green and red are complementary colors (i.e. they are opposites on the color wheel), which means that they neutralize each other's hue! That's it! We hope you enjoyed painting some easy Easter decorations in this lesson, and feel free to use different colors or patterns as needed.
If you want to watch Shoo painting his own, check out his video:


