In this lesson, we'll be learning how to paint 3 easy backgrounds while picking up new watercolor techniques. In particular, if you're interested in using the wet-in-wet method, this is the tutorial for you! Thanks for sharing what you know, Mako!
Materials used:
- Hahnemühle's Watercolor Book (90lb landscape, size 5.8 x 8.3") or any watercolor paper (140lb, size 6" x 9")
- Artist's, masking, or washi tape (1/2" width)
- Palette for mixing paint
- Container with clean water
- Dry rag or paper towel
- Staedtler Black Pigment Liner (0.3mm)
- Uniball UM 153 Signo white gel pen (broad)
Winsor & Newton's Cotman Watercolors
- Cadmium Yellow Hue
- Cadmium Orange Hue
- Mauve
- Dioxazine Purple
- Cerulean Blue
- Payne's Gray
- Prussian Blue
Schmincke Akademie Watercolors
- Violet
- May Green
- Cyan
- Burnt Umber
- Ultramarine
Brushes
- Da Vinci Series 5580 CosmoTop Spin: Round brush (no. 6)
- Da Vinci Series 3503: Round brush (no. 2)
Step 1: Setting Up Your Workspace
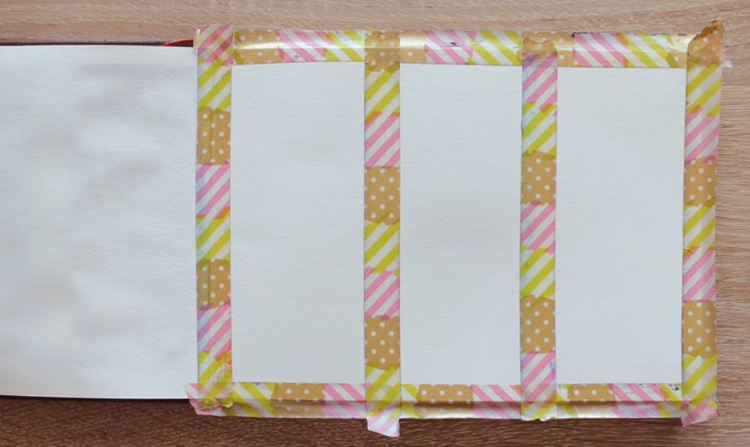 Before you begin painting, it's important that you prepare your workspace properly. This tutorial is all about using the wet-in-wet technique, which means adding wet paint to an already wet surface. You may need to re-wet your paper often, so make sure that your water container is within easy reaching distance. Use artist's tape to divide your watercolor paper into three equal vertical panels. If you're not using a watercolor block or book, you can tape the paper to a flat surface. This will prevent it from buckling, which may happen when using watercolor techniques that need the paper to hold a lot of water.
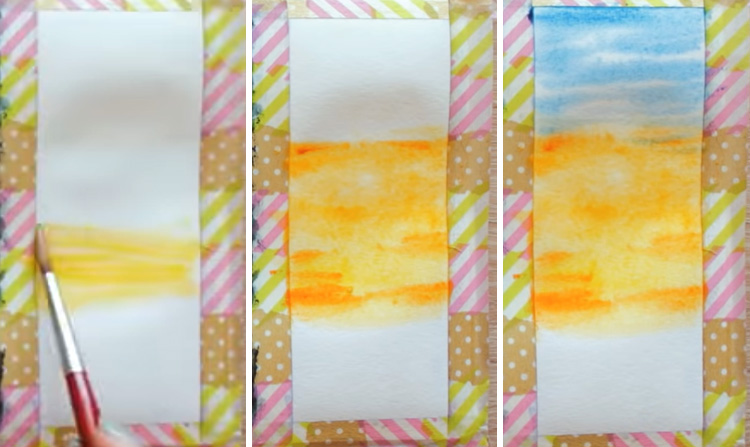
Step 2: Beginning a Sunset Sky
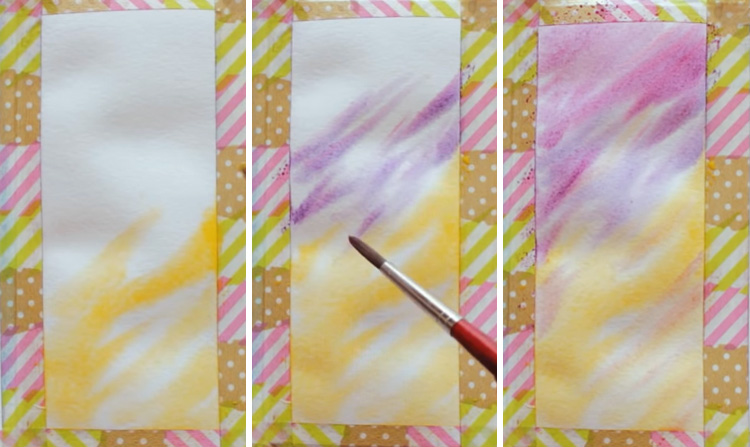 The first painting we'll do is a sunset sky! To start, take the no. 6 round brush loaded with clean water and apply a layer of water to the first section of your watercolor paper. Make sure that you add the right amount of water to give the paper a glossy sheen. You can lift any excess water with a dry rag or paper towel. Next, pick up Cadmium Yellow Hue and start applying it starting from the bottom. Use choppy, diagonal strokes with the wet-in-wet technique, which gives each stroke a soft edge. Experiment by using both the tip and side of your brush, as well as different amounts of pressure, to vary the thickness of each brushstroke. Do the same with Violet and Mauve, working upwards until you've covered this whole section of paper. Work in light, loose strokes that are spaced out so that the white of the paper is visible in between. You can allow the different colors to overlap, but try to keep them largely in sections to preserve the brightness of each tint. Pro tip: Try to work as fast as you can! Watercolor techniques like these benefit the most while the page is still wet and the colors can mix together naturally.
Step 3: Adding Streaky Depths
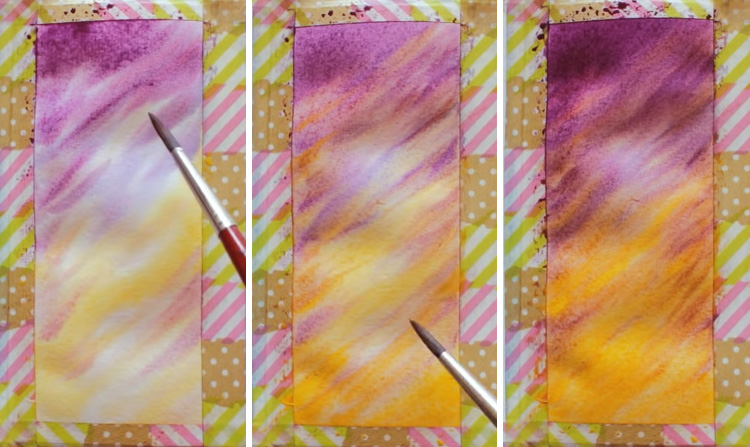 Mix a darker shade of purple by adding Dioxazine Purple to Violet. Apply this tint to the upper part of the page with your no. 6 round brush. Use the same diagonal, choppy strokes from the previous step. Next, pick up Cadmium Yellow Hue and add a few strokes to the lower half of the page. You can add a few streaks of yellow to the purple section, but do so sparingly. Now allow this section to dry, because it's time to use your watercolor techniques to create the next painting!
Step 4: Exploding Life into a Nebula
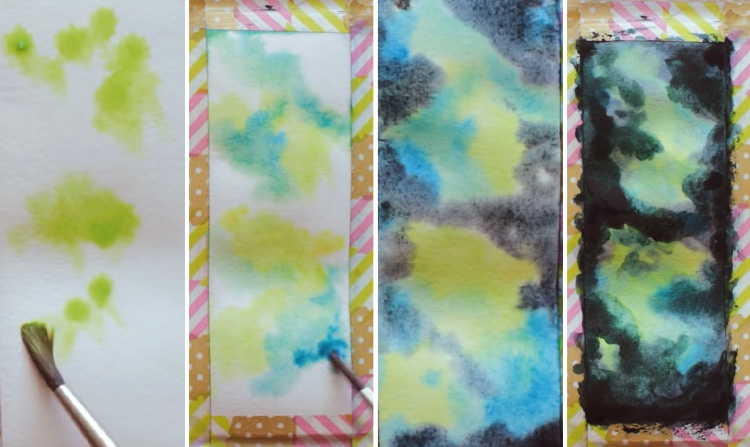 Rinse out your no. 6 round brush and apply a clean layer of water to the middle section of your watercolor paper. Like before, make sure to add just enough water to give the page a glossy shine. Next, pick up May Green, and add it to the wet surface via the wet-in-wet technique. Use a dabbing motion and apply the paint in concentrated puddles on different parts of this section. Switch to Cerulean Blue and dab it around the puddles of green. Allow the colors to mix together if they touch each other - that's part of the magic of these easy paintings! Surround the lighter "nebula" areas with a mixture of Cyan and Payne's Gray, slowly building up this color until you've filled up the whole page. You want to create as much contrast as possible to bring out the nebula's colors. If the paint has started to dry in certain sections, allow the painting to dry completely before dabbing in more paint. Build up the darker "space" areas with a layer or two of Payne's Gray mixed with Ultramarine, then leave it to dry completely.
Step 5: Painting an Ocean Sunset with Wet-in-Wet Watercolor Techniques
 While the second painting dries, it's time to start the third painting! You know the drill: rinse out your brush and add a layer of water to the last panel of watercolor paper. Now pick up Cadmium Yellow Hue and apply it in horizontal strokes to the center of the page. Working wet-in-wet again, make sure you block in around 1/3rd of the paper. Next, load your brush with Cadmium Orange Hue and apply it to both ends of the yellow section in a graded wash (i.e. a wash that naturally changes in value or tint). This should be easy if the yellow area is still wet! Pick up more orange paint and add shorter strokes from the edges of the painting to give the appearance of clouds. Finally, starting from the top of the page, add Cerulean Blue in loose, horizontal strokes. You can lightly overlap it with the orange section, but keep them separated for the most part.
Step 6: Transforming Colors Into A Vivid Sunset
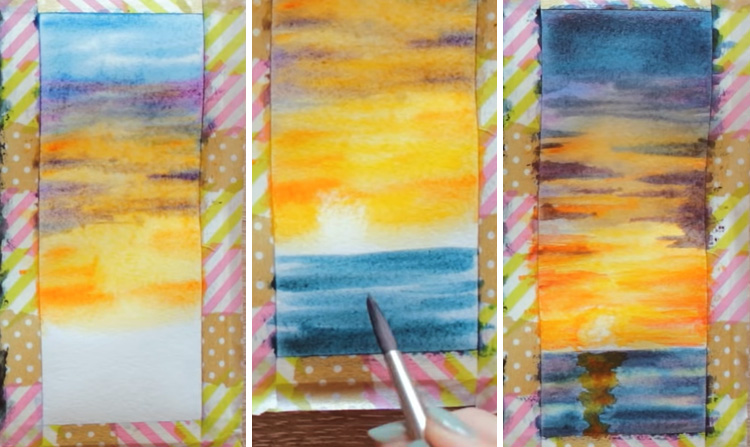 Load your no. 6 round brush with the purple mixture, and add streaks to the lower part of the blue sky section. You can also add strokes to create clouds in the yellow and orange mid-section, but again, do this sparingly. If the purple paint is too watery, pick up the excess with a dry rag or paper towel. As far as watercolor techniques go, this one is very handy! Use the tip of your brush to soften the edges of the purple streaks and blend them evenly into the background. Next, use a dry rag or paper towel to lift off some paint to create an impression of the sun at the bottom left corner of the yellow sky. If your paint has already dried, use a clean wet brush to gently reactivate and take the paint off. Now to paint the water! Dilute Prussian Blue, then use the same horizontal strokes to block in the ocean. Start from the bottom of the paper, and fill it up to the yellow sky. Keep a thin space between the ocean and the sky so that the colors don't accidentally bleed into each other. You can also add some blue streaks to the upper part of the sky to deepen it. While the ocean layer is still wet, pick up more Prussian Blue and add deep blue streaks into the water. Keep your horizontal strokes loose and choppy to create interest, then add some yellow and orange reflections. Finally, use the lifting technique to lift some paint from the water, making space for the sun's reflection. Finish it off by dabbing in Cadmium Orange Hue to strengthen its orange tint.
Step 7: Using Silhouettes To Create Interest
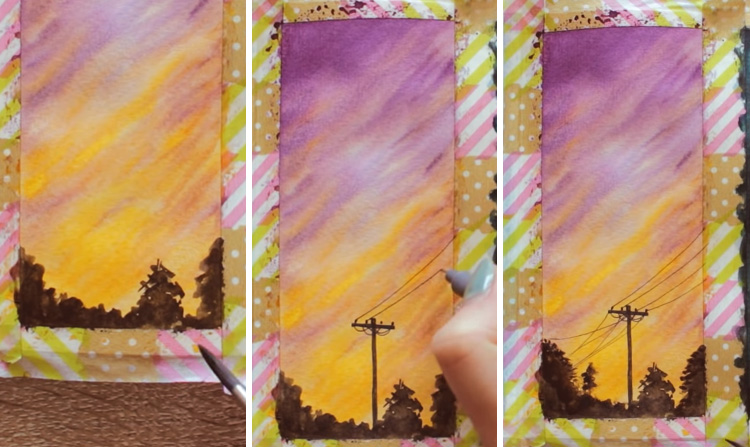 It's time to finish off one of these 3 easy painting ideas! First, load up your no. 6 round brush with Burnt Umber. With the tip of your brush, add some tree silhouettes rising up from the bottom of the sunset painting. Use the wet-on-dry technique for this (i.e. adding wet paint to a dry surface) to give the trees a good, textured edge. Next, take your Pigment Liner (or any black fineliner) and draw in a power line with thin cables that stretch all the way out of frame. Be sure to draw the cables in the same diagonal slant as the sky to create harmony in your painting. Use a no. 2 round brush loaded with Burnt Umber to darken the silhouettes - and there you have it! You've just picked up some watercolor techniques to help create interesting silhouettes!
Step 8: White Inky Stars
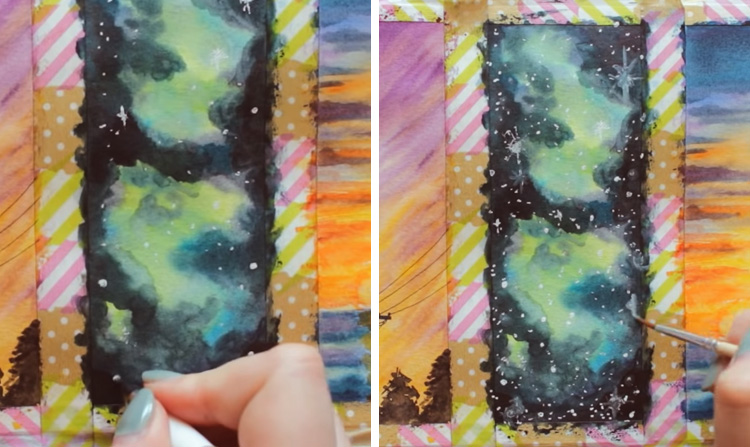 Let's finish off that nebula! How, you ask? Why by using a white gel pen, of course! Use the white gel pen to add white dots to the sky, concentrating most of them along the darker sections of the painting. You can add bigger stars by drawing them in an asterisk shape. Here's something that can add extra fun to this painting: use your no. 2 round brush loaded with water to blend out some of the white ink. This will give the stars an interesting, faded look that can add depth to this magical scene. Now hang on to your brushes for a bit longer because there's one more step to share!
Step 9: Polishing off an Ocean Sunset
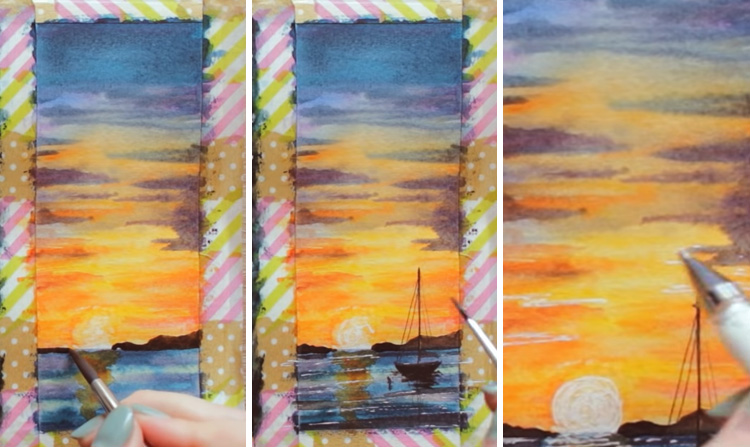 Are you enjoying these watercolor techniques? We hope you are, because now it's time to combine everything you've learned! To finish off this ocean sunset, pick up Burnt Sienna using the no. 2 round brush. Next, add distant island silhouettes along the horizon and the islands' reflection to the water. Make sure the islands and shadows don't cover the sun and its reflection in the water. Next, take your Pigment Liner and draw out the shape of a sailboat in the right section of the water. Draw the mast and ropes, then block in the body of the boat with more Burnt Sienna. Do the same for the boat's shadow as well. Finally, use the white gel pen to add highlights to the water, boat, and sky. Once all 3 paintings have dried completely, carefully peel off the tape from the watercolor paper. Hurrah; you're done! We hope you enjoyed learning these beginner watercolor techniques! If you'd like to watch Mako at work, here's her video:


