If you're stuck on what to paint, why not try this tutorial featuring a watercolor wharf in Marshall, California? Award-winning artist William "Bill" Dunn shows how to tweak a photo's composition, and which colors to use to make a painting look better. Want to watch the video version? The full tutorial is available to members of our Beeblys WatercolorPainting.com.
Materials Used In This Watercolor Class:
- Reference picture of a wharf in Marshall, California (click here for Bill's picture)
- A block of Arches rough watercolor paper (140lb, size 10″ x 14″)
- Pentel Graphgear 1000 automatic drafting pencil, 0.7mm lead size with 2B lead
- ¾" Artist's or masking tape
- Painting palette for watercolor paints
- Auxiliary plate or palette for gouache paint
- A container of water
- Paper towels or a rag
- A tabletop easel or a box to prop your painting on
- A spray bottle with clean water
- Kneaded eraser
- 10" Hyde curved spring aluminum paint shield (or any paint shield)
Paints (Holbein Artists' Watercolors)
- Brilliant Orange
- Pyrrole Red
- Permanent Alizarin Crimson
- Cobalt Violet Light
- Mineral Violet
- Leaf Green
- Olive Green
- Cobalt Green
- Viridian
- Cerulean Blue
- Cobalt Blue Hue
- Prussian Blue
- Indigo
- Yellow Ochre
- Burnt Sienna
- Burnt Umber
- Neutral Tint
- Ivory Black
Daniel Smith's Extra Fine Watercolors
Holbein Artists' Gouache
- Permanent White
Brushes
- Escoda Perla Joseph Zbukvic Series: Round brush (no. 12)
- Escoda Perla Joseph Zbukvic Series: Round brush (no. 20)
- Neef Rigger Supreme Taklon Series: Long handle rigger brush (no. 6)
- Neef Rigger Supreme Taklon Series: Long handle rigger brush (no. 8)
- Neef Rigger Supreme Taklon Series: Long handle rigger brush (no. 12)
- Silver Brush Black Velvet Series 3008: Square wash brush (size ½")
- Winsor & Newton's Cotman Brush Series 111: Round brush (no. 2)
- Winsor & Newton's Cotman Brush Series 333: Rigger brush (no. 1)
- Winsor & Newton's Series 7 Kolinsky Sable: Round brush (no. 1)
- Dynasty Faux Squirrel Brush Series 1827RI: Aux reservoir liner brush (size 8)
- An old toothbrush
Step 1: A "Sketchy", Shifting Composition
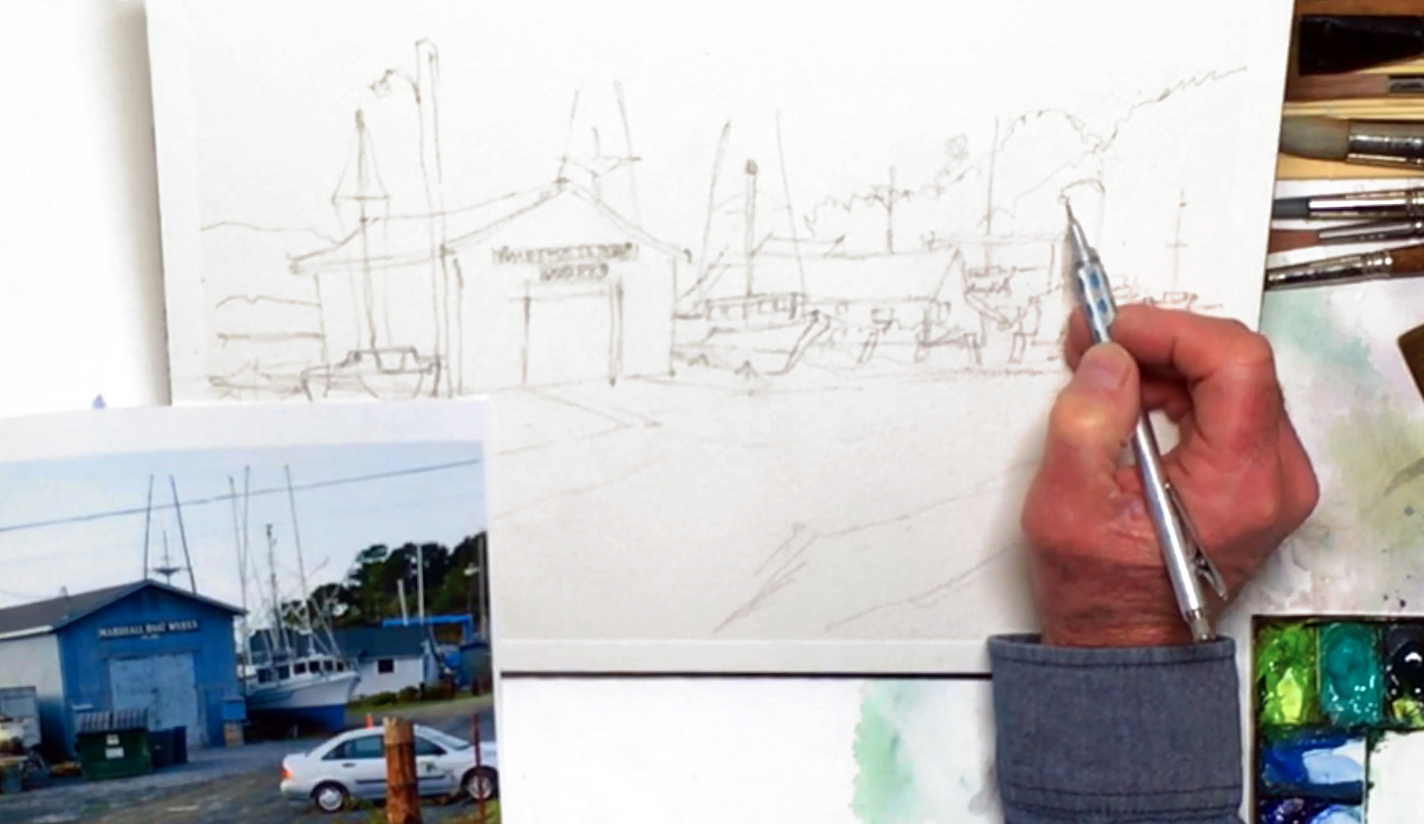 Bill is back with another watercolor idea! This time, a wharf scene from Marshall takes the spotlight. To begin, Bill breaks down the composition of his reference photo. While it isn't bad, he shows how to make it better. A key part is to take out things that aren't important to the painting, such as the trash cans and cars. You should also avoid centering a composition, meaning its focal point (i.e. the blue boat store) should be shifted towards the left. Once the main areas have been mapped out in your mind, tape the edges of your paper block with artist's tape. This will create a clean border around your painting for any future framing purposes. Next, sketch out the wharf, starting with the larger shapes before adding smaller details. While drawing, make the changes you need in order to get the composition you want. Outline the background as well, and take special care when drawing the boats, as their proportions need to be in perspective with everything else. For the buildings, mark off the position of the corners of the roof and walls before connecting them. Curve these lines slightly to make the buildings look less rigid for a "painterly" touch. Be flexible with the angles and sizes of the posts and masts, using the reference photo as a guide and not an absolute. Add other details, and adjust the angle of the road so it looks like it's going off towards the upper right side. Before you finish, step back to check the overall picture, and make any final changes if need be. Below is a close-up of Bill's sketch:
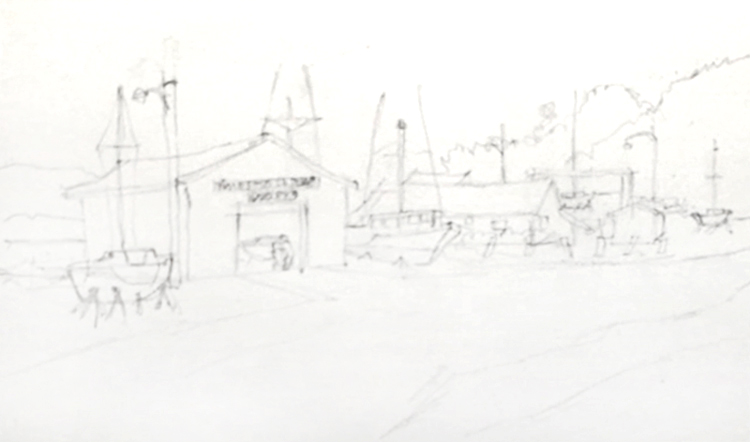
Step 2: The "Wet-On-Dry" Vs The "Wet-In-Wet" Technique
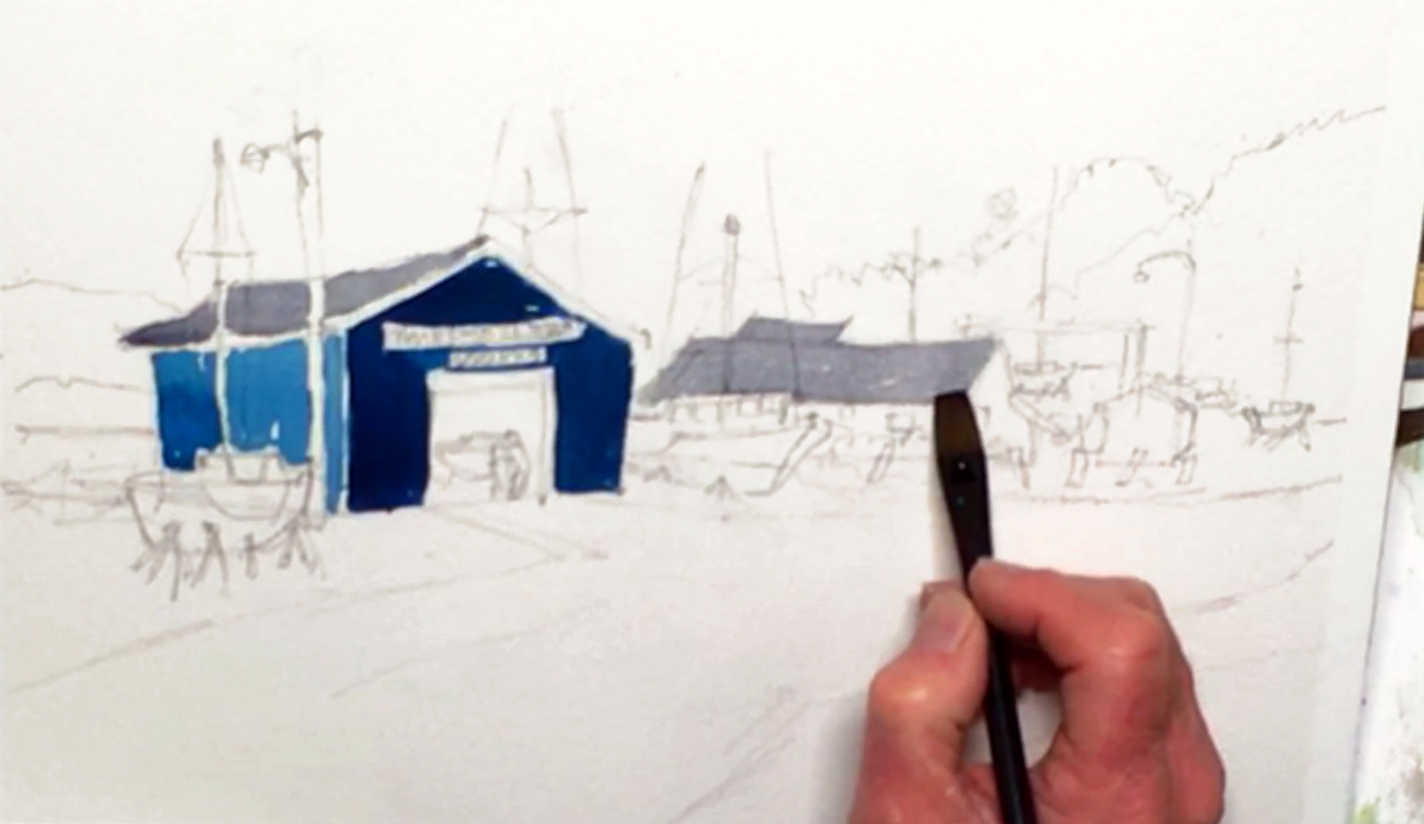 About 10 minutes before painting, spray your paints with water to soften them up. Prop your painting at a 20º angle as well so gravity can help pull your washes downwards. To start, use a no. 12 round brush to mix Cobalt Blue and Green, then paint the left wall of the main building. Use the "wet-on-dry" technique here for a flat but strong color. Avoid the masts and lamppost in front (called "cutting")! Add some Prussian Blue to your mix before painting the front side of the boat store, being careful not to touch the wet paint. Go around the sign and door for now, and leave some white spots showing for texture. Layer some diluted Neutral Tint to the front wall, blending the paint in while it's still wet (called the "wet-in-wet" technique). Switch to a flat brush and paint the roof with Neutral Tint, cutting around the masts and lamppost again. Use the same techniques to paint the roof of the other building as well.
Step 3: On The Road Again
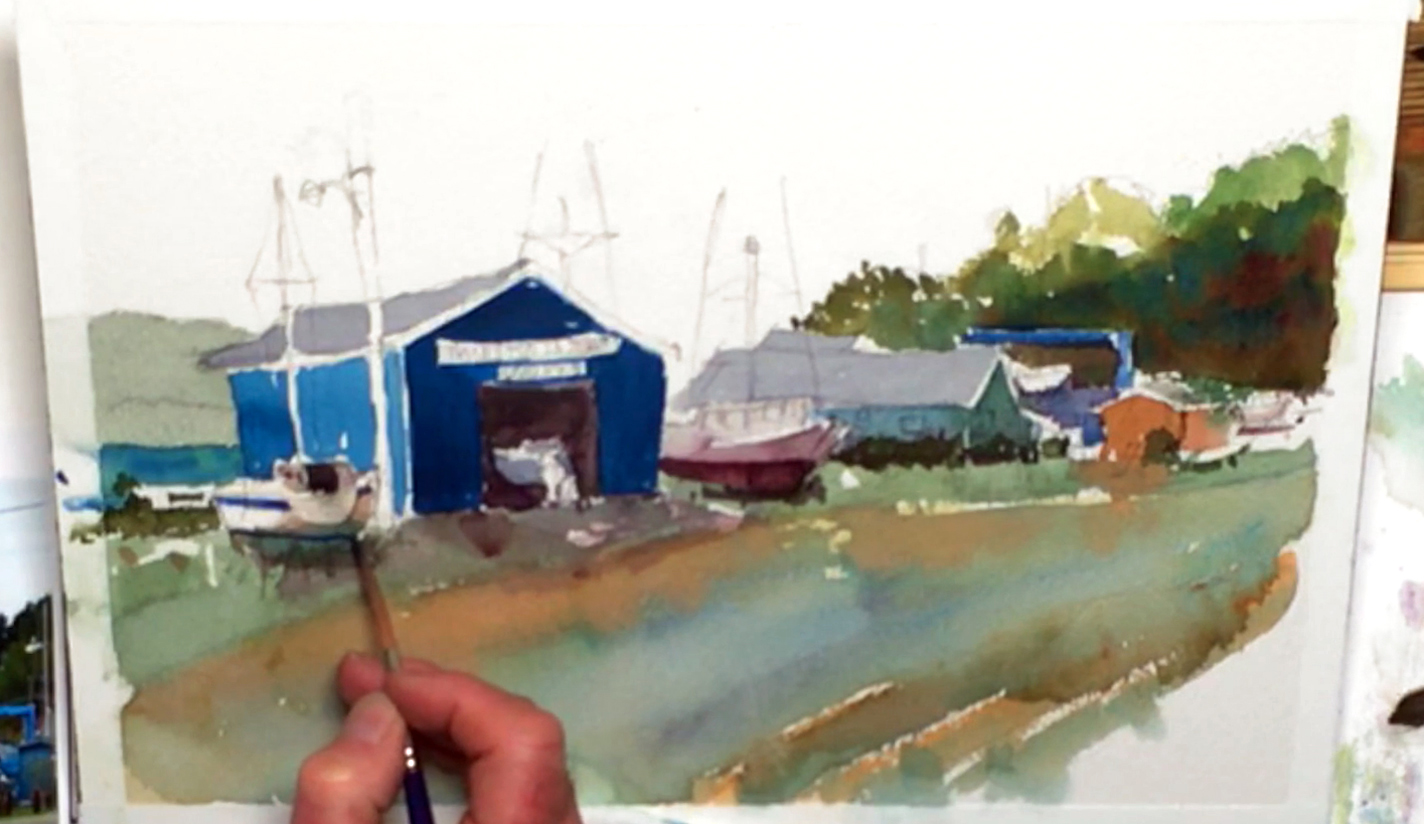
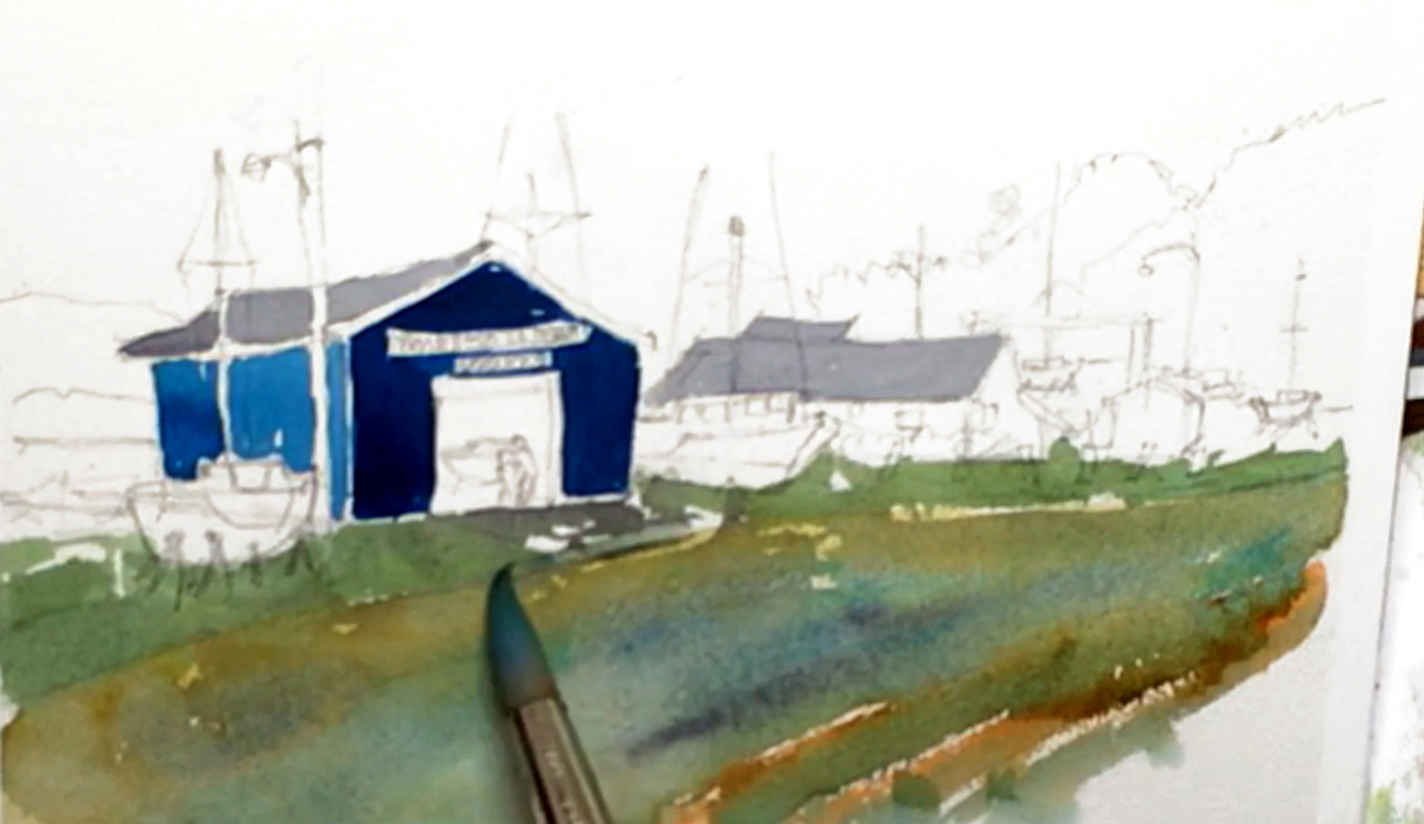 Switch to a no. 20 round brush, adding a lot of Yellow Ochre to your blue mix for a light brown. Paint the road, following its direction with your brushstrokes while allowing the rough texture of the paper to show through your paint. Next, touch in some Burnt Sienna towards the bottom right corner for more of a dirt feeling, and streak some Prussian Blue to this area for a grass feeling. Use Chromium Green Oxide for the grassy areas, then go back to the Neutral Tint for the boat store's driveway and for part of the road. Add Prussian Blue to the previous green and blue mixtures, and streak it in the road as well. Throughout this process, make sure to let some of the underlying layers show through! If the colors get too strong, spread the pigments out a little, or lift them out with a paper towel or rag. You can also use more Neutral Tint to tone down some areas, especially in the lawn section of your watercolor wharf.
Step 4: Painting Buildings And Nature
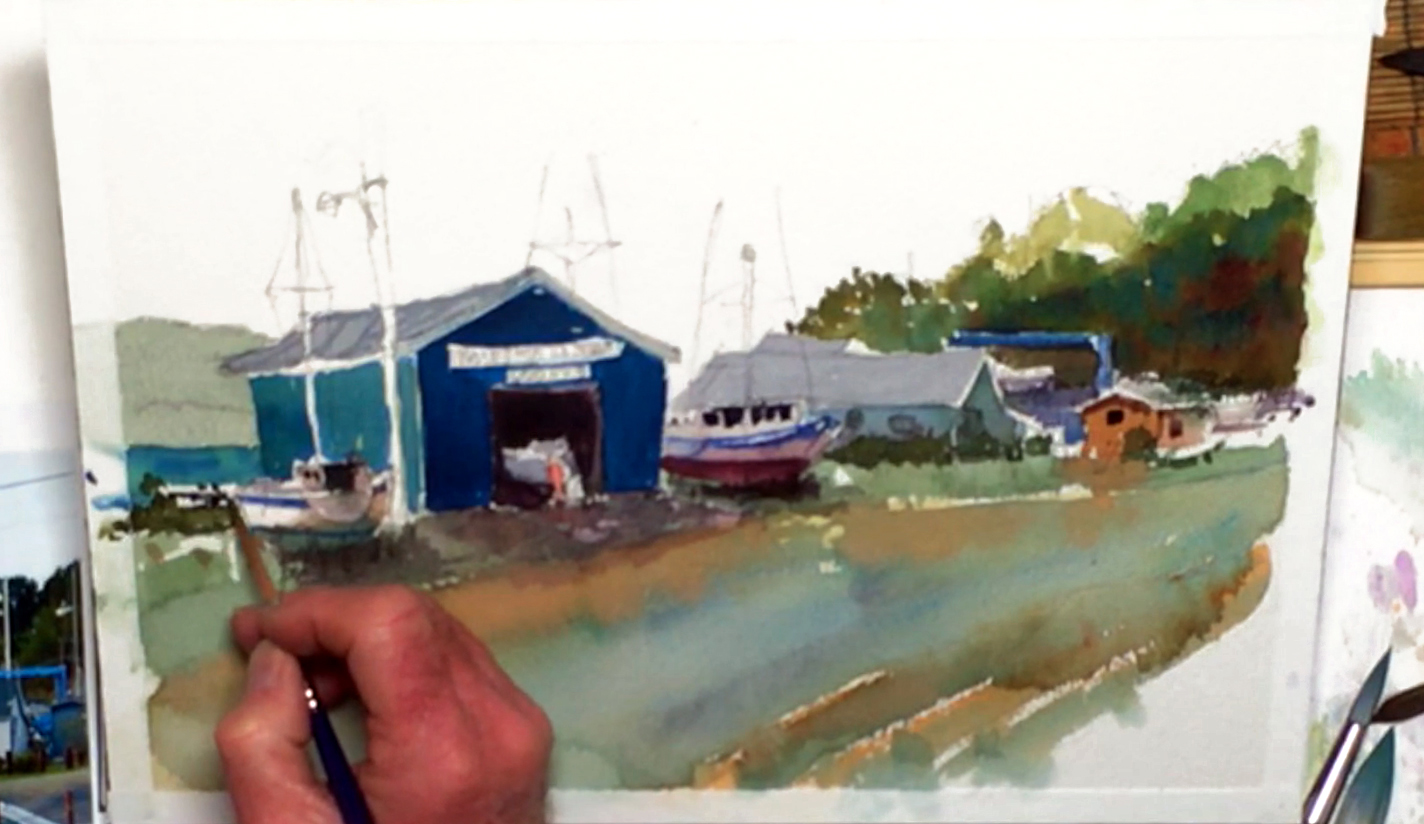
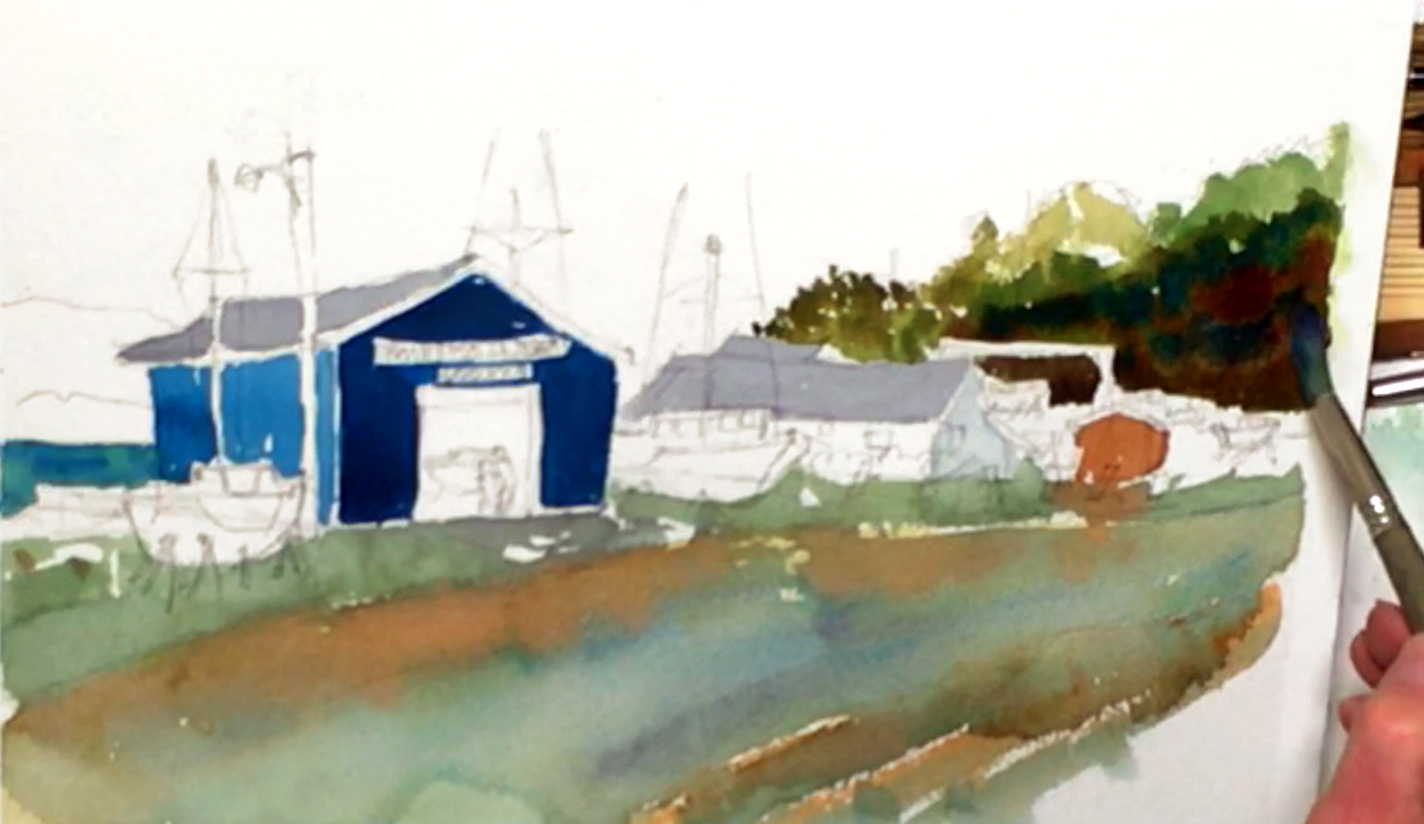 Go back to the no. 12 round brush, then use diluted Neutral Tint for the front wall of the house to the right. Add Brilliant Orange to Neutral Tint for a rusty orange color, and paint the shed to the right of the house. Use this orange to glaze some of the road as well, streaking it in for more texture, and to help harmonize the colors in your watercolor wharf. Next, use Cobalt Green for the sea in the background, then drop in some Cobalt Blue while it's wet. With a mixture of Chromium Green Oxide and Yellow Ochre, paint the trees in the background to the right, brushing quickly to capture their essence rather than painting every individual leaf and detail. Leave some white spots showing for definition, then drop in a darker green using saturated Green Oxide for the rightmost area. Darken your mixture even more by adding Olive Green, and paint towards the front area of the trees for more depth. Drop in Carbazole Violet directly on paper to create very dark shadows among the forest, then switch back to a stronger Green Oxide for the middle area. You can use Cobalt Blue as well for a variation in tone, but don't overdo it as the base color should still be green.
Step 5: Mountain Range And Shadows
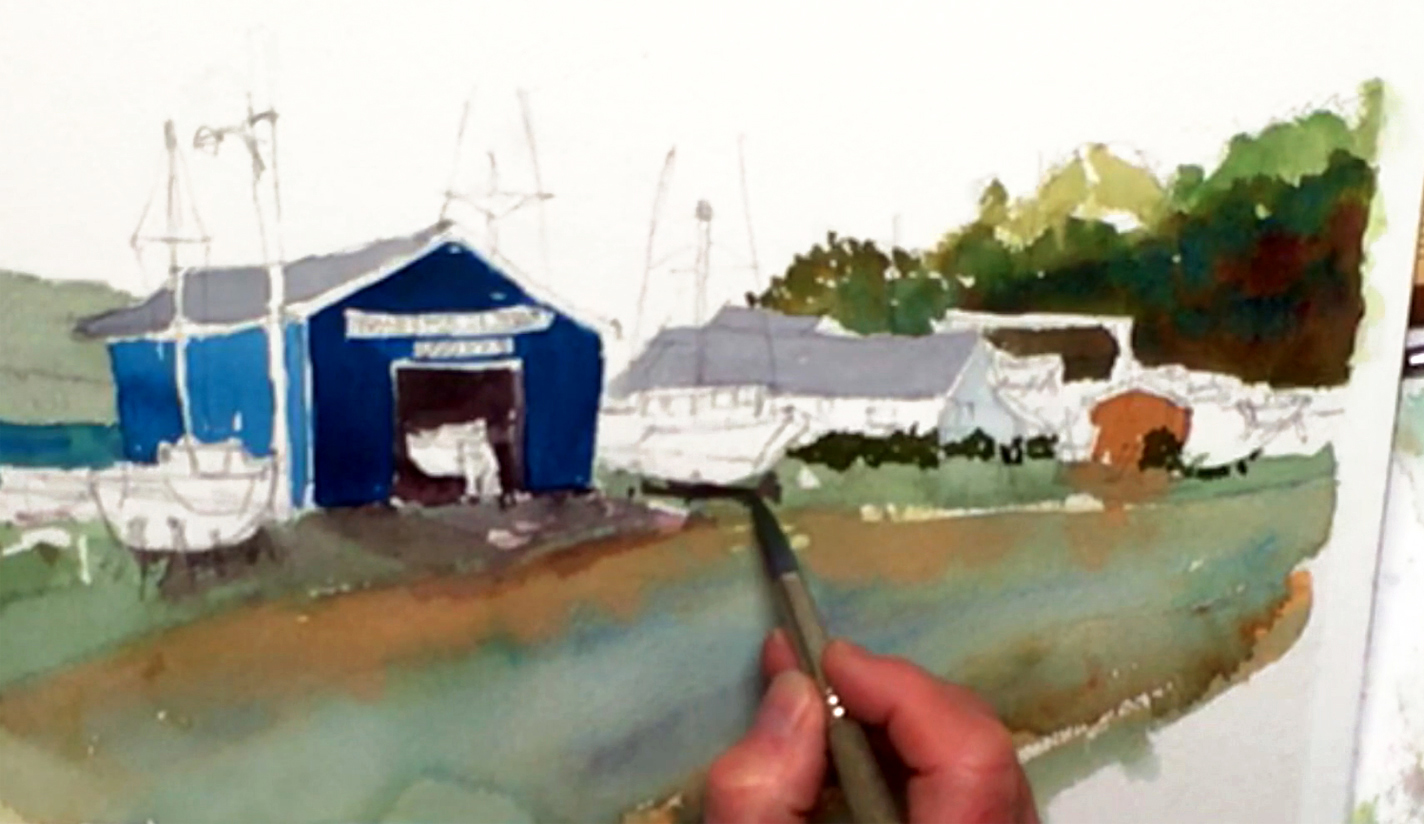 For the background mountains, dilute a mixture of Chromium Green Oxide and Neutral Tint for a "faraway" look. Next, mix Permanent Alizarin Crimson, Chromium Green Oxide, and Viridian for a rich black, and use this to paint the interior of the boat store. Avoid the people and the boat inside, then dilute the mixture before touching some in for the door post. Use the diluted mix to add shadows under the boats and store, and mix Viridian with Olive Green to paint some bushes around the other buildings. Remember that you're not looking to be 100% accurate, and that it's more important to get a good composition for your watercolor wharf!
Step 6: Adding Boats To A Boatyard
 Go back to the Neutral Tint, then add Cobalt Violet Light, Olive Green, and the rest of the green mixture. Paint the leftmost boat's shadows with this gray color, including the sides, bottom, and interior. Add a mixture of Cobalt Green and gray to the bottom of the boat as an extra layer, then add Carmine to your gray mix before painting the bottom half of the boat to the right of the store. For the house's walls, use a light Cerulean Blue so its "white" wall won't clash with the white boat next to it. Switch to the diluted gray again for the leftmost boat's cabin, then use an even more diluted gray for the boat's shadowed stern. Throughout this process, Bill recommends jumping around the dry areas of your painting to avoid any one area in your watercolor wharf from becoming too saturated with paint.
Step 7: A Quaint Town At The Wharf
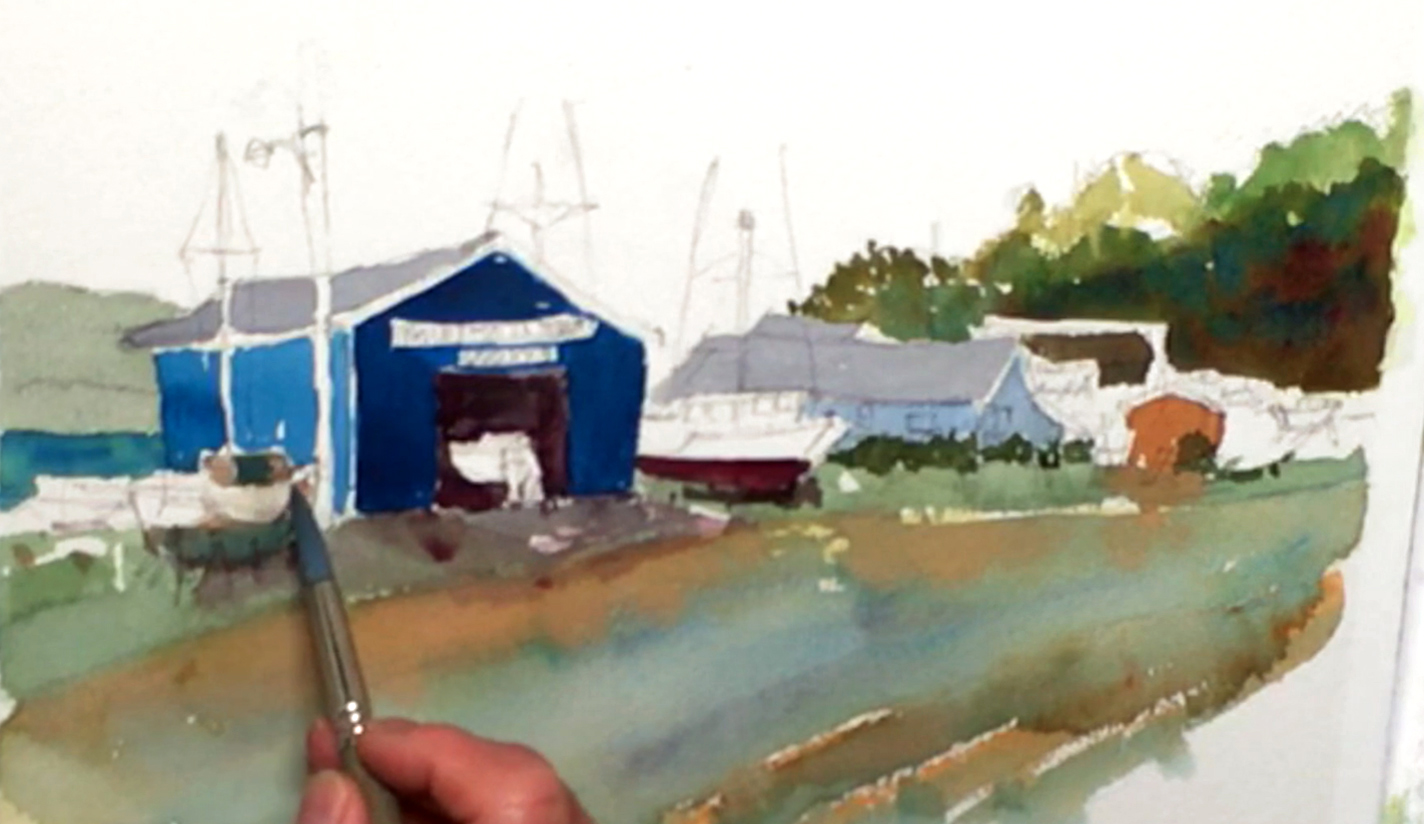
 Change over to a no. 8 rigger brush, and after mixing Neutral Tint and Olive Green, paint the blank area to the very left. Fill this out with the illusion of foliage and a possible boat, and add more of the gray mixture to get a different value. Add more Neutral Tint to the warm gray tones you used for the road, and paint some shadows and details of the red boat next to the boat store. Leave some white highlights for contrast! Next, use Cobalt Blue for the edge of the deck, being careful not to touch the wet paint from before. Mix the red and grays on your palette to paint shapes in the right side background and around the shed to get the feeling of a small town. Keep your values light here, as this background is also in the distance of your watercolor wharf. Use the same color to darken the shadow side of the red boat using the "wet-in-wet" technique (i.e. painting on a wet surface). Drop in more Cobalt Blue to the background buildings as well to make the colors cooler in terms of color temperature, and to tie them to the boat store building.
Step 8: Glazed Shadows And Dry Details
 With Neutral Tint, paint the roof of the shed, then dilute the orange mix from before to paint the shed's sidewall. Brush in some last details in the background buildings, then darken the front of the house with a glazed wash of the blue-green mixture on your palette. Touch in some of your red-gray mixture into the bushes, then add any details with the wet-on-dry technique. Use the gray-blue mixture for the boat inside the boat store, leaving the edge white for some brightness. You can jump around to paint other details in your watercolor wharf scene as well, like windows and boat cabins. When the boats are dry, use Cobalt Blue to paint decorative marks and some windows on them.
Step 9: Roofing And More Details
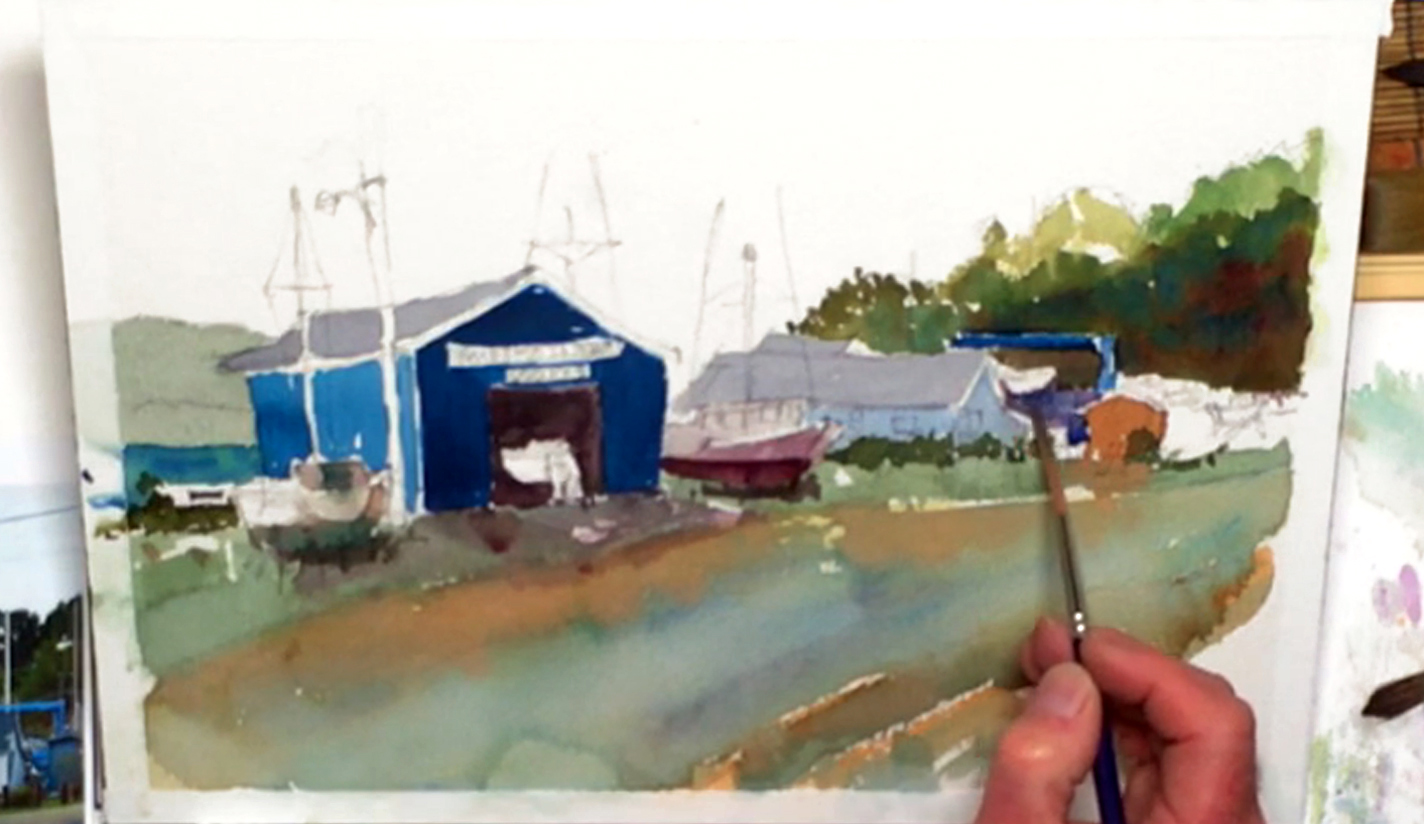
 Next, switch to the no. 12 round brush, and use a touch of Green Oxide to vertically glaze the side of the boat store for the feeling of the wooden planks used to build it. Going back to the no. 8 rigger brush, dilute the gray-blue mix, then add tile lines to the roof of the boat store while making sure to keep it in perspective with the rest of the watercolor wharf. Paint the edges as well to help define the building better. Add Neutral Tint to your black mixture, then glaze this color over the boat store's interior. Dilute this color to make the boats' and store's cast shadows darker, then darken the shadows of the foliage and anywhere else that needs it. This will help suggest where the light source is coming from, and unify the overall look of your watercolor wharf. Keep working on the background buildings, adding more activity via the diluted black mixture. Add other details in the leftmost boat, and if any accidental bleeds happen, lift out the mistake with a "thirsty brush". An aluminum paint shield can also help if you want to create straight lines when lifting. To paint the people, use Pyrrole Red for the shirt, gray for pants, and diluted Yellow Ochre for the skin. This splash of warm color will add a good contrast to the cool colors of your painting, drawing the viewer's eye to the focal point. Lastly, use Ivory Black to paint the windows on the boats and buildings with the wet-on-dry technique.
Step 10: A Quick And Easy Sky
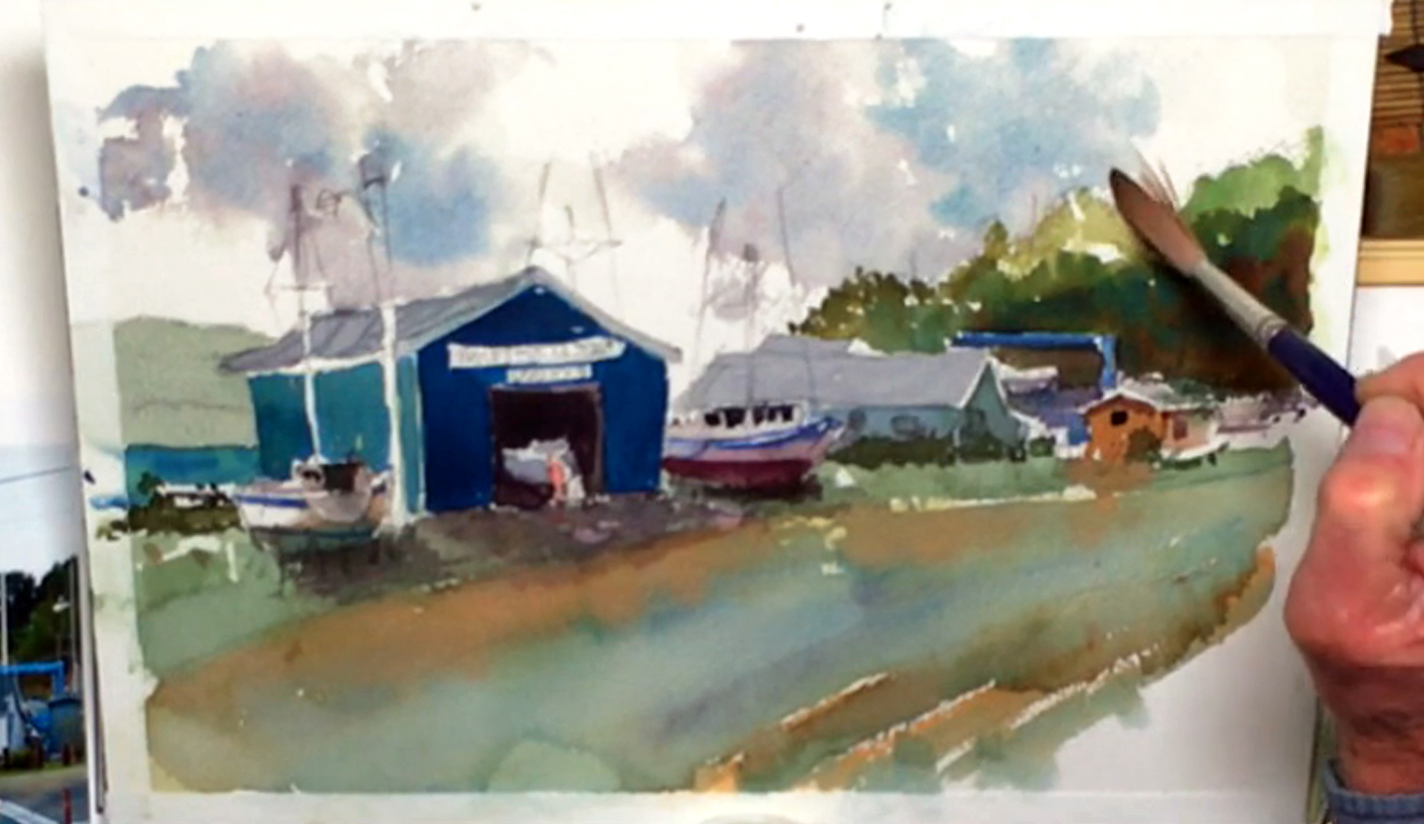 For the sky, use the wet-in-wet technique to give it a soft, blended look. This means switching to the no. 20 round brush and wetting the sky area with water (leave dry patches for clouds). With the no. 12 rigger brush, drop in the diluted black mixture, brushing quickly to make the shapes as random as possible. Avoid the cloud areas, then touch in Cobalt Blue for a hint of cloud shadows. You can bring your sky color into the trees as well for a better overall look to your watercolor wharf.
Step 11: Lettering A Sign
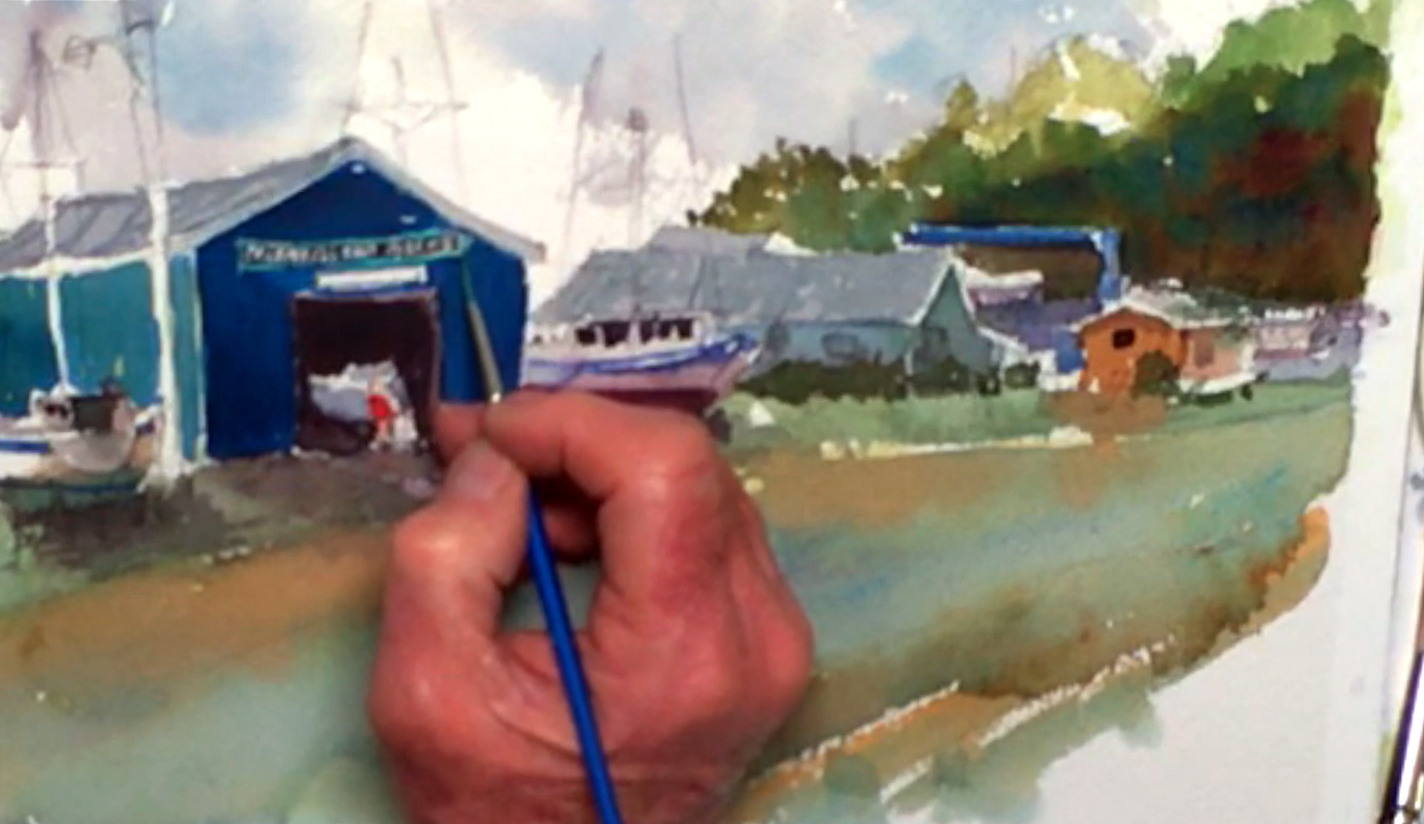 With the no. 8 rigger brush, strengthen the color of the tile lines in the roofs. You can also add a shadow texture using the Cobalt Violet Light and gray-blue mix for the background buildings. Touch up your watercolor wharf as well, but keep the background simple in contrast to the focal point. For the store's upper sign, use a no. 2 round brush and paint a border around it using saturated Neutral Tint and Cobalt Blue. Drop in a touch of Leaf Green as well to brighten this border. Next, carefully erase the pencil lines inside, then letter in the name of the store by painting the negative, thus leaving the actual words white.
Step 12: Painting People And Using Black
 Use the green mix to paint the mountain range's closer layer, then switch to Carbazole Violet to add more details to the background. Add Olive Green to the violet before touching up the buildings and painting lines to depict the planks that make up the wooden walls. With the Neutral Tint mixture, paint in the person next to the red one. Touch up the windows in the buildings as well, using Ivory Black to create more contrast. Try not to use too much of this black though, as it can deaden the colors in your watercolor wharf painting.
Step 13: Grassy Textures And Layers
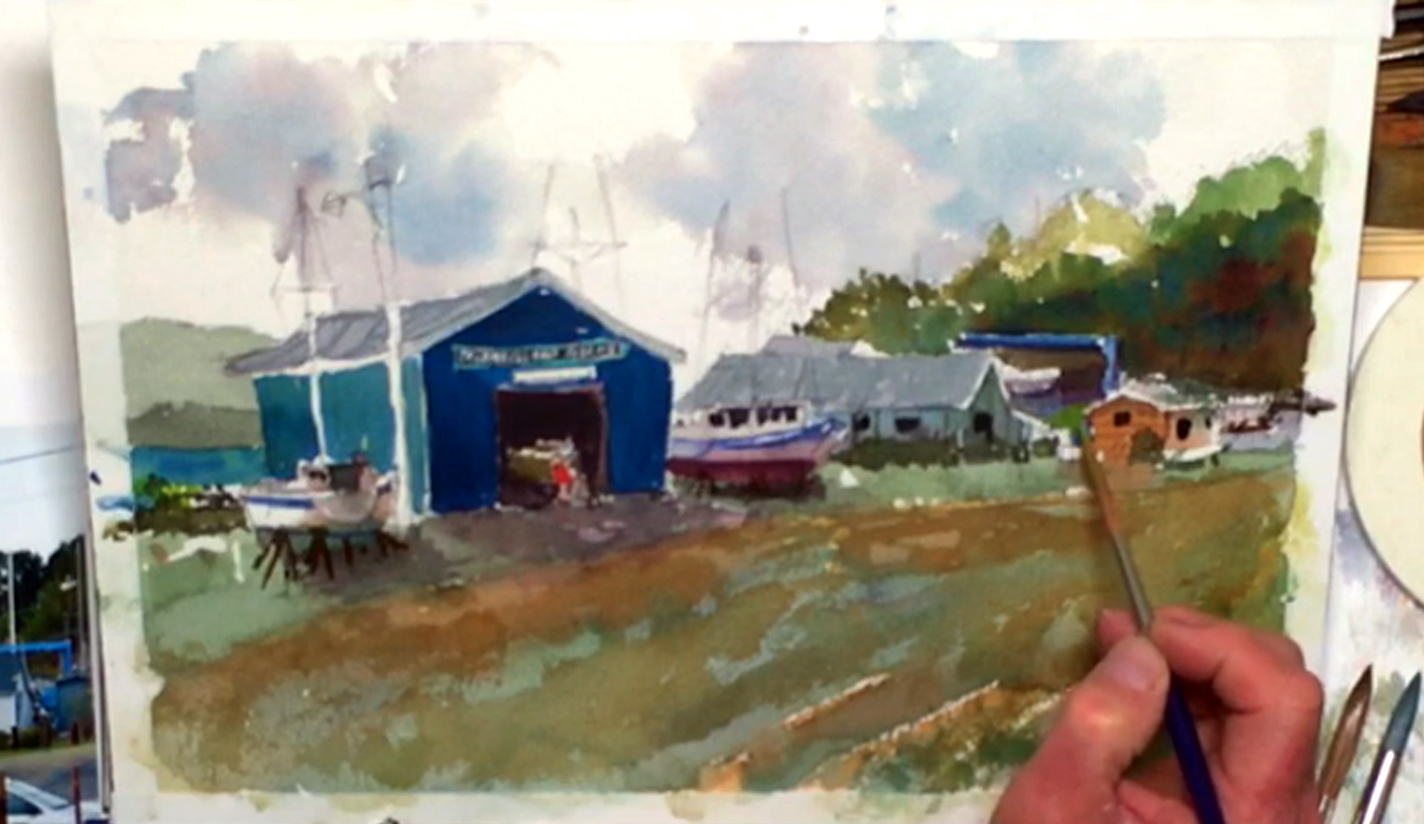 Go back to the no. 12 rigger brush, and with the green-purple mix, add in Mineral Violet, before painting the grass area in the bottom right corner. Touch in Ivory Black to tone down the mixture if needed, and get a grassy texture by banging your brush's bristles on the paper. Add Cobalt Blue and Green to the grass, then Indigo and Prussian Blue for darker shadows on the ground. For more of a dirt color, mix Burnt Sienna and Ivory Black, and streak it into the dusty road of your watercolor wharf. Paint quickly to get a rougher texture, and glaze just enough to create more layers without completely covering up the underlying ones. While the road area dries, switch back to the no. 8 rigger brush, then use your dark brown mix to paint the support racks for all the boats. Don't forget the one inside the boat store! Add shadows to this boat while you're there as well. Lastly, for more of a brighter foreground feel, add some Leaf Green to the bushes that are in front of the house and boat store.
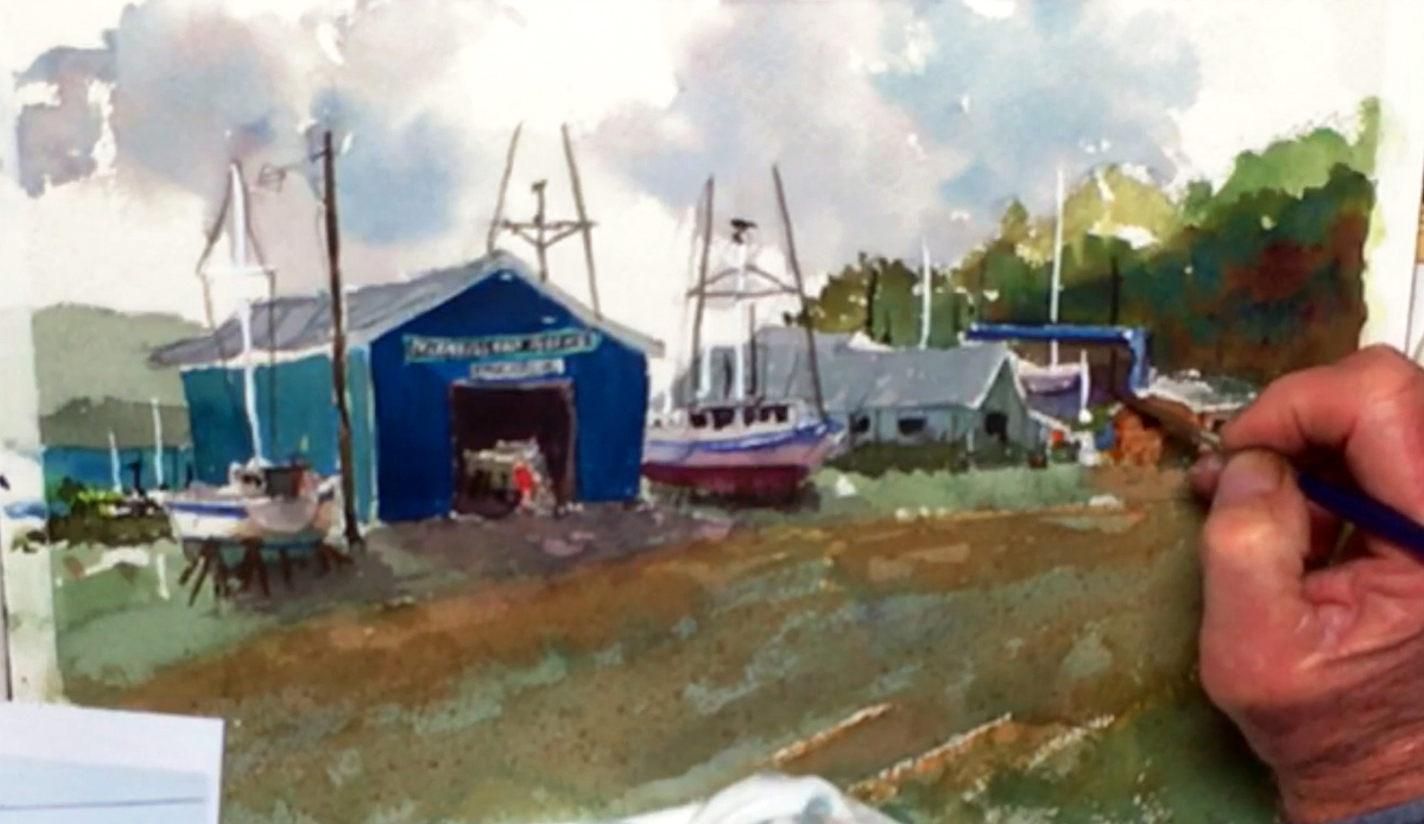
Step 14: Spray It With A Toothbrush
 It's time to add some paint spray! You can get the feeling of little pebbles and gravel on the road using something as simple as an old toothbrush. To do this, use a brush to mix up some Burnt Sienna and Neutral Tint on your palette, keeping it relatively saturated so the paint will show. Then, pick up some of the color with the toothbrush, and run your thumb across the bristles to create a fine spray of paint over your painting. Use your other hand to shield the top half of the watercolor wharf to keep the splatter away from your boats and buildings.
Step 15: Bridging The Gaps
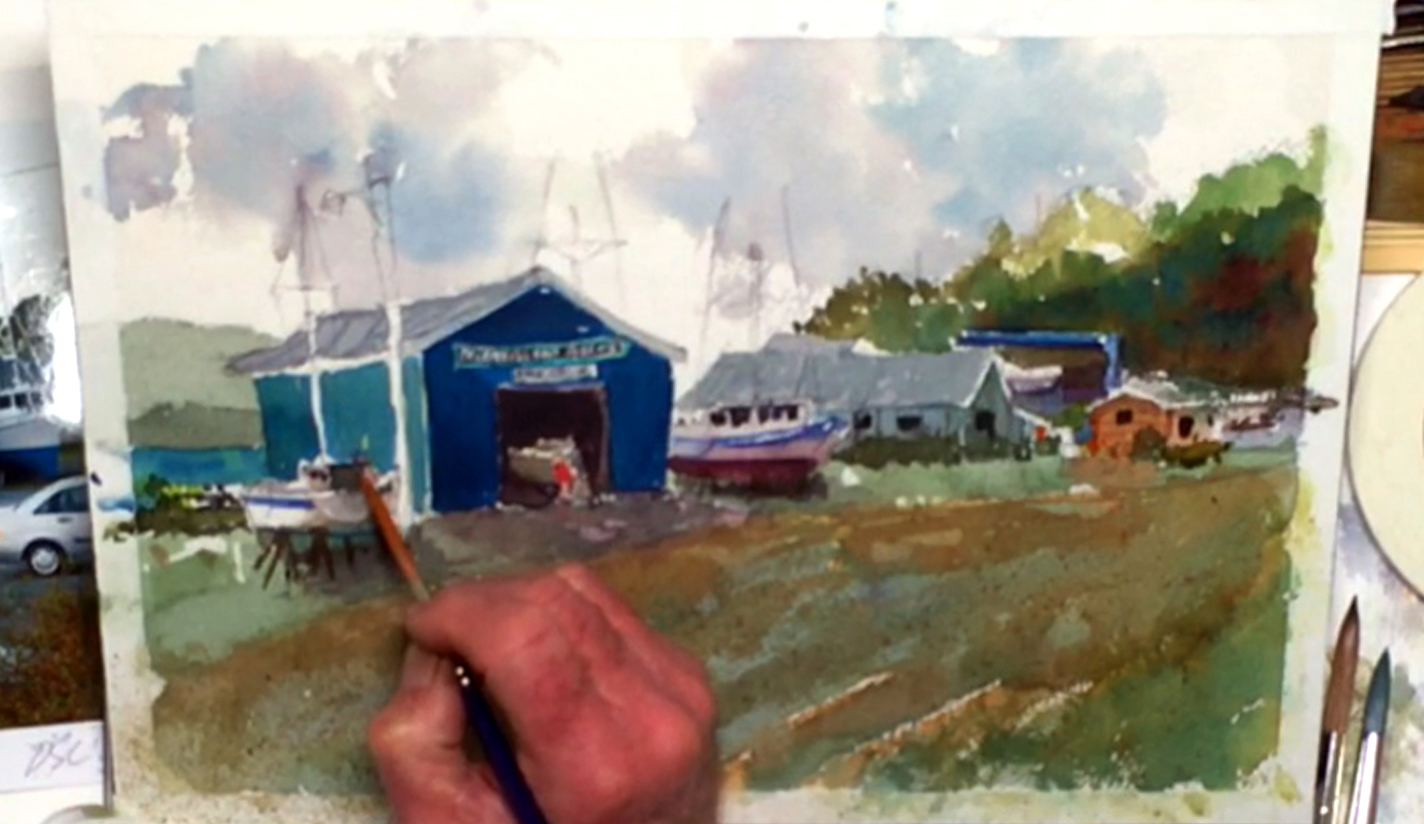 Going back to the no. 8 rigger brush, use your Olive Green mixture to fill in some gaps in the background, and wherever it's needed. Mix Brilliant Orange and Cobalt Blue next to paint some tiny details in the boats for bright spots of color in your watercolor wharf painting. Switch to the no. 2 round brush, and use Indigo to letter the bottom sign on the boat store that says "Established 1964".
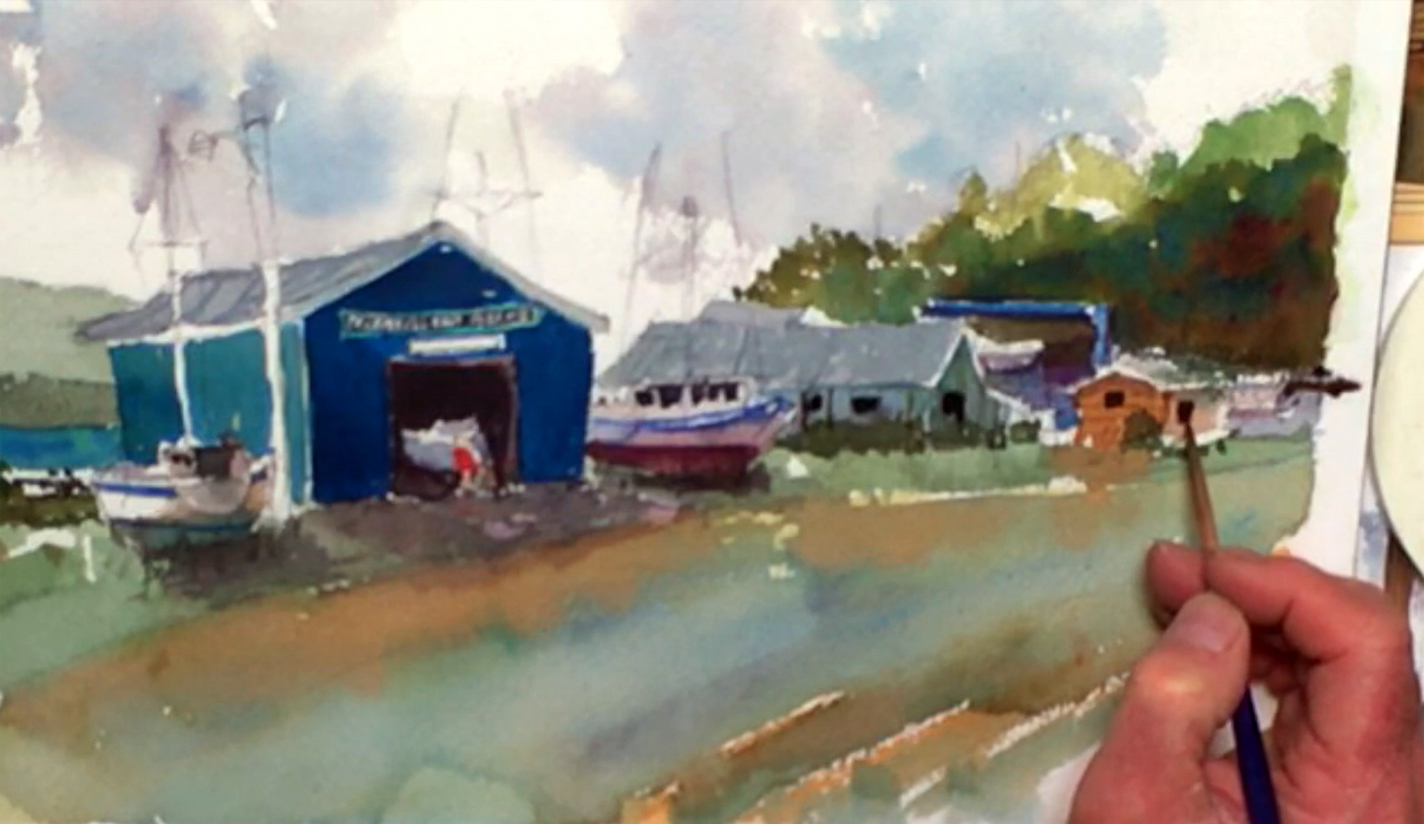
Step 16: Bringing Back The Highlights And Masts
 Squeeze out a little Permanent White gouache paint onto your palette or plate, then with a no. 6 rigger brush, paint a few of the masts in both the foreground and background. Gouache paint is an opaque type of paint, so will show up especially well in darker areas. Paint the masts in different heights and angles for a more natural look. You can also mix Burnt Sienna and Neutral Tint for a few dark brown masts, and to paint the lamppost next to the boat store. While this lamppost is still wet, you can touch in a little Cobalt Blue along its edge for a weathered look. Add Indigo and Prussian Blue to your dark brown mix for even darker masts and rigging details for the boats, using the reference picture to guide you. Again, try not to touch any of the wet paint here, as you want your details to be wet-on-dry!
Step 17: Finishing Off A Watercolor Wharf
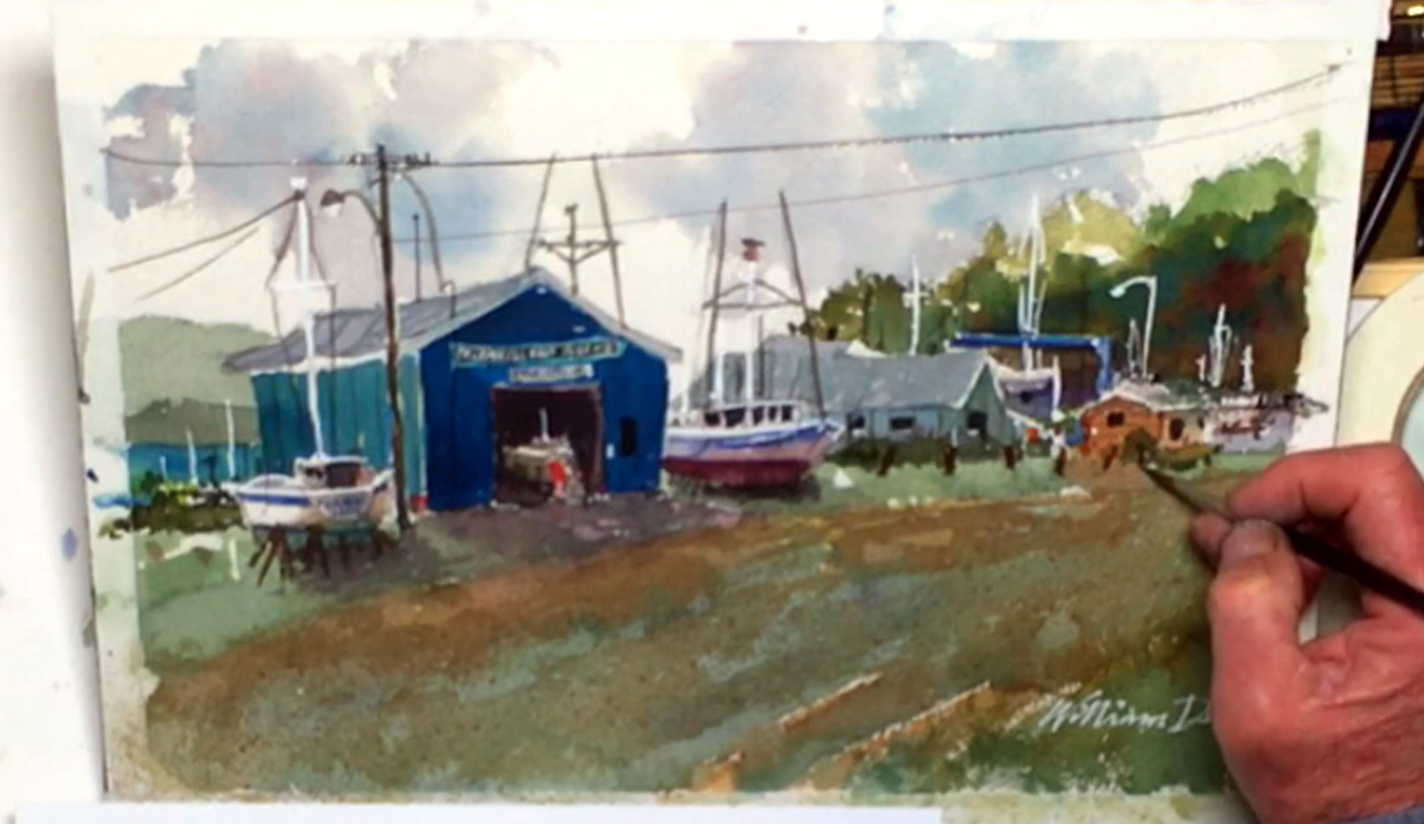 With a small no. 1 rigger brush, use the white to add highlights on the edges of the boats. Remember to add light bulbs in the lampposts as well! Switch to Pyrrole Red to dot some warm, brighter details onto the boats. Next, use Ivory Black and the dark brown mix for chimneys and other roof details on the buildings. To paint electrical wires across the painting, use a reservoir liner brush to get the thin line you need. Make sure to curve the wire across the top of the lamppost before cutting to the other side. Use the dark brown mix here, and go as slowly as you can to prevent the line from "skipping". If it does though, you can carefully go over the same line again with more paint. Paint details on the wire and more for the buildings before adding the finishing touches to your painting. You can do anything from adding Burnt Umber posts to the ground around the house, to painting a name on the leftmost boat. You can even splatter an extra light layer of white for the road area. When you're done, sign with a no. 1 round brush in white, and leave your watercolor wharf painting to dry. With that, you're done! We hope this tutorial has inspired you to keep practicing and painting good compositions.


