Paint the summer sun and summer fun in this lesson featuring a watercolor beach scene from Del Mar, California. Instructor William "Bill" Dunn shows how to use color to capture the warm feeling of the beach, and to properly establish a foreground and background. Want to watch the video version? The full tutorial is available to members of our Beeblys WatercolorPainting.com.
Materials Used In This Watercolor Class:
- Reference picture of a beach in Del Mar, California (click here for Bill's picture)
- A block of Fabriano cold press watercolor paper (140lb, size 12″ x 18″)
- Pentel Graphgear 1000 automatic drafting pencil, 0.7mm lead size with 2B lead
- ½" Artist's or masking tape
- Painting palette for watercolor paints
- Auxiliary plate or palette for gouache paint
- A container of water
- Paper towels or a rag
- A tabletop easel or a box to prop your painting on
- A spray bottle with clean water
Paints (Holbein Artists' Watercolors)
- Cadmium Lemon Yellow
- Brilliant Orange
- Pyrrole Red
- Permanent Alizarin Crimson
- Cobalt Violet Light
- Mineral Violet
- Leaf Green
- Olive Green
- Cobalt Green
- Cerulean Blue
- Cobalt Blue Hue
- Prussian Blue
- Indigo
- Yellow Ochre
- Burnt Sienna
- Burnt Umber
- Neutral Tint
- Ivory Black
- Buff Titanium
- Jaune Brilliant No. 1
Daniel Smith's Extra Fine Watercolors
Holbein Artist's Gouache
- Permanent White
Brushes
- Escoda Perla Joseph Zbukvic Series: Round brush (no. 8)
- Escoda Perla Joseph Zbukvic Series: Round brush (no. 20)
- Neef Rigger Supreme Taklon Series: Long handle rigger brush (no. 6)
- Neef Rigger Supreme Taklon Series: Long handle rigger brush (no. 8)
- Neef Rigger Supreme Taklon Series: Long handle rigger brush (no. 12)
- Winsor & Newton's Series 7 Kolinsky Sable: Round brush (no. 1)
- An old toothbrush
Step 1: A Summery Sketch
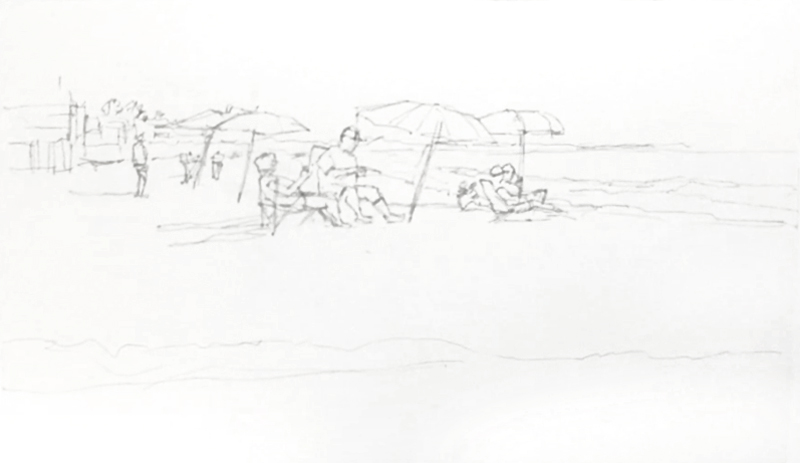
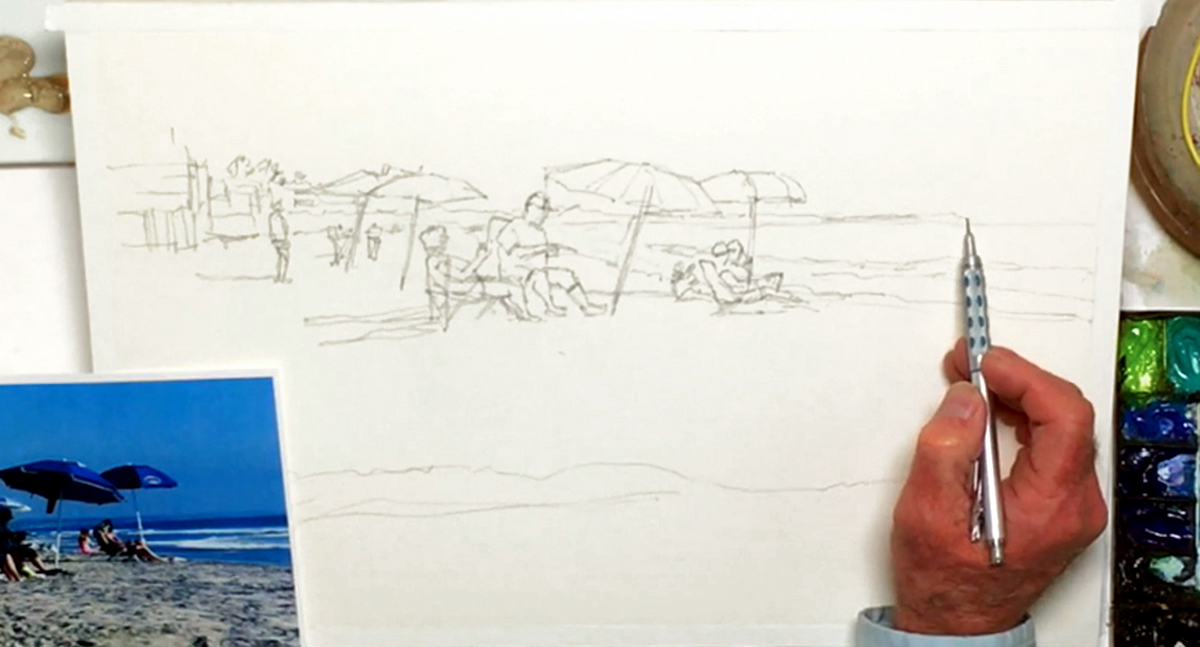 Dive into this sizzling hot tutorial featuring a summer beach scene along the coasts of California! To begin, prep your watercolor block by taping the edges with artist's tape, which will give you a clean white border for any future framing purposes. Prep your paints too by spraying them with water before sketching to soften them a bit. As the composition of the painting is already captured within Bill's reference photo, this will make it easier when sketching, as you don't need to make as many adjustments. So with a pencil, lightly draw in your guidelines, starting with the horizon line before adding large to small shapes. Like the reference picture, try not to center your composition, as this won't be as interesting. Start with the closest figures and umbrellas, going as slowly as you need to get the proportions right. Each person's head size will help indicate how close or distant they are, so make sure all your measurements are taken from there. The positions of other objects like chairs should be relative to the people, while the ocean and background details should be relative to the horizon line. Tweak any details that need tweaking, and remember that objects in the distance should look less detailed. You can also add facial features to the people even if you can't see them in the picture to make the composition more interesting. Adding a little drama is also fine, and when you're done, step back to check the overall look before continuing. Below is a close-up of Bill's sketch:
Step 2: How To Paint Sand (And Footprints)
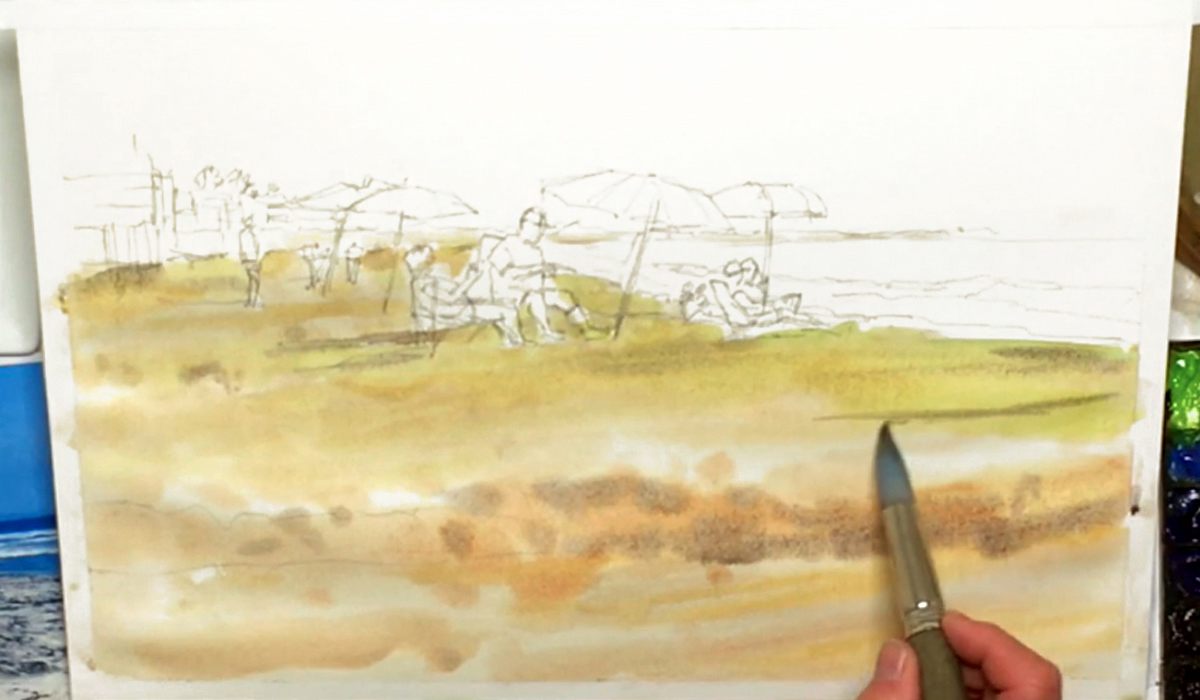 It's time to start painting! Beginning at the beach, use a no. 20 round brush to wet the beach area with clean water. Propping your painting at an angle will help you see which areas are wet, and to prevent liquid from pooling all over. Next, drop in Buff Titanium onto the wet surface, thus creating soft blends via this "wet-in-wet" technique. Since this is just your first layer, it's fine to paint over the shadows and umbrella poles. Just make sure to avoid the figures on the beach! It's also okay to leave in some whites for the lightest areas. Paint the land mass behind the ocean as well, then dab in Burnt Umber near the foreground to make small divots in the sand. Dab in more saturated Buff Titanium towards the back, creating contrast, depth, and texture in your watercolor beach scene. Streak in some Yellow Ochre next, using long, horizontal brushstrokes to mimic the direction of the sand. Next, mix Cobalt Green with a touch of Olive Green to paint along the beach line and around the people. For the deepest footprints and shadows in the sand, use Neutral Tint to add more impact to the beach. If your paint ever starts puddling, you can lift out the excess using a "thirsty brush". In this way, build up your layers to make subtle changes in the beach's color while planning ahead on what colors to use for the rest of your watercolor beach scene.
Step 3: Painting An Ocean With Gravity
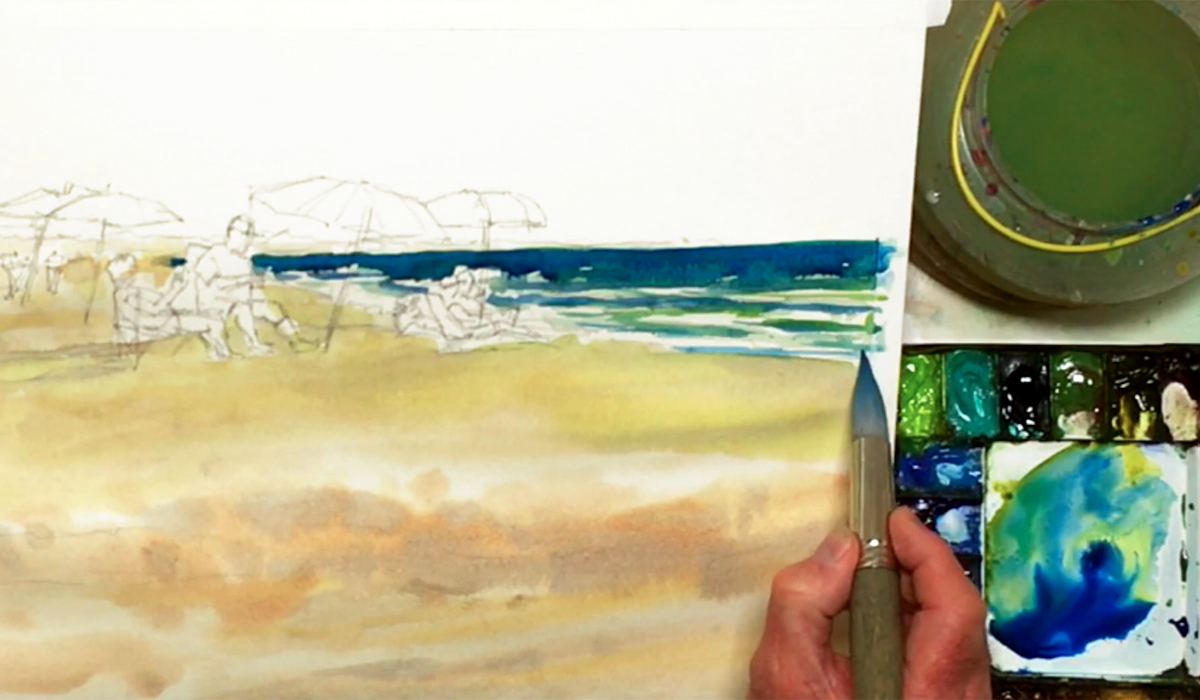 For the ocean, add some Cerulean Blue to the green mixture, then streak in horizontally starting from the horizon line. Use the "wet-on-dry" technique here to get more controlled brushwork, as you'll also need to leave white strips for the impression of cresting waves. Add Cobalt Blue Hue to the mix and make the ocean bluer, saving your whites while allowing the colors to bleed into one another. Leave larger strips of white as you near the shore, then switch to Cobalt Green for a different shade of ocean water. Next, lightly touch in some Leaf Green, then go back to Cerulean Blue so it's not too green. Switch freely between your different blues and greens, preserving your whites as much as possible. Use Prussian Blue to darken the very top edge of the ocean, then let gravity (from tilting your painting) pull this line downwards to blend into the wet paint below. Touch in a little of this dark blue into the rest of the ocean, then switch to a no. 8 rigger brush and lift out some of the still-wet paint in the back part of the ocean for some very subtle waves.
Step 4: Colorful Umbrellas In A Watercolor Beach Scene
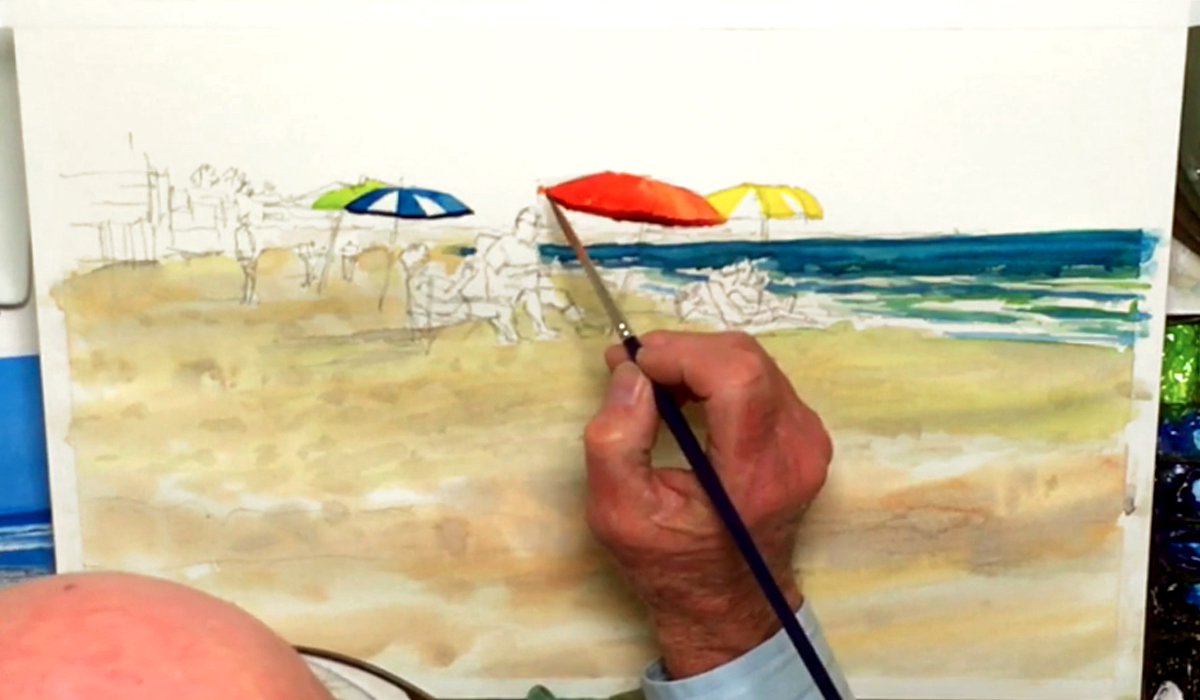 As the sand section should be dry now, use more Buff Titanium for more "wet-on-dry" footprints, and to touch up any areas that look too uniform. Don't overdo this though, as the sand isn't the focus of this watercolor beach scene. Next up are the umbrellas. For the largest umbrella, use Brilliant Orange for its base layer, leaving spots of white for highlights. Then, drop in Pyrrole Red wet-in-wet, with some of the orange showing through on the right side of the umbrella. This helps to indicate where the light source is coming from, which is the top right side. While you could use whatever colors you want for the umbrellas, Bill suggests thinking ahead on which colors would look best for your watercolor beach scene. With that in mind, he goes on to use Prussian Blue for the umbrella to the left, painting an alternating pattern on it for variation. He then uses Lemon Yellow for the umbrella to the right of the red one, also in an alternating pattern. Next is Leaf Green for the one to the left of the blue umbrella. For shadows to suggest the interior of the front two umbrellas, use Carbazole Violet for the red one, and a mixture of Indigo and Prussian for the blue one. Throughout the process, try not to touch any of the wet paint, and come back later to paint any white sections that were left.
Step 5: Mixing And Painting Skin Tones
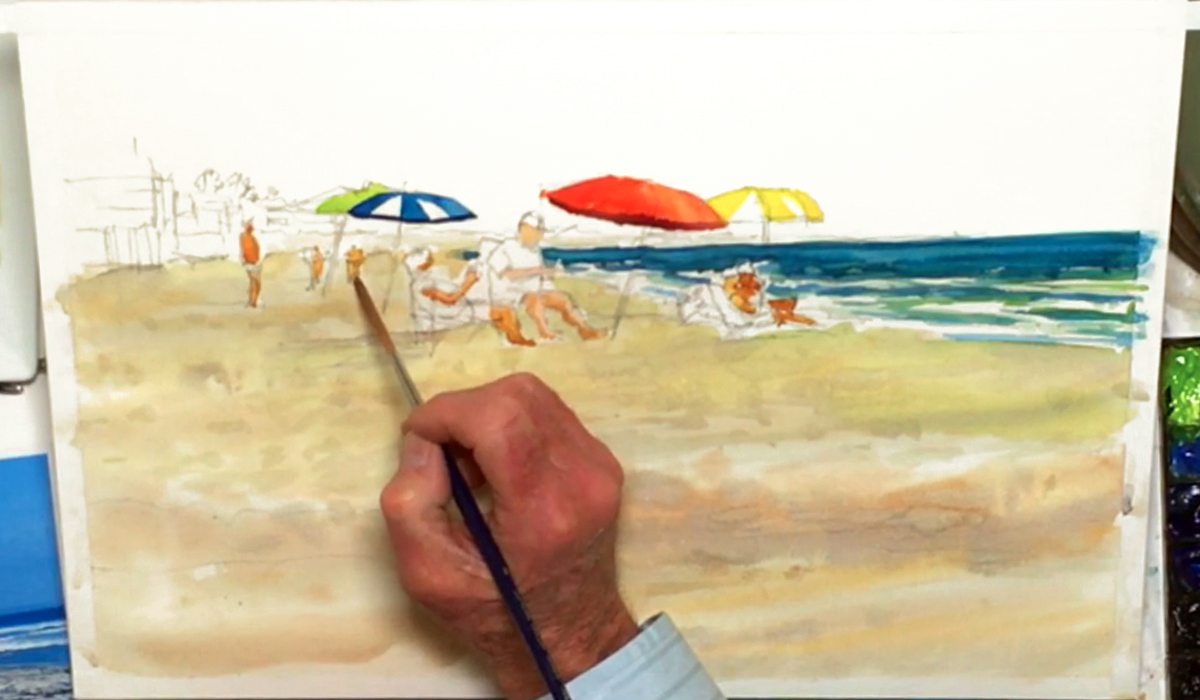 To paint the people, use Jaune Brilliant No. 1 as a base skin tone color, mixing in a different shade for different ethnicities. For example, Bill touches in Pyrrole Red for a pinker Caucasian tone for the man sitting in the painting's focal point. He then adds Yellow Ochre for a more tanned skin tone for the lady sitting next to the first man, and to another man standing on the far left. Through diluting mixtures for lighter skin tones, and adding colors like Burnt Sienna for darker ones, you can play with a variety of tones and use them to paint the rest of the people in your watercolor beach scene. Try not to mix a color that's too similar to the sand though, and test your colors on a piece of scrap paper before using! For those closest to the foreground, you can add shadows onto the body using darker skin tones, especially for the focal area. Remember that the light source is coming from the top right corner, so shadows should go on the bottom left sides.
Step 6: Background Buildings And A Distant Land
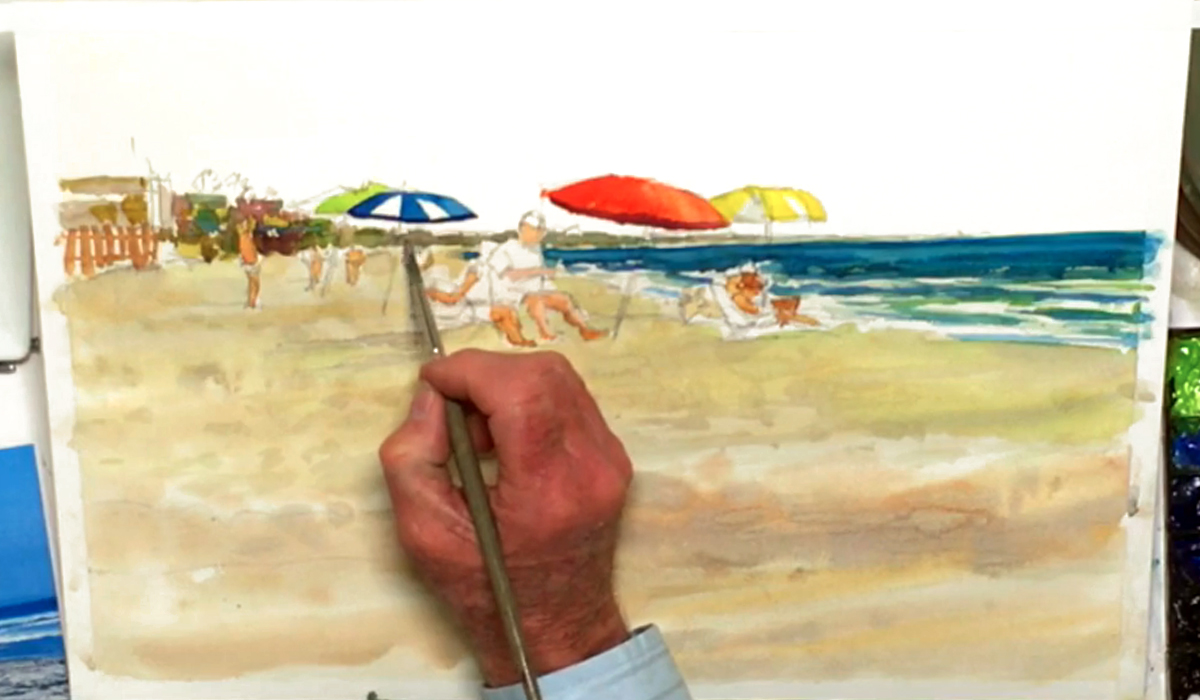 Switch to the no. 8 round brush, then mix Neutral Tint and Burnt Sienna for a brown to paint the buildings. Paint in different brushstrokes to help differentiate between the buildings, and leave some white spaces for other colors. With the turquoise mix left over from painting the ocean, add a few smaller details in the buildings. Use the purple mix next, then mix in some orange for a warm gray tone for even more details. Paint a fence in the left side, but try not to paint any regular patterns, even if the reference photo says otherwise. This will make for a much livelier and dramatic painting. Change to Chromium Green Oxide next, then mix in your browns for a variation in color. Paint an impression of the architecture rather than anything precise, as you're going for a more "painterly" look. As you paint towards the right side, things are getting more distant, so simplify and lighten your details accordingly. Dilute Neutral Tint to paint the land mass behind the ocean, stopping halfway to touch in Burnt Sienna for a more earthy tone, then Chromium Green Oxide for a hint of vegetation. Leave a sliver of white between the land and water for a bit more sparkle. Next, touch in Cerulean Blue to the landmass to harmonize your colors and to carry the color scheme of your watercolor beach scene. Lastly, with Quinacridone Gold, glaze the leftmost building and fill in some of the final gaps within the background.
Step 7: Swimsuits And Other Beach Details
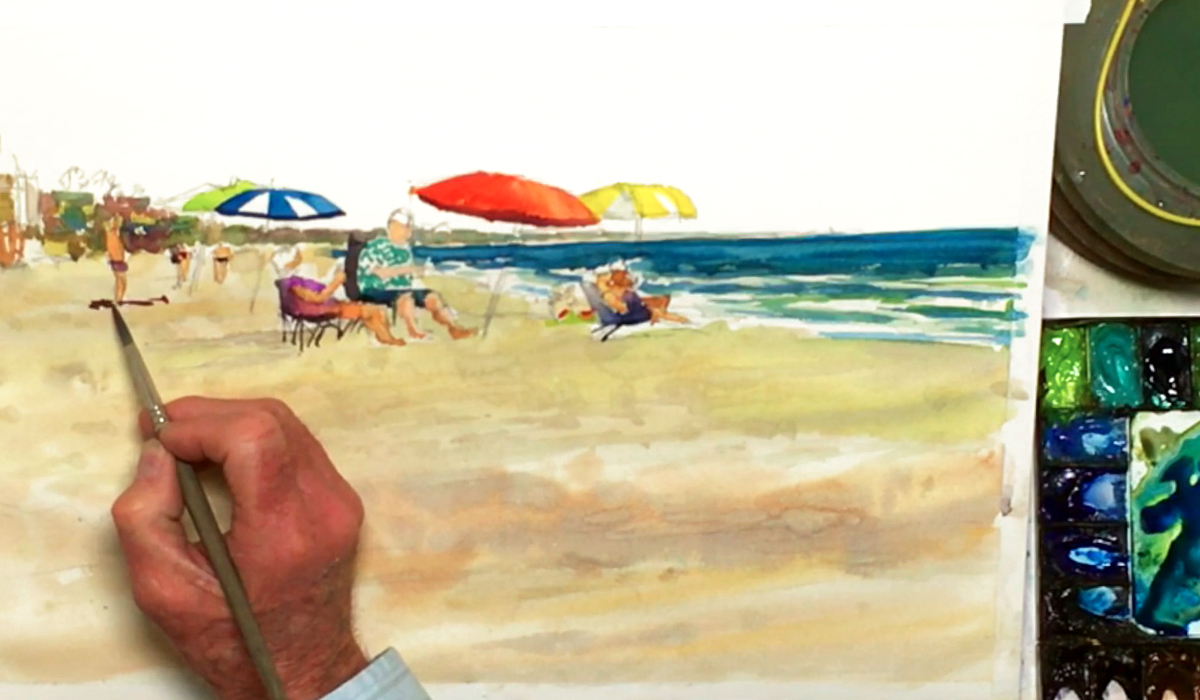 Paint swimsuits and clothing next, using purple for the leftmost person, then Cobalt Green for a squiggly impression of a Hawaiian style shirt for the man sitting at the focal point. Switch to Indigo for his pants. Use Cobalt Violet Light for the lady next to him, while her pants can be orange for contrast. Switch to Prussian Blue for the next guy on the right, touching in a little Cobalt Violet Light so it's not too similar to the ocean's color. Use Carmine for the other people in the background. Again, you can technically use any colors you want for the clothing, but you can use Bill's selections as a reference point. Make sure to use colors you think will look good in your watercolor beach scene! In addition, use the wet-on-dry technique here for these small detail sections. For the chairs, mix Neutral Tint and Ivory Black, being careful not to touch any wet paint from the clothing. Add other details like beach towels as well, again using any colors you want. Lastly, add each person's cast shadow on the beach using the dark blue mixture for the shadows in the back, and the brown mixture for the two in the front.
Step 8: Glazing Shadows And Tweaking The Background
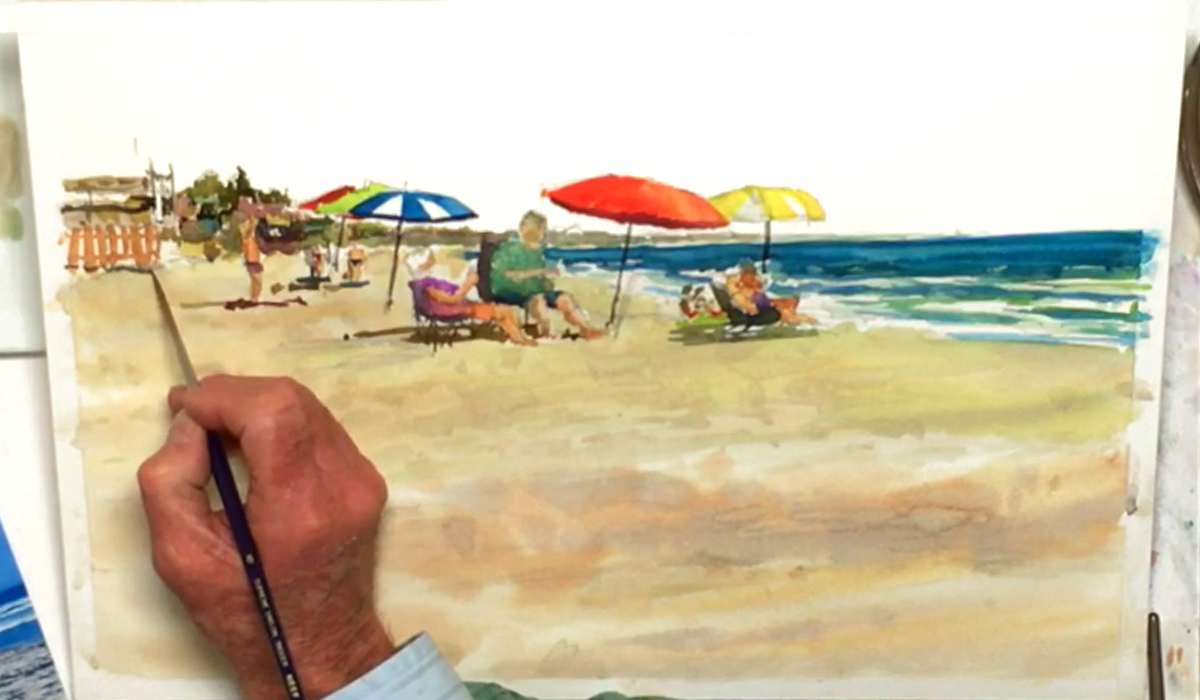 Glaze the man in the focal point with a diluted version of the shadow color to make it look like he's in shadow. Then, paint a stronger shadow under the rightmost person to set his place in this watercolor beach scene. Next, use Olive Green for some trees and foliage in the far distance. Touch up any areas that need more work, such as mixing Pyrrole Red with a touch of Cobalt Violet Light to paint one last umbrella next to the green one. Switch to a no. 6 rigger brush to paint in the umbrella poles using Neutral Tint, being careful here as you only get one shot to paint each pole. Use the same paint to add windows and architectural details to the buildings in the background, then leave the whole painting to dry.
Step 9: Using The "Wet-In-Wet" Technique For A Bright Sky
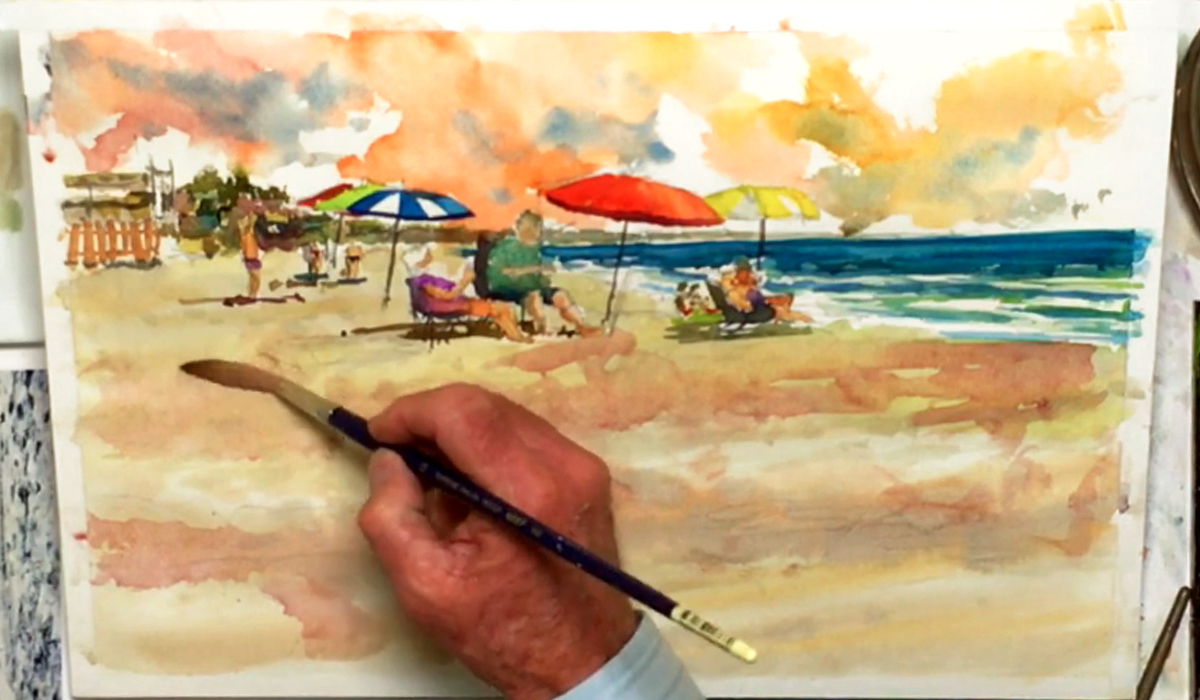 To paint the sky, switch to a no. 12 rigger brush, and wet the sky area with water. Leave some dry areas for clouds, then use the wet-in-wet technique to paint the sky using a mixture of Pyrrole Red, Brilliant orange, Cobalt Violet Light, Carmine, and Permanent Alizarin Crimson. Work quickly to keep the soft, blended effect, adjusting the color ratios as you go so you get a more colorful variation. Add Lemon Yellow and Yellow Ochre toward the right section, and make sure the orange tone isn't too strong, as you don't want to detract from the focal point. Drop in some Cerulean Blue for a shadowed underside for each cloud, but don't add too much or the sky will begin to look stormy. Like with the umbrella poles, you only get one chance to make it look right! Brush some of the red mix and some of the orange mix onto the sand to harmonize it with the sky, and to brighten it so it balances out your painting.
Step 10: Finishing Features And White Details
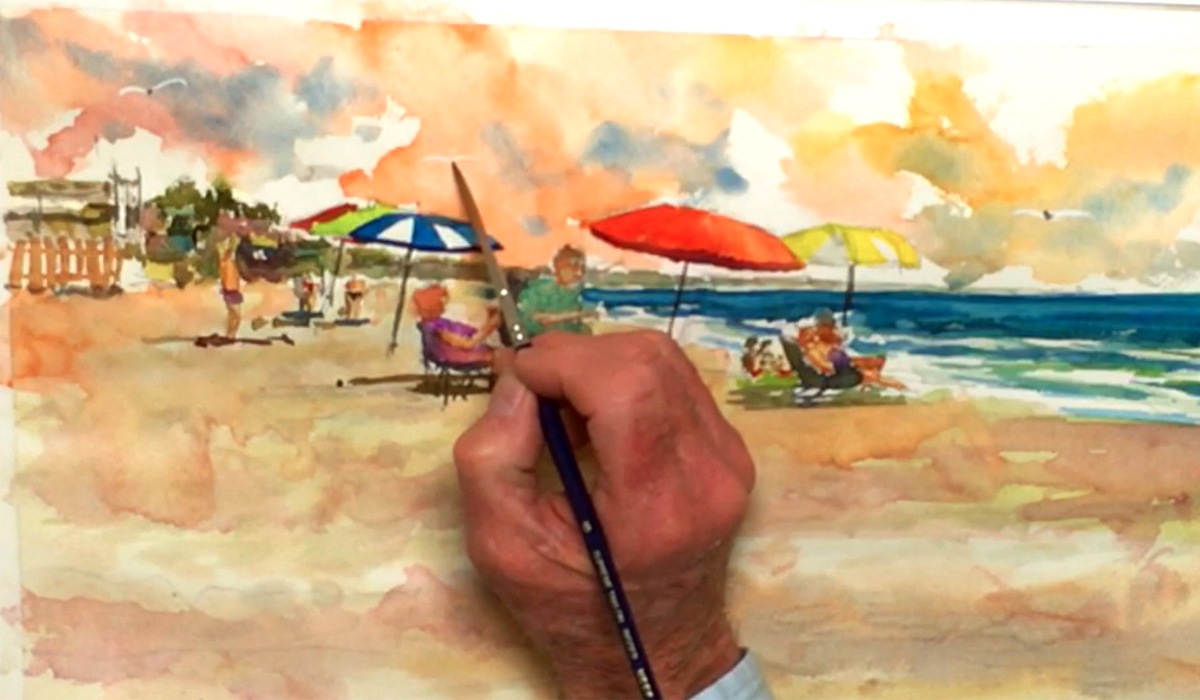 It's time to add some final touches to your watercolor beach scene! As the main area should be dry by now, you can add more features to the people, such as painting in the lady's hair using a small no. 1 round brush and mixing Burnt Sienna with your red mixture. Use the same color to add some facial features to anyone who's positioned near the foreground, and feel free to touch up or add anything that your main area needs. Squeeze some Permanent White gouache paint onto an auxiliary palette, then add some birds in the sky using a no. 6 rigger brush. Since gouache is a type of opaque paint, it will sit on top of your watercolors, making it perfect to use for white details you may have left out. Add a dot of Ivory Black for each bird's head, then lighten this color by dabbing it with a rag or paper towel.
Step 11: A Splatter And A Signature
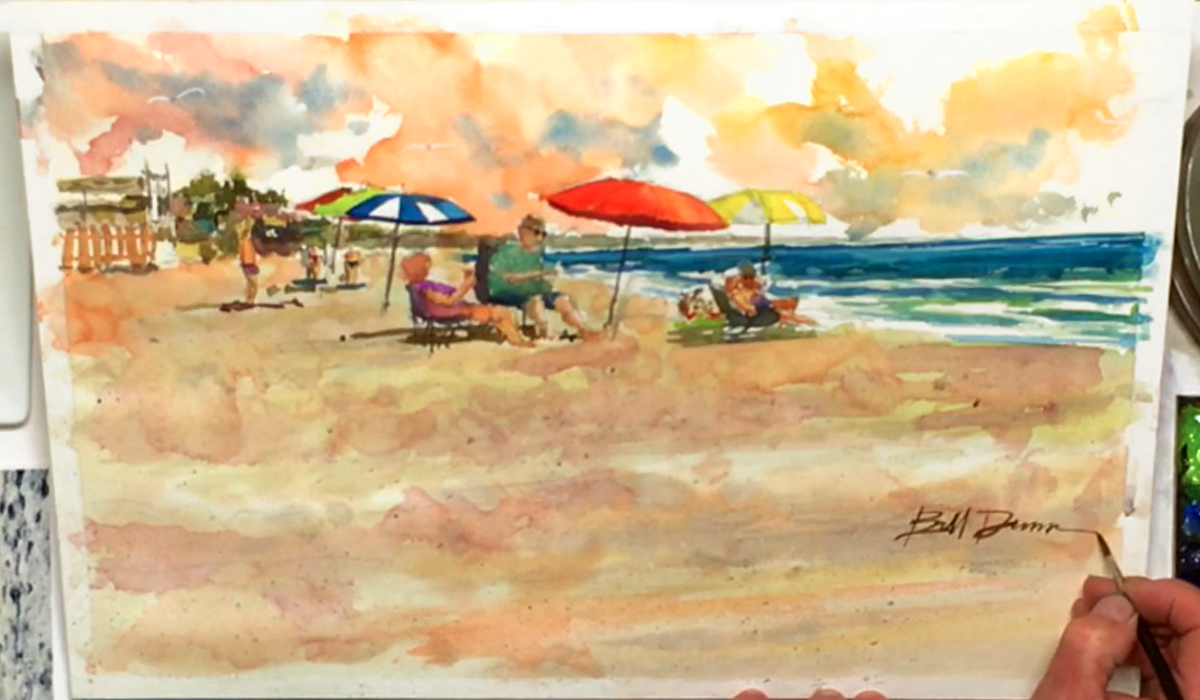 Once the beach is dry, mix some Burnt Umber, Indigo, Ivory Black, and Prussian Blue with your no. 12 rigger brush. Next, pick up some of this dark color using an old toothbrush. While hovering over the beach area, run your thumb over the bristles to create a splatter over the sand. You can hold a piece of scrap paper in your other hand to prevent paint from splattering onto the people. Switch back to the no. 6 rigger brush, and with the gouache white paint, add more surf in the ocean, and paint the horizon line for a brighter feeling. Paint any highlights in the people as well, and for a "summer" touch, use Neutral Tint and the no. 1 round brush to paint sunglasses for some of them. When you're done, sign your watercolor beach scene using a mixture of Burnt Sienna and a touch of Indigo. Make sure to practice before doing this! And finally, gently peel off the tape to reveal the clean white border underneath.


