Hope you're not feeling hungry, as you'll be doing a sweet meringues painting study of Wayne Thiebaud's Meringues! Award-winning artist William "Bill" Dunn focuses on colors and contrasts in this tutorial, and shows the power of layering watercolors. Want to watch the video version? The full tutorial is available to members of our Beeblys WatercolorPainting.com.
Materials Used In This Watercolor Study:
- Reference picture of Wayne Thiebaud's Meringues
- A block of Hahnemühle's Cornwall matt watercolor paper (210lb, size 9.4″ x 12.6″)
- Pentel Graphgear 1000 automatic drafting pencil, 0.9mm lead size with 2B lead
- Painting palette for watercolor paints
- A container of water
- Paper towels or a rag
- A tabletop easel or a box to prop your painting on
- A spray bottle with clean water
Paints (Holbein Artists' Watercolors)
- Cadmium Lemon Yellow
- Gamboge Nova
- Brilliant Orange
- Pyrrole Red
- Permanent Alizarin Crimson
- Leaf Green
- Olive Green
- Cobalt Green
- Turquoise Blue
- Cerulean Blue
- Cobalt Blue Hue
- Phthalo Blue (Yellow Shade)
- Jaune Brilliant No. 1
- Brilliant Pink
Daniel Smith's Extra Fine Watercolors
Brushes
- Escoda Perla Joseph Zbukvic Series: Round brush (no. 12)
- Winsor & Newton's Sceptre Gold II Series 303: Rigger brush (no. 1)
Step 1: A Sketch As Easy As Pie
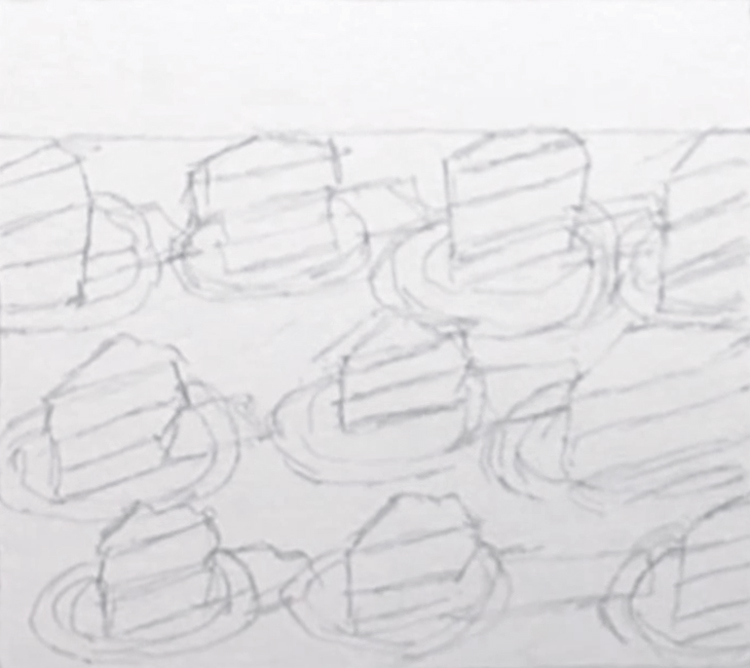
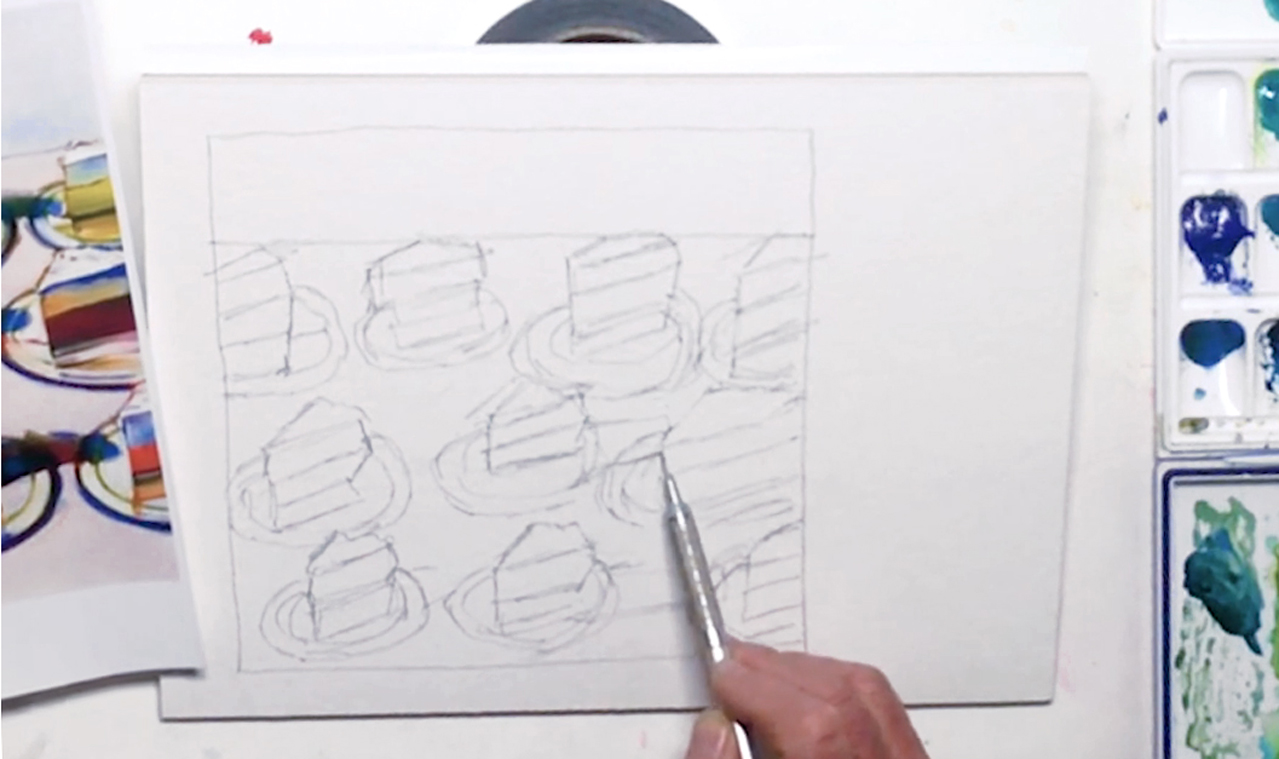 This famous painting study is almost too delicious to paint, as you'll be focusing on Wayne Thiebaud's Meringues. Although originally an oil painting, instructor Bill shows how to translate that to a watercolor painting, with emphasis on color layering and value contrasts. To begin, make sure you have the paints you need on your palette, and set up your painting tools like Bill has in the picture above (switch accordingly if you're left-handed). Next, you can either use artist's tape to tape a border around your painting area on your watercolor paper block, or draw a border that's to scale with your reference photo. This will create a clean white border around your meringues painting study, which will work well for any future framing purposes. When you're done, sketch the meringue pattern, using the reference to help. Draw from large to small shapes, and keep your lines simple, as you can always add details with your paint later. Observe the proportions, perspectives, and distances between each plate of pie carefully, and try your best not to use an eraser as this may damage your paper. Don't forget to add in the shapes of the cast shadows as well! Ultimately, getting a good color study is more important than drawing an exact replica of Thiebaud's work, so don't worry too much, even if some of the lines or proportions are off. Below is a close-up of Bill's sketch:
Step 2: A "Wet-In-Wet" Base Layer
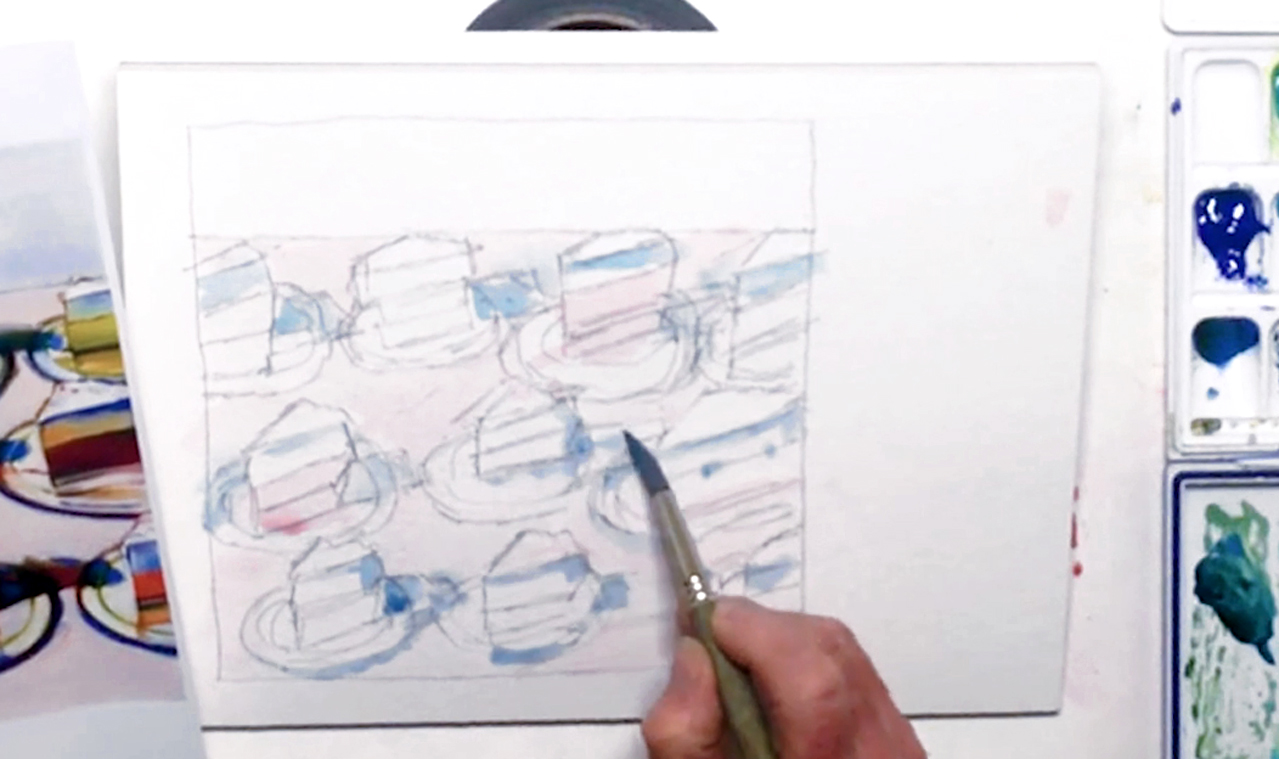 Before painting, prop your paper block at a 30º angle, and spray your paints with water to soften them. Then, use a no. 8 round brush to mix Brilliant Pink with a touch of Permanent Alizarin Crimson, and dilute it so it matches the color of the table in Thiebaud's painting. Bill decides to use the "wet-in-wet" technique here (i.e. wet paint on a wet surface), so he wets the table and any pink areas with water before dropping the pink paint in. You can follow along, and like Bill, you can add Cerulean Blue to some of the plates and pies. Darken the blues with Cobalt Blue Hue, and allow some of the paint to bleed into one another, especially in areas where the cast shadows hit the table. Note that the colors won't be dark enough yet, as you will build them up later with lots of layering. In addition, the balance between warm (i.e. pink) and cool (i.e. blue) colors will help with contrasts too, and keep your meringues painting study as interesting as Thiebaud's version.
Step 3: Adding Lighter Colors In This Meringues Painting Study
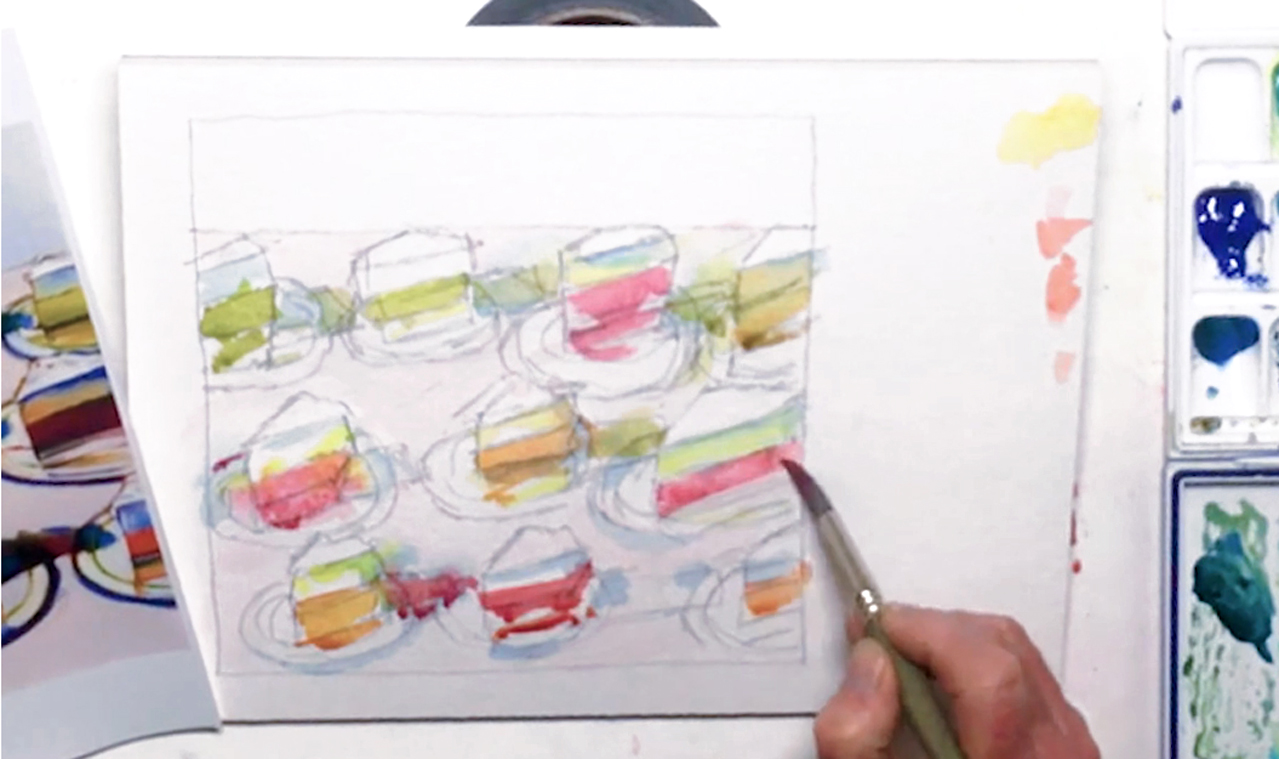 Switch to Gamboge Nova, and drop it where you see yellow or orange in the reference photo. Remember not to add to all of the cakes, as this will make them look too similar! You can switch to Cadmium Lemon Yellow or Brilliant Orange for variation, although you may want to tone down the orange with Alizarin if needed. Next, mix Chromium Green Oxide with Olive Green, and add to a few of the top row of pies. Change back to Alizarin Crimson to paint on top of some of the pink pie layers, and wherever it's needed. You can also use Pyrrole Red for a stronger red color in some parts of your meringues painting study. In addition, note that watercolor paint always dries lighter than when it's wet, so don't worry if the color looks too dark at first.
Step 4: Switching Between Wet And Dry Layering
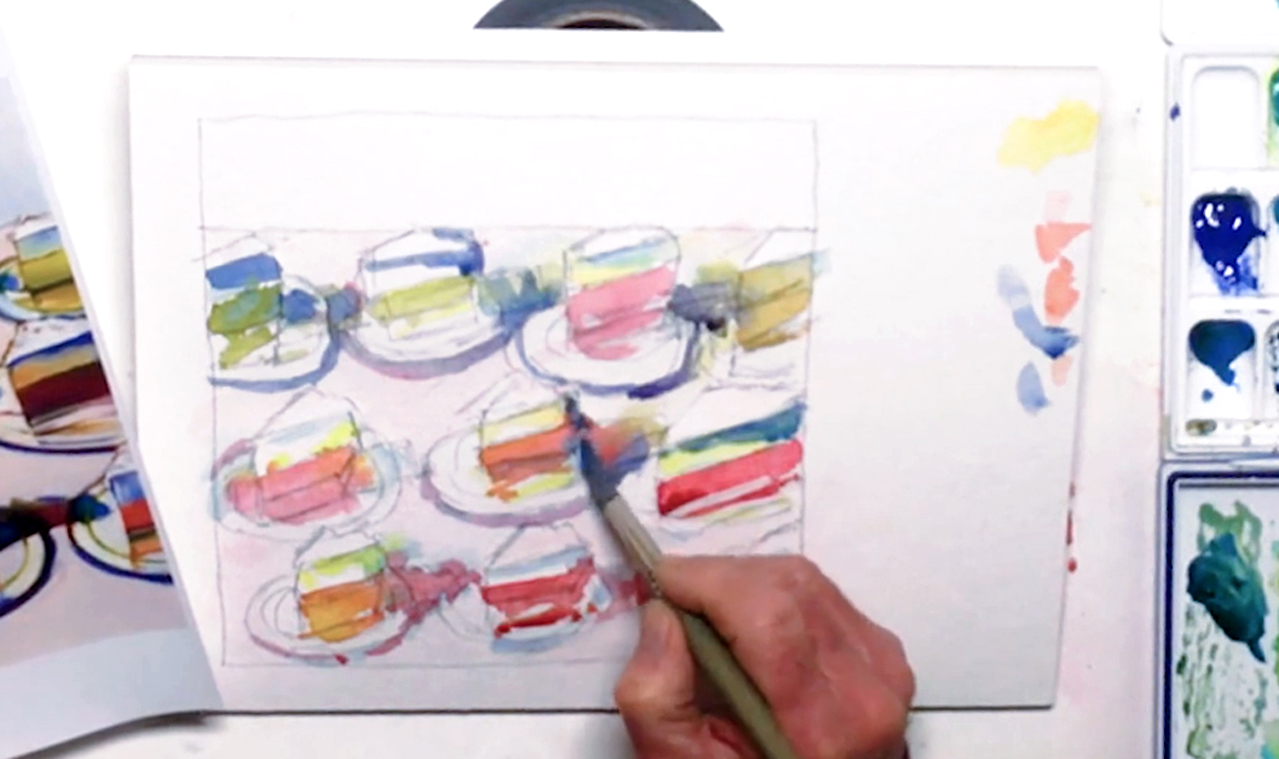 Go back to your Cobalt Blue mix, and paint the cast shadows and the shadows under the plates. With your Cerulean Blue mix, darken any areas that look too gray. It's good to use the wet-in-wet technique here to create softer transitions between the many different bright colors. Later on, you can layer using the wet-on-dry technique to create stronger colors and details. Mix Leaf Green and Chromium Green Oxide next, and darken the green pies, such as the second one from the top row. If the paint starts to puddle, you can lift out the excess with a "thirsty brush" while the paint is still wet. Use Cobalt Green in other areas for a brighter tone and variation, then go back to Cerulean for other details, using the reference picture as a guide. Keep going in this manner, changing or strengthening colors as necessary without overdoing it. In any case, even though this is for practice, keep your meringues painting study fun and loose! And use your artistic instincts to help inform you of what colors to place where, especially when placing cool colors against warm colors.
Step 5: Plate Shadows And Bright Details
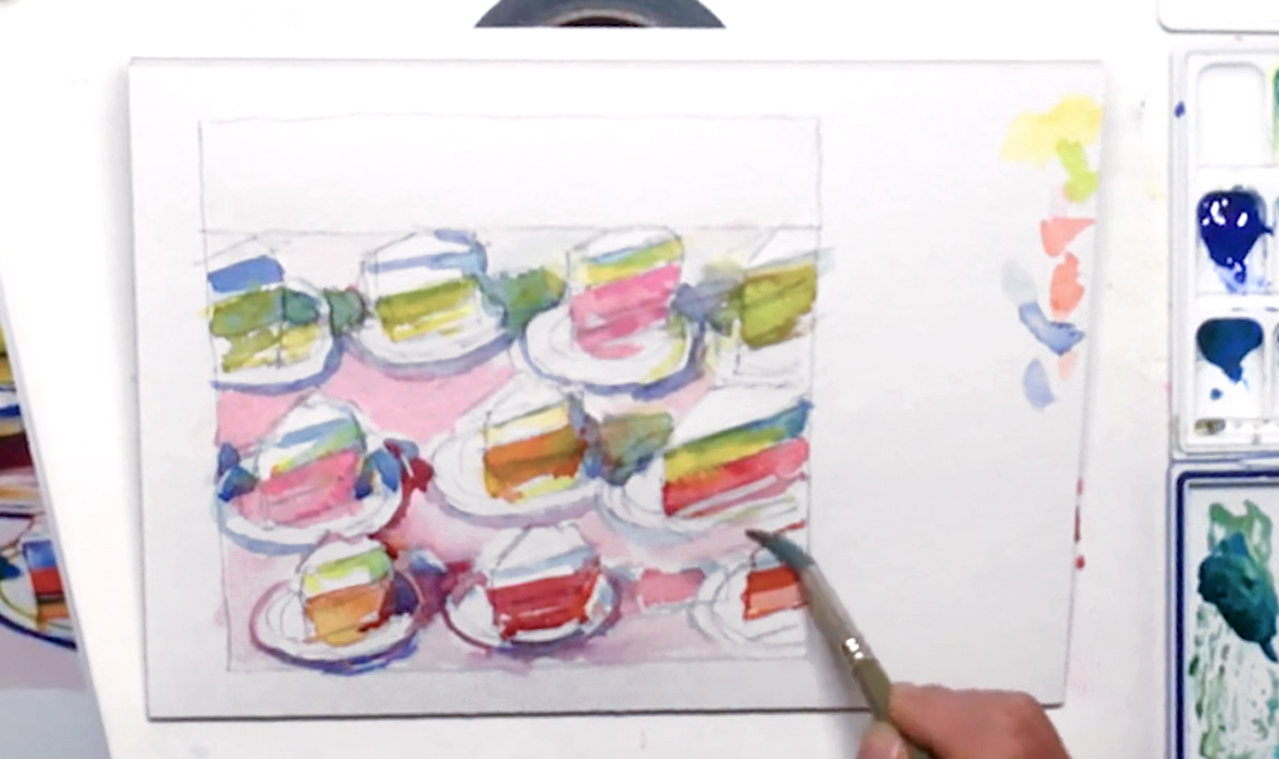 Go back to Cobalt Blue, and add details on the leftmost pie in the middle row. Add more Pyrrole Red as well for the transition of the cast shadow going from plate to table. As this is a painting study, it should be easier to follow and sense where each color should go, as there's no need to think up of your own colors. When using the blues and reds, you might notice that these colors may bleed and make purple in some sections. This is fine; you'll learn that the right effect can be achieved this way, even if it may not be exactly like Thiebaud's painting. This wet-in-wet technique can also be used in the plate shadows, such as painting a rim of blue, then dropping red in some areas to get a dark purple. Continue with more details, using Brilliant Orange or a saturated Gamboge to layer on areas that need a stronger orange or yellow. Use pure Leaf Green to brighten your painting, and add more Brilliant Pink on the table using the wet-on-dry technique for a stronger color. Keep stepping back to compare your overall painting to the reference picture, then adding or fixing anything that doesn't look right. By doing so, you'll notice that you can learn a lot from simply observing and copying Thiebaud's masterpiece.
Step 6: A Quick Background Wall And Meringues
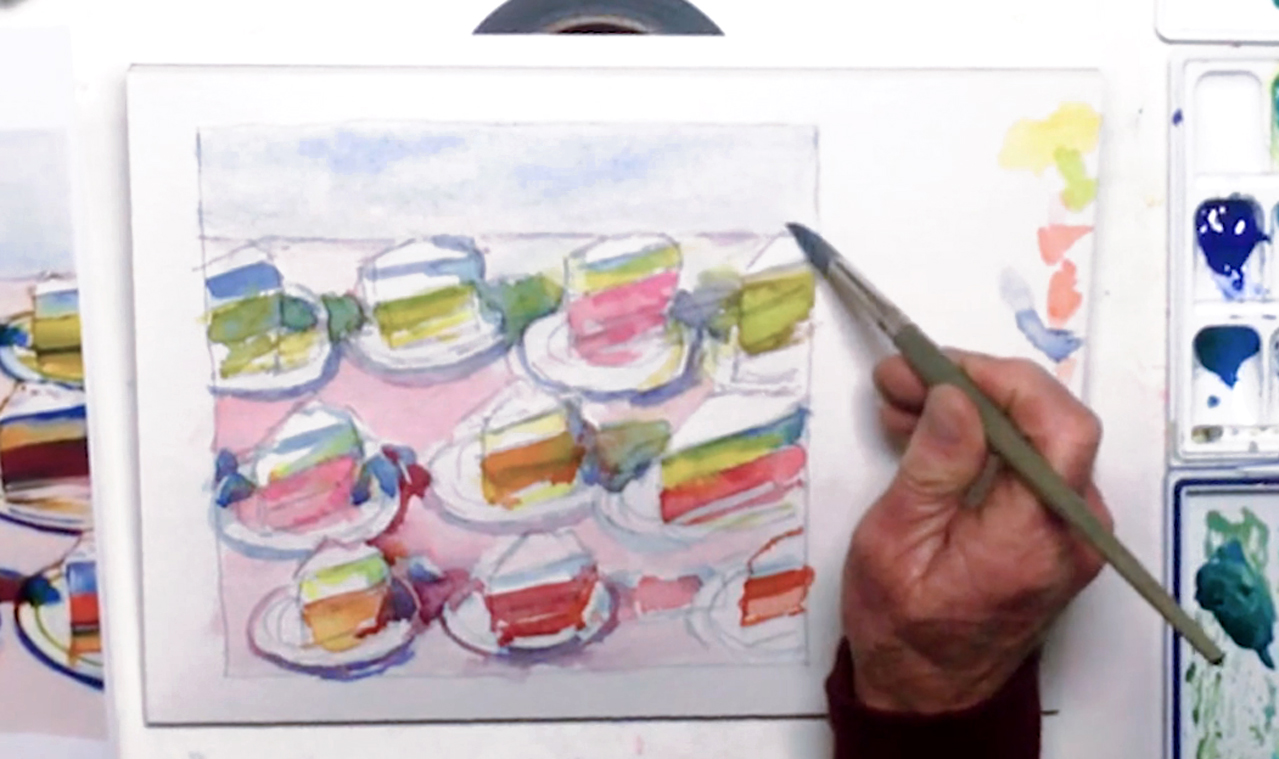 Before painting the background wall, wet it with water, then wait for a few minutes so that it's not too wet. Streak in some pink quickly, before diluting Cerulean Blue and dropping it in gently. Allow some of the pink to show through in a subtle way, and if the blue is too strong, feel free to spread the pigment and thin it out over the wall area. Make sure to get the values right! This will make sure the background is light enough to enhance the contrast against the main meringue area. Add more plate details using Cerulean Blue, then with Jaune Brilliant No. 1, lightly brush in to the white meringue part of each pie. Use the same color in some of the pink table areas as well.
Step 7: Strengthening And Deepening Colors
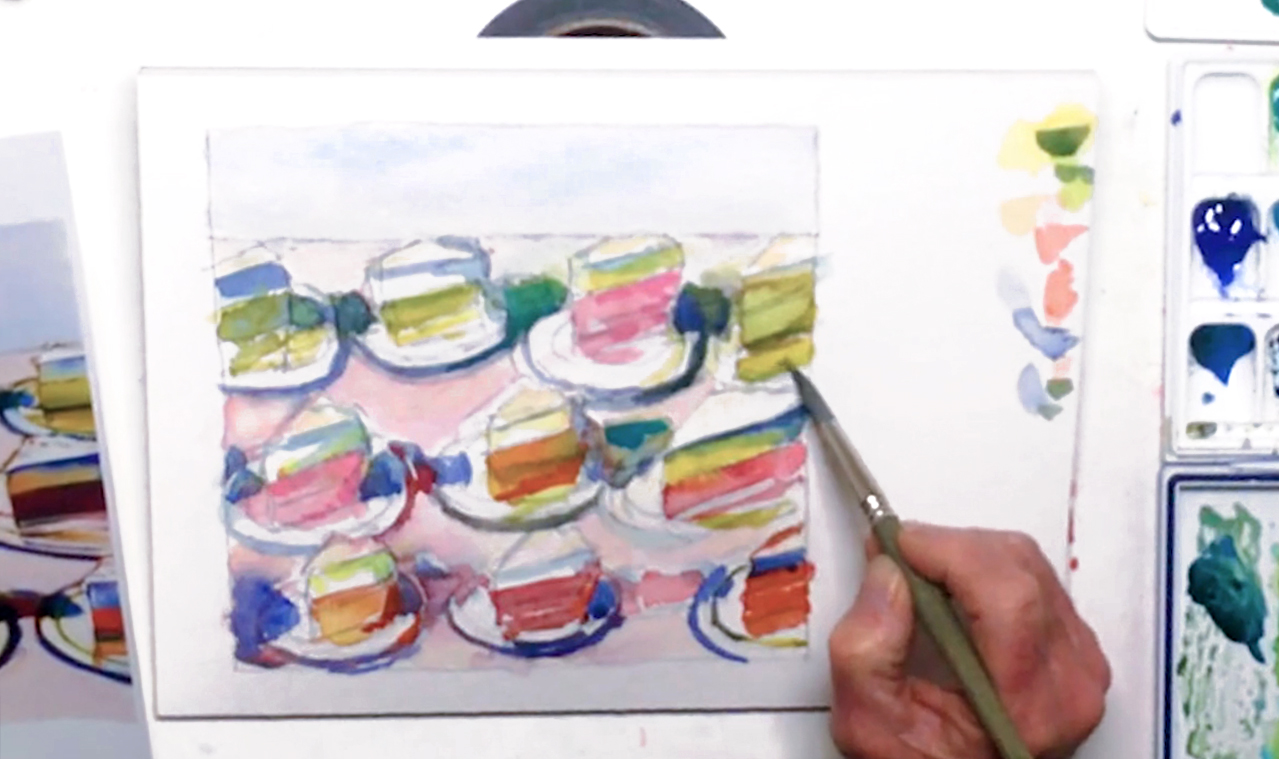 Keep layering brighter and more saturated colors for depth and contrast, especially in the pies' details. You can use Turquoise and Cobalt Blue, switching between the two so the same blue isn't found in every pie. Strengthen the shadows with the blue, then the red mixture, and layer more Brilliant Orange in the orange areas. Layer matching colors in your meringues painting study, so a stronger green in the greens, a stronger yellow in the yellows, etc. Try to put yourself in Thiebaud's shoes! And jump around from wet to dry areas so that your paper doesn't get too saturated. If it does, you can use a wet lifting technique with a rag or a "thirsty brush".
Step 8: Building Up Layers In Plates And Pies
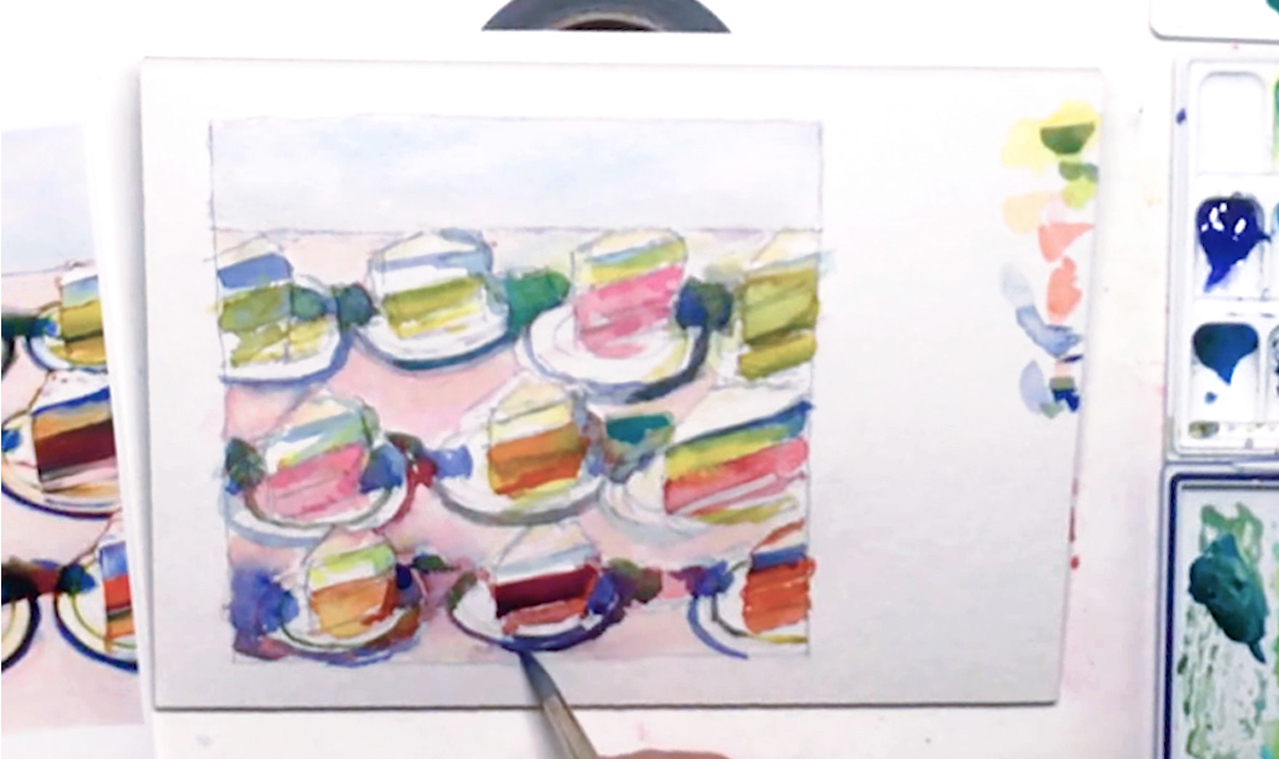 As you're studying an oil painting, you'll notice that the values in Thiebaud's Meringues will be a lot darker. This is because oil paint is much thicker than watercolor. Consequently, this means that you'll need to build up more layers in watercolor to achieve a similar effect. So with a more saturated Permanent Alizarin Crimson, start adding really deep colors, especially in the middle pie in the bottom row. Drop in Cobalt Blue while it's still wet to get that dark purple near the shadowed edge, then switch to Chromium Green Oxide to add to its cast shadow. For even stronger shadows and plate rims, use Phthalo Blue, then go back to the Alizarin Crimson to deepen the red pies that look too light. Remember that it's better to risk being bold and create a more dynamic painting than to take the careful way out! In the end, this is still a painting study, so take any mistakes as a chance to learn more.
Step 9: A Better Horizon
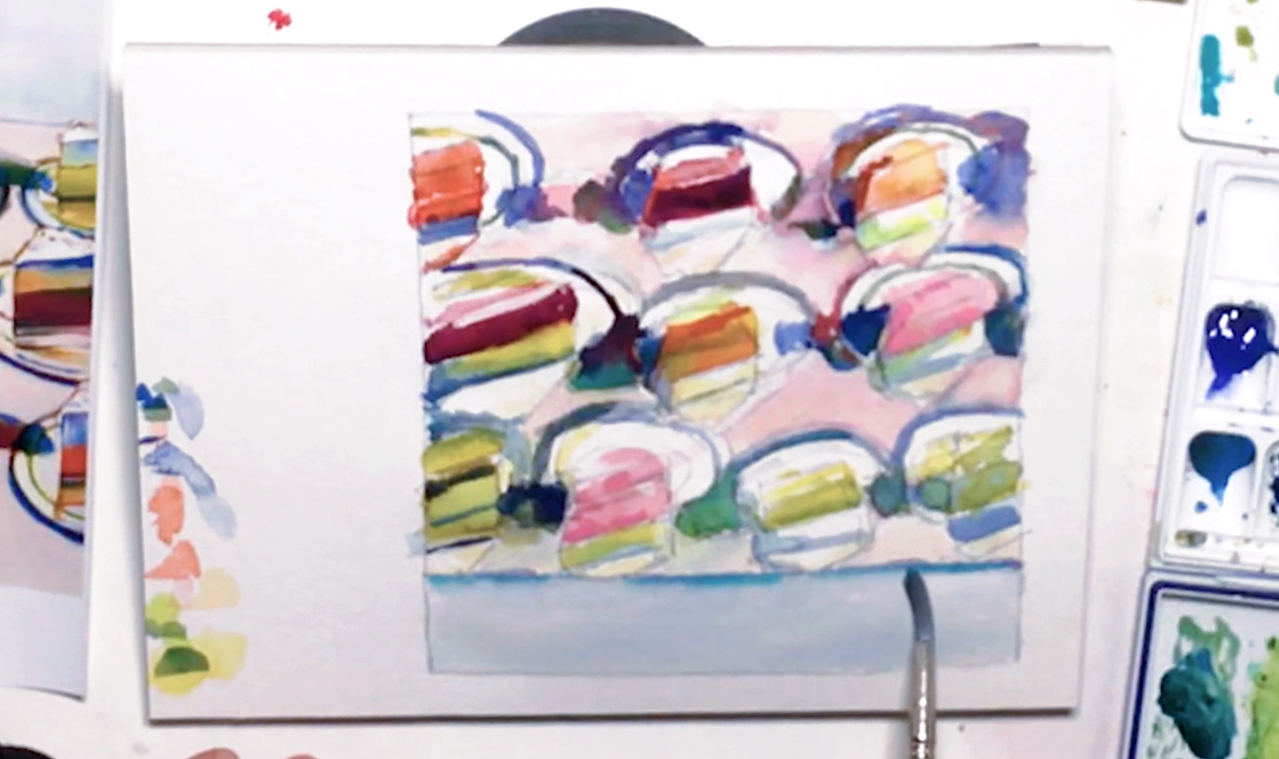 Keep adding details in different blues, and paint the edge of the table (the "horizon line") using your blue mixture. If it's too strong, turn your painting upside down, and wet the area next to this line so it fades into the wall a little. Add a touch of Turquoise Blue and Cobalt Green, and carefully tone down again, lifting some paint out if necessary.
Step 10: The "Wet-On-Dry" Technique For Control
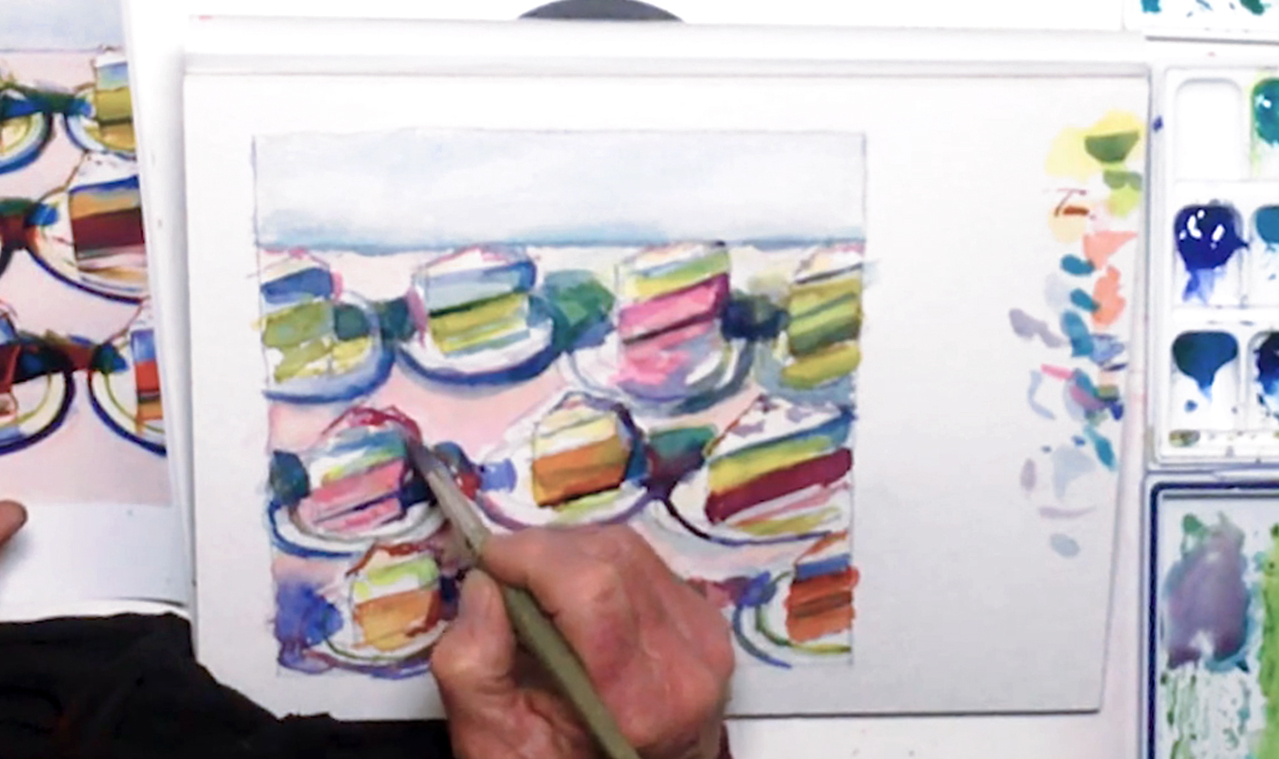 Add more layers and details to the top half of the pies, and use the wet-on-dry technique so you have more control over where the paint goes. Your paint will also be less diluted, which is perfect for detail work. Use your blues and greens, and roll with whatever mistakes you may have made in the sketch. In this meringues painting study, color is more important than line work, and value is more important than color. Keep building up your values, and remember not to use the same color combinations everywhere. The shape of the pies may be similar, but the colors should work together in a way that they harmonize while looking very distinct from one another. Use diluted Permanent Alizarin Crimson to paint a faint "burnt" effect along the edging of the meringues. For the illusion of creamy decorations, mix in Turquoise Blue for a diluted gray purple color, then paint the tops of the meringues.
Step 11: Brush And Value Control
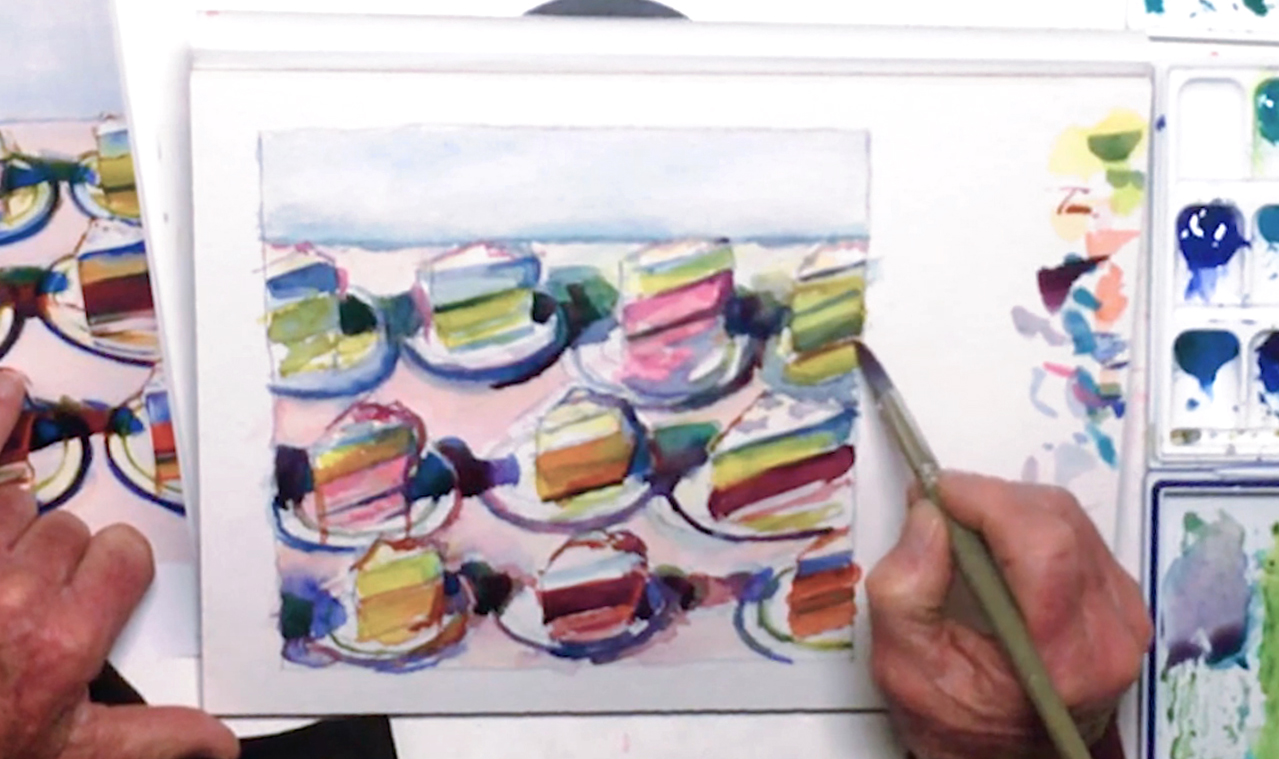 For some lighter details, put saturated Lemon Yellow on top of the bottom left pie. While layering light colors on top of dark ones is usually avoided in watercolor painting, in this case it should be fine as long as the underlying layer isn't too dark or saturated to do so. Add more finishing touches, holding your paintbrush near the top of the ferrule to have better control over your brushstrokes. Mix Phthalo Blue and Olive Green for a different dark color in the shadows, creating as much contrast as possible. Focus especially on the shadows, mixing Carbazole Violet and Alizarin Crimson for a deeper purple where needed. Don't rush yourself or overdo the darks though, as you need to keep the values of your meringues painting study intact!
Step 12: Finishing Up This Sweet Painting
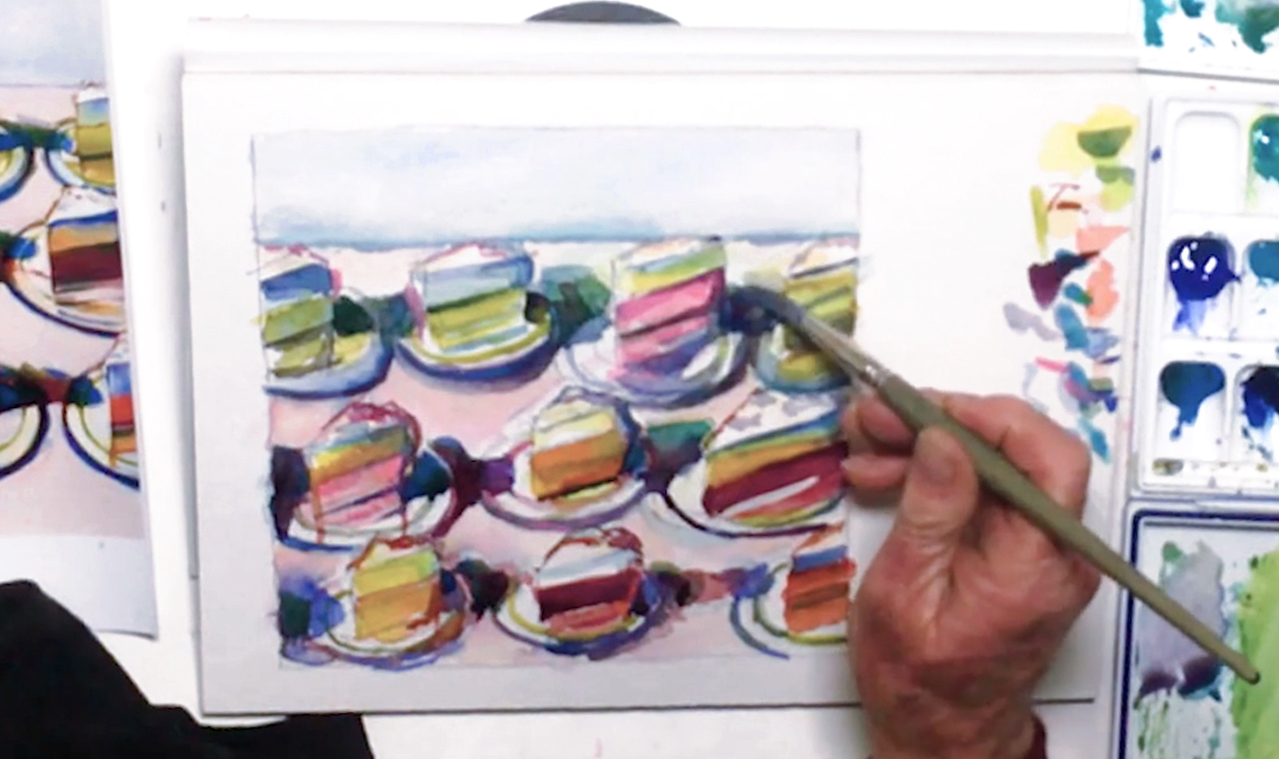 In this last step, use more of your blue mix for details, then more of the light purple mix for the third pie on the top row. Stay aware of your painting's warm vs cool, and light vs dark contrasts. The balance of these contrasts will help define a painting, and make it more dramatic like Thiebaud's Meringues. Keep stepping back to check your overall progress, and to see what needs changing and/or fixing. You're done when you can't think of anything else to do, so as a final touch, use a no. 1 rigger brush to sign your painting at the top in a light Turquoise Blue. Remember to credit the original artist! You can use a hairdryer, or let the paint dry by itself while cleaning up. Hope you've learned a lot from this meringues painting study, and enjoyed the process and result!


