Turn the Mission San Juan Capistrano into a colorful AND a non-colorful historical watercolor painting! Artist William "Bill" Dunn shows how to do a quick value painting study before painting the final version. Want to watch the video version? The full tutorial is available to members of our Beeblys WatercolorPainting.com.
Materials Used In This Watercolor Class:
- Reference picture of Mission San Juan Capistrano in California
- A block of Fluid 100 hot press watercolor paper (140lb, size 9″ x 12″)
- A block of Fabriano rough watercolor paper (140lb, size 12″ x 18″)
- Pentel Graphgear 1000 automatic drafting pencil, 0.7mm lead size with 2B lead
- ½" Artist's or masking tape
- Painting palette for watercolor paints
- Auxiliary plate or palette
- A container of water
- Paper towels or a rag
- A tabletop easel or a box to prop your painting on
Paints (Holbein Artists' Watercolors)
- Gamboge Nova
- Brilliant Orange
- Cadmium Red Purple
- Cobalt Violet Light (a.k.a. "Lavender")
- Mineral Violet
- Olive Green
- Viridian
- Cobalt Green
- Leaf Green
- Cerulean Blue
- Cobalt Blue Hue
- Quinacridone Gold
- Yellow Ochre
- Burnt Sienna
- Burnt Umber
- Indigo
- Neutral Tint
- Ivory Black
- Chinese White
Winsor & Newton's Professional Watercolors
- Permanent Carmine
- Permanent Mauve (or Sennelier's Cobalt Violet Deep Hue watercolor paint)
- Oxide of Chromium
- French Ultramarine
Brushes
- Neef Rigger Supreme Taklon Series: Long handle rigger brush (no. 6)
- Neef Rigger Supreme Taklon Series: Long handle rigger brush (no. 12)
- Escoda Perla Joseph Zbukvic Series: Round brush (no. 8)
- Escoda Perla Joseph Zbukvic Series: Round brush (no. 12)
- Escoda Perla Joseph Zbukvic Series: Round brush (no. 20)
- Winsor & Newton's Cotman Brush Series 111: Round brush (no. 2)
- Hamburg Premier Professional Brush: Badger fan brush (no. 6)
Step 1: A Grayscale Compositional Study
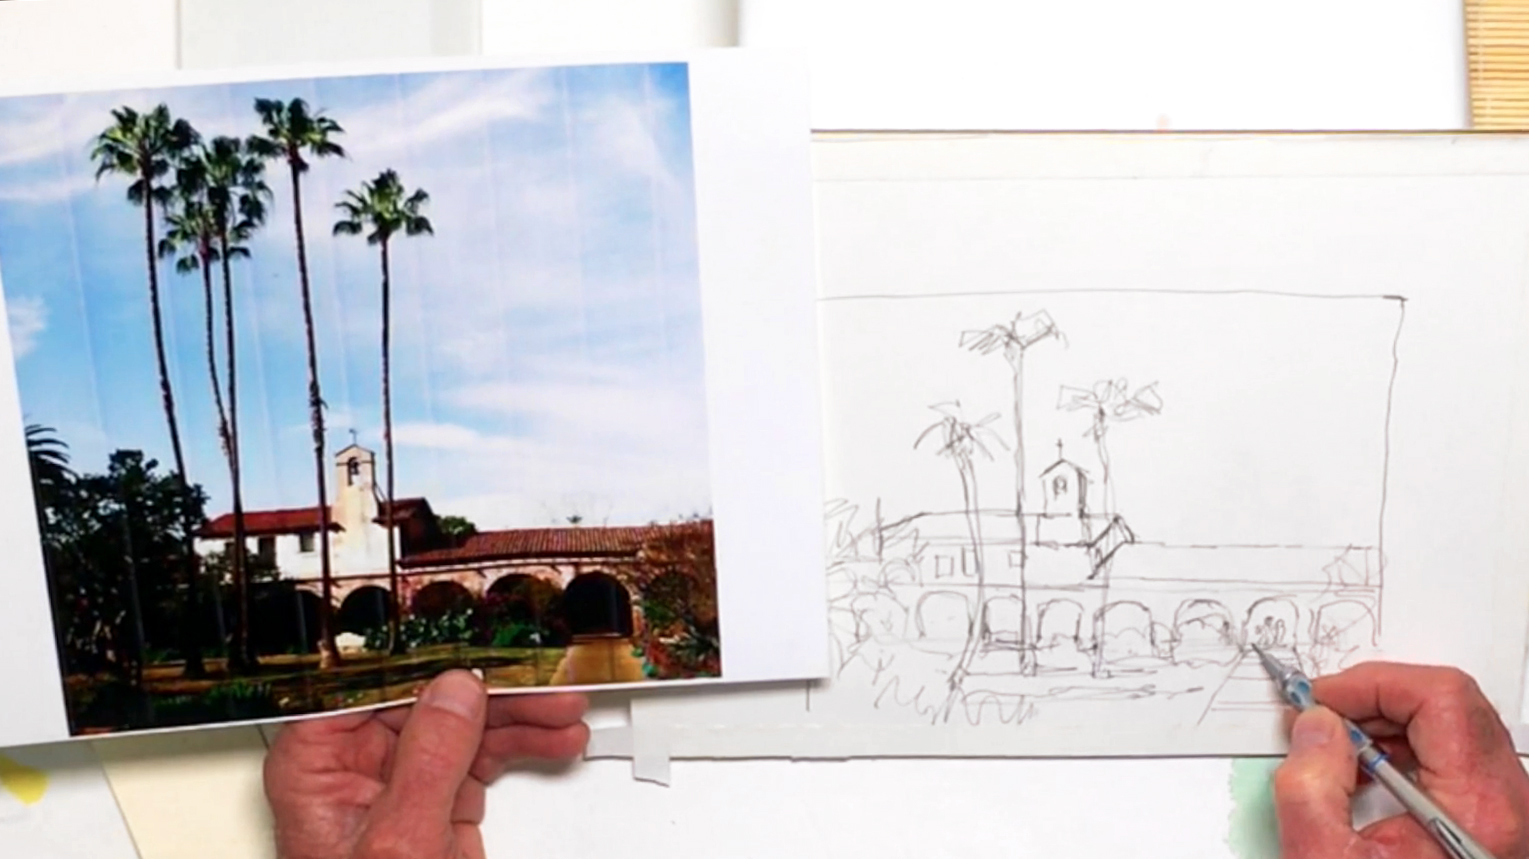 In this tutorial, we'll be painting something more historical: the Mission San Juan Capistrano. To begin, Bill focuses on the compositional process by first doing a version in black and white. Tape the edges of the smaller 9" x 12" watercolor paper block using artist's tape, then draw a rectangle that will frame your painting area. This will be a rough guide as to the size of your final painting. Next, draw in simple outlines of the objects you see in the reference picture, starting from the largest shapes to the smallest. You can tweak the composition as you go. For example, Bill shortens the trees as they need to fit inside his frame, and places the main focus of the building slightly off-center for a better design. He also adds a few figures in the archways so they'll stand out against the dark background. Remember to sketch the building in perspective, and try not to erase, as you might damage the surface of your paper. There's also no need to be 100% accurate or to include every single detail, since this is just a quick painting study.
Step 2: Painting In Value
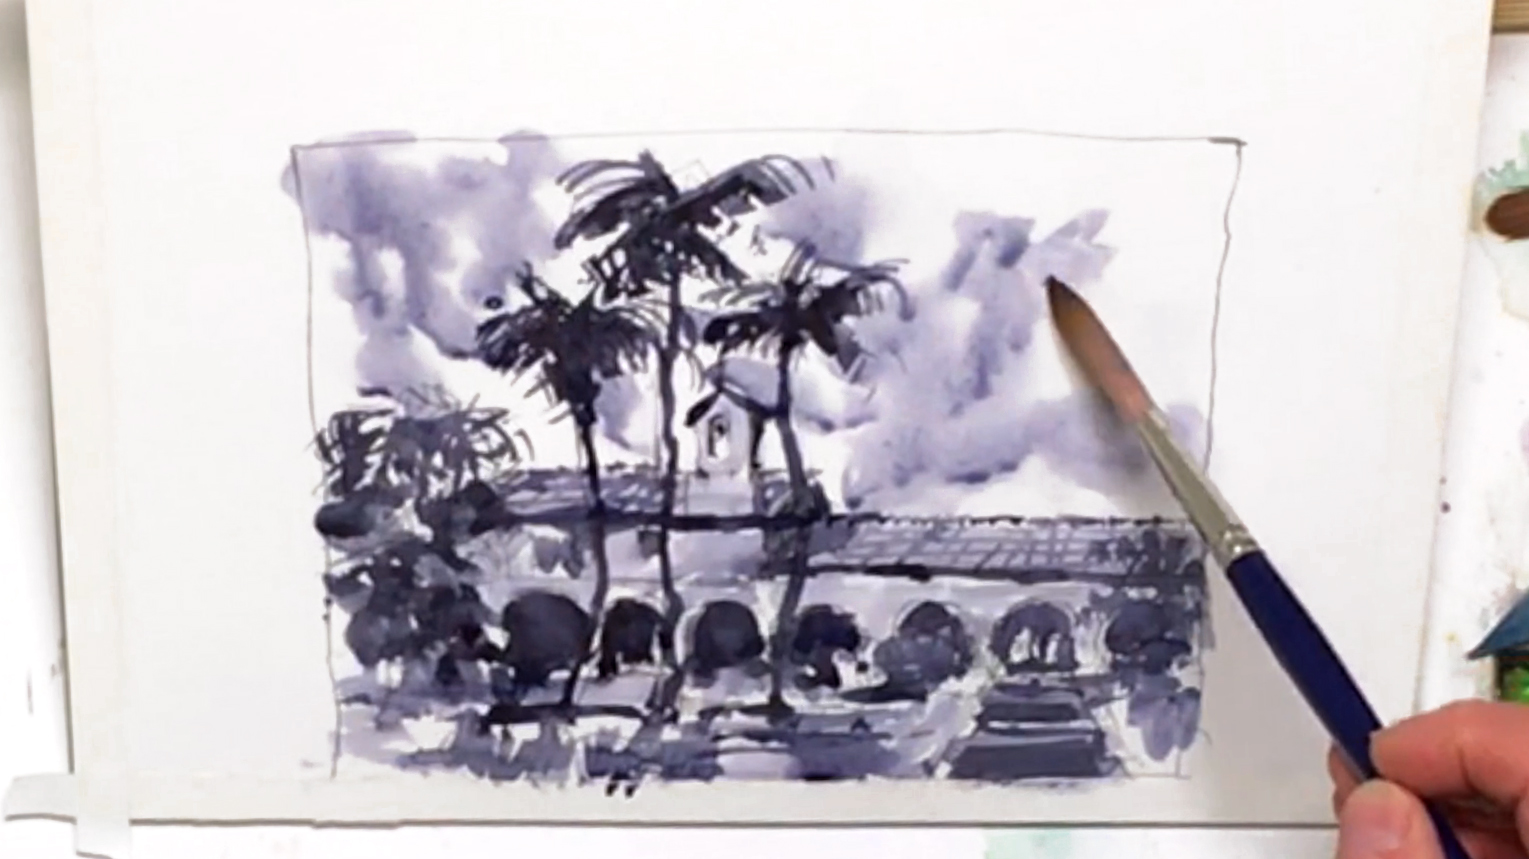 Prop your paper block on an easel or thick book, so it angles at about 30º. With the no. 12 round brush, dilute Neutral Tint on your palette, then paint the mid-tones. Leave areas white as your lightest value, and feel free to have some white spots showing through on the building's walls. Switch to a darker tone for the palm trees, and switch to a fan brush to paint the palm fronds and foliage. For the darker areas, use a very saturated Neutral Tint and a no. 8 round brush to get some of the details, such as the archways and windows. For the thinnest details, use a no. 6 rigger brush, and make sure to get some tiling and shadow details around the roof area. To paint the sky, wet it with clean water using a no. 12 rigger brush, before adding a tone via this wet-on-wet method. For the darkest parts, you can add an additional layer of Ivory Black for more contrast. In this manner, finish painting your grayscale study, making note of the values (i.e. light vs dark) in your historical watercolor painting. It will be a helpful guideline to refer to when you're working in full color! Below is a close-up of Bill's grayscale building:
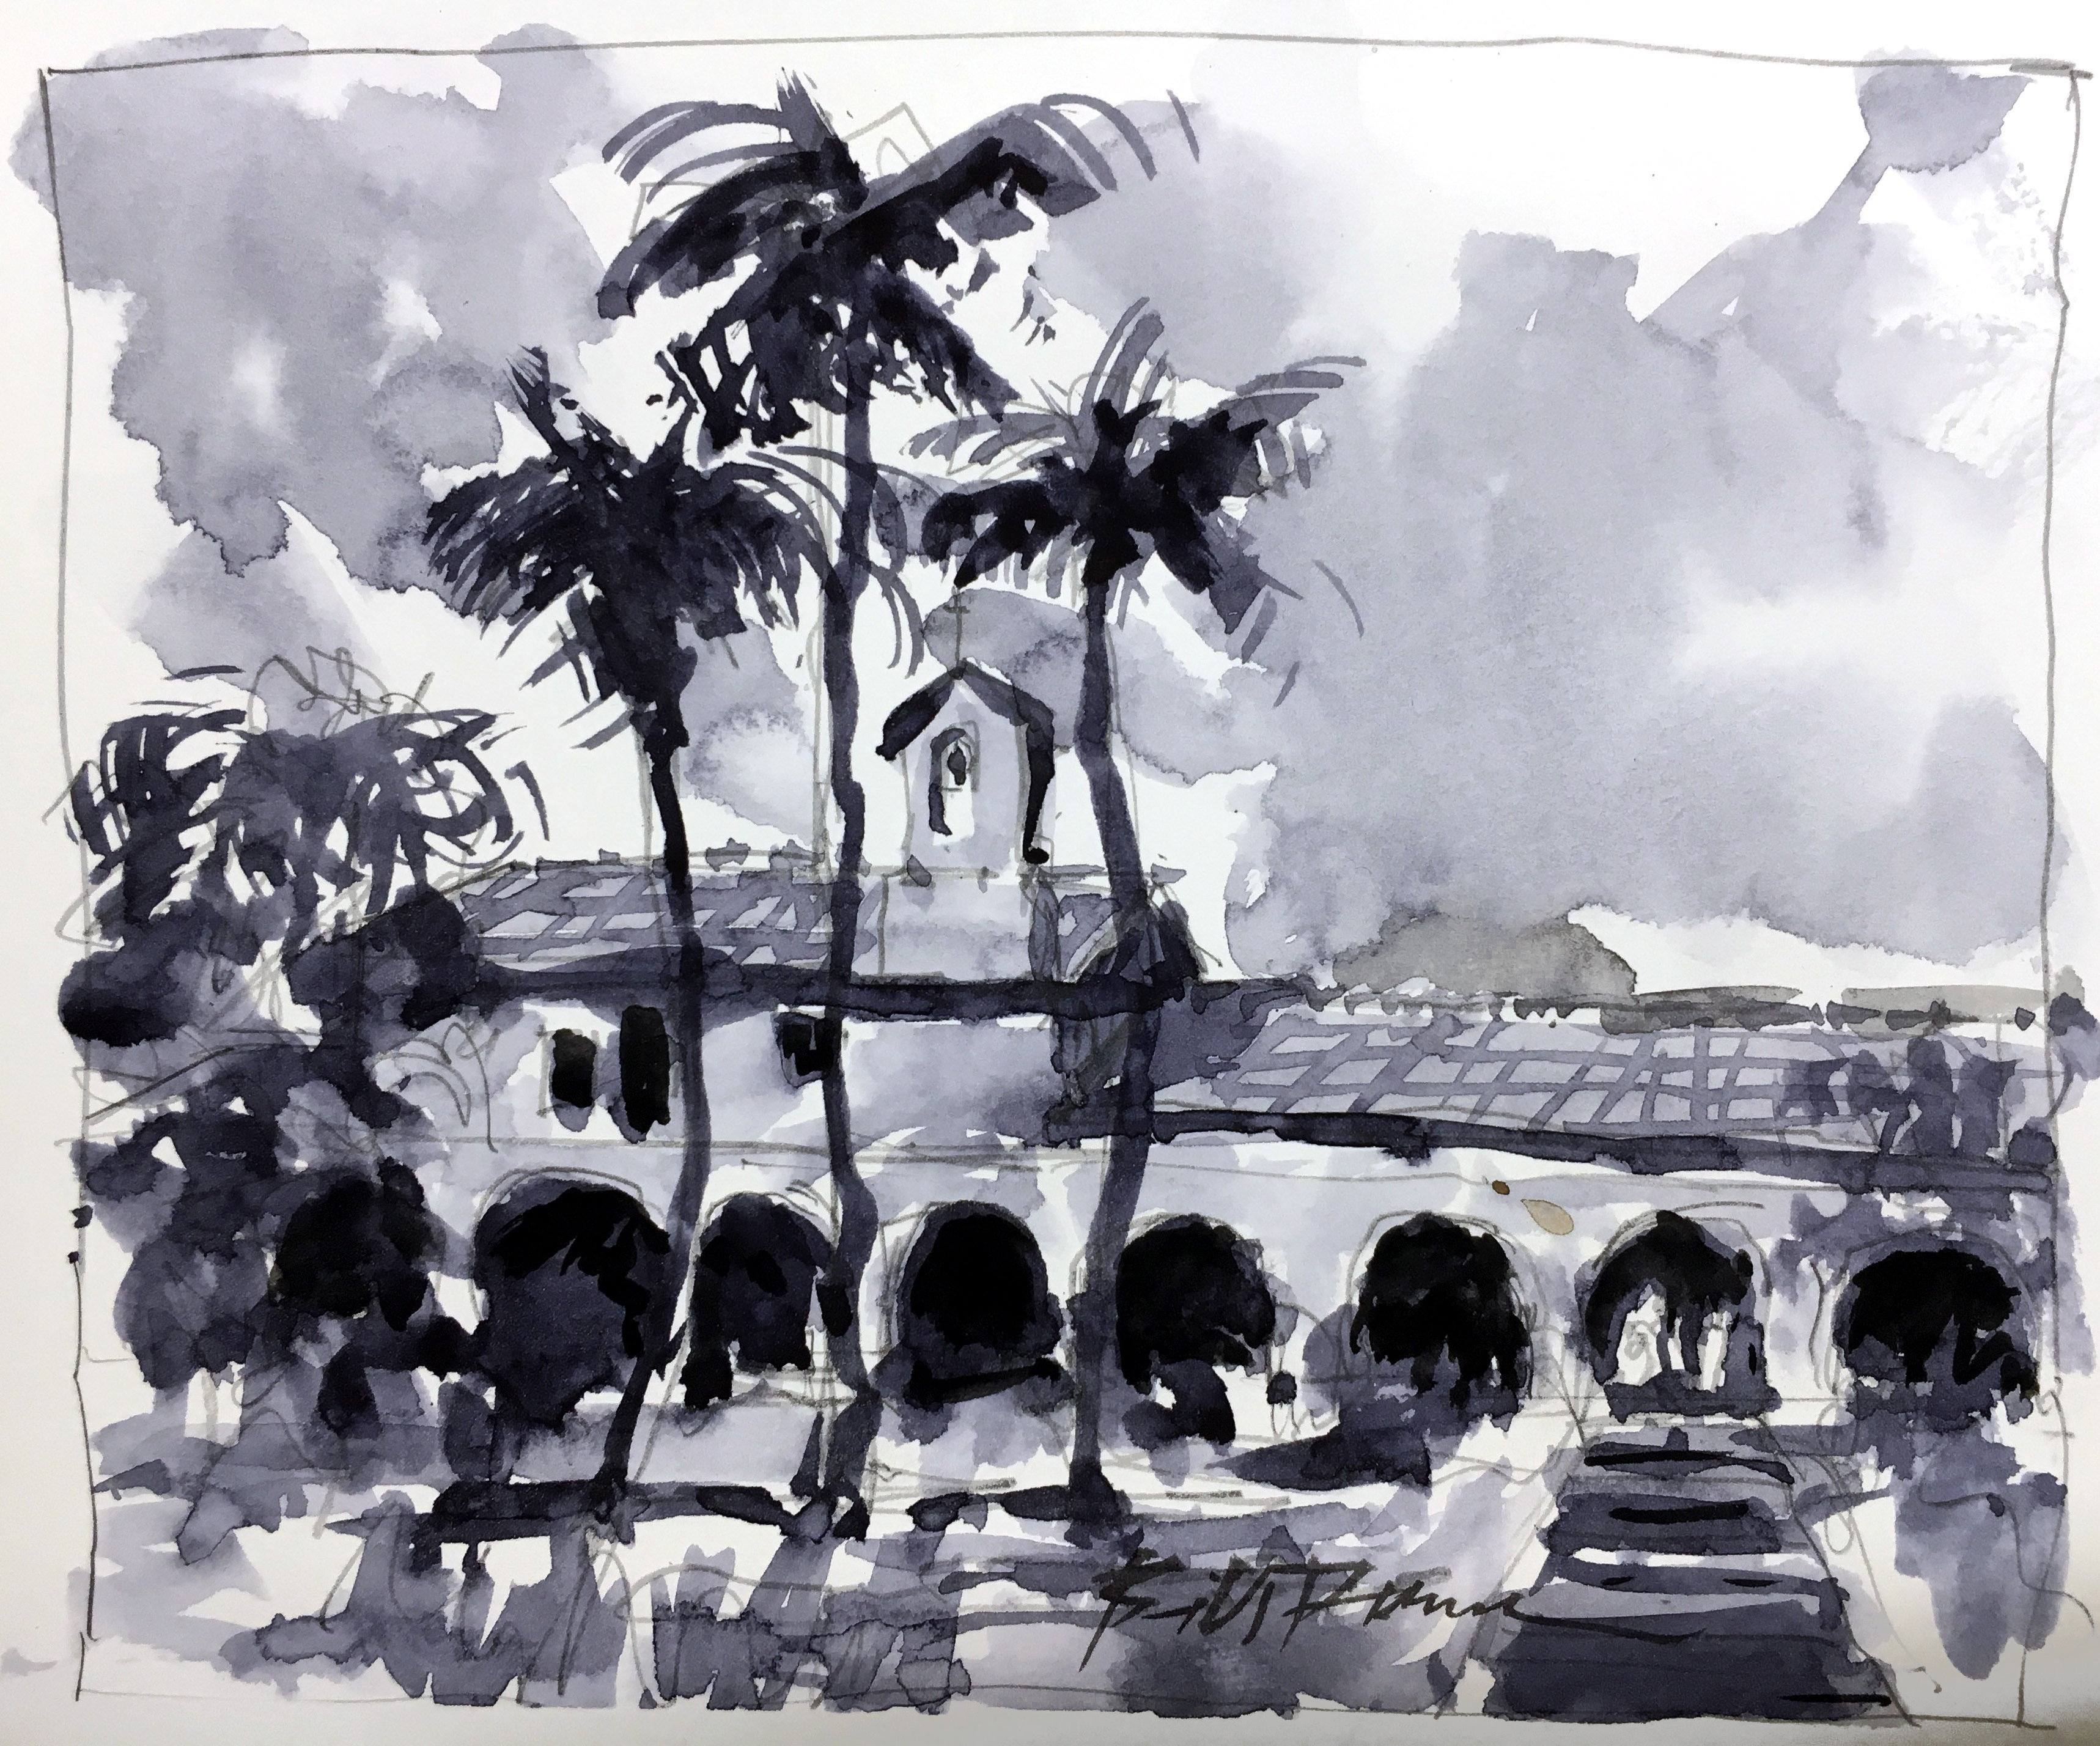
Step 3: Sketching The Mission San Juan Capistrano
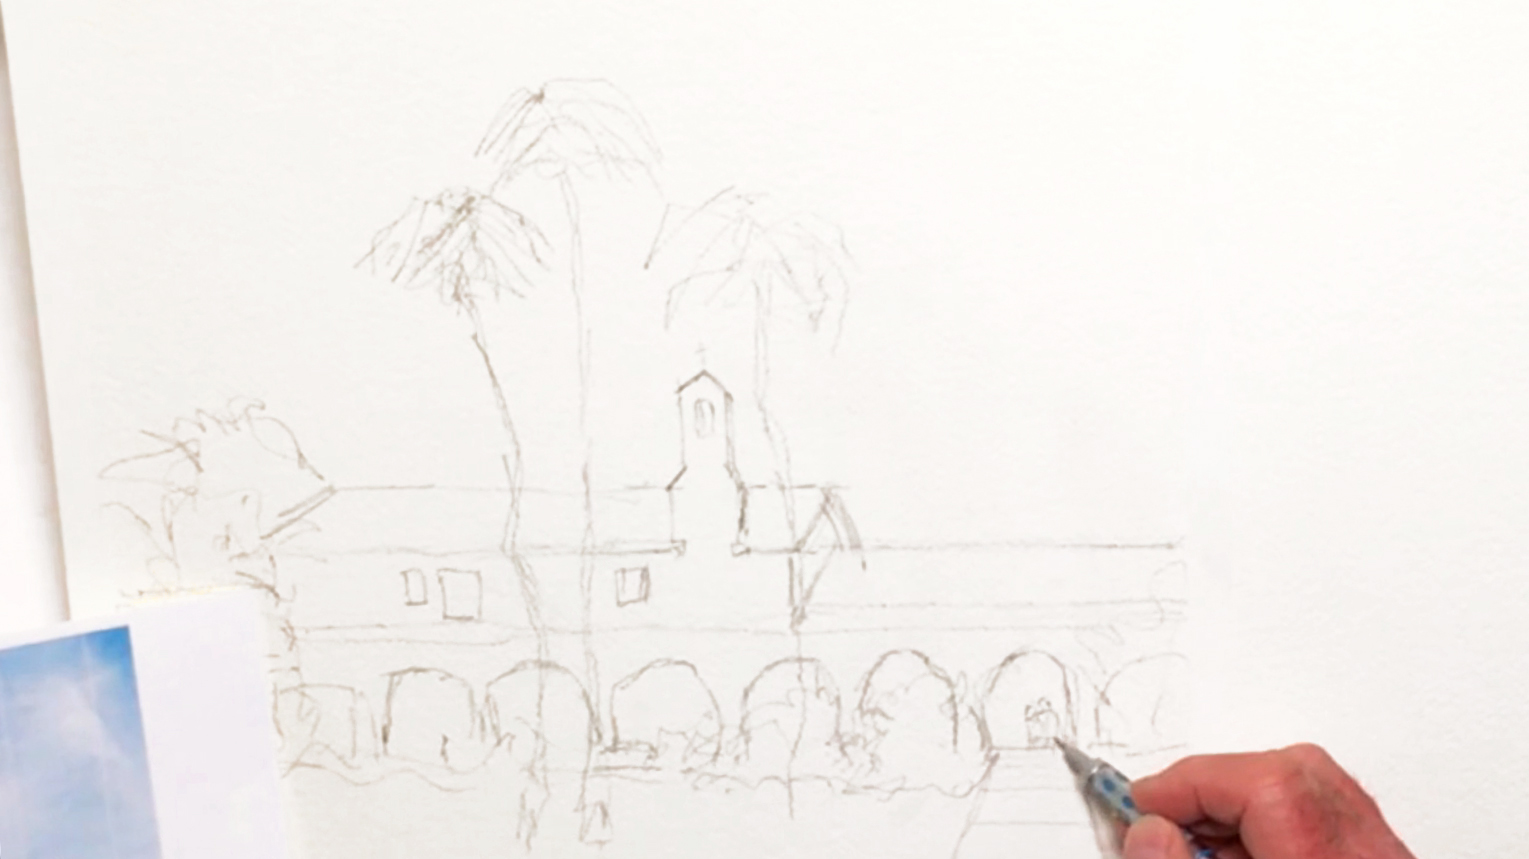 To begin your historical watercolor painting in color, switch to the bigger 12" x 18" paper block, and prep it in the same way as step 1. You can use the tape this time to become the actual frame for your painting area, and any extra space can be for color testing. In addition, try to make the painting area to scale with the reference photo! Once again, do a simple sketch of the San Juan Capistrano, keeping it in a similar, loose style as the grayscale version. Be more careful this time though, in terms of getting the proportions and measurements right. Add as many details as you need, but remember that you can always draw with your paintbrush. Below is a close-up of Bill's sketch:
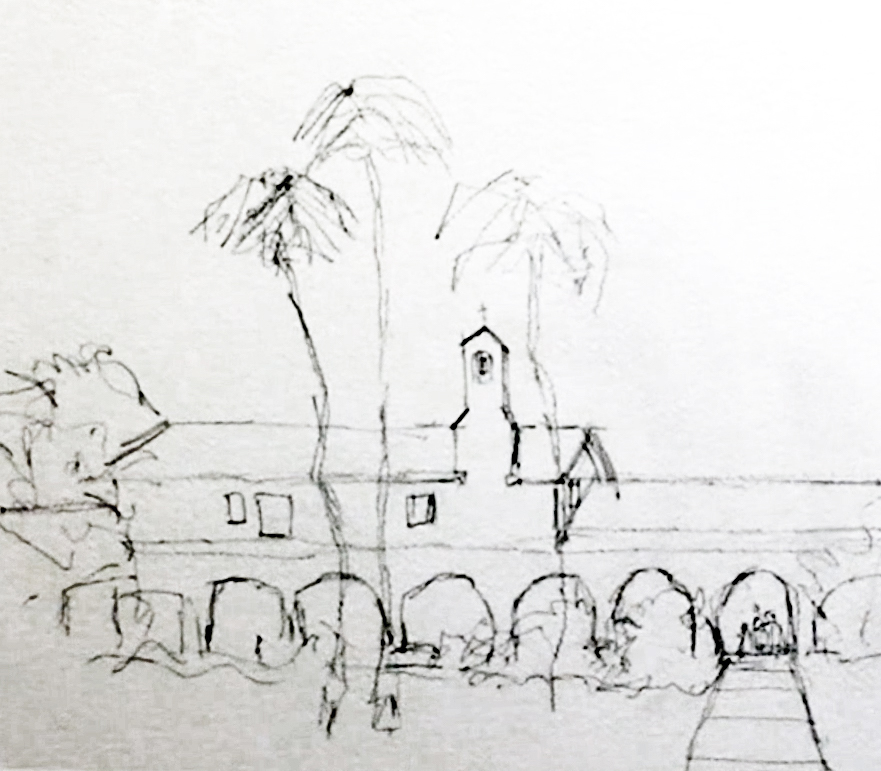
Step 4: Wet-On-Dry Walls
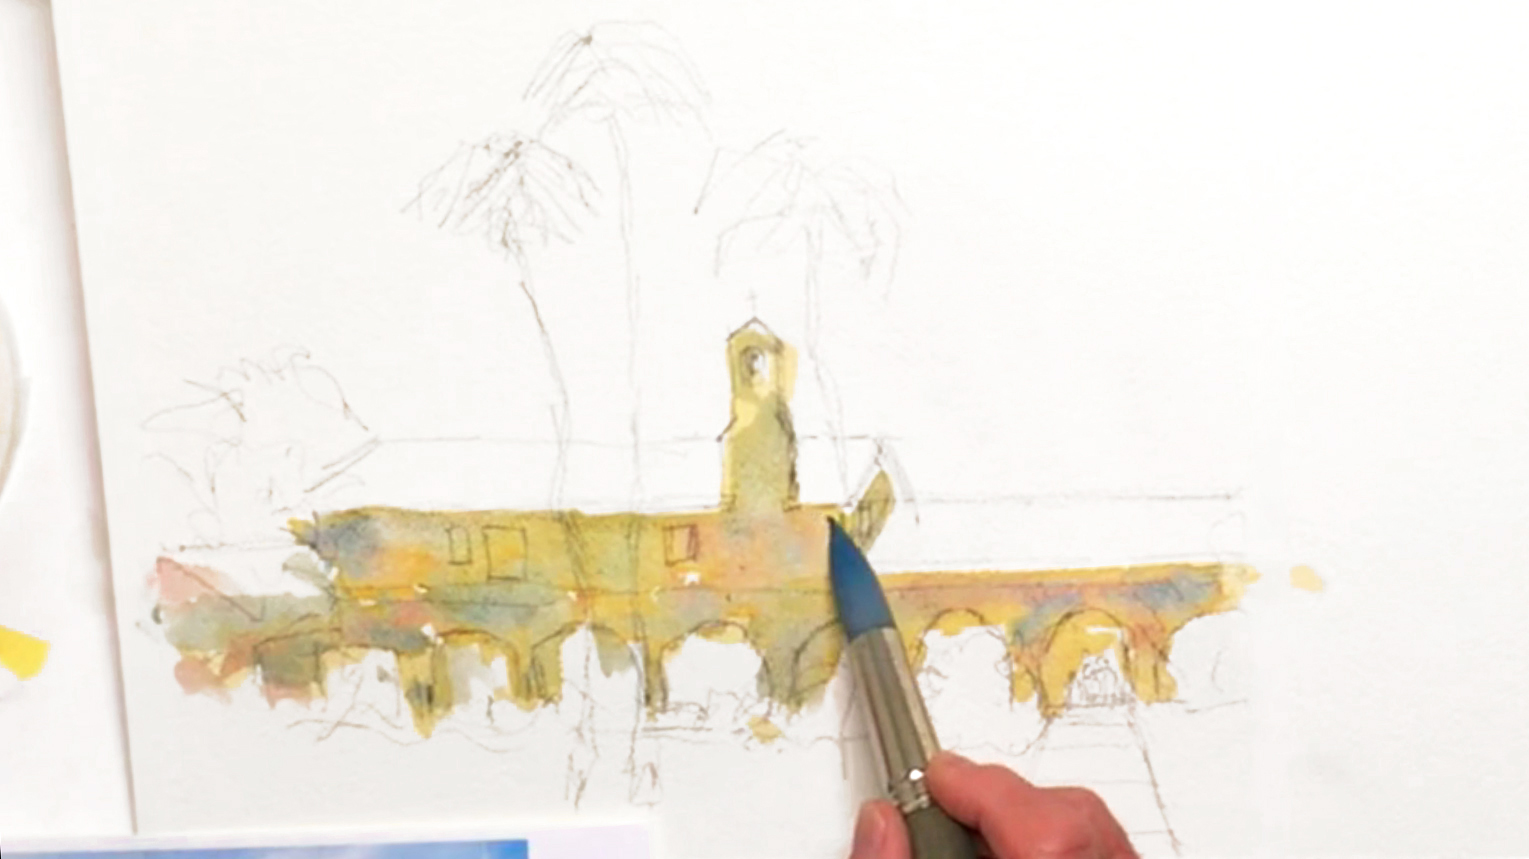 It's finally time to begin your historical watercolor painting! To start, you can clean off the Neutral Tint from your palette, and plan the color scheme of your painting. Bill decides on a more natural look with good contrasts, and to paint the building first. With a no. 20 round brush, pick up Yellow Ochre, and start painting the walls with the "wet-on-dry" technique (i.e. wet paint on a dry surface). Be bold, and remember that watercolors dry lighter than when they're wet. Again, you can leave some white showing through for highlights and a bit of texture. While the paint is still wet, drop in Cobalt Violet Light, then Cerulean Blue. This wet-on-wet method will help create the soft blends you need for this historical watercolor painting.
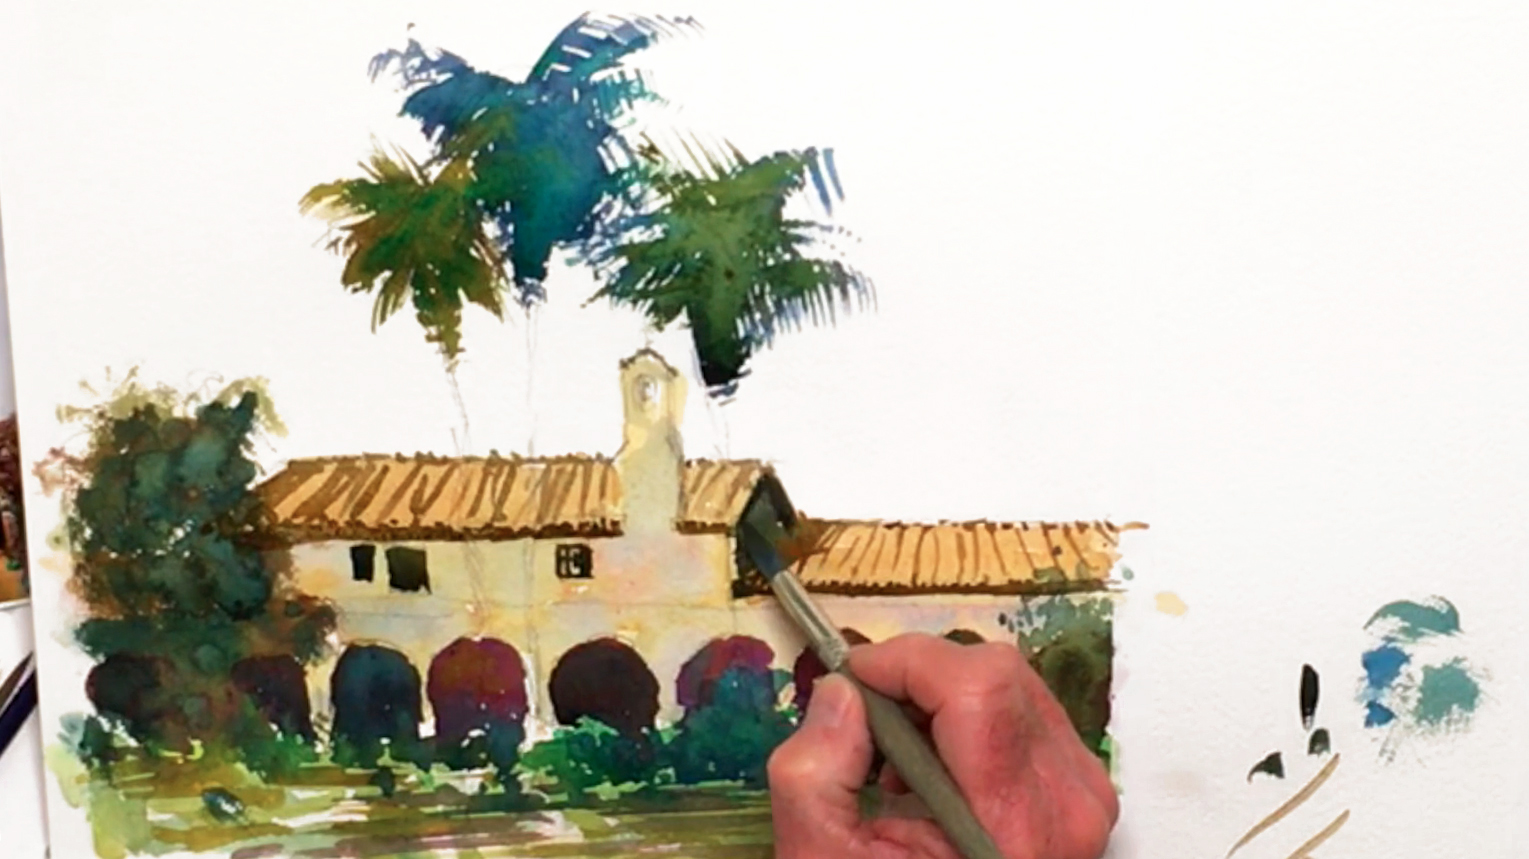
Step 5: Foliage And Layering Tones
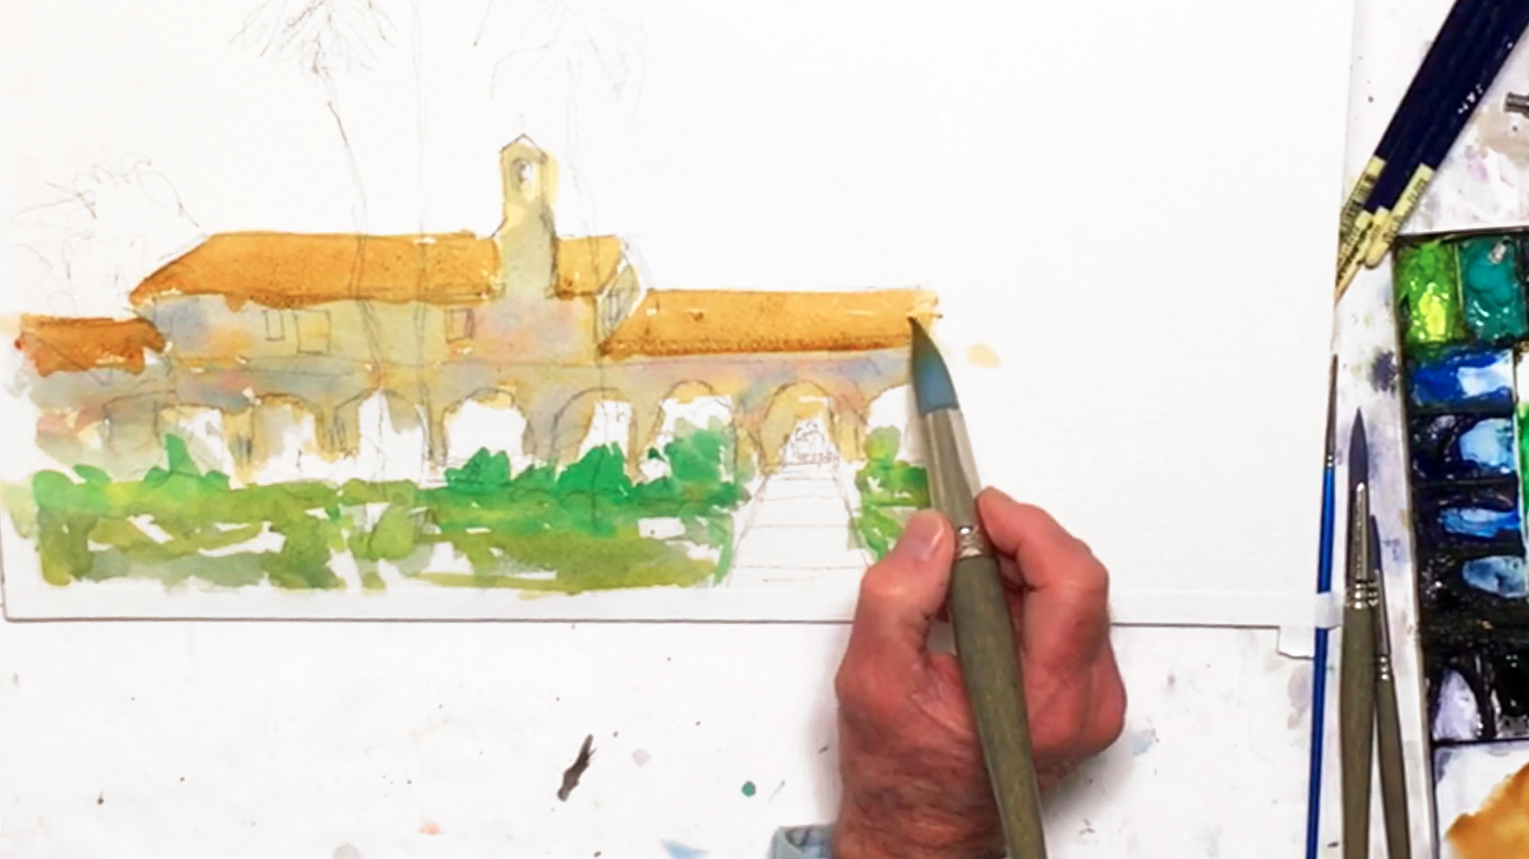 Use Oxide of Chromium as the base color for the garden foliage. This includes the bushes and lawn in front of the San Juan building. Don't be too careful here, as foliage should look naturally messy. Drop in Cobalt Green, Viridian, and Yellow Ochre to vary your greens, and leave the darker values for later. Use Burnt Sienna for the roof, and try not to touch any wet paint lest it bleeds into the surrounding area. Switch to the no. 12 round brush, then mix a saturated Permanent Mauve and Mineral Violet for the archways. You can vary the saturation of the dark purples here, and drop in Olive Green or French Ultramarine for a different tone in a few of them. Since you're mixing colors on your paper rather than on the palette, you'll get slightly different results each time, which is good since you're painting a painting, not reproducing a photograph. Paint around the shapes of the people and foliage under the archways, and remember to get the right values for each element of your historical watercolor painting.
Step 6: The Color Green
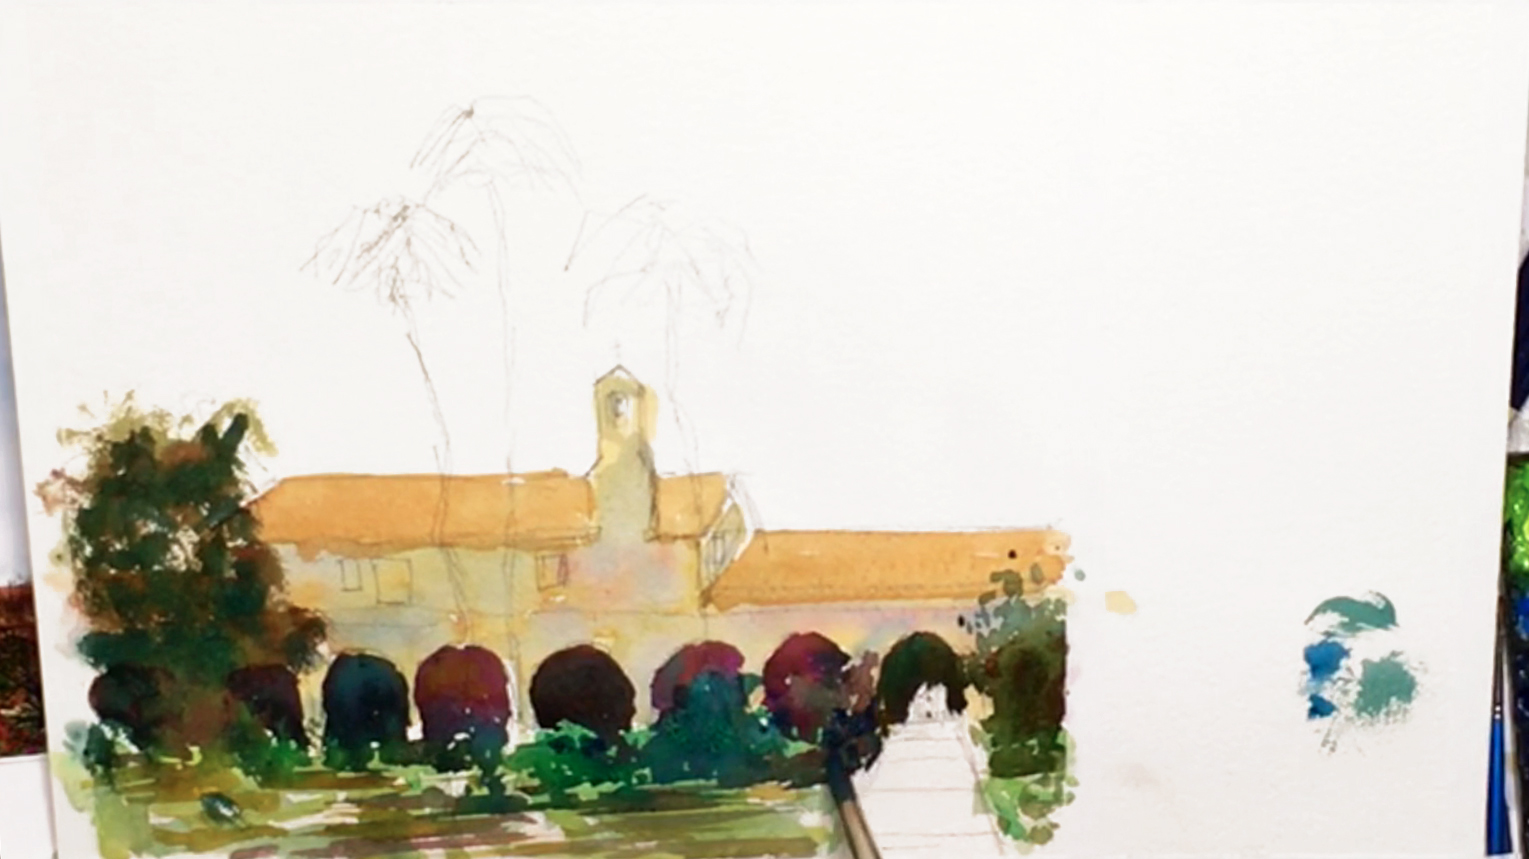 Drop in Cobalt Green for where the foliage comes in front of the arches, and extend it downwards. Add some of the details here, such as shadows, highlights, or some individual leaves around the edges of a bush. Change the color where needed so it's not the same green everywhere, and streak in some grass in horizontal brushstrokes. Next, mix Olive Green, Mineral Violet, and Viridian for the background trees to the left side of your historical watercolor painting. Dab the color in, and layer pure Mineral Violet, then French Ultramarine on top to darken. Add this to some of the other bushes as well for more depth and contrast.
Step 7: How To Use A Fan Brush 101
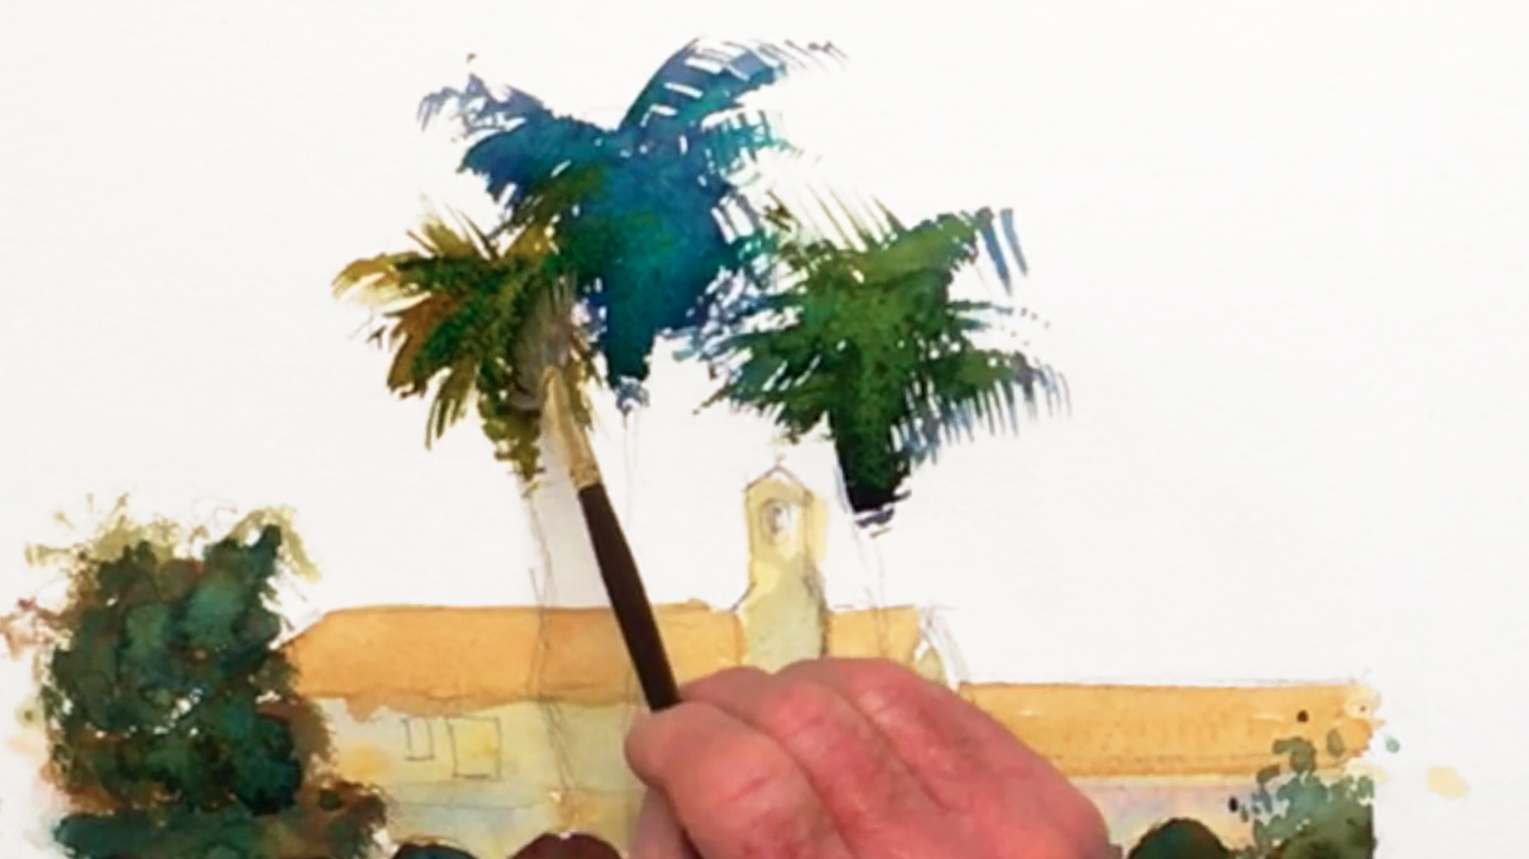 Like before when doing the grayscale study, you can use a fan brush for the palm fronds. This time, start with Cobalt Blue Hue, and paint the one in the middle. Layer Olive Green on top, and remember to curve your brush in different ways to get the right effect. For the one to the left, use Permanent Mauve with Cobalt Blue, Cobalt Green, and Viridian on top. For the one on the right, use Olive Green, with Viridian on top. As a side note, these are all suggested colors, so don't feel like you have to use them! Follow your own artistic instincts to get the historical watercolor painting you want.
Step 8: Shadows And Perspective
 Switch to the rigger brush (no. 6), and mix Burnt Sienna, Umber, and French Ultramarine with the blue mixture for the shadowed side and the eaves of the San Juan Capistrano. Add tile patterns using more Burnt Sienna, remembering to apply the rules of perspective again. Add Indigo and Ultramarine to darken the shadows under the roofs, then switch to the no. 12 round brush to paint the windows using a mixture of Neutral Tint, Burnt Sienna, and Ultramarine. Mix Gamboge Nova with Yellow Ochre, and paint the walkway in horizontal brushstrokes. For more foliage shadows, add Cobalt Blue to your previous mixture. Again, be bold in your color choices to make your historical watercolor painting really stand out!
Step 9: Palm Trees And A Bell Tower
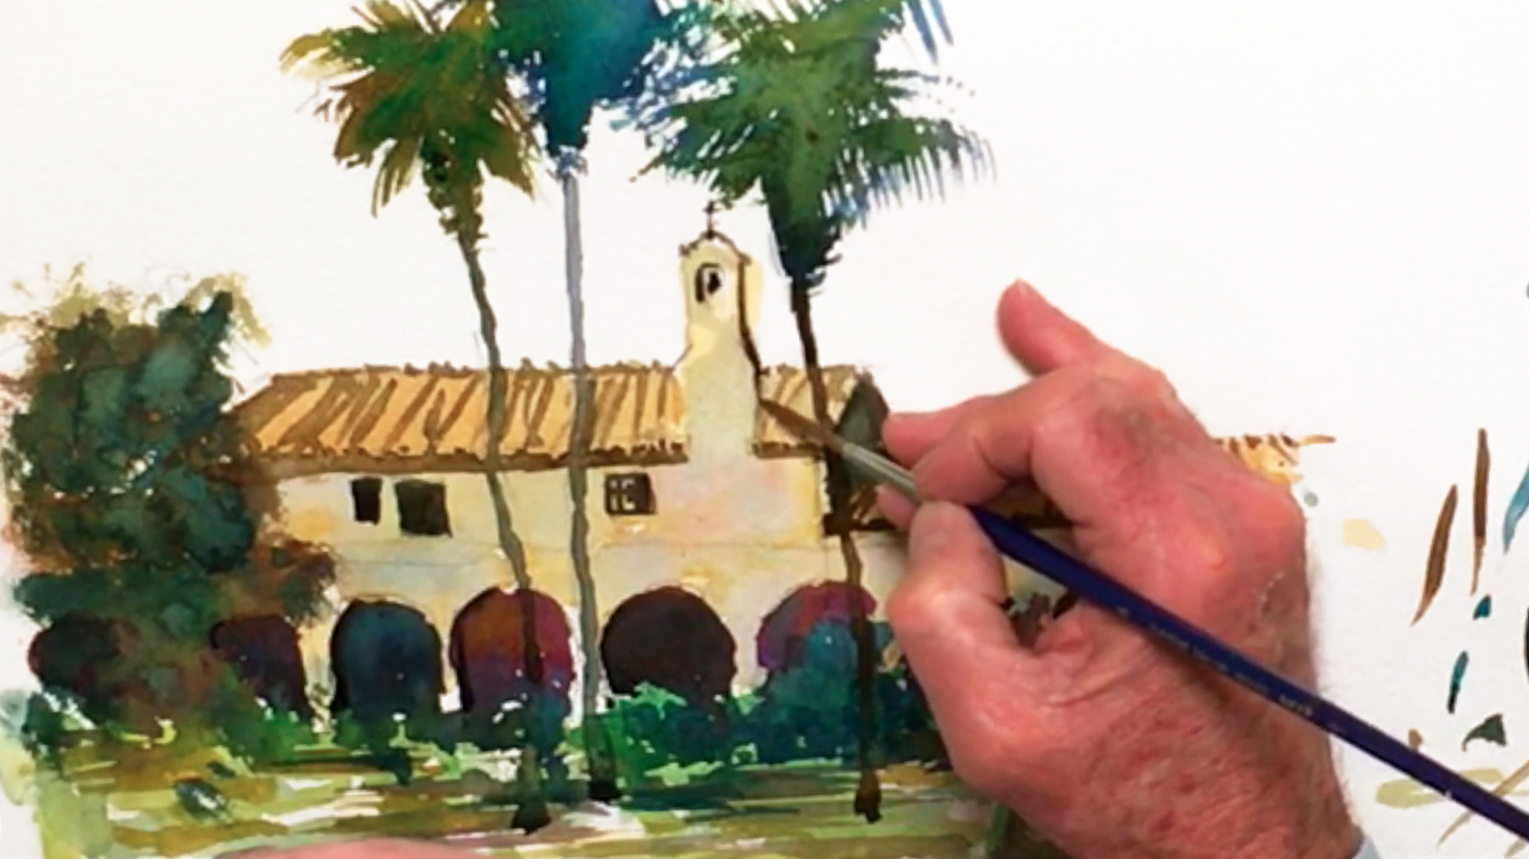 With a no. 12 rigger brush, mix the blues and browns, and paint the tree trunk on the left. Don't make it completely straight! Mix in more Neutral Tint, and paint the trunk in the middle. Then add more Burnt Sienna for the rightmost trunk. Use the brown mix to darken the walkway, leaving streaks of underlying color through for more texture. Then, change back to the no. 8 round brush, and touch up more details. Be careful not to touch the wet tree trunks! Layer some Ivory Black to darken the edge of the arches, and for smaller details, use the no. 6 rigger to paint the shadowed sides of the bell tower, the cross, and the bell itself.
Step 10: Figures Under The Arch
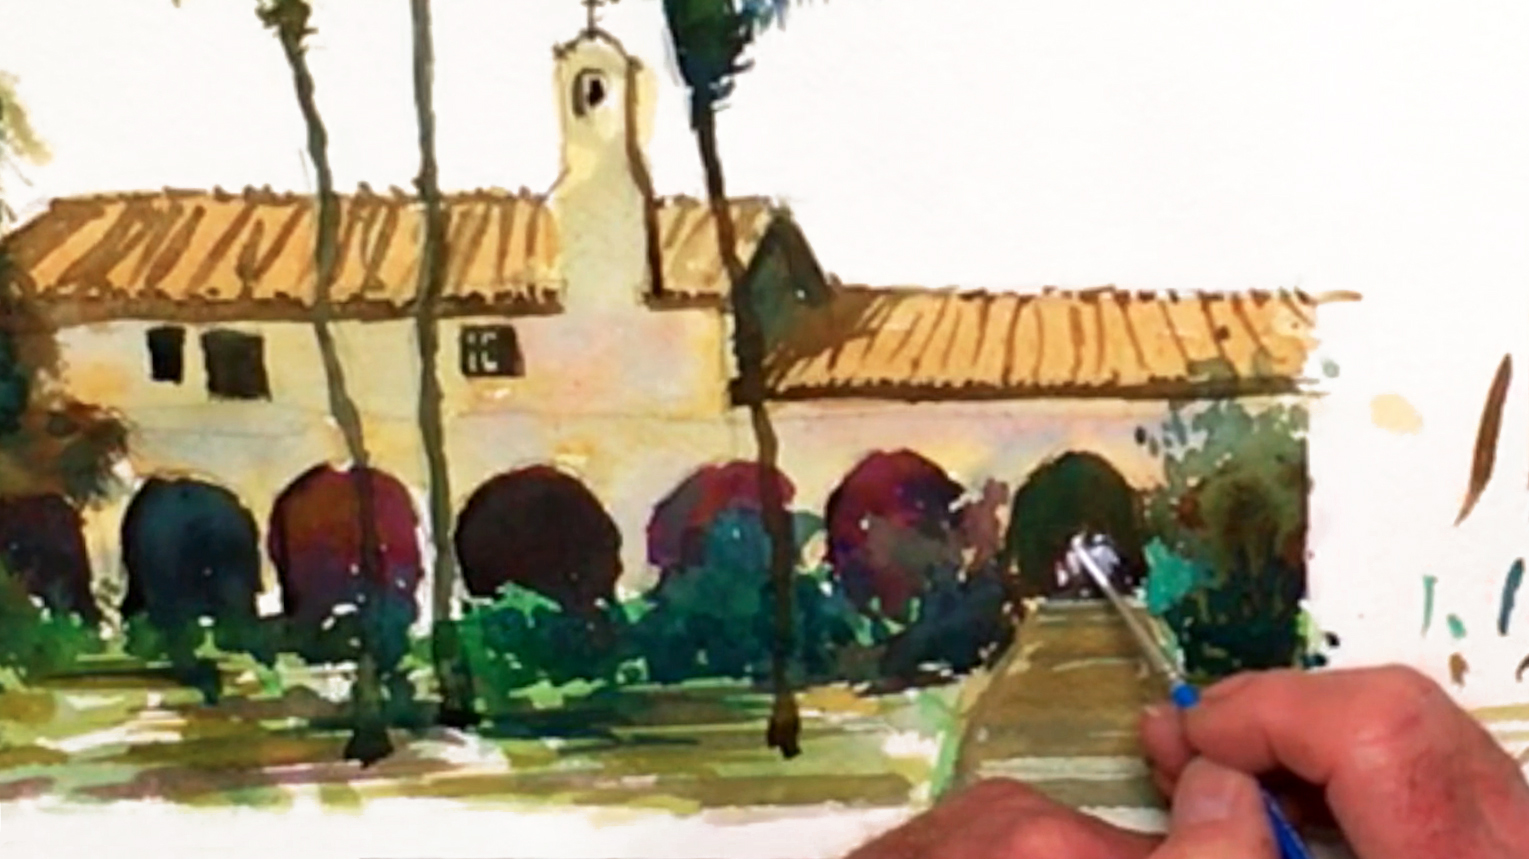 Use Cobalt Green to touch up the foliage, and then paint the people standing under the archway using any colors you want. Bill uses Permanent Carmine, Cobalt Blue, and Ivory Black for different parts of the clothing, and Yellow Ochre for the skin and head. If the colors get too dark, you can do some wet lifting using a dry, "thirsty brush". When the paint is dry, you can also add highlights by dotting in a very saturated Chinese White using a no. 2 round brush.
Step 11: A Wet-On-Wet Tropical Sky, And Color Harmony
 The last big area to paint is the sky. Like before, use the no. 12 rigger brush to wet the sky with water, leaving some parts dry for clouds. Use a diluted Brilliant Orange to drop onto the wet surface, brushing as randomly as possible. It's fine to overlap a little with other objects in your historical watercolor painting, and paint as much as you need to add some interest to the background without taking the focus away from the Capistrano. With the same orange, bring this into the building's walls and roofs as well. Take care not to make the orange too strong, and be selective in where you put it. This will help add color harmony to your painting, and tie the whole thing together.
Step 12: Finishing Off A Historical Watercolor Painting
 For finishing touches, step back to look at your historical watercolor painting, and see what's still missing or needs fixing. Bill adds some walkway lines, and touches up the people's skin tone and foliage details. He also uses very saturated Cadmium Red to add flowers to one of the bushes, and Chinese White for the other bushes, the lawn, and a window. To get more of a "historical watercolor building" feel, he uses Burnt Sienna and a round brush (no. 2) to paint bricks along the edges of the arches, then a row of them in the middle of the Capistrano. When you're finished, feel free to add the final flourish - your signature - in white. That's it for this tutorial! Hope you enjoyed it.


