Follow Steve Curl as he teaches you all the watercolor techniques required to paint a color portrait of President Theodore Roosevelt from a black-and-white reference photo. This tutorial covers helpful planning and drawing techniques to more advanced watercolor techniques like painting a turning edge versus a rigid edge and creating a "lost-and-found" effect. Want to watch the video version? This tutorial is also available to members of our Beeblys WatercolorPainting.com.
Materials used:
- Reference picture of a profile of President Theodore Roosevelt (you can print one out here)
- A block of Arches cold press watercolor paper (140lb, size 16" x 12")
- HB or 2B pencil
- Kneaded eraser
- Painting palette for watercolor paints
- A container of water
- A towel or rag to rest brushes on
- Tissue or paper towel
Paints (Holbein Artist's Watercolors)
- Cadmium Yellow Deep
- Aureolin
- Cadmium Yellow Orange
- Cadmium Red Deep
- Permanent Alizarin Crimson
- Ultramarine Deep
- Cobalt Blue
- Cerulean Blue
- Peacock Blue
- Sap Green
- Hooker’s Green
- Yellow Ochre
- Burnt Sienna
- Burnt Umber
- Sepia
- Payne's Grey
- Lamp Black
Brushes
- Silver Brush Black Velvet: Cat’s tongue brush (¾" width)
- Fibonacci Kolinsky-Sable: Round brush (size 12)
- Escoda Kolinsky-Sable: Round brush (size 6)
- Cheap Joe’s Fritch: Scrubber brush (size 4)
- Synthetic round brush (size 6)
Step 1: Sketching Techniques
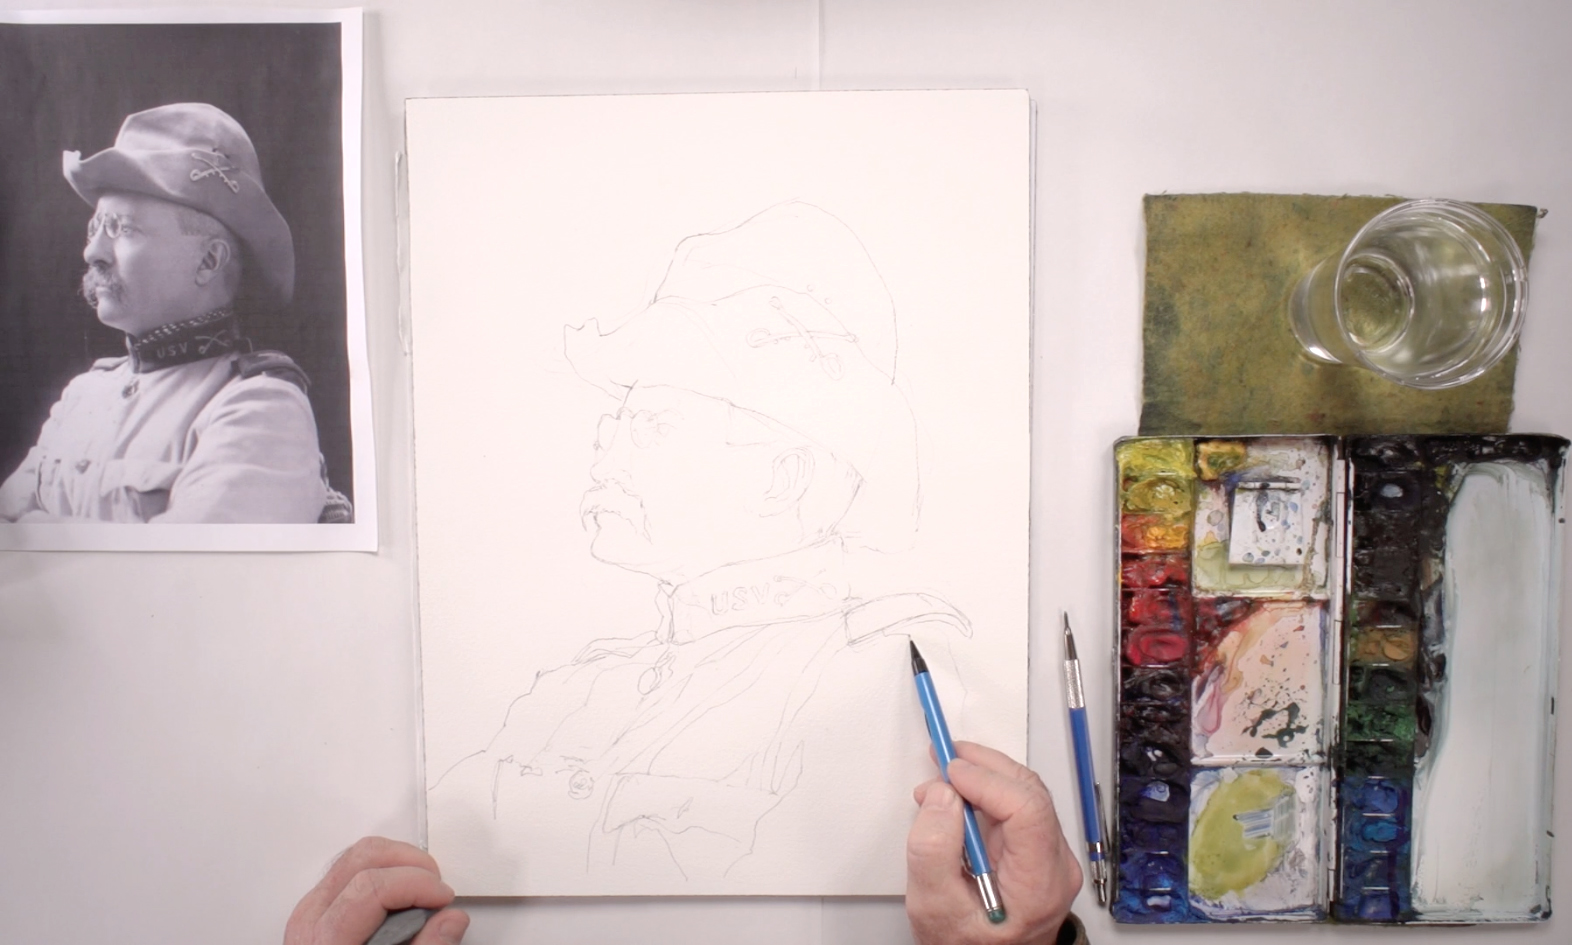 To paint a good portrait, it’s best to work using a live model, or if that option isn’t available, then make sure you have a good picture – one that has the person’s features at a good angle and with great shapes within their features. Also, make sure the lighting is optimal; not too bright so the colors are bleached out, but not too dark so you can’t determine features clearly. Here, Steve uses a black-and-white picture of Theodore Roosevelt. You can use the same one by printing a copy here. Start by lightly sketching the basic lines using an HB or 2B pencil. Keep it simple, take your time, and keep measuring the distance between facial features to get the proportions right (you can use your thumb or pencil). Study the shapes created by the hat, clothes, and facial features to get the best results before adding details, including shapes of cast shadows, to the drawing. Clean up any extraneous lines with a kneaded eraser before continuing. Below is a close-up of Steve's drawing:
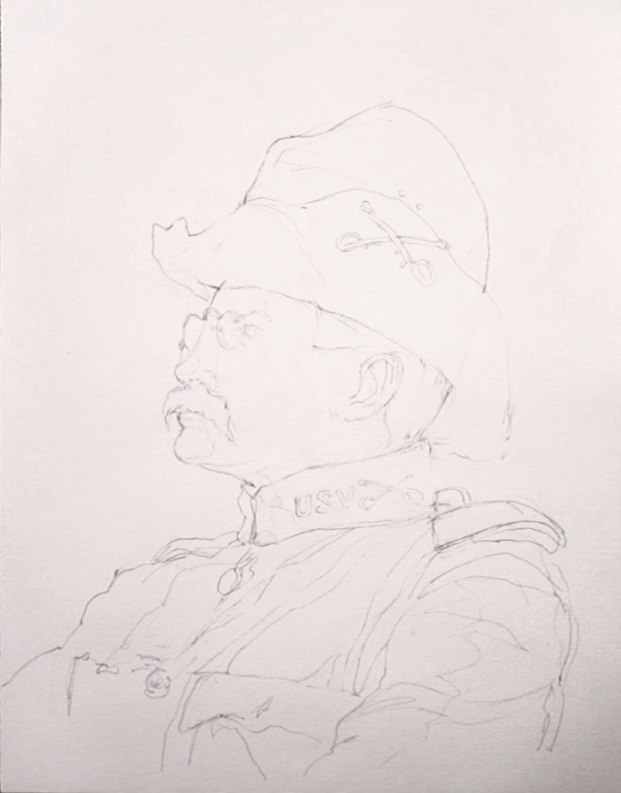
Step 2: Techniques For Painting Skin
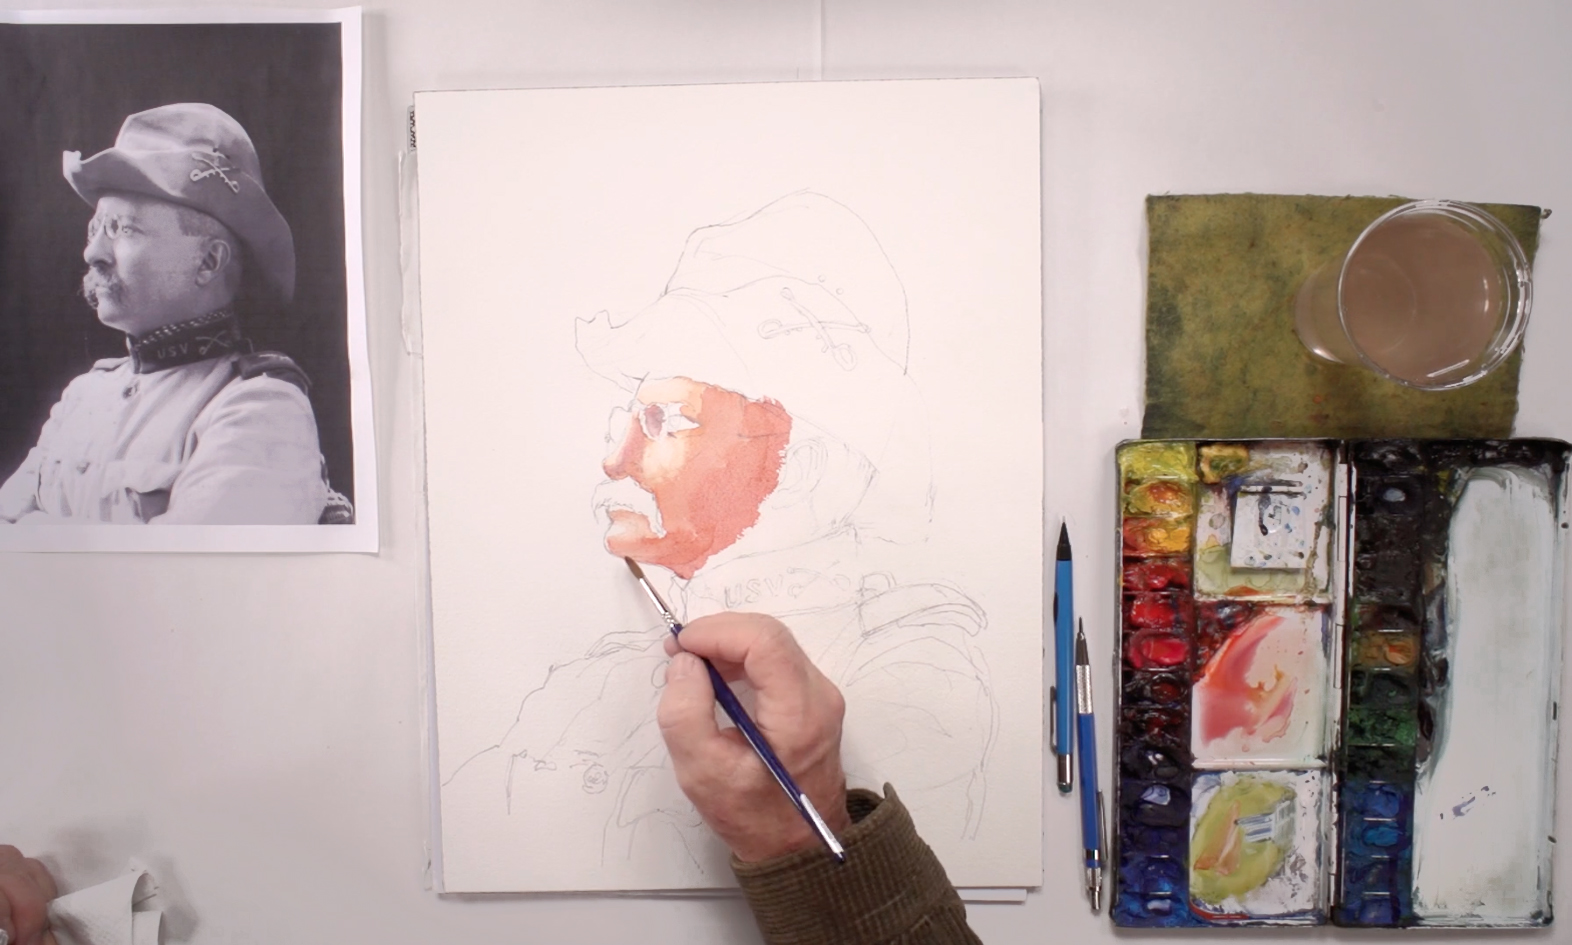
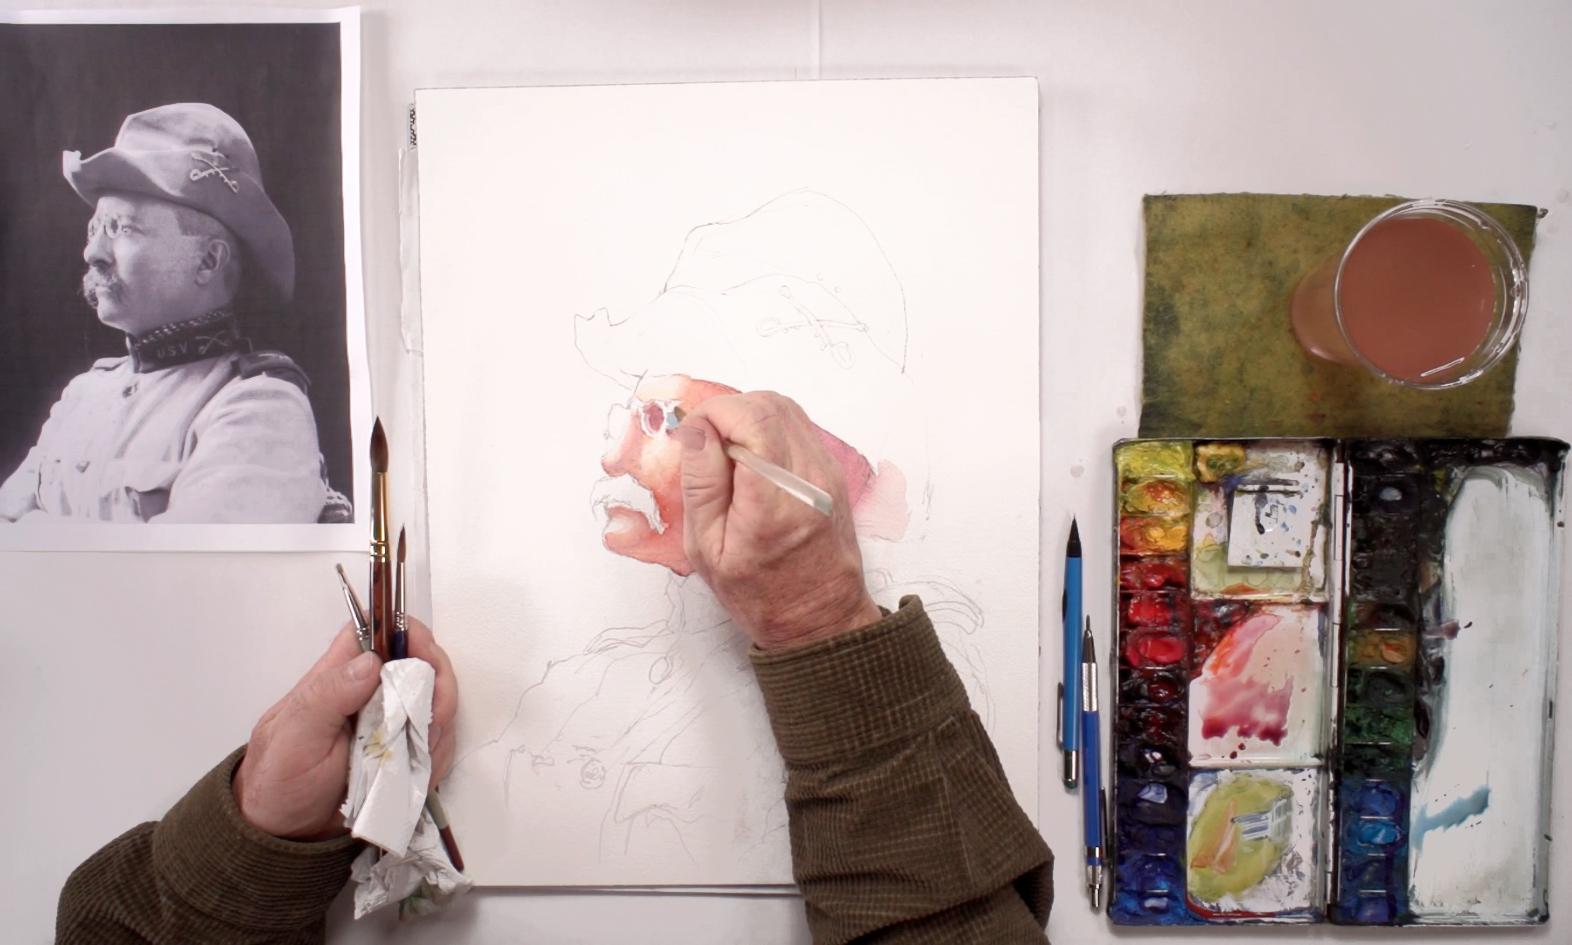
 Make sure the space where you mix your colors on your palette is clean before mixing a batch of skin color with the Fibonacci size 12 brush: Aureolin yellow, Cadmium Yellow Deep, and a little Cadmium Red Deep. It should be a dark peach color. Then, paint the tip of the nose, the shadow around the eyebrows and eyes, and the cheeks. Leave highlights (where the light is hitting directly onto the face) white. Before the paint dries, use a clean size 6 brush and some water to soften the edges of the shadow. This is called a “turning edge”, where you make objects appear round by making the transition from dark to light more gradual.
Step 3: Color Mixing Techniques
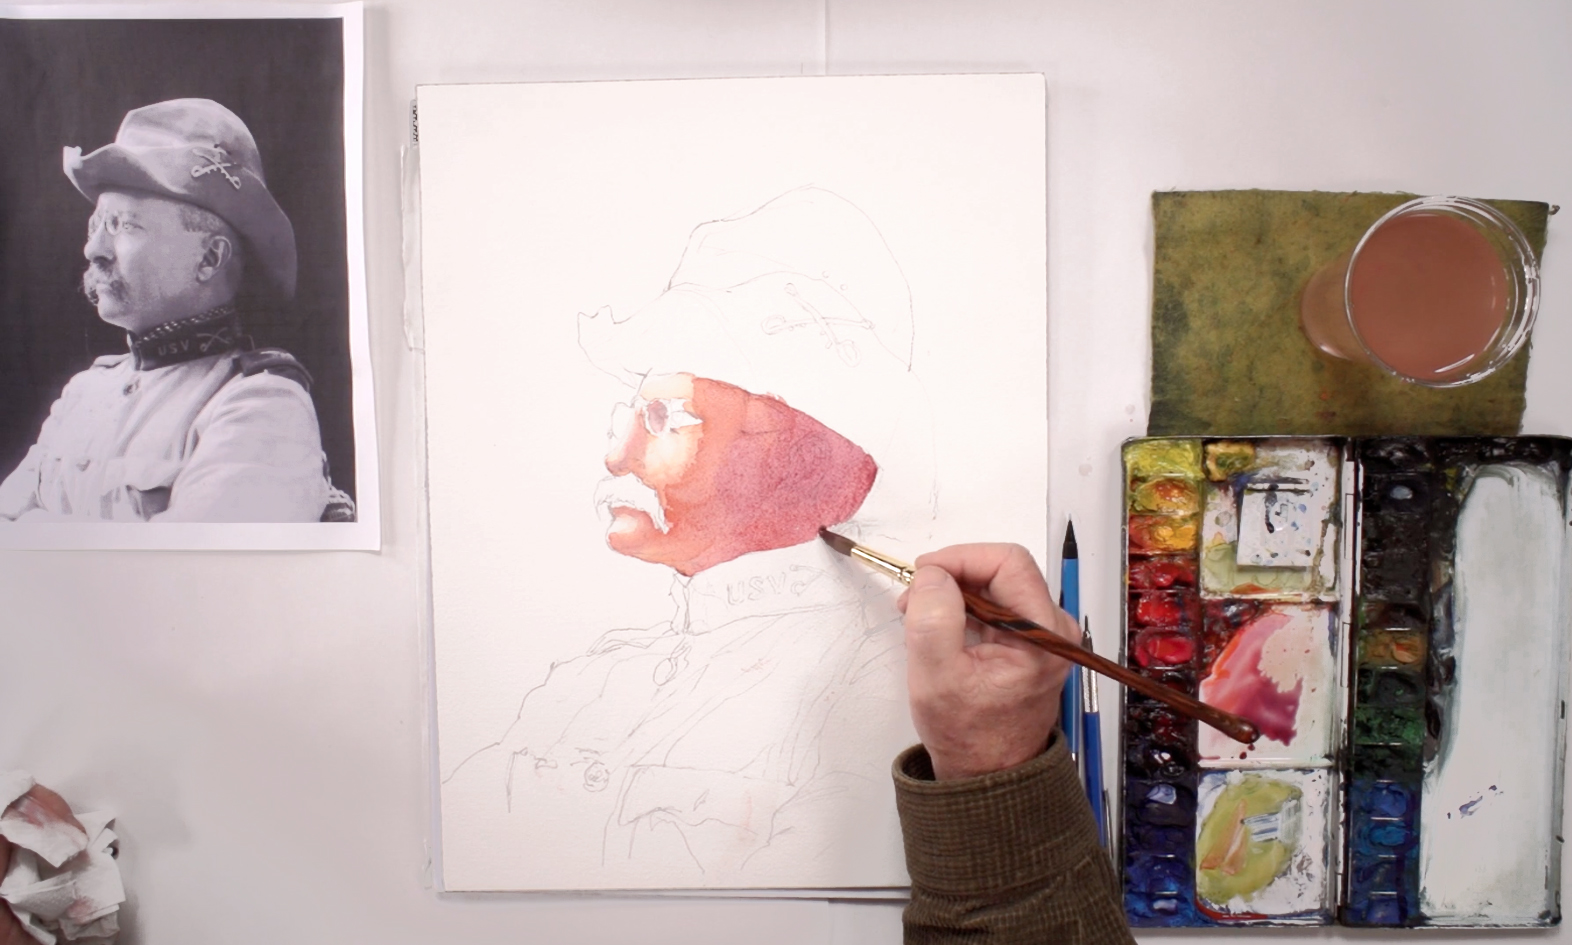
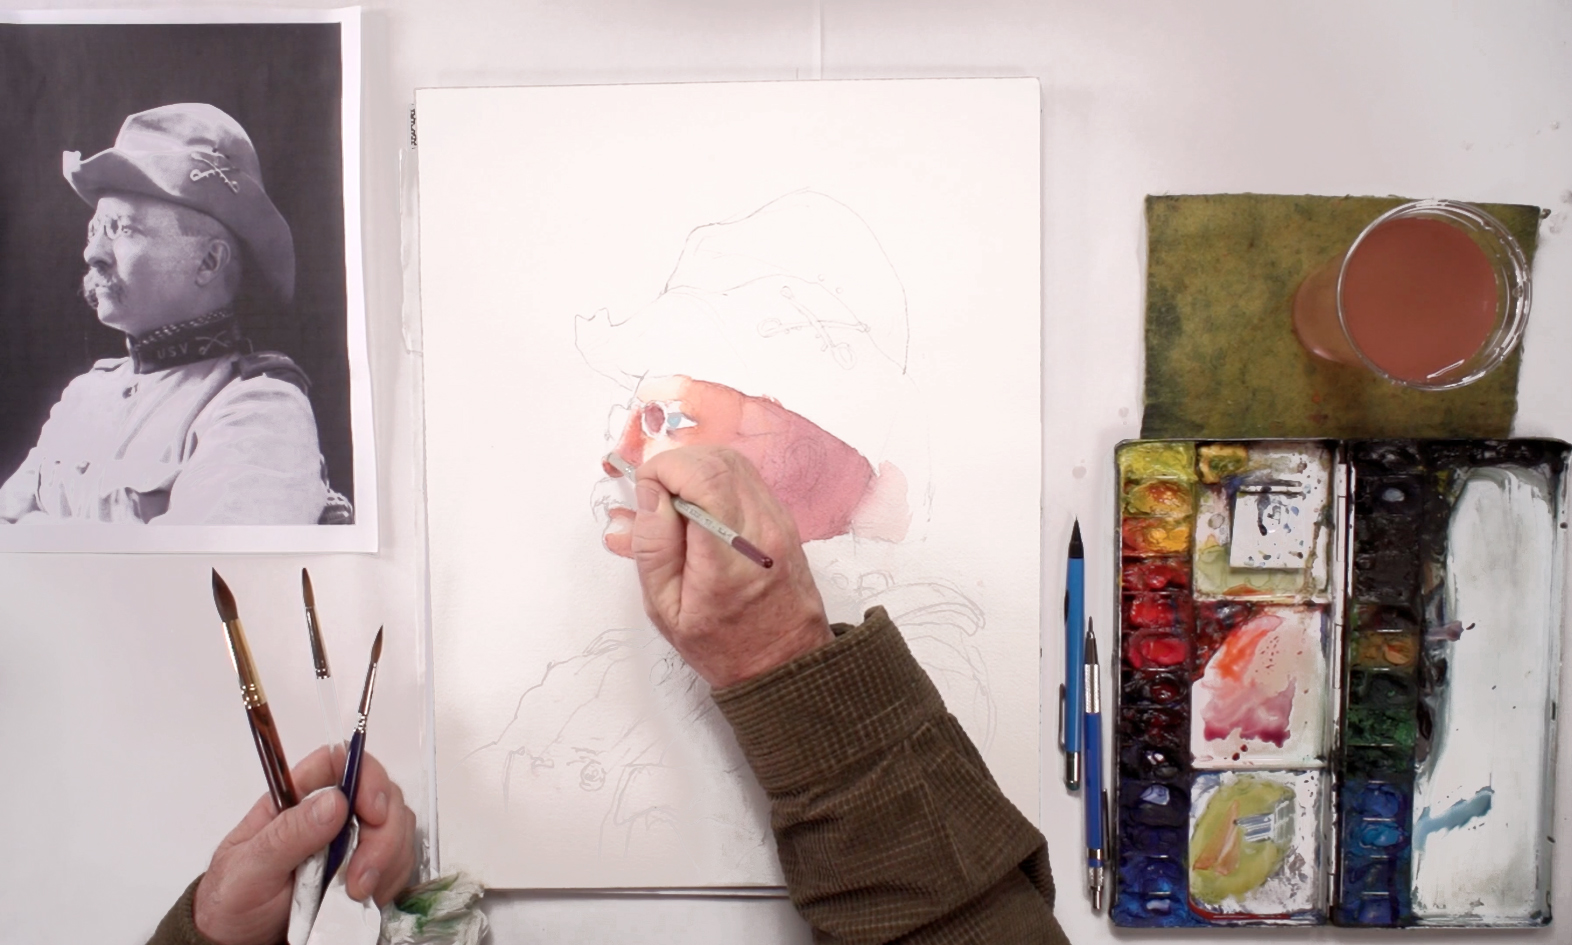
 As you get to the darker parts on the face, pick up some of the cooler reds, such as Permanent Alizarin Crimson or adding a touch of Ultramarine Blue to your skin color mixture. Paint the inside of the nose where shadows collect, inside the glasses, and where the values change from warm to cool. As a general rule of thumb, values are warmer where there is more light, and cooler where there isn’t. Pick up more Ultramarine Blue or Cobalt Blue to darken the eye area around and inside the glasses, then add more Alizarin for the jaw area to the chin, and the area above the ears. Remember to soften the shadows’ edges with a clean brush and water to create a rounded look. You can also lift out paint with the same brush if you make a mistake, or to add reflected light, such as a small area under the chin. Refill the spot with a lighter mix of Cadmium Red and Yellow Deep, as this should reflect the color of Roosevelt’s uniform.
Step 4: Techniques For Painting Shadows On Skin
 For the face’s core shadow, add more Alizarin Crimson and Ultramarine Blue for a darker and cooler color for the part where the face turns into shadow. You can paint over the ear, hair, and the back of the head (the darkest area). Details will be worked in later. Make sure to soften where the back of the head meets the hat, and where dark meets light. If you’re not sure about your colors, you can look at different pictures of Roosevelt to get an idea of his complexion and the colors of the clothes he wore.
Step 5: Techniques For Painting Eyes
 Use Peacock Blue with a touch of Hooker’s Green for his iris and pupil. Then, mix more Alizarin and Ultramarine Blue for a purple color, and use this for the shadow under the eye and eyelid. Darken the areas around the bottom lip and the side of the nose as well. You can lift out more paint on the front of the eyelid and forehead to add more contrast. One option is to use the scrubber brush (size 4), but be gentle as it is more abrasive and may make a hole in the paper if you use it too much. And remember, watercolor is quite a transparent medium, so don’t water down your paints too much as it will always dry lighter than when it’s wet.
Step 6: Techniques For Painting Highlights & Shadows
 Keep adding details and color to the shadows and highlights, touching up whenever you need and switching to the scrubber brush to create highlights more easily. The important part is to get the shapes of the shadows right. You can add more color under the glasses and eyes, then add more Alizarin Crimson and paint a thin shadow where the hat meets the head. Remember to round the edge by softening the shadow with a clean wet brush, and if you decide to paint another layer of paint, make sure the surface is damp before doing so, unless you want the paint to have a hard edge.
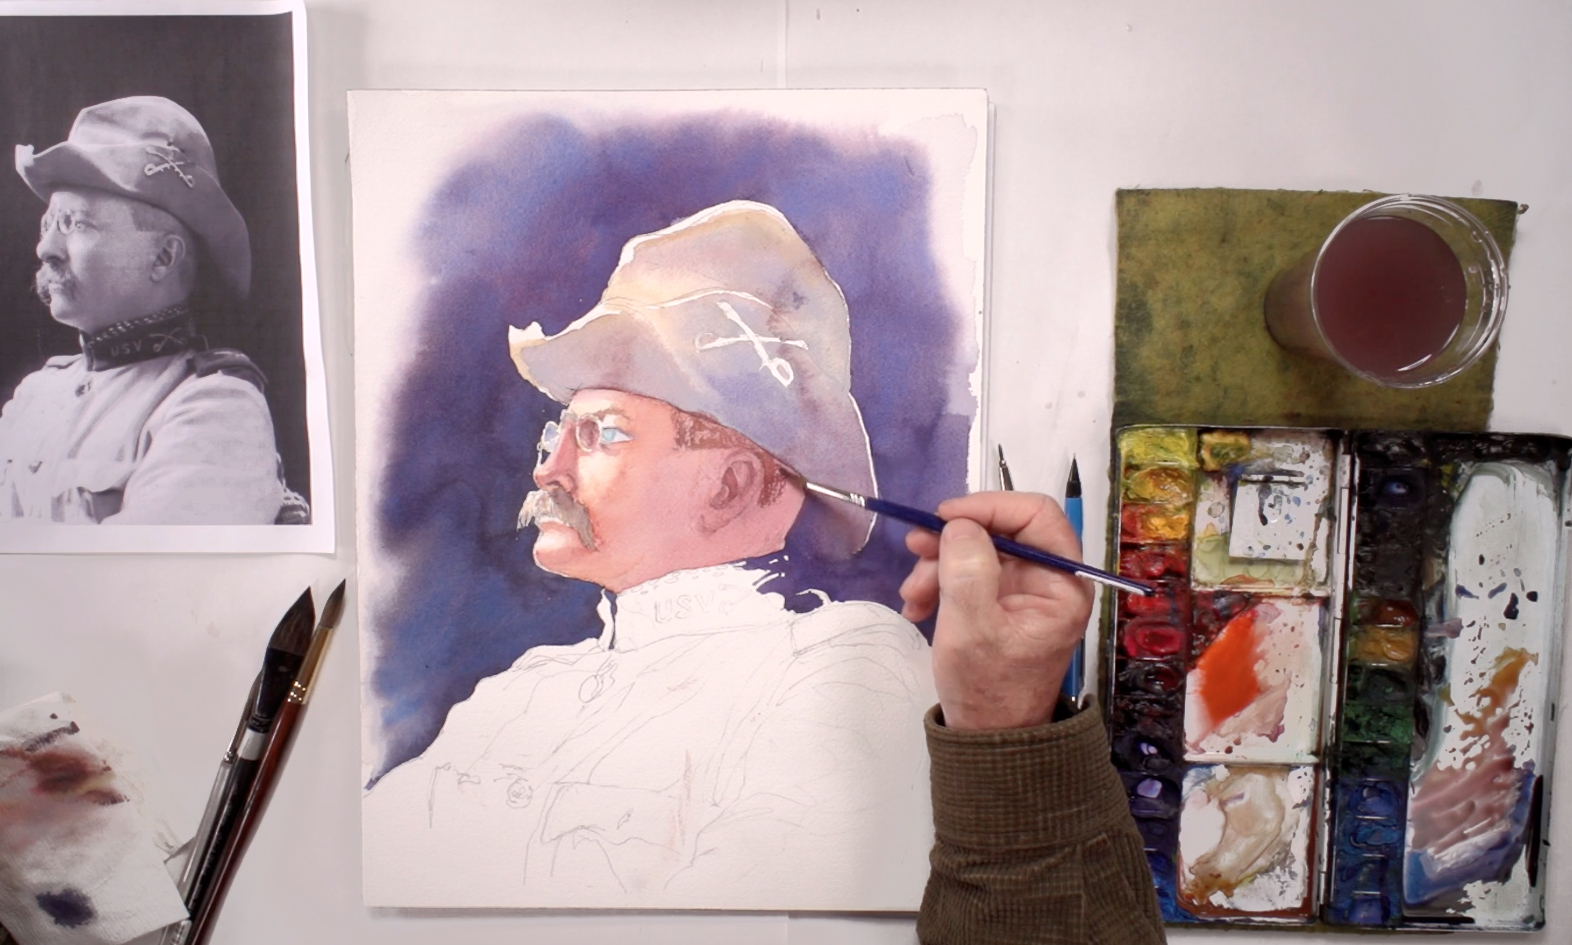
Step 7: How To Paint A Hat
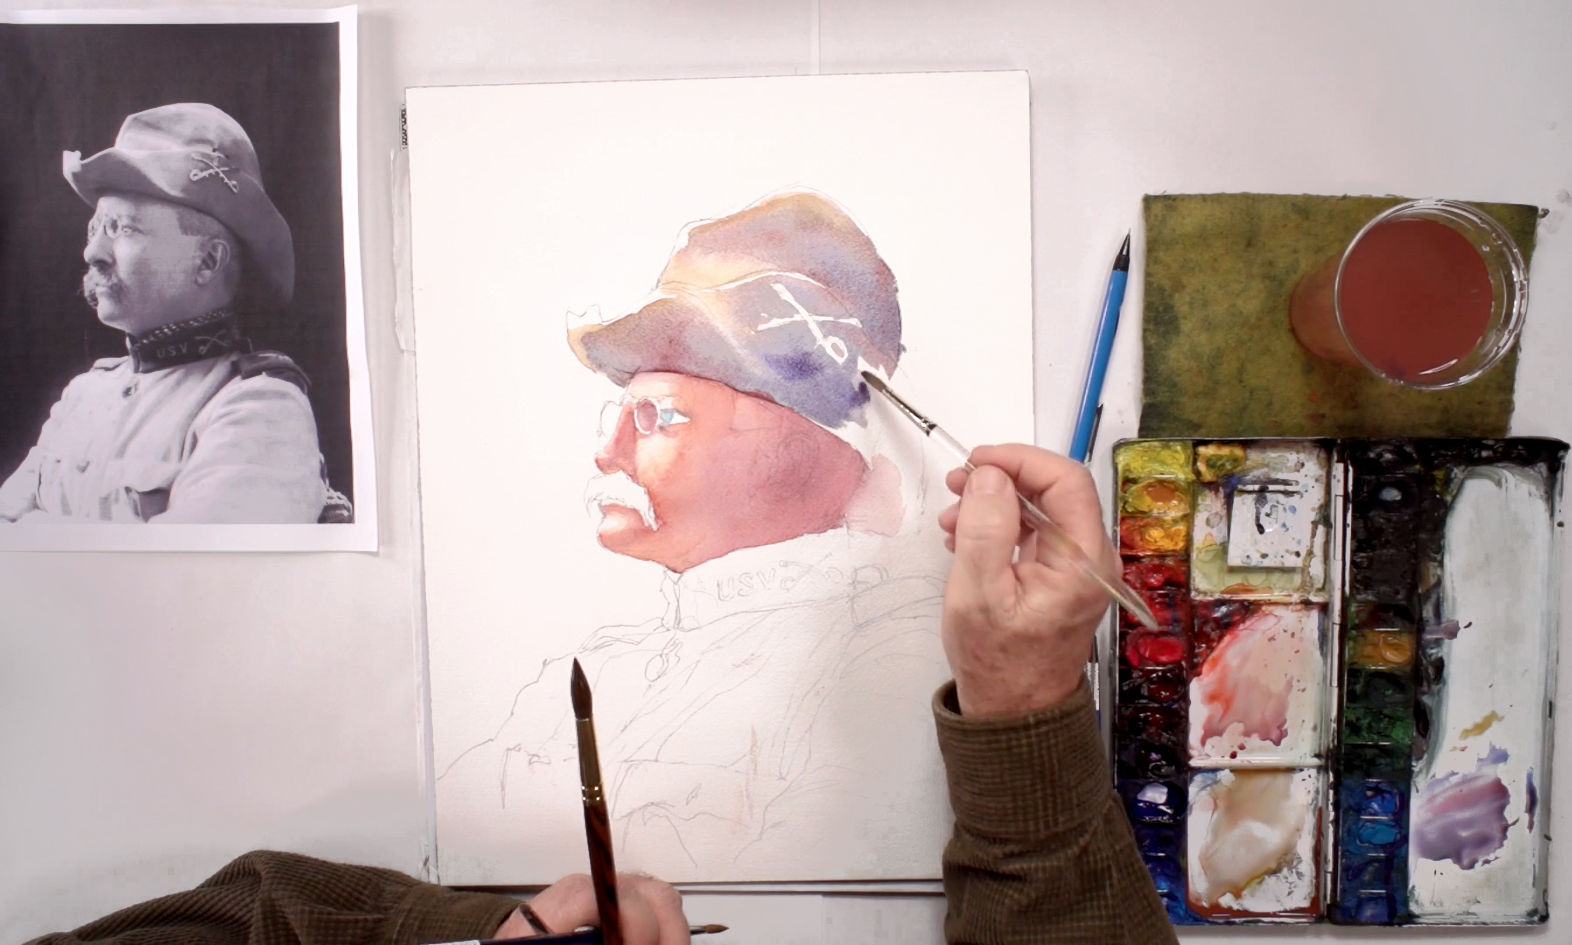 Paint the hat next. Determine your light and dark values, then mix up a canvas color: Yellow Ochre and Cadmium Yellow Orange for the hat’s “local color” (i.e. base color). Paint in the light tones first, avoiding highlighted areas and painting around where the insignia appears. For mid tones, add Alizarin Crimson and Ultramarine Blue for a cooler and darker value. Pay close attention to the way the hat folds and creases. You can add different blues to the canvas color for a variation in the shadows, and for the darkest areas, mix in more purple by adding Alizarin and Ultramarine Blue, and a touch of Cadmium Yellow Orange to dull it down. Lift out any highlights if necessary. Switch to the size 12 brush to cover bigger areas, then add in Yellow Ochre for a more neutral tone, using it for the reflected light found at the back of the hat.
Step 8: Applying The "Lost-And-Found" Watercolor Technique
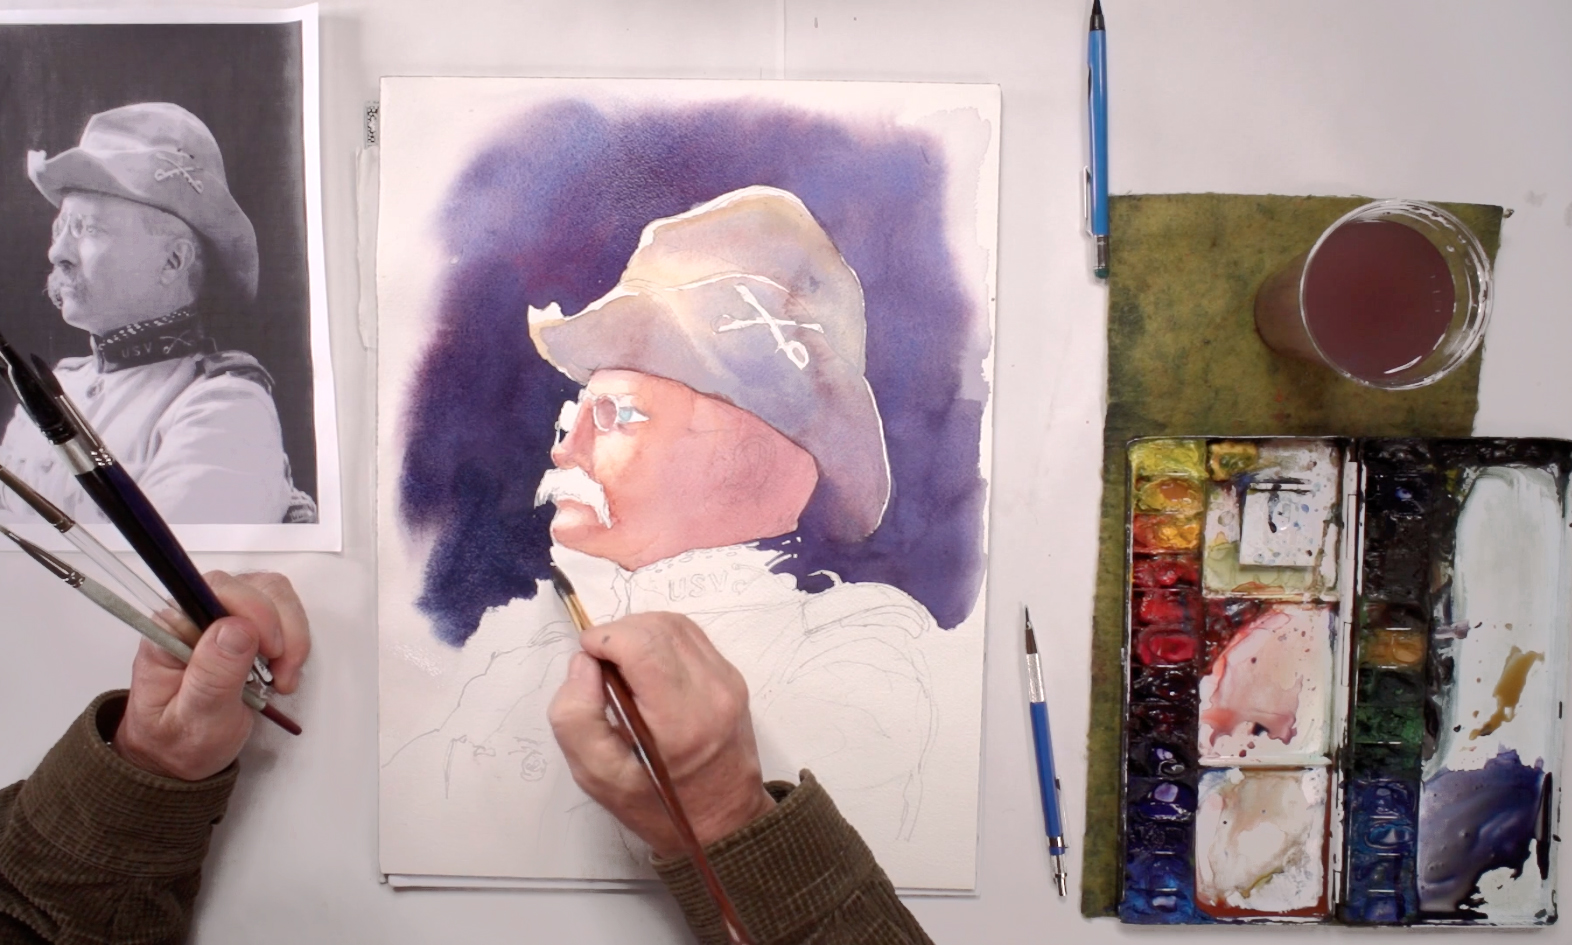
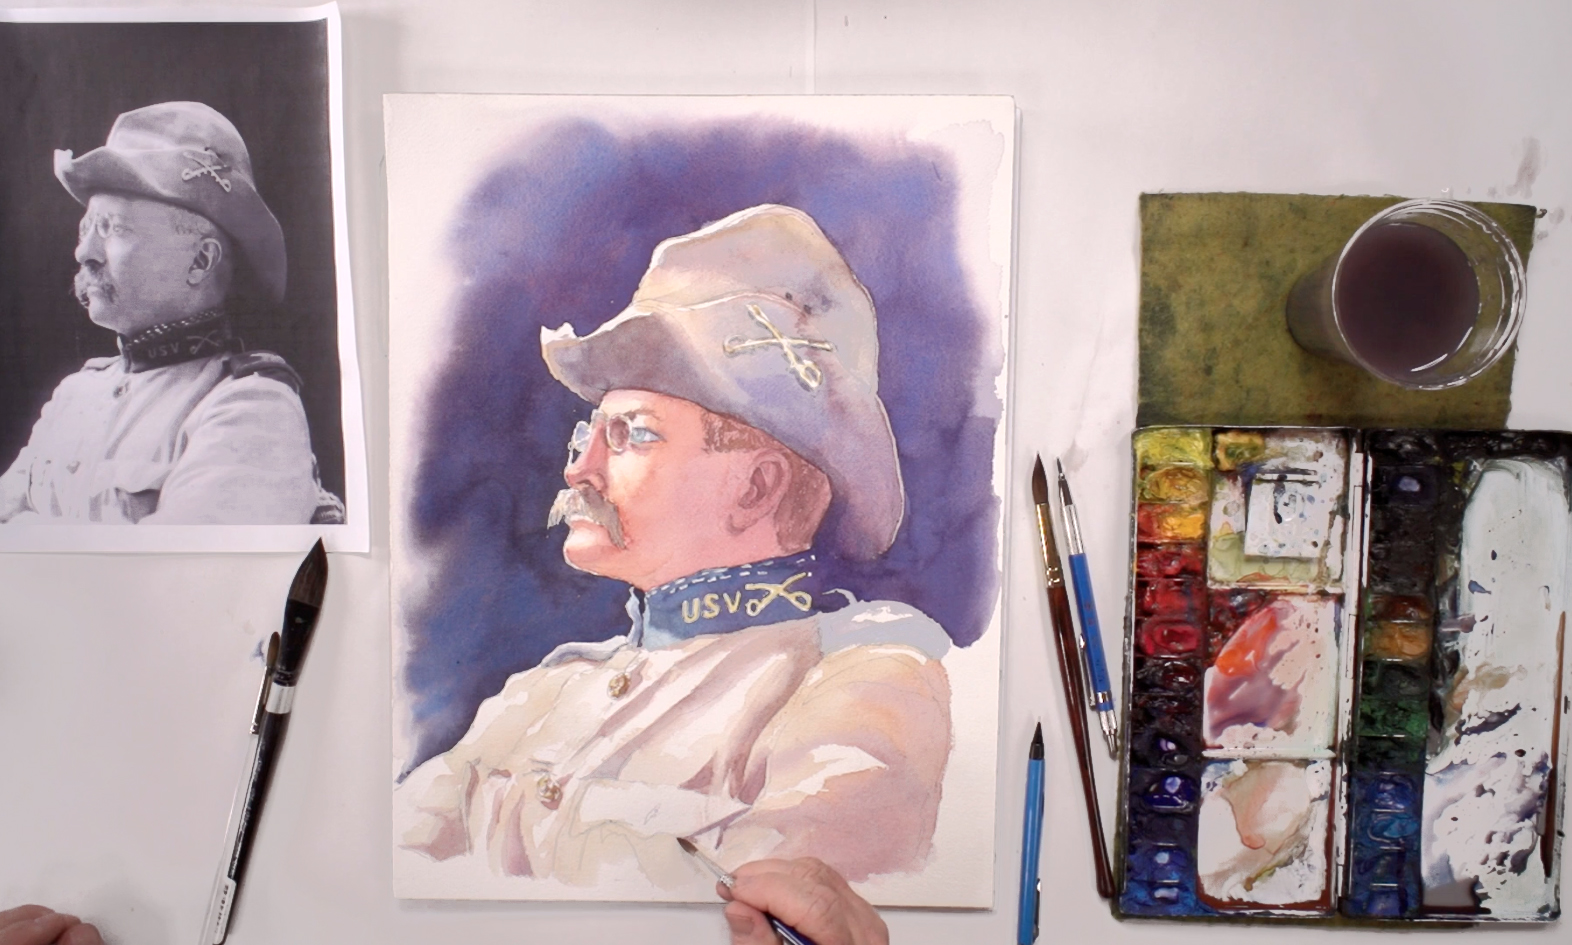
 The darkest part of the hat blends into the background, so start by mixing a large batch of the background color: Permanent Alizarin Crimson, Ultramarine Blue, Cerulean Blue, and Peacock Blue for a deep indigo color. Start from the back of the hat (blend it in with the nearby shadow color), and overlap the back of the collar with the same color as well, taking care to avoid any of the collar’s details. This is what Steve calls the “lost-and-found” effect, where you drastically increase the contrast of a painting by placing something very light next to something very dark without losing the continuity of the overall picture. In this portrait, it will make Roosevelt part of the background (“losing” him) while making him the main subject at the same time because the highlights on him make him stand out from the rest of the background (“finding” him). Continue painting the background, creating variations of the same color by adding more blues, Alizarin, or Payne’s Grey. For a softer, more interesting background, you can paint wet-on-wet by using the cat’s tongue brush to wet the paper before dropping paint in. Just be careful where the background meets the hat or Roosevelt’s face as you want a clean, crisp edge. To do this, make sure the hat’s edges are dry before trying to paint near them. Remember to leave any highlights around the edge of the hat.
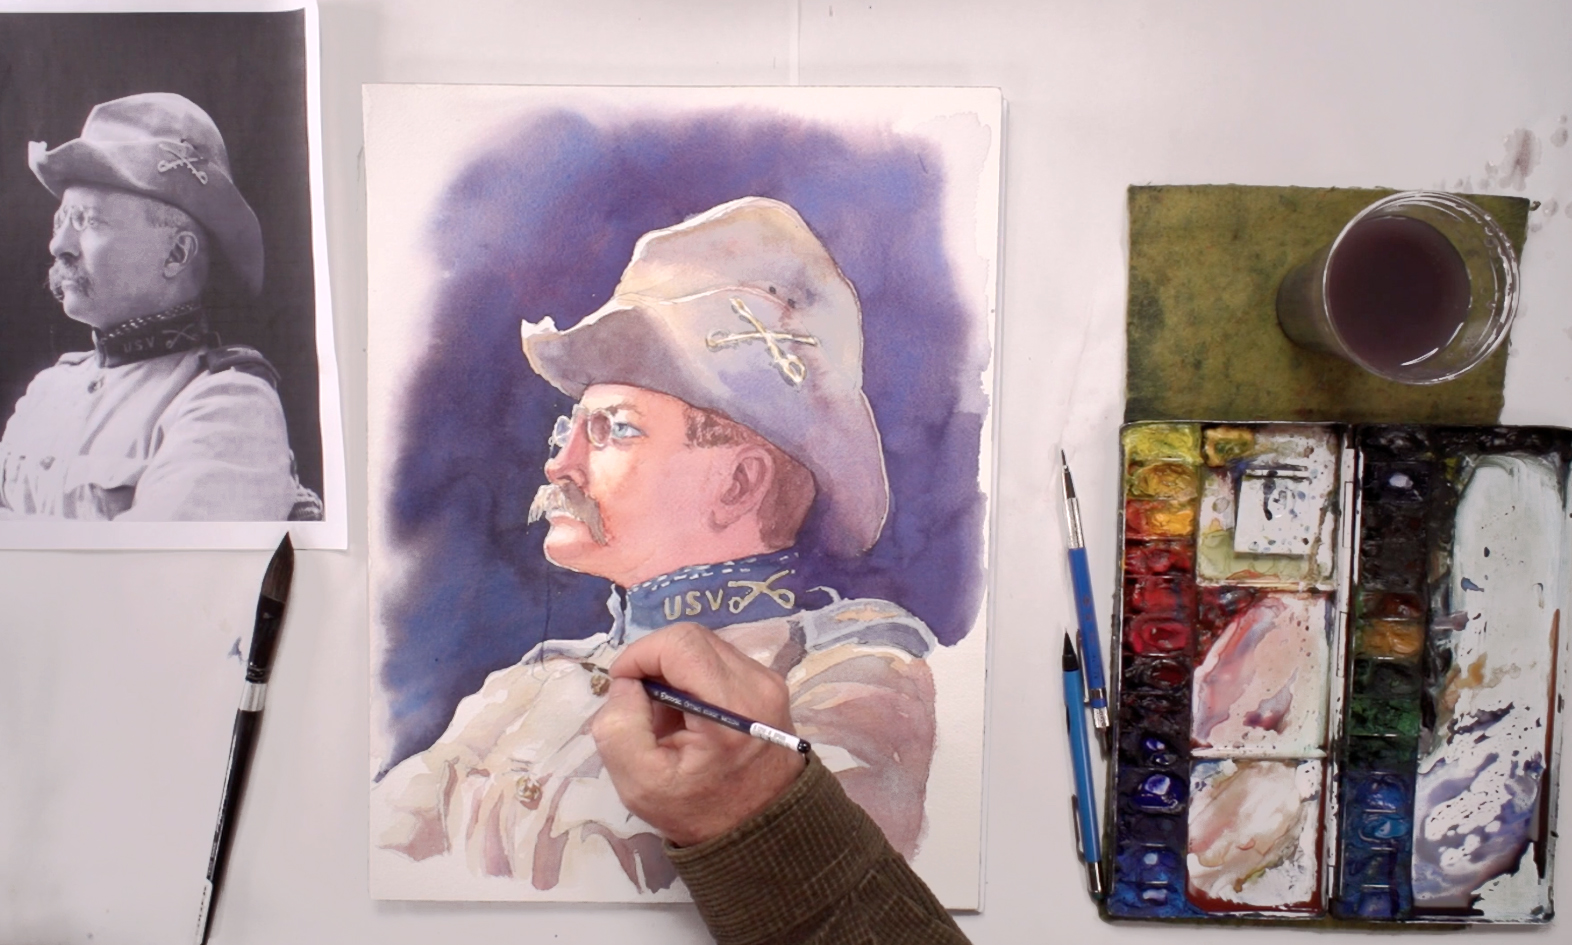
Step 9: Finishing The Background
 Use a smaller size 6 round brush when you get to painting around the face, and add more Ultramarine Blue and Payne’s Grey to darken the area next to the face. Paint the negative space around his moustache to add texture, and keep sitting back to check the overall painting. To paint the part of the background that shows through his glasses, water down the background color before painting inside the glasses (leave the frame white though). When you’re done, let the paint dry before moving on to the next step.
Step 10: Techniques For Painting Moustaches
 Using the Fibonacci size 6 brush, mix Yellow Ochre and Burnt Sienna for a tan color, then paint the hairs of the moustache while avoiding the highlighted areas. Paint the cast shadow caused by the nose by adding more Alizarin Crimson and Burnt Sienna, and for the darkest areas, add the dark indigo mixture used in the background and using that to paint a few strands of moustache hair. You can also use the same color around and inside the nostril, and remember to soften any turning edges.
Step 11: More Techniques For Painting Realistic Eyes
 Mix some Alizarin Crimson and Cadmium Red Deep with the tan color, then bring out the eye further by emphasizing the shadowed areas around the eye and the area around the eyebrows. Use an earthy tone by adding Burnt Sienna and Yellow Ochre before painting the hairs of the eyebrows. Feather the edges for a hair-like texture. Make a gold color by adding more Yellow Ochre to this mixture before painting the frames of the glasses – leave some highlights though, to show that the glasses are metallic. Then, add some of the indigo mixture for the thin shadow under the eyelid, and paint the sclera (the "white” part of the eye that surrounds the iris) using a very watered-down Payne’s Grey and blue.
Step 12: Techniques For Painting Realistic Ears
 Mix a reddish-purple hue using Alizarin Crimson and Ultramarine Blue, then paint the shadow of the ear. Soften the edges where the surface is round, but don’t overwork the ear as it’s not the focal point of the portrait. You can add some yellow for a warmer tone in places where some light hits the ear to give it more depth, and use a more saturated purple mix for the darkest parts of the ear. For his hair that peeks out from underneath the hat, use the purple mix, and add Cadmium Yellow Orange, Burnt Sienna, and some Sepia to make a dark brown before scumbling paint on to get the texture of close-cropped hair. His hair gets darker and less detailed at the back due to shadow, so as you move back, scumble less while mixing more paint in.
Step 13: Finishing The Hat
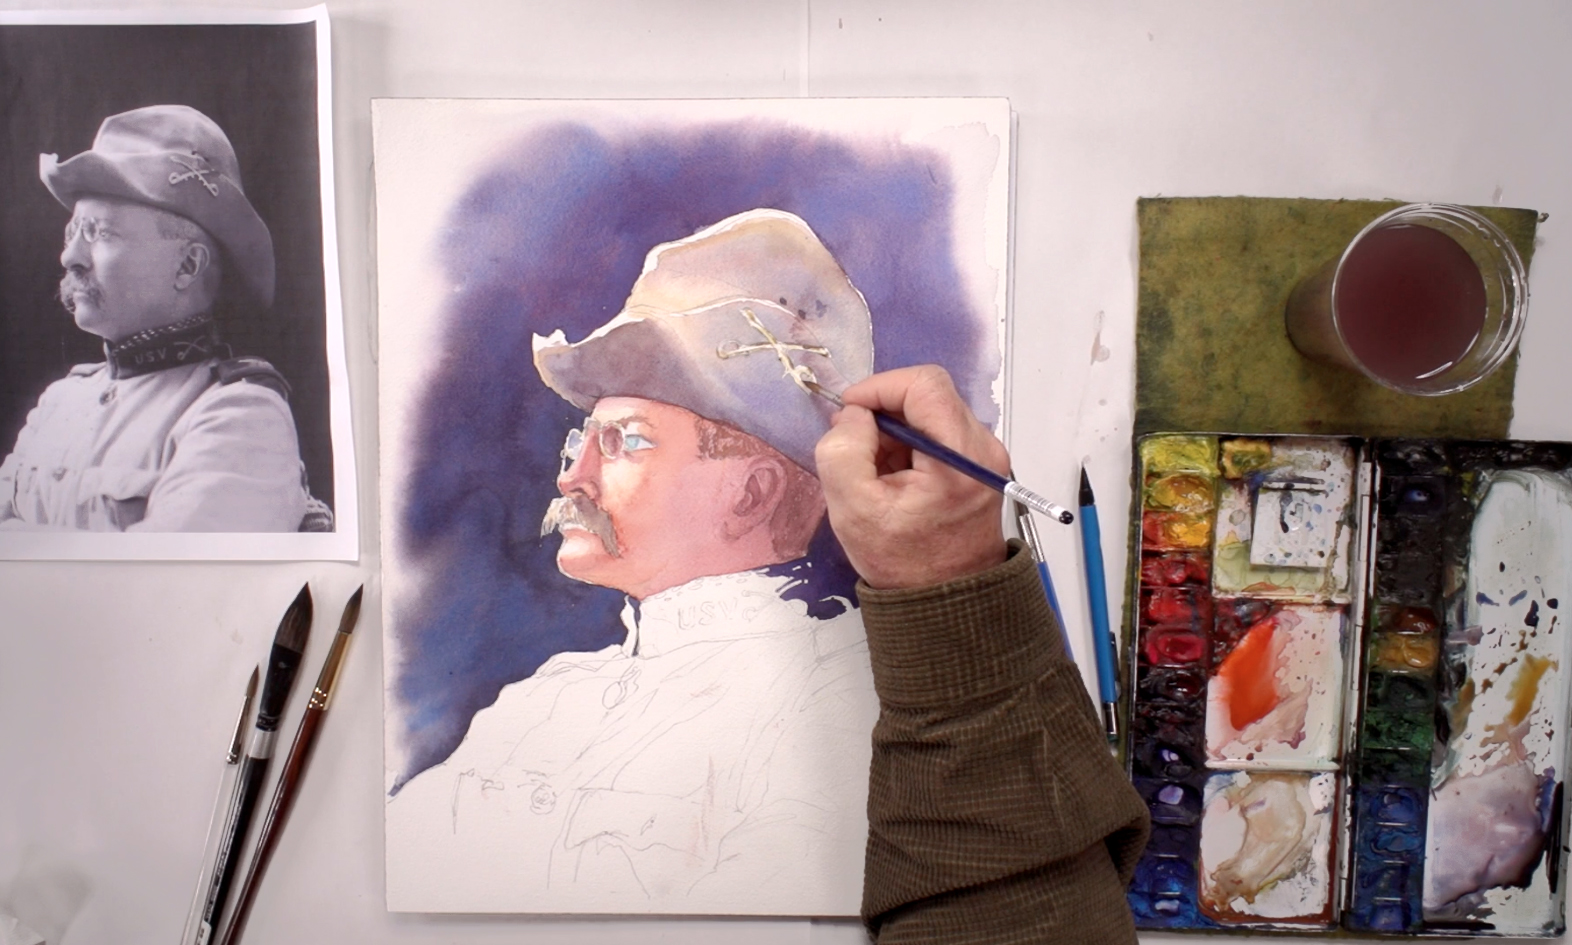 Mix Alizarin Crimson, different blues, Payne’s Grey, and some of the indigo mixture and darken some of the hat’s shadows. Then, mix Aureolin and Yellow Ochre for a golden yellow, and paint the insignia (the crossed swords) on the hat. Don't add too much paint so the details don’t get too dark and lost within the hat. Add Burnt Sienna and Umber for the insignia’s shadows, and indigo for the darkest shadow to make the details pop. You can use this same color to outline the pupil as well (use a small size 6 brush), making sure to avoid the reflected light in the eye. Add some of this color to the shadow at the back of the eye, under the eye, and under the eyelid to bring out the eye even more. In this way, you can continue adding depth to the hat and eyes until you’re satisfied.
Step 14: How To Paint A Shirt Collar
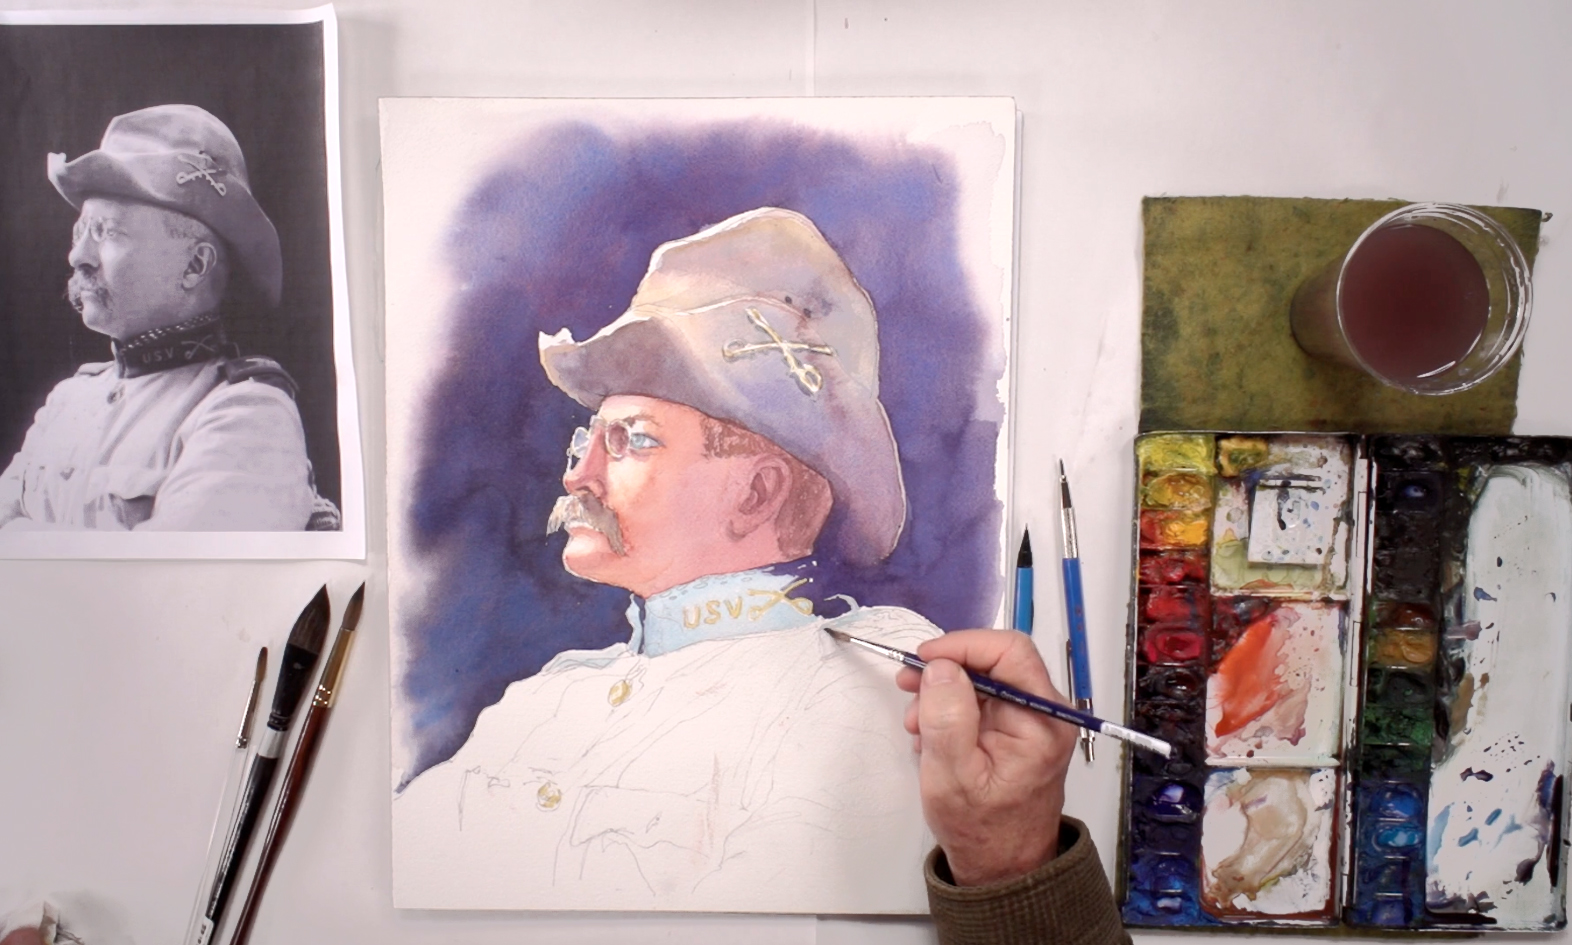 Use the same gold tone as the hat’s insignia for the collar’s details, this time filling the whole insignia without leaving any highlights as the entire collar is in shadow. Paint the buttons and medals too, but you can avoid the highlights with them. Wait for the collar’s details to dry, then block in the main color of the collar using Peacock and Cerulean Blue, making sure to avoid the details on the collar. Use the same color for the epaulettes (the badges on the shoulders of a uniform) too, while avoiding highlights. Leave the paint to dry.
Step 15: How To Paint A Jacket
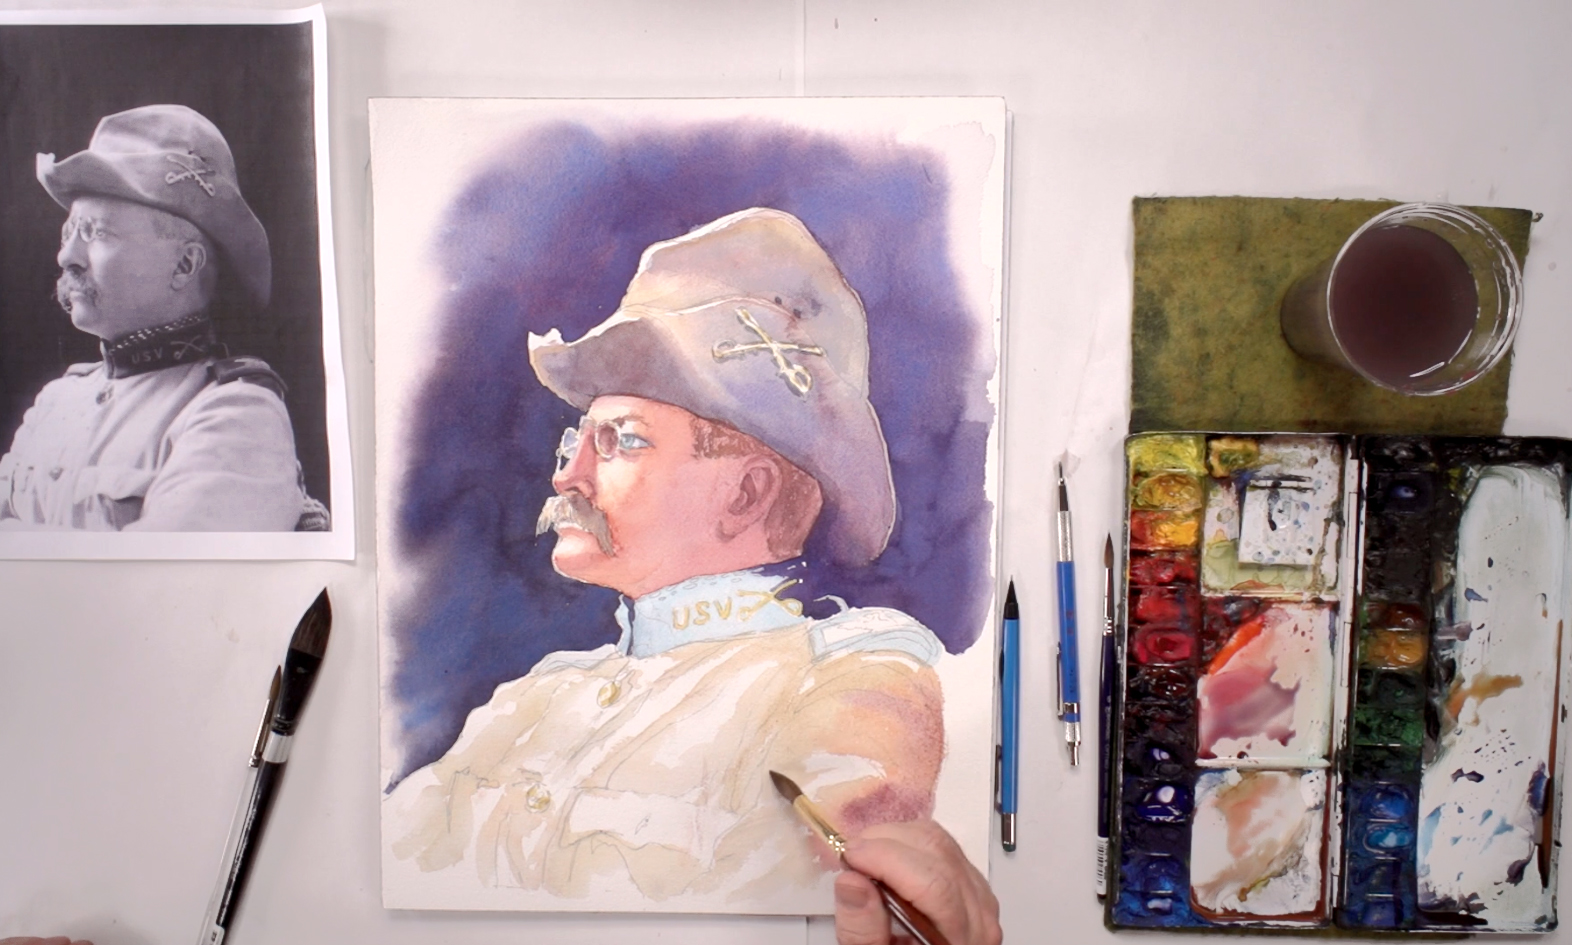 Determine the values of the jacket, and mix the local color first: Yellow Ochre, Cadmium Red Deep, Aureolin, and Cadmium Yellow Orange for a tan color, then use the size 12 round brush to paint any mid and dark tones on the jacket. Soften the edges and avoid white areas, and use loose brushstrokes as you don’t want too much detail on the jacket. Add more Cadmium Yellow Orange and Red Deep for darker shadows, then Alizarin Crimson and Ultramarine Blue for even darker shadows around the shoulder and arm. Soften these shadows as well, then let the paint dry.
Step 16: How To Paint Clothes
 While you’re waiting, you can move back to the collar. Mix Ultramarine Blue, Payne’s Grey, and the indigo mix to paint the shadow of the collar. Use the size 6 brush to paint around the decorations, and where it folds, soften the edge where the shadow meets the light. Mix Cerulean and Ultramarine Blue for the top part of the collar, and darken it with indigo to blend it into the rest of the collar area. Add Payne’s Grey for an even darker shadow for the inner part of the collar, and use the same color for the shadow under the epaulettes. You can soften this shadow by adding Yellow Ochre to represent the reflected light coming from the jacket.
Step 17: Finishing The Jacket
 Mix a bronze color next: Yellow Ochre, Cadmium Red Deep, Cadmium Yellow Orange, Burnt Sienna, and a touch of Ultramarine and Cerulean Blue, then paint the shadow of the buttons and any embossed designs it has on its surface. Emphasize the shadows on the jacket and under the epaulettes using a mixture of some blues, Alizarin Crimson, Cadmium Red Deep, and the indigo mixture, then paint the pockets’ shadows. Get a good shape for any wrinkles on the jacket, and distinguish between pinched and rolled folds by softening the shadows of the rounded ones while leaving the crisp ones alone. Alternate between warm and cool shadows where it turns from light to dark, and deepen any shadows with a more saturated version of the same color (focus in particular on the shadowed arm).
Step 18: Techniques For Finishing Your Portrait
 Without overworking your painting, do any final touch-ups, including adding darker shadows on the epaulettes by using a more saturated version of the background’s color. Mix Payne’s Grey, Alizarin Crimson, and Ultramarine Blue, and lay in a wash of this color on top of the collar’s insignia to put it in shadow. You can also add in a little of this color into the hair, especially where it blends into the background. Finally, you can paint the cord that attaches Roosevelt’s glasses to his jacket, using the Lamp Black and lifting out paint right next to the cord to create the highlight for it. When you’re satisfied with the overall painting, let it dry completely before erasing any unwanted pencil lines with the kneaded eraser.


