Let's beat the summer heat with a cool watermelon watercolor painting! In this tutorial, Yasmina shows us how to use basic watercolor techniques to create loose, fun-looking watercolor fruit, perfect for a sunny day! Thanks for keeping it fun and fresh, Yasmina!
Materials Used:
- Canson XL Series coldpress watercolor pad (140lbs, 9" x 12")
- Palette for mixing paint
- Container with clean water
- Paper towels or a dry rag
- Uni-Ball Signo gel pen (white)
- Hairdryer
Mijello Mission Gold Watercolors
- Permanent Rose
- Bright Opera
- Red Violet
- Yellow Green
- Viridian
- Lemon Yellow
- Sepia
Brushes
- Princeton Neptune Series 4750 Synthetic Squirrel Hair: Round brush (no. 10)
Step 1: Begin with a Juicy Pink Triangle
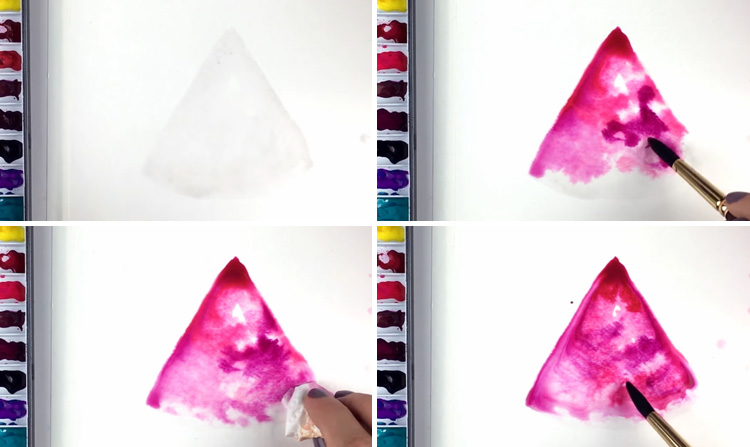
No need for a sketch this time around! We'll start right off the bat by blocking in the bright pink flesh of this watercolor watermelon. Load your no. 10 round brush with clean water and lay down a triangle with a rounded bottom. Next, drop in Permanent Rose via the wet-in-wet technique, starting from the top of the triangle. Adding wet paint to a wet surface gives the pigment a chance to flow through the wet area, creating unique and interesting patterns. Add charges of Bright Opera and Red Violet as well to create a variegated wash, which is a kind of wash that allows different colors to blend together in a natural way. If you vary where you put your colors, you'll create even more interesting patterns in your watercolor painting! If you notice that a lot of water and paint is starting to gather at the bottom of the triangle, take a paper towel and soak up the excess liquid. This will give the bottom of the watermelon a soft, textured edge. You can also use a thirsty brush to soak up paint pooling throughout the triangle; simply remove moisture from your brush by dabbing it on a paper towel, then use the brush's tip to soak up the paint.
Step 2: Drawing a Pop of Green
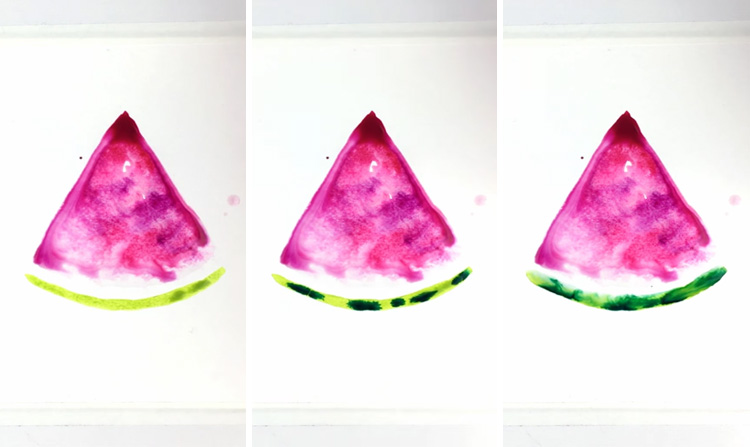
Let's leave that pink triangle alone for now and introduce the watermelon's green skin so that we have a pop of new color. Load your round brush with Yellow Green and draw a curve at the bottom of the pink triangle. Use the wet-on-dry technique (i.e. laying down wet paint on a dry surface) this time to achieve hard edges on the paint you lay down. Leave about half an inch of space between them to act as the white part of a watermelon, and to prevent the pink from mixing with the green. Since these 2 colors are on opposite sides of the color wheel, they are considered complements and can dull each other's brightness when mixed - definitely something we'd like to avoid in this watercolor painting! While the watermelon's skin is still wet, introduce hints of Viridian into it. You can use the tip of your brush to gently encourage the colors to mix together, but try not to overdo it. Instead, let the colors mix naturally on the page to achieve soft edges.
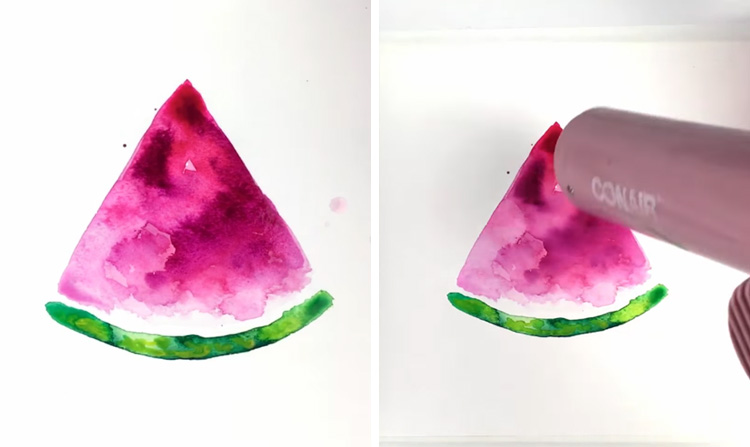
Step 3: Quick-Drying Watercolor Techniques!
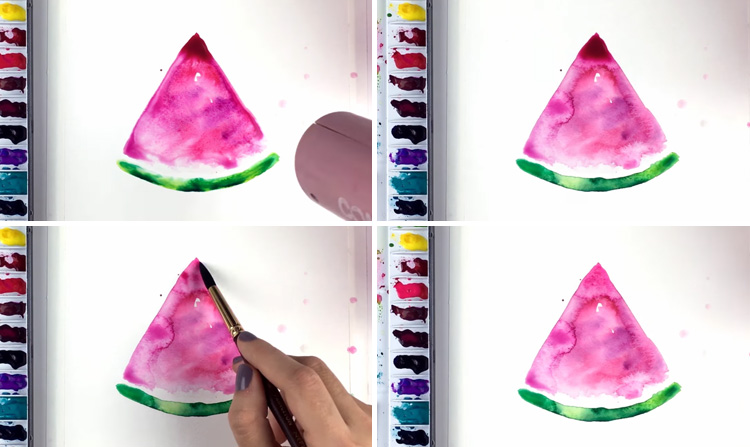
Did you know that a hairdryer can do more than speed up the drying time of your easy paintings? If you use it a certain way, it can help you create an interesting effect that you can use to give your watercolor ideas more character. Here's how it works: First, make sure your watercolor watermelon is still wet. It should have puddles of diluted pigment swimming around the edges of the layer. Take your hair dryer and proceed to dry your painting. Put it on the lowest setting and move it around the whole painting, rather than just pointing it at one spot. In doing this, the sections with the least amount of water dry up first, and hard edges are created where they touch with sections that are still wet. What an interesting texture it adds to this watercolor painting, right? Once the painting is mostly dry, put down the hairdryer and switch to a thirsty brush to lift up any remaining puddles of paint.
Step 4: Creating a Vibrant Watercolor Painting
Do you want to know the secret behind creating intense pops of color in a basic painting? One word: layers. Since watercolors are a transparent medium, it often takes more than one layer of paint to create a vibrant result. Since we want our watermelon to stand out from the crowd, let's add a second layer to make it really pop. Use your round brush to dab in a second layer of Permanent Rose, Bright Opera, and Red Violet, intensifying the watermelon with a second variegated wash. Since the colors you've added are all different shades of pink, the effect is pretty cool!
Step 5: Brightening Greens With More Layers
To finish off the base layers, rinse out your brush and dab Lemon Yellow into the green curve of this watercolor painting. At this point, some sections may still be wet and that is totally okay. Since this is a very loose rendition of a watercolor watermelon, just dab in paint and let it do its thing. When you're done, pick up the hairdryer and go over the whole painting until it's completely dry.
Step 6: Making the Best out of Mistakes
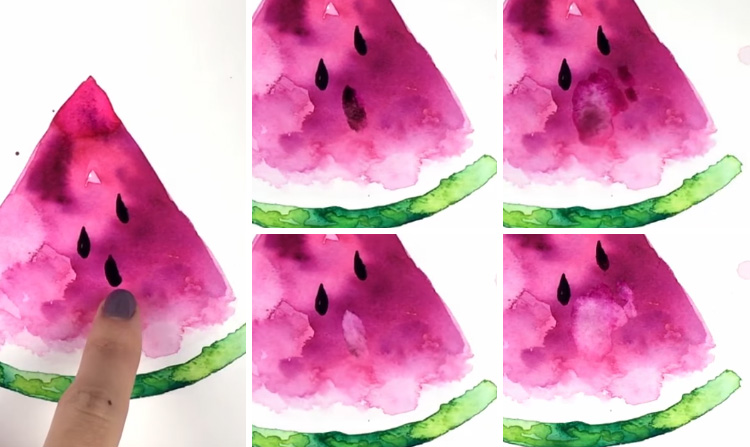
Adding details can help to spruce up a watercolor painting, so in this step we're painting seeds to complete the picture. All you need is your no. 10 round brush loaded with Sepia paint and you're good to go! But wait - what if you make a mistake? Here's how you can deal with misshapen seeds: Each seed doesn't need to be perfectly teardrop-shaped, but mistakes happen, like when the artist attempted to draw in her third seed. What you can do is rinse out your brush, and load it with clean water. Next, gently scrub over the "mistake" with the tip of your brush, and use a paper towel to lift the re-wetted pigment. Voila! No more seed! However, notice how you've lifted some of the pink pigment off the page as well? This sort of thing is unavoidable, so try to roll with the punches instead. What the artist does in this case is to rewet a slightly larger area surrounding the "mistake", and lifting that up. Now that section looks like it's part of the painting and gives the watercolor watermelon a more textured look! Once this section completely dries, continue adding seeds to your watercolor painting before moving on to the next step.
Step 7: Finishing Off With White Ink
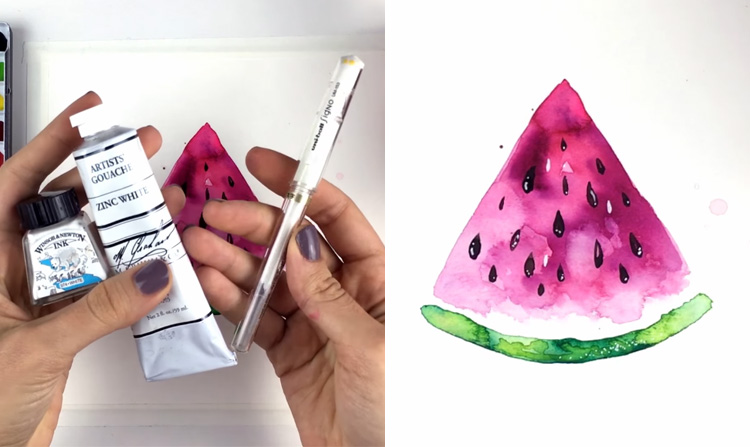
The final step in this watercolor painting involves white ink and a little self-control. It's time to add highlights! The artist uses a white gel pen, but you can also use a brush with white gouache or ink. Add dots and dashes to the bottom curve of the seeds, and do the same with the watermelon skin. Finally, add 2-3 white seeds in between the dark-colored ones.
Remember: try not to do overdo these highlights and details!
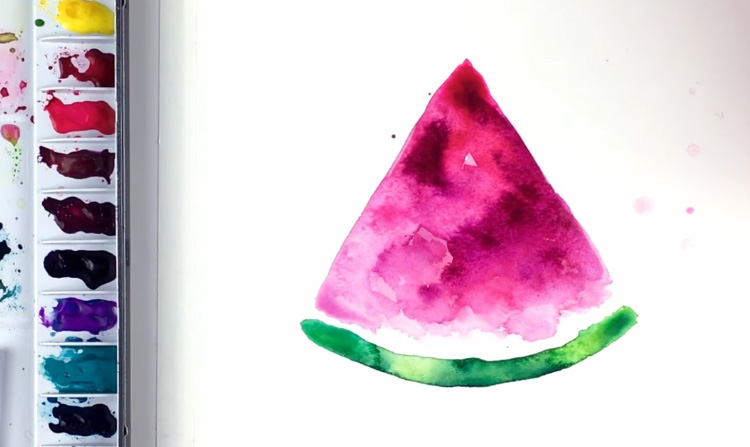
At the end of this lesson, you've painted a fresh, vibrant slice of watermelon to feast your eyes upon. Good job!
If you'd like to watch Yasmina create her watermelon masterpiece, here's her video:


