In today's step-by-step for watercolor techniques, Van Gogh is our muse! Learn how to paint a starry night sky with sweeping brushstrokes and variegated washes, thanks to the guidance of artist Untamed Little Wolf!
Materials Used:
- Arches cold press watercolor paper block (140lb, 7" x 10")
- Palette for mixing paint
- A container with clean water
- Dry rag or paper towel
- Toothbrush
Winsor & Newton's Cotman watercolors
- Yellow Ochre
- Cadmium Red Hue
- Ultramarine
- Dioxazine Violet
- Indigo
- Mauve
- Payne's Gray
Holbein Artists’ Gouache
- Permanent White
Brushes
- Any Chinese round brush (no. 12)
Step 1: Wet-in-Wet and Warm Colors
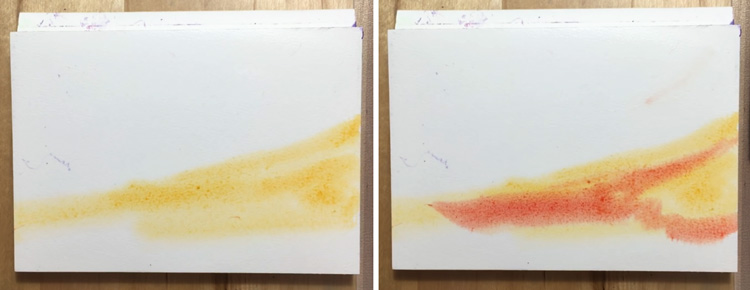
For this step-by-step watercolor painting, we're skipping the base sketch and allowing the paint speak for itself. Don't worry, it's not as scary as it sounds! First, load your no. 12 round brush with clean water and apply it to the entire page. Make sure that your paper is damp and not over-saturated, and pick up any water that pools around the edges with a paper towel before you apply paint. Next, begin coloring this starry night painting by applying Yellow Ochre via the wet-in-wet technique. Use sweeping, diagonal strokes that begin on the right and end at a slant on the left. While the layers are still wet, apply Cadmium Red Hue into the yellow layer, allowing the colors to overlap while letting some yellow shine through. It's important that these layers remain wet for the next few watercolor techniques, so jump right in to step 2!
Step 2: Cooling Down the Evening Sky
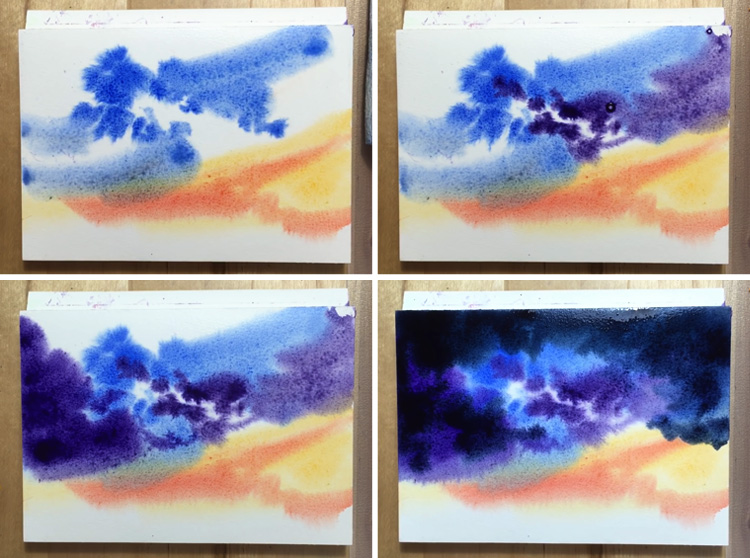
In this step, we're finishing up the foundation for a beautiful night sky. Use your round brush loaded with Ultramarine to apply loose strokes into the top part of your watercolor painting. Do the same with Dioxazine Violet, and let the purple frame the blue tint in the middle of the painting.
To give the values interest, deepen the purple with some blue and keep it concentrated on the left side of the painting. Finish off the sky by using Indigo to cover up the remaining white space at the top of the frame, and bring it down on either side to frame the blues and purples in the middle.
Notice how interesting the brushstrokes look in the picture? You can create different kinds of impressions simply by changing the way you use your brush. You can use the brush tip to dot the page, or the side of the brush to create wider strokes. Experiment with pressure to create thin to thick brushstrokes. While you're at it, allow the colors to mix together on their own so that they're able to both blend together and retain their own unique hues. This is called a variegated wash, and it's a great way to create wild, unique patterns out of your colors!
Step 3: Create a Sweeping Night Sky With Watercolor Techniques
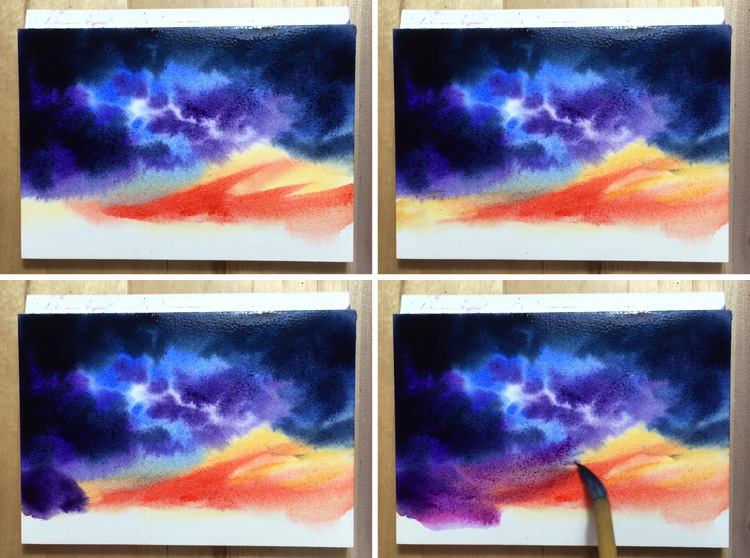
Now that the base colors have been established, let's polish them up a bit! Strengthen the warm colors at the bottom by adding more Cadmium Red Hue and Yellow Ochre. Next, add a blob of dark purple to the leftmost end of the warm colors layer. Load your brush with diluted Mauve and start your strokes at the purple blob, "dragging" the purple tint into the reds and yellows with sweeping, left to right brushstrokes. This will produce a cool, wispy effect that will give your night sky a dreamy atmosphere.
Step 4: Dabbing in a Dotted Galaxy
Your sky should be in the process of drying up by now. So far so good! However, before things get completely dry, let's use some different watercolor techniques to add a galaxy to this night sky. Load your brush with Ultramarine and use a dabbing motion to apply it to the center of the night sky. Use the tip of your brush for this, and try to vary the sizes, shapes, and distance between each brushstroke. Use a crumpled paper towel to lift parts of the paint to create light-valued spaces with soft, textured edges.
Do the same with Dioxazine Violet, Mauve, and hints of diluted Cadmium Red Hue, then allow the entire painting to dry before moving on to the next step.
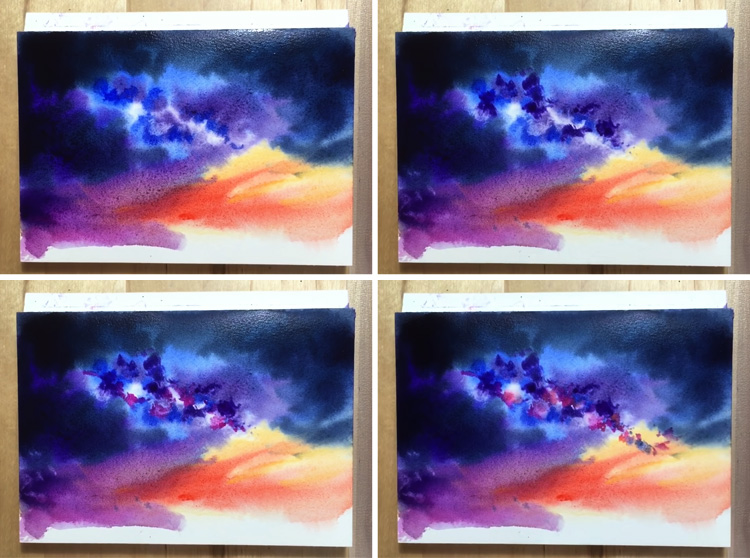
Step 5: Grounded Silhouettes

Now that we've established our beautiful night sky, it's time to ground it with an impression of the land. The main focus of this painting is the galaxy and its nighttime backdrop, so the land shouldn't be too distracting. To do this, we'll paint a simple silhouette of some mountains and trees, and use watercolor techniques to give these elements subtle texture. First, load your round brush with Indigo combined with Payne's Gray, making sure you have a lot of pigment so that your layers will appear dark and deep. Lay down several strokes until you've covered most of the left side, then continue the layer by gradually adding hints of Dioxazine Violet.
Lessen the amount of water and increase the amount of pigment so that you can achieve a dry brush effect with textured brushstrokes. Create mountain silhouettes on the right by continuing to use this "wet-on-dry" technique as well. Next, pick up Indigo again and use choppy strokes to add the impression of a forest sprouting out from the ground on the left side. You can use a little water and the tip of your brush to smooth out some of your strokes to achieve the look you want.
Step 6: Splattering Stars Around A Colorful Galaxy
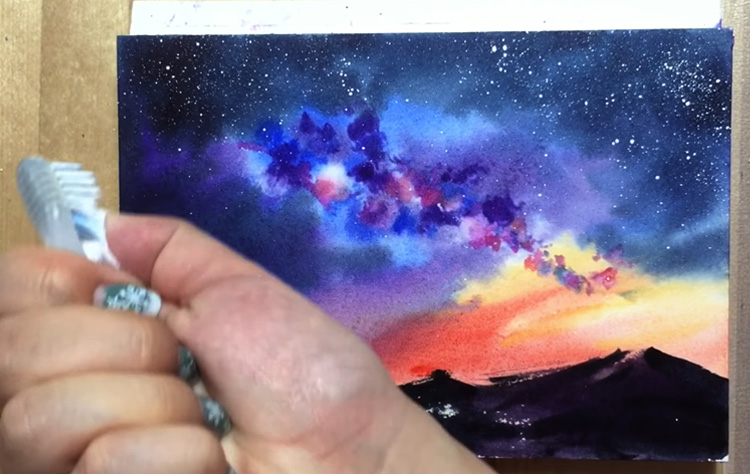
We might have been saving the best for last because this final step involves a fun watercolor technique! Take out Permanent White gouache and dilute it with water until you achieve a creamy texture. Next, load a toothbrush with pigment, and move it around your painting as you flick the bristles with your thumb.
This is the spattering technique, and it's a quick and easy way to create a random dotty texture over your work! Do this as many times as you wish (without overdoing it) - and that's it!
Thanks for sitting through this lesson on how to make a starry night painting.
If you'd like to watch how Untamed Little Wolf creates this mini masterpiece, here's her video:


