It's easy to feel overwhelmed when you're learning to paint a person's face, so why not start small? Take your time and try out this step by step painting tutorial on creating a realistic watercolor eye, courtesy of Kelly Eddington. Thanks for sharing your techniques, Kelly!
Materials used:
- A reference image of an eye
- Arches cold press pad (140 lb, 9" x 12")
- 4H pencil
- Factis eraser
- Incredible White Mask Liquid Frisket (Kit #2)
- Painting palette for watercolor paints
- A container of water
- Paper towels
- Artist's or kraft tape
Old Holland Classic Watercolors
- Cadmium Yellow Light
- Cadmium Yellow Medium
- Alizarin Crimson Lake Extra
- Cadmium Red Light
- Old Holland Magenta
- Ultramarine Blue
- Prussian Blue Extra
- Permanent Green Light
- Dioxazine Violet
- Sepia Extra
Holbein Extra Fine Artists' Watercolors
Grumbacher Academy Artists' Watercolors
- Cerulean Blue Hue
- Thalo Yellow Green
Winsor & Newton Cotman Watercolors
- Turquoise
Brushes
- Silver Brush Silverwhite: short handled brush (no. 6)
- Sax: Copper acrylic wooden handle flat brush (no. 10)
- Silver Brush Silverwhite: short handled brush (no. 2)
- Any old round brush with stiff, messed up bristles (no. 4 or 6)
Step 1: Beginning Your Watercolor Eye
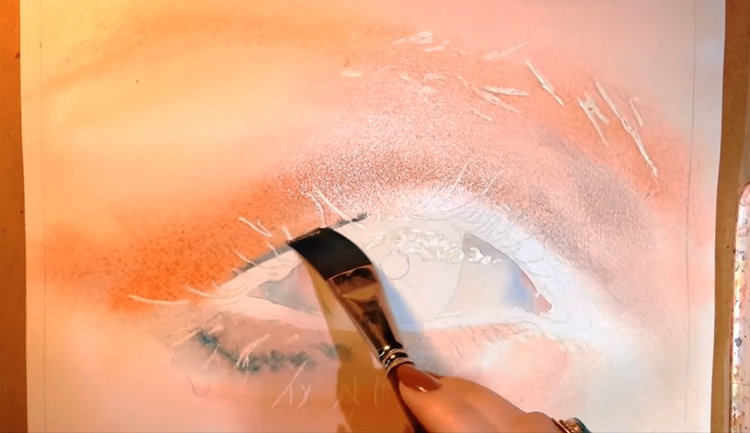 Before you begin painting, use artist's tape to secure your watercolor paper to a flat board, then lightly sketch the eye based on your reference image. Next, add masking fluid to protect the highlights in your painting. In this step by step painting tutorial, this includes the brightest part of the iris, a few eyelashes, and some hairs along the eyebrow. With a no. 6 round brush, cover the whites of the eye with a layer of water, then drop in subtle hints of Cerulean Blue and Orange via the wet-in-wet technique (i.e. adding wet paint to a wet surface) to create a variegated wash. While that layer dries, use a no. 10 flat brush to cover the area around the eye with water, leaving space for the waterline (which is the rim in between the eye and the eyelashes). With the wet-in-wet technique, add streaks of orange tint as the base layer for the skin. Use a combination of warm and cool oranges to define the shape of the eye socket and eyebrow, still working wet-in-wet. You can play with the edges of the flat brush to create different, soft-edged strokes in this first layer.
Step 2: Painting an Iris
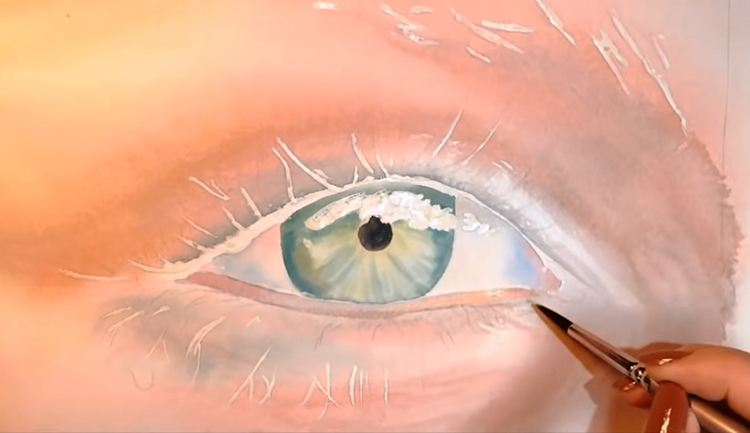 Switch back to the no. 6 round brush and add a layer of water to the iris, painting around the pupil for now. Drop in hints of Cerulean and Thalo Yellow Green and allow them to mix together naturally. Next, add a darker outline of Prussian Blue to the iris, and add a few short streaks that radiate towards the pupil. Pick up a yellow tint and add a soft outline around the pupil. Mix together Dioxazine Violet, Sepia, and Prussian Blue to create a dark tint and use this to paint in the pupil using the wet on dry technique (i.e. adding wet paint to a dry surface). Remember to avoid the wet portions of the iris so that the colors don't accidentally bleed into each other. Finally, pick up the skin tone color and define the lower waterline of your watercolor eye. Add hints of yellow at the rightmost corner of the waterline to create more interest.
Step 3: Creating Texture with Short Strokes
 Now to work on the details of this watercolor eye! Load a no. 2 round brush with dark blue mixture (Prussian Blue with Sepia) and outline the outer edge of the iris, working wet on dry. As with before, add short strokes that radiate towards the pupil. Stick to covering about 1/3rd of the iris, and vary the lengths of the radiating strokes. Next, with your yellow mixture, paint streaks that start from the pupil and radiate outward. Do the same with the dark blue tint, keeping the effect subtle.
Step 4: Adding Definition to the Watercolor Eye
 To finish off the iris, pick up more dark blue tint and add a final layer to the iris outline. Add a few lines radiating towards the pupil, making sure to vary the lengths to create interesting textures. At this stage, your watercolor eye is finally taking shape so don't forget to have fun and let loose! As the iris dries, let's focus on adding more definition to the whites of the eye. First, use a watered down blue-gray tint to deepen the shadows under the upper eyelid. Then work in hints of the skin tone tint while the shadow layer is still wet. Finally, use the same color to fill in the tear duct at the right corner of the eye.
Step 5: Establishing the Eye Socket
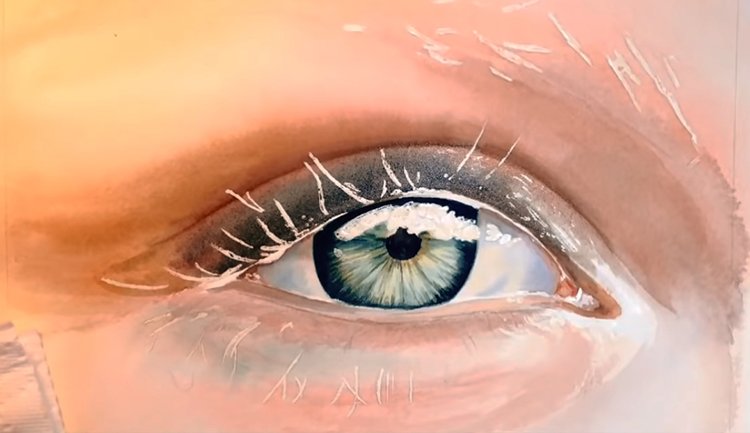 Now that the watercolor eye is done, it's time to shape the parts around it. Switch back to the larger no. 6 round brush and use Sepia to outline the crease above the upper eyelid. Do a graded wash by gradually adding water to dilute the pigment as it gets further away from the eye. Go back to the no. 2 round brush to add a light layer of brown tint to the lower waterline. Next, add an orange mixture to define the area around the tear duct. With the no. 6 round brush, mix Prussian Blue, Dioxazine Violet, and Sepia Extra, and use the resulting dark tint to line the top part of the eye, as if you are putting on eyeshadow. Start with a thick line from the left corner of the eye, and allow it to gradually taper off as you reach the right corner. Add water to create a graded wash as you approach the eyelid crease.
Step 6: Strengthening Shadows
 Outline the top of the eye with another layer of dark tint, then pick up Sepia and darken the crease above the upper eyelid. Soften the edges of your strokes by using water and short strokes to feather out the tint. With a dark gray mixture, paint in the shadows under the lower lash line, just below the waterline. As with before, do a graded wash and allow the pigment to lighten as it gets further away from the eye. Add hints of brown and orange tint into the wet layer to add interest, working wet-in-wet.
Step 7: Using an Old Brush in a New Way
 Pick up some dark tint and add a final layer to define the upper eyelid crease. Next, add a final outline of paint around the upper eyelid. Do the same for half of the lower eyelid starting from the left corner, and allow the paint to fade away from the eye in a graded wash. Establish eyelash shadows by painting short, curved strokes that radiate away from the left corner of the eye. Now let's do something a little unusual! Find an old round brush, preferably one with stiff, messed up bristles, and load it with brown paint. Hold the brush perpendicular to the watercolor paper and use the tip to draw in the eyebrow with the dry brush technique (i.e. using thick, "dry" paint on a dry surface). Do this by following the arch of the eyebrow and using short strokes to create the effect of hair strands. Make sure the paint isn't mixed with too much water so that each stroke comes out rough and uneven. An old brush with frizzy bristles will also add more interesting textures to each stroke.
Step 8: Framing the Eye
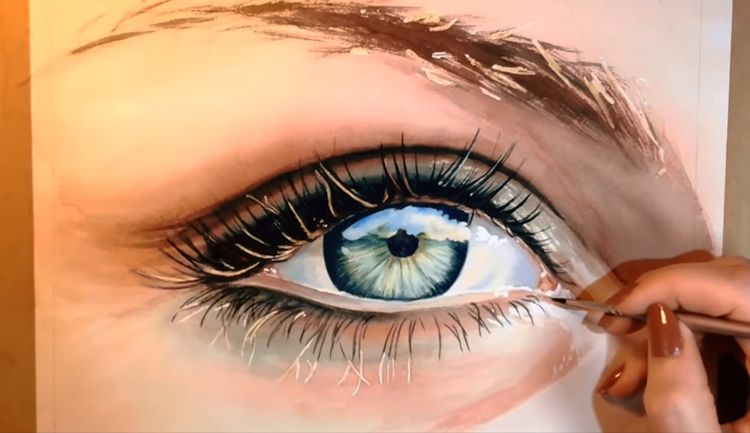 Now that we've established the main elements of this watercolor painting, it's time to move on to the fun part: the details! First, gently rub off all the masking fluid from your painting paper, then use a no. 2 round brush to add a layer of water to the highlight on the iris. Drop in hints of Turquoise, working wet-in-wet and keeping the effect subtle. This will give your watercolor eye a bit of sparkle later on. Next, add light layers of yellow and brown tint to the eyelash highlights on the left side of the eye. Do the same on the eyelash highlights to the right, using a subtle blue tint. With the same light blue mixture, gently add highlights to the shadows on the right side of the upper eyelid. Now pick up the dark mixture from before and add eyelashes, starting from the upper left corner of the eye. Make sure that each eyelash curves away from the eye, radiating outward. When adding eyelashes closer to the right corner of the eye, the lashes should curve in the opposite direction towards the nose. When you draw in the lower lashes, keep them shorter and more spread out. Remember that if you want to have more control over your brush strokes, just lessen the amount of water you add to the paint. You can also add more variety to the dark tint by mixing different amounts of purple, brown, blue, or green.
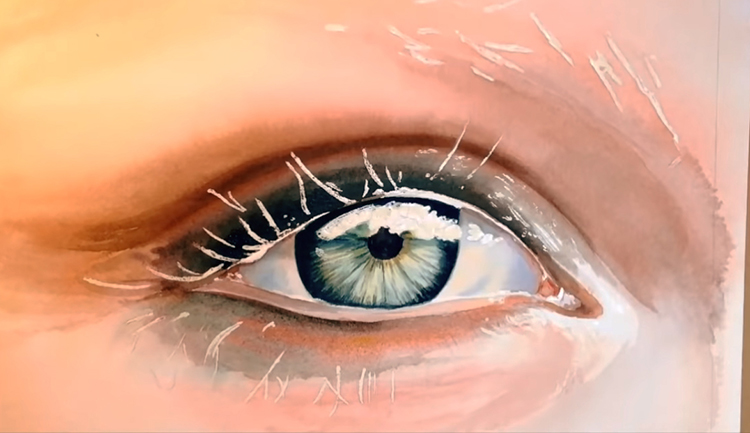
Step 9: Final Touches
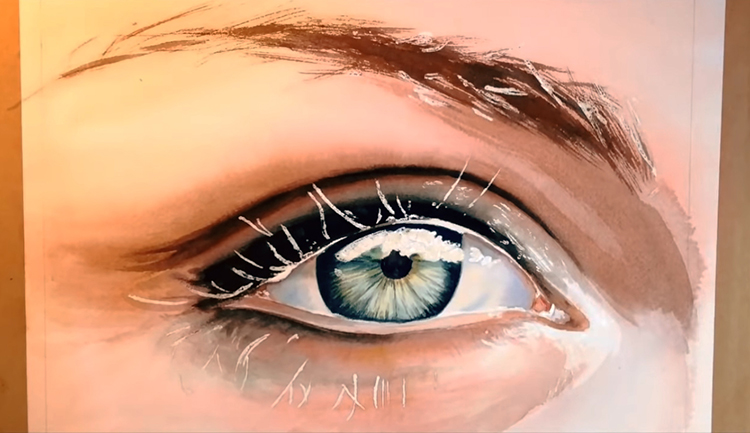
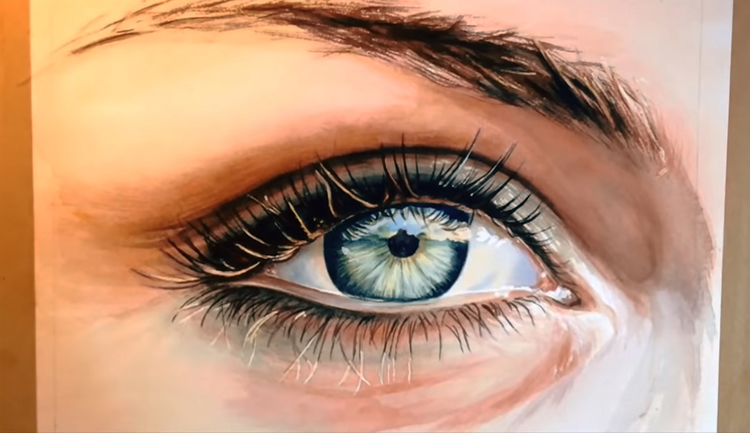 Final touches are all about improving your values to make important areas of your watercolor painting pop. The eye itself is the main character, of course, so to make it stand out more, darken the outline of the iris with a blue and brown mixture. Next, water down the tint and add reflections of the eyelashes within the iris highlight with short, curved lines that radiate in the opposite direction (i.e. inward, towards the pupil). To finish off the eye, use a watered down brown tint to darken the lower left corner of the waterline. Leave a thin line to separate the flesh tone from the lower eyelashes for extra sparkle. Now pick up the old brush again and use the dry brush technique to add brown streaks that blend the highlights into the eyebrow. Next, brush in some darker tint to give the hairs more depth. Finally, dry brush flesh tones and yellow tint around the eye socket to soften any harsh edges and darken shadows. Guess what? You ought to give yourself a pat on the back because you've just painted a realistic watercolor eye! To see how Kelly does it, here's her video:


