Paint through fields of wine in this watercolor landscape tutorial featuring a vineyard in Napa Valley, California. While it seems intimidating, award-winning painter William "Bill" Dunn takes you through step-by-step, making this easier than it looks. Want to watch the video version? The full tutorial is available to members of our Beeblys WatercolorPainting.com.
Materials Used In This Watercolor Landscape Class:
- Reference picture of a Napa Valley vineyard (click here for Bill's picture)
- A block of Fabriano rough watercolor paper (140lb, size 12″ x 18″)
- Pentel Graphgear 1000 automatic drafting pencil, 0.7mm lead size with HB or B lead
- Kneaded eraser
- ½" Artist's tape
- Painting palette for watercolor paints
- Auxiliary plate or palette for gouache paint
- A container of water
- Paper towels or a rag
- Spray bottle with clean water
- Book or box to prop painting on
- Mr. Clean Magic Eraser (original)
Paints (Holbein Artists' Watercolors)
- Lemon Yellow
- Brilliant Orange
- Cadmium Red Purple
- Cobalt Violet Light (a.k.a. "Lavender")
- Olive Green
- Sap Green
- Viridian
- Leaf Green
- Peacock Blue
- Indigo
- Quinacridone Gold
- Yellow Ochre
- Burnt Sienna
- Burnt Umber
- Neutral Tint
- Ivory Black
Winsor & Newton's Professional Watercolors
- Permanent Carmine
- Permanent Mauve
- Perylene Violet
- French Ultramarine
Winsor & Newton's Designers' Gouache
- Permanent White
Brushes
- Neef Rigger Supreme Taklon Series: Long handle rigger brush (no. 6)
- Neef Rigger Supreme Taklon Series: Long handle rigger brush (no. 8)
- Neef Rigger Supreme Taklon Series: Long handle rigger brush (no. 10)
- Neef Rigger Supreme Taklon Series: Long handle rigger brush (no. 12)
- Escoda Perla Joseph Zbukvic Series: Round brush (no. 20)
- Winsor & Newton Cotman Brush Series 111: Round brush (size 1)
Step 1: Sketching And Composing A Vineyard
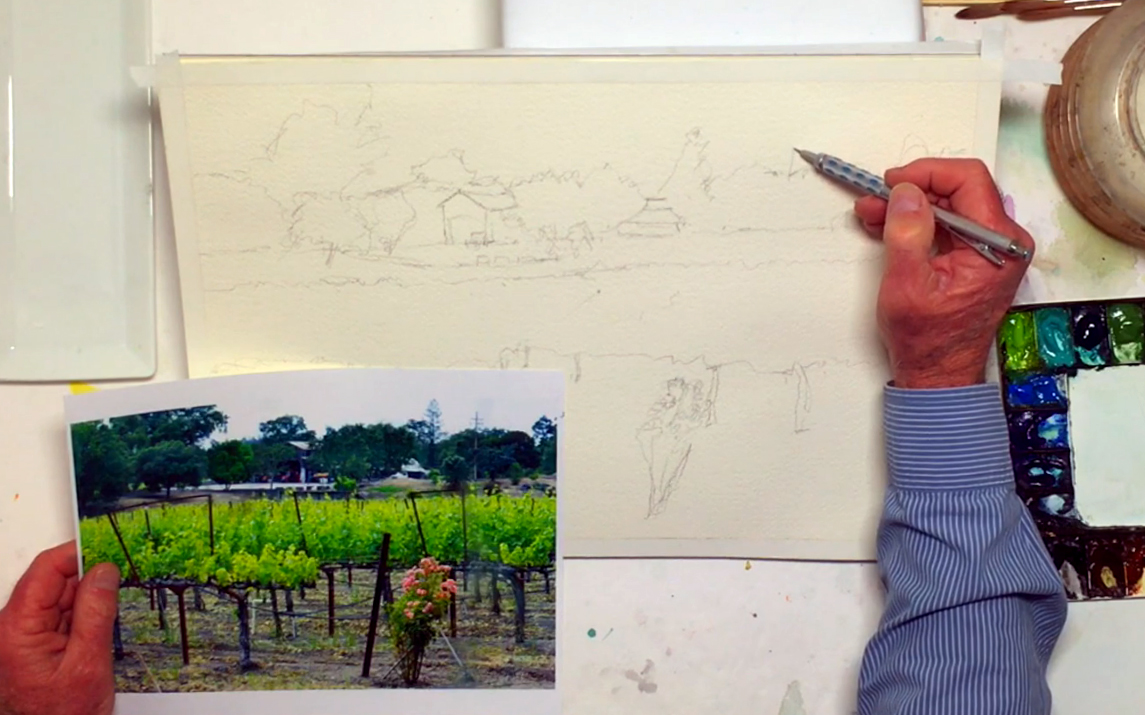 Welcome to this step-by-step watercolor landscape course taught by Bill! As preparation before sketching, make sure you have a copy of the reference picture in front of you. In addition, apply artist’s tape to all edges of the paper to create a margin for possible framing purposes later. It also helps to make sure the size of paper is to the same scale as the reference picture, which you can do by following the diagonal line through the picture and onto the larger watercolor paper. As you analyze your photo, be mindful of the composition and the colors you choose. Bill advises against placing the painting's focal point in the center, as this makes for a very boring composition. Sketching a good composition also forms the foundation of your entire painting, and determines the end result. The goal isn't to be realistic, but to get a good impression of the subject matter. This means you can add or remove elements from the reference photo to make it more interesting. Bill divides the picture into 3 "bands" of information - the top, middle, and bottom third. You can divide your own paper in the same way as well, following the "Rule of Thirds". Start the sketch with the top band, drawing the 2 buildings and adjusting them so they're not centered. Continue by adding the line of trees behind, drawing the shape of the forest rather than individual trees. Then, sketch the road and parking lot area as well, ignoring the wall that divides the road from the vineyard. For the vineyard area, sketch the support posts and the clusters of grape vines. Don't forget to include the angle of perspective and depth within the fields! Also, as you add some details, remember that you don't have to draw everything - you only need enough information to guide your painting. Once you're done, you're ready to paint. Below is a close-up of Bill's sketch:
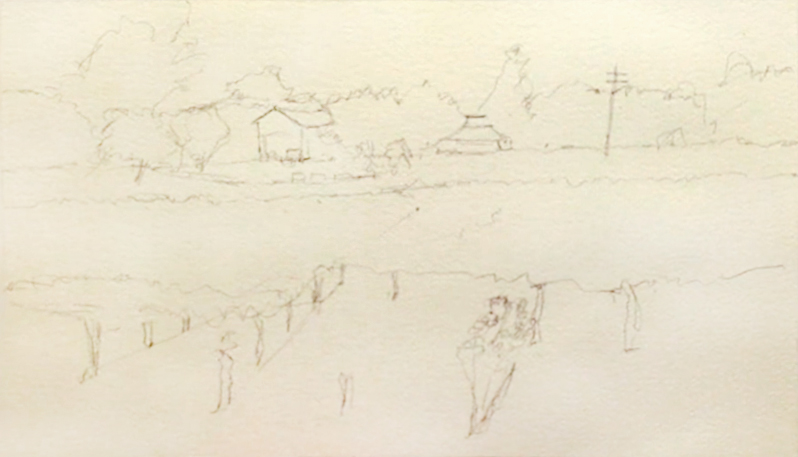
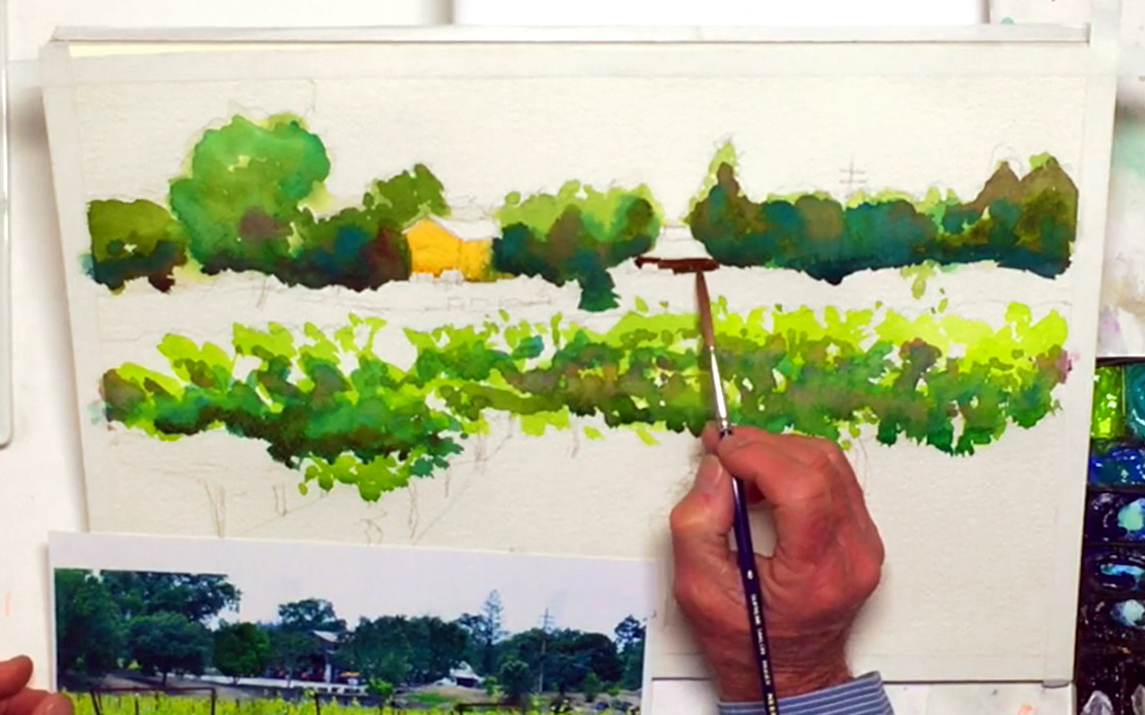
Step 2: Painting A Colorful, Wet-On-Wet Forest
 Before you paint, make sure you have all your equipment in an organized and efficient setup. You can also spray your paints with water to soften them and make it easier to mix the colors you need. Propping your painting at a 30° angle will help as well, especially when you need to drain off excess paint. Starting with the wet-on-wet technique, wet the no. 20 Escoda brush with clean water, then brush it over the forest in the background. Try your best to avoid the buildings, sky, and ground so you can paint them later with a lighter color. Then, while the paper is still wet, prep Leaf and Sap Green on your palette and paint the first and lightest layer for the trees. As you go, try creating the general impression of leaves, leaving white areas for different colors or for the feeling of light filtering through the leaves. This will make up the first underlying wash for your background forest. Mix Viridian with a hint of Indigo, and use this darker color to serve as a shadow layer for the trees. As you work from light to dark, remember to keep darker colors towards the bottom as the light is coming from the top. Also, don't dilute your colors too much when using the wet-on-wet technique, since they'll look washed out with all the extra liquid. For more variety, drop in Permanent Mauve while the paint is still wet to create a warmer green shadow. For cooler greens, drop in French Ultramarine, and make sure not to blend the colors too much. Remember to keep the shape of the leaves random, and work quickly to get the soft blends created by using the wet-on-wet technique.
Step 3: Switching To The Wet-On-Dry Technique For The Vineyard
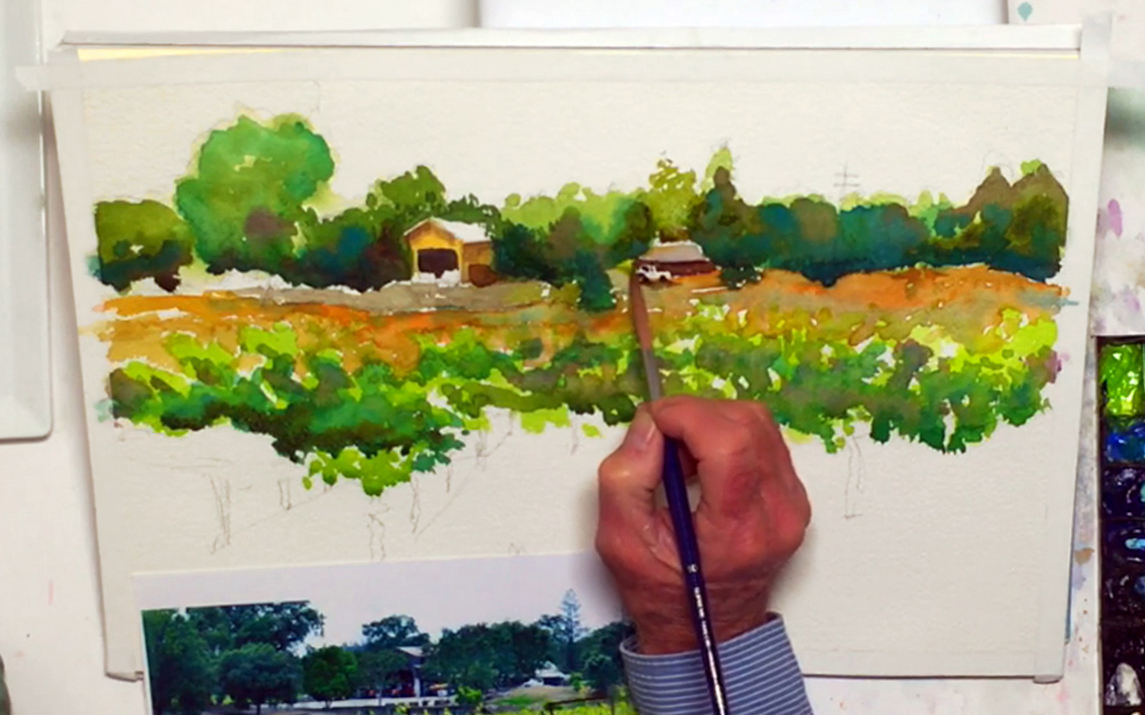
 You can work on the vineyard section while waiting for the trees in this watercolor landscape to dry. To do this, use the wet-on-dry technique and apply the brighter Leaf Green for the vineyard's first layer. As the vineyard is closer to the foreground, you can use the tip of your brush to create more defined leaves and shapes. Again, leave white areas for light, and add some French Ultramarine for the shadows in the lower areas. Work in some Peacock Blue into the still-wet vineyard for mid-tone shadows, and increase the contrast with strong Olive Green near the front. Again, for variety, add touches of Cobalt Violet Light and Permanent Mauve for warmer shadows. Soften hard edges with a wet brush, but leave some smaller, more defined leaves for details. These details also help bring the vineyard to the front, especially because you're using brighter colors.
Step 4: Painting A House And Winery In This Watercolor Landscape
 Take a break and let your painting dry, or use a hairdryer to speed up the process. Once it's done, switch to the rigger brush (no. 8), and mix Yellow Ochre and Quinacridone Gold with a touch of Burnt Sienna. Use this to paint the front and sides of the leftmost house in the background, being careful to avoid touching any areas that still feel damp. Paint the house's interior as well, but leave the vehicles white. For the other building, mix Burnt Umber with a touch of French Ultramarine for a dark brown. Then, paint the lower part of the winery, keeping the roof and truck white. Leave this layer to dry before returning to paint the details to prevent the colors from bleeding together.
Step 5: Filling In The Gaps And Lifting Paint
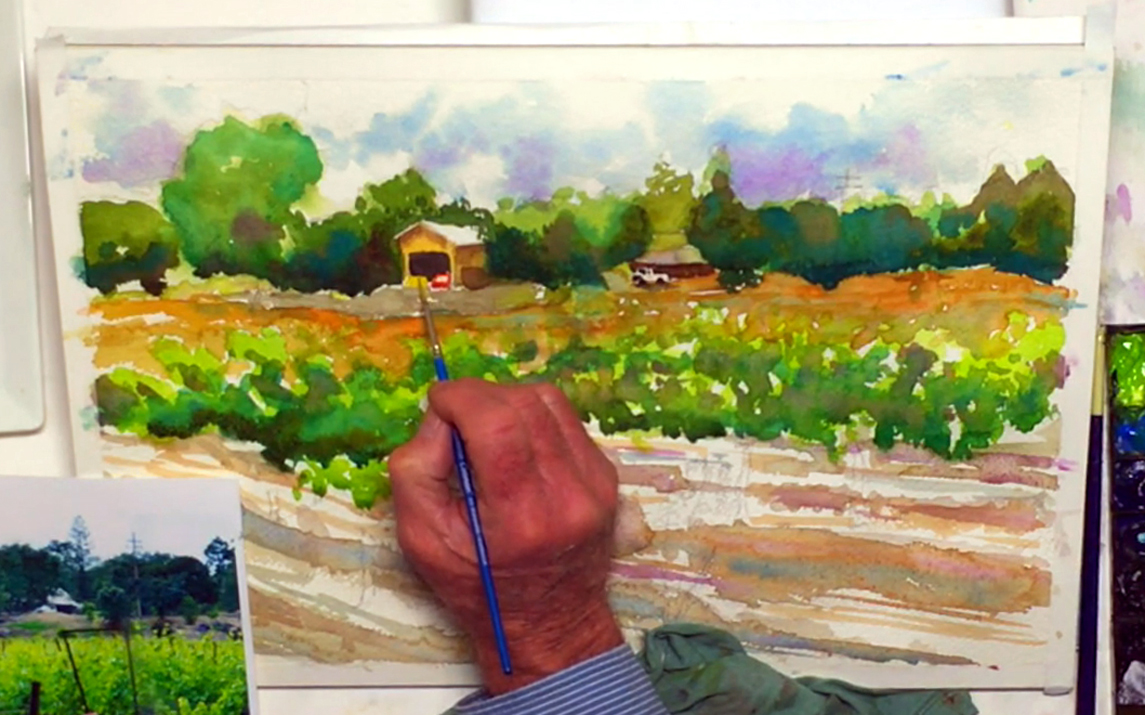
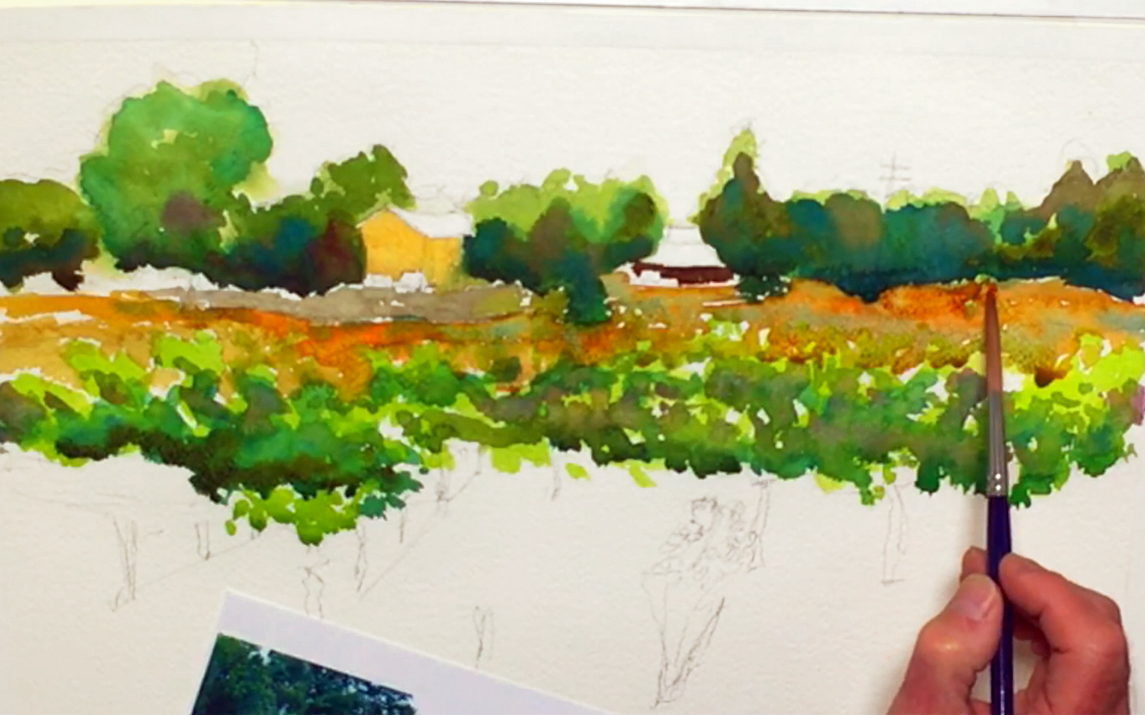 Next is to fill in the white space between the upper and middle bands of your watercolor landscape painting. To do this, add Yellow Ochre and Neutral Tint to the previous brown mixture, and paint the road and parking lot. When painting, it's fine to leave some white spots behind as they add to the texture and brightness of the overall composition. Add a touch of Olive Green for a tree in between the roads of the two buildings, and mix Perylene Violet and Viridian for some dark bushes in the lawn area. It's okay if the green bleeds into the road a little, as this helps increase the sense of perspective. Switch to the no. 10 rigger brush, and mix the browns with Yellow Ochre and Quinacridone Gold for a bright earthy color. Paint the gap between the vineyard and parking lot, allowing some color bleeding with the foliage. For a different dirt color, use pure Burnt Sienna for the right side of the ground, and brighten by streaking in Brilliant Orange into the wet paint. This will give your watercolor landscape an autumn feel while making it more interesting. If the orange gets too strong, you can tone it down by brushing in Peacock Blue. This works due to their complementary nature, and also serves to create some shadows on the ground. Lastly, remember to use a rag or paper towels to control the liquid in your brush or to lift out mistakes while the paint is wet. You can also use a "thirsty brush" to soak up excess paint and lighten an area that might have been too dark.
Step 6: Adding Shadows And Adjusting Details
 Add Neutral Tint to the dark earthy mixture, then paint the shadowed side of the leftmost house. For its interior, use pure Neutral Tint, being careful to avoid covering the truck below. Add a tree behind the roof as well if you haven't already done so to make the roof stand out. With Ivory Black (a stronger black than Neutral Tint), paint the windows and wheels of the tractor in front of the winery. You only need tiny touches of it since it's quite small. Dilute the black to get gray, then add a shadow underneath the tractor. Mix Neutral Tint and Cadmium Red Purple for a reddish brown, and apply this to the windows and under the eaves of the leftmost building. Jumping back to the right building, use diluted Neutral Tint to paint a corrugated gray roof, leaving white areas for highlights. Then, drop in a touch of Yellow Ochre and Burnt Sienna to add the illusion of rust to the roof. As you move along, you can add and adjust the trees in this area to help make the roofs and buildings stand out. It will also help bring the overall watercolor landscape together and harmonize the different elements in the painting. Finally, use Cobalt Violet Light and Leaf Green for some extra bushes on the leftmost side, layering the colors separately for more depth.
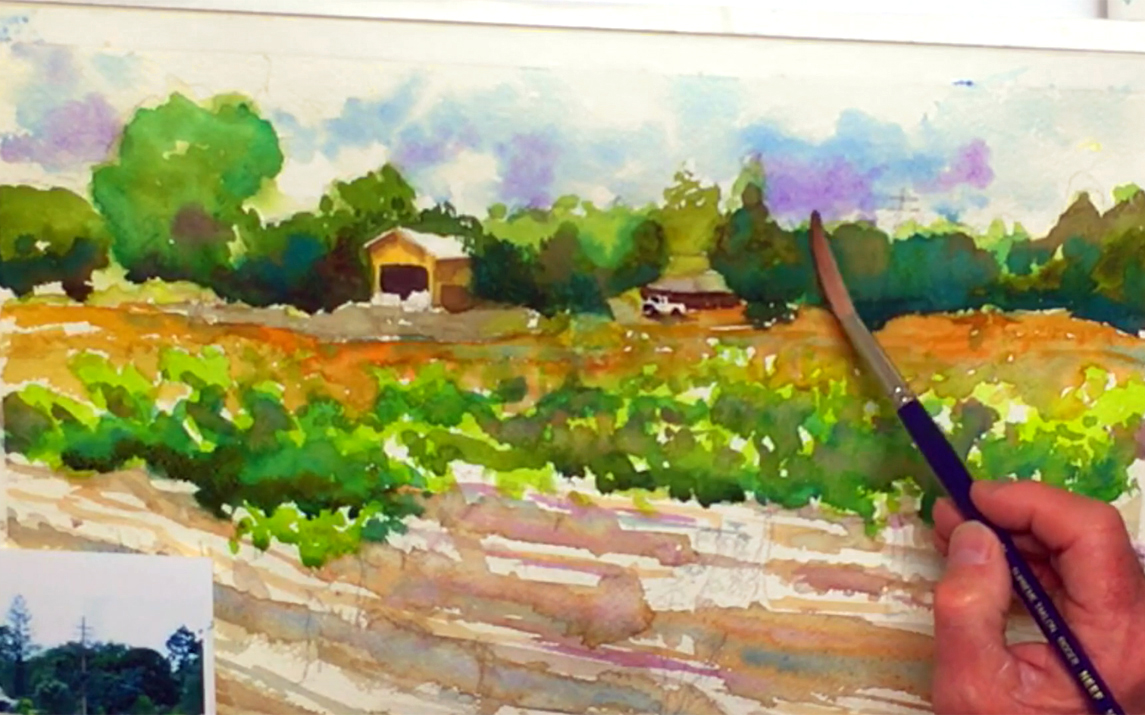
Step 7: Painting Furrowed Dirt In A Watercolor Landscape
 Moving on, it's time to focus on the lower third of the painting. Switch to the no. 12 rigger brush and mix a reddish brown using Burnt Sienna, Netural Tint, Yellow Ochre, and Quinacridone Gold. Then, paint the furrows in the watercolor landscape using the wet-on-dry technique, serving as the dirt's color. Remember to follow the perspective lines you sketched as you apply these rows of dirt. You can also paint over the support poles and roses, as they can be painted on top later. In addition, don't forget to leave some white between each furrow to get the appropriate effect! Streak in some pure Burnt Sienna to warm up and stimulate the previous tones using the wet-in-wet technique. Then, go back to the Peacock Blue to add variety and shadows to the furrows and underneath the grapevines. Follow up with Cobalt Violet Light again, but be subtle, leaving room for more possibilities. Touch up any similar-colored areas that need it, like the ground area in the upper band, and don't be afraid to be bold and add more color, even if the reference picture says otherwise.
Step 8: Planning And Painting A Wet-On-Wet Sky
 The next step is to work on the sky. As it's best to paint it in one go, Bill recommends coming up with a plan of action before painting. He decides to use the wet-in-wet technique with Peacock Blue for a sunny feeling, and add a few clouds to liven up the watercolor landscape. To do this, wet the sky area with water, then drop in the blue paint. Work quickly so the paper doesn't dry before you can finish, and let the water on the paper do its job. You only need a few well-placed brushstrokes to achieve a sky, so once you've got the impression down, just leave it be. Keep some areas white for clouds, and add a secondary color like Cobalt Violet Light to the sky to give it a more vibrant feel.
Step 9: Tiny Brush For Tiny Vehicle Details
 Switch over to the tiny Cotman size 1 round brush, and pick up some Brilliant Orange and Cadmium Red Purple for a brick red color. Paint the front of the truck that's in front of the left building, and switch to Lemon Yellow for the next car over. Leave all the windows white, but use diluted Neutral Tint to brush over the tractor on the right side. This will create a shadow on an otherwise white tractor, while the warm colors will help the vehicles contrast with the cool background.
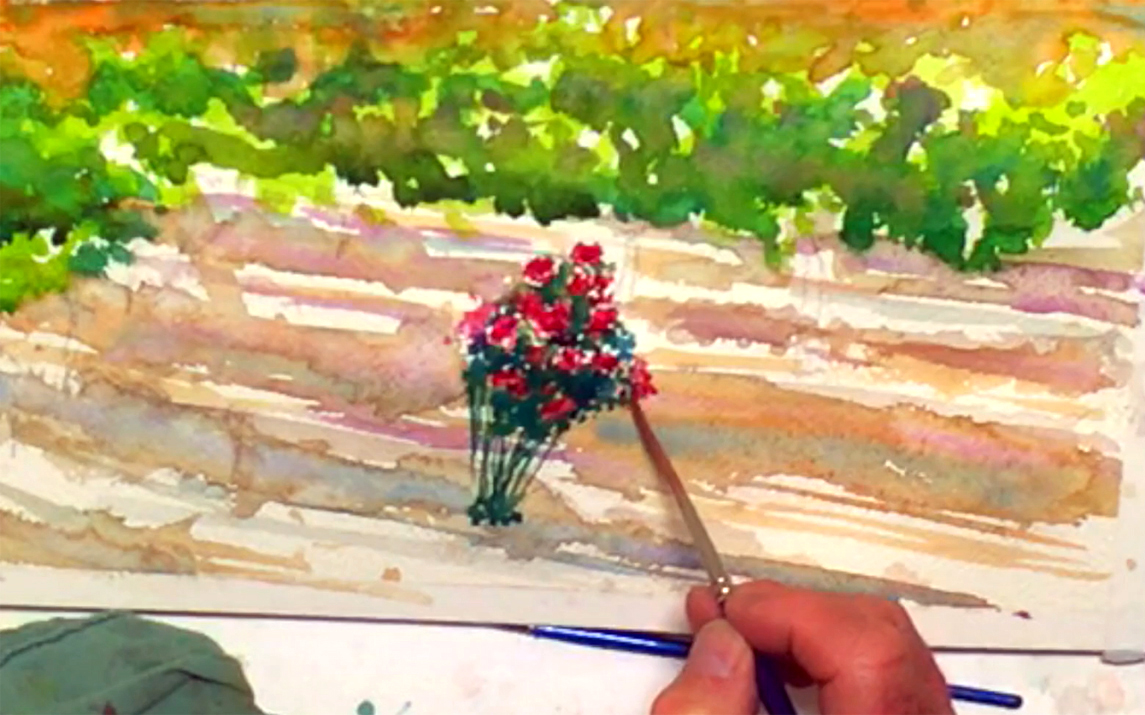
Step 10: A Flowery Impression And Using A Magic Eraser
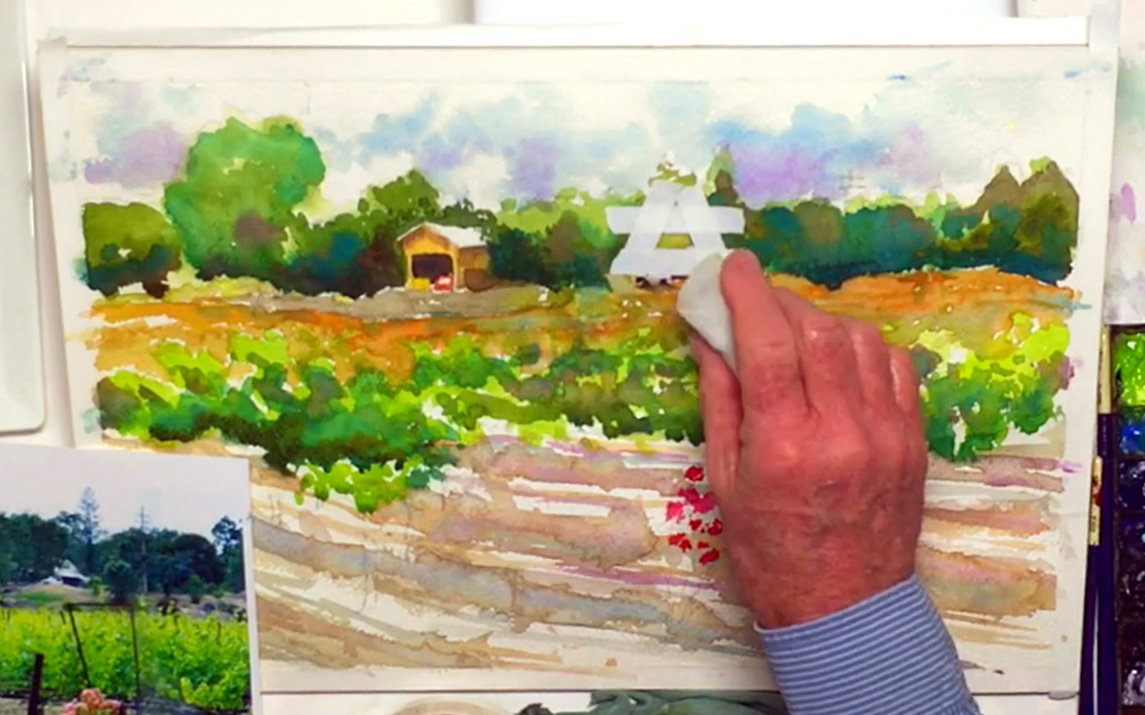 For the roses, use the no. 6 rigger brush and Permanent Carmine for a pinkish tone, and paint the rounded petals of each flower. Again, you're trying to get the impression of roses rather than paint photorealistic flower petals. This is one of the reasons why Bill paints so quickly, as he's relying on his instincts instead of overthinking what roses should look like. After that, Bill shows a way to lift out the paint in your watercolor landscape. Simply use the artist's tape to gently tape around the area you want to change or fix, then scrub over that area with the Mr. Clean Magic Eraser. Be careful not to go past the tape! After lifting out the paint, gently peel the tape off as you don't want to ruin the surface underneath. To demonstrate, Bill does this to the top half of the winery's roof as he accidentally covered it with green paint.
Step 11: More Details And Rose Leaves
 For some extra details, use Neutral Tint and a touch of Burnt Sienna to strengthen the shadows under the roof of both buildings. With the opaque Permanent White gouache paint and size 1 brush, dot in the headlights of the vehicles (put the paint on the auxiliary palette for more space). Then, switch back to the no. 6 rigger brush, and mix Sap Green, Indigo, and some French Ultramarine for a dark green. Use this for painting the leaves between the roses in the foreground, again making random brushstrokes and allowing leaves to stick out here and there. With the same color, paint the stems and the basket-like structure that supports the roses as well. If you want, darken the roses with more Permanent Carmine, but be careful not to touch the wet leaves.
Step 12: Staking Out A Vineyard And Adding Depth
 As you finish up the flowers, it is time to finalize this watercolor landscape to turn it into a true vineyard. So, mix Burnt Sienna and French Ultramarine to paint the support poles in the vineyard. Make sure that they're not all pointing in the same direction, and vary the length and thickness depending on perspective. This means thicker poles are in front, while thinner ones are in the back. Doing so will create the illusion of depth in your watercolor landscape, and all with just a few simple strokes of the brush. For the stakes closest to the front, switch to the no. 10 rigger brush, and mix a darker brown using Burnt Sienna and Neutral Tint. Carefully paint a close-up stake, and repeat this process a few times, filling in the rows of stakes from left to right. More details can be seen on closer objects, so you can even add the little "branches" stemming from the top of each pole for extra support and depth. While the poles are still wet, drop in some Brilliant Orange to liven them up a little, especially the poles near the front. You can also darken them using French Ultramarine, either as a suggestion of texture or shadows. Use this color to continue applying small plant details to the wooden stakes, and keep touching up these details as you see fit.
Step 13: Finalizing Details And A Signature To Complete This Course
 The rest is all finishing touches to get the best vineyard watercolor landscape possible. You can tape off the parking lot and lighten the area with the magic sponge and soften the edges with a wet brush, then touch up the roads with more Peacock Blue for more depth and contrast. Next, fill in the white roof of the leftmost building with diluted Yellow Ochre, and add tile details to the rightmost building using the size 1 Cotman brush. You can also use pure Neutral Tint to finalize the details on the vehicles, such as windows or shadows. One of the last things to add is the distant telephone pole in the background. Bill opts for a light-to-dark effect, where the top half is a dark pole against a light background, while the bottom half is a light pole against a dark background. To do this, use artist’s tape to outline the vertical pole, and lift out the paint where the pole overlaps with the forest. For the top half, use the no. 6 rigger brush and pure Burnt Umber to paint the pole so it transitions into the bottom half. Don't forget the crossbeams and other details, and add telephone wires with a diluted Burnt Umber to complete the painting. When there's nothing left to touch up, go ahead and sign your watercolor landscape painting. Use the size 1 brush and a "vineyard" color by mixing Cadmium Red Purple with a touch of Neutral Tint. Don't paint too close to the edge of your watercolor landscape, but otherwise, feel free to place it somewhere unobtrusive. For a professional-looking signature, don't hesitate, and paint it in one go. After that, take off the tape on the painting's edges and let it dry, because you are finished!


