Learn how to master the wet-in-wet watercolor technique from an award-winning painter, William "Bill" Dunn, as he features this technique while painting a pair of exotic fish. This course is the perfect practice for water control and blending colors on paper, and is especially appropriate for those interested in applying the basics to a complete and colorful painting. Want to watch the video version? The full tutorial is available to members of our Beeblys WatercolorPainting.com.
Materials Used In This Wet-In-Wet Watercolor Class:
- Reference pictures of colorful exotic fish (click here and here for Bill's pictures)
- A sheet of Arches rough watercolor paper (140lb, size 10″ x 14″)
- A sheet of scrap paper
- Pentel Graphgear 1000 automatic drafting pencil, 0.9mm lead size with HB or 2B lead
- Kneaded eraser
- Mr. Clean Magic Eraser (original)
- Artists' tape
- Painting palette for watercolor paints (with 24 wells)
- Auxiliary plate or palette for gouache paint
- A container of water
- A towel or rag
- Tissue or paper towels
- Spray bottle with clean water
- Tilted wooden board
Paints (Holbein Artists' Watercolors)
- Cadmium Yellow Lemon
- Cadmium Yellow Deep
- Brilliant Orange
- Cadmium Red Purple
- Quinacridone Magenta
- Cobalt Violet Light (or Lavender)
- Mineral Violet
- Olive Green
- Cobalt Green (or Turquoise)
- Permanent Green #1
- Peacock Blue
- Prussian Blue (or Ultramarine Blue)
- Indigo
- Payne's Gray
- Neutral Tint
- Ivory Black
Winsor & Newton's Designers' Gouache
- Permanent White
- Cadmium Red
Brushes
- Neef Rigger Supreme Taklon Series: Long handle rigger brush (no. 6)
- Escoda Perla Joseph Zbukvic Series: Round brush (no. 12)
- Escoda Perla Joseph Zbukvic Series: Round brush (no. 20)
- Winsor & Newton Series 7: Kolinsky Sable round brush (size 1)
- Winsor & Newton University Series 223: Round brush (no. 2)
- Old toothbrush
Step 1: Thumbnails And Sketching Tricks
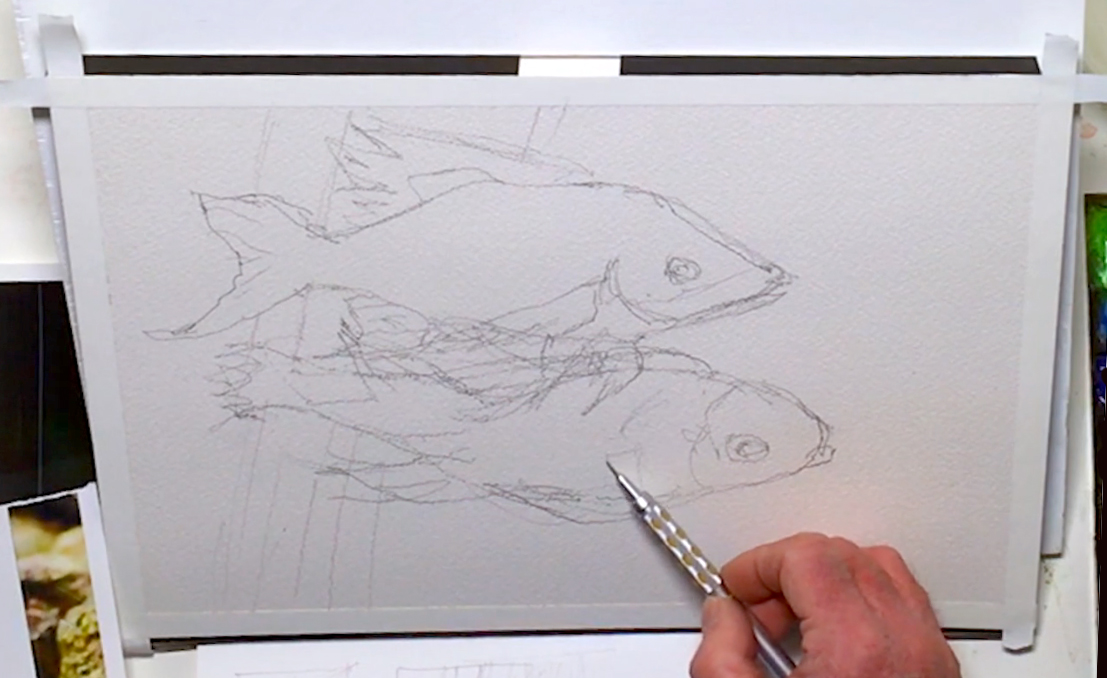 Prep your watercolor block or sheet of paper by taping the sides down to a tilted board with artist's tape, creating a ½" margin for a good clean edge for future framing purposes. Then, plan your composition by doing a quick thumbnail sketch that's scaled to your watercolor paper. A trick to do this is to imagine a diagonal line running through your watercolor paper, then lay your scrap paper on top. The borders of your thumbnail sketch should share the same diagonal line, even though the surface area is smaller. In this quick sketch, draw where each fish should go, and have fun with the background - you can include underwater plants or rays of light in your composition to make it more interesting. Try not to overdo it though as the main focus is still on the pair of fish. Another tip is not to place the fish dead center in the composition; instead, use the Rule of Thirds for a more lively design. Once you're done, transfer the sketch to the larger watercolor paper, making sure to keep your lines loose and light to minimize eraser usage as the eraser may change the paper's surface. You also don't need to add too many details, as some of them will be added later with your paintbrush. Make sure to keep the fish in proportion though, especially the eyes and fins, and try to keep the fins within the taped border so the focus won't be drawn away and off the page. You can exaggerate some of the shapes and lines as needed for your composition, holding your pencil sideways when drawing broad strokes, and switching to a normal grip when penciling in smaller details. Try to get a good impression of two fish swimming in water, but don't make it too messy or else it will be difficult to paint, and look sloppy to boot. Below is a close-up of Bill's sketch:
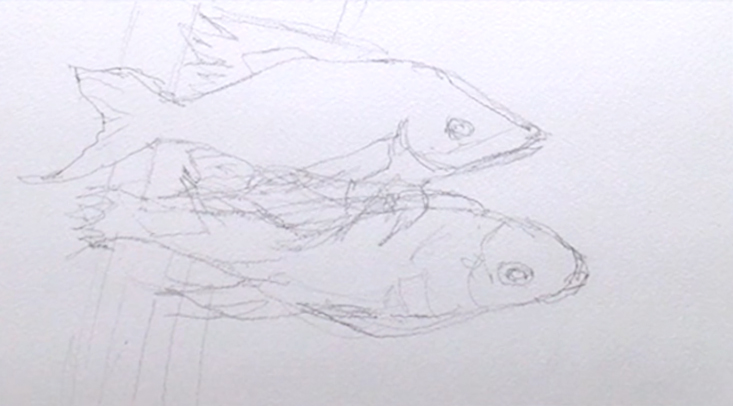
Step 2: Breaking Down Wet-In-Wet Watercolor Basics
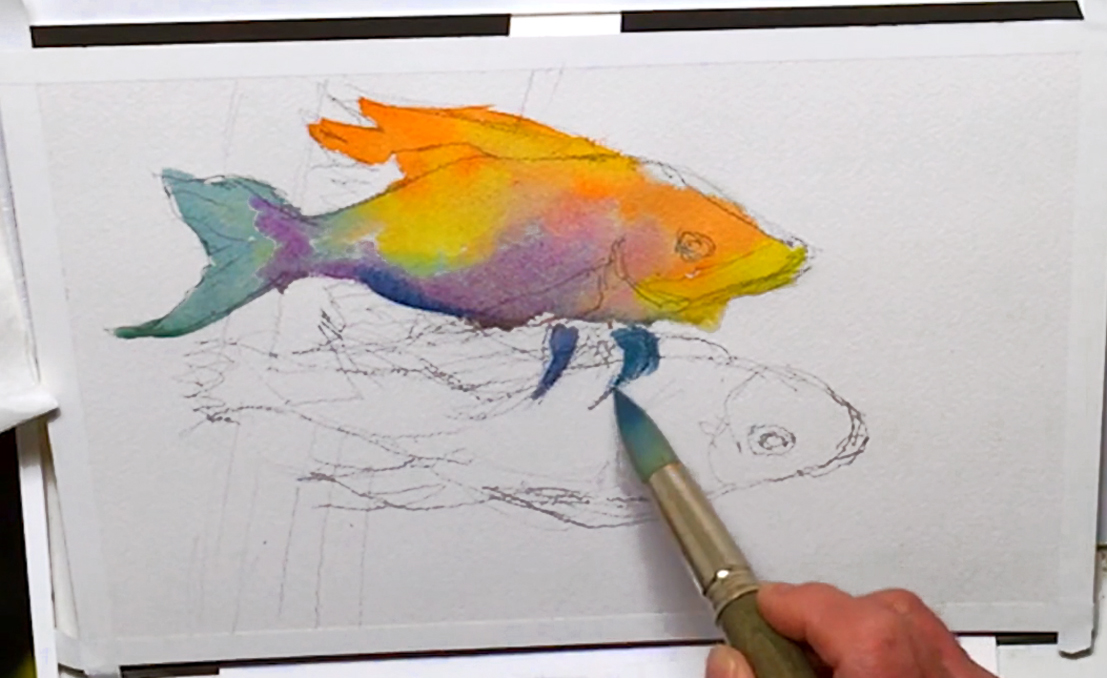 About 5-10mins before painting, spray the paints on your palette with clean water to soften them. You can think ahead of how to paint your fish and which colors to use, because while the reference photos are there, they should act more as a guide to your painting and less of a strict rule. You're not aiming to reproduce an exact copy of the picture; you want a lively painting that shows off some of your artistic style! For good compositional tips, Bill recommends working from big to small shapes, light to dark colors, and to have a good contrast of warm (i.e. reds, oranges, yellows) and cool colors (i.e. greens, blues, purples) at a ratio of 3:7. Once your paints are soft, you're ready to use the wet-in-wet watercolor technique! For this, use the Escoda Perla no. 20 round brush. Make sure the paintbrush is clean, then with your brush, wet the first larger fish with water, being careful around the edges of your fish. It's okay to go over all the details such as the eyes, fins, and any other lines. If you accidentally put too much water, you can lift the excess water out with a clean dry brush. Let this layer of water soak into the paper for a minute or two before you start painting. Starting with the lightest colors, mix Cadmium Yellow Deep with Brilliant Orange on your palette, then drop in this mixture to the top fin and the face of the upper fish. The paint will spread due to the wet surface, but this is fine for the wet-in-wet watercolor technique. If it starts pooling in one area, you can lift out the excess with a dry brush or a paper towel or rag. Keep working in this way, changing to Cobalt Violet Light and dropping it next to the light orange areas for contrast in the fish's main body, then add a touch of Cadmium Yellow Lemon near the top area and along the mouth. Switch to Peacock Blue and patch it in to some of the white areas in the main body and tail, and the paint will naturally fill in the wet areas on paper. Use more of the Cobalt Violet Light to bring out some details in the tail, and add some shadows to the underside of the body. You can intensify the shadows by mixing in Prussian Blue with the purple mixture, and use the same paint for the bottom fins. Flick your brush outwards starting from the fish's body to create tapered lines for the fins, and add in some Cobalt Green for more splashes of color.
Step 3: Using The Wet-In-Wet Watercolor Technique For Fluid Blends In Fish
 Continue dropping the same dark blue into the orange-yellow areas in the main body to tone down the warmth of these colors. Due to the wet surface, the paint will create soft blends with each other, which is the purpose of using the wet-in-wet watercolor technique. For the ends of the tail, mix in the darker blues such as Payne's Gray, Indigo, and Prussian Blue, and paint in some lines for the fins' skeletal structure. Mix in more Cobalt Violet Light for a deep indigo color and paint the gill area, then switch back to a warmer color by mixing Cadmium Red Purple, Brilliant Orange, Cadmium Yellow Lemon, and a touch of Cobalt Violet Light to paint the area where the lower fin attaches to the main body. Keep in mind that you can always change the composition for the sake of a better painting, and lift out any puddles with a clean dry brush. Paint will always dry lighter than when you first put it on paper as well, so don't worry if the painting looks too dark when it's wet. In fact, since the surface you're painting on is already wet, adding more water will create a white "rind" in your painting while increasing the chances of damaging the paper, so try to hold off from diluting the paints too much.
Step 4: Painting Shadows And Details On Fins
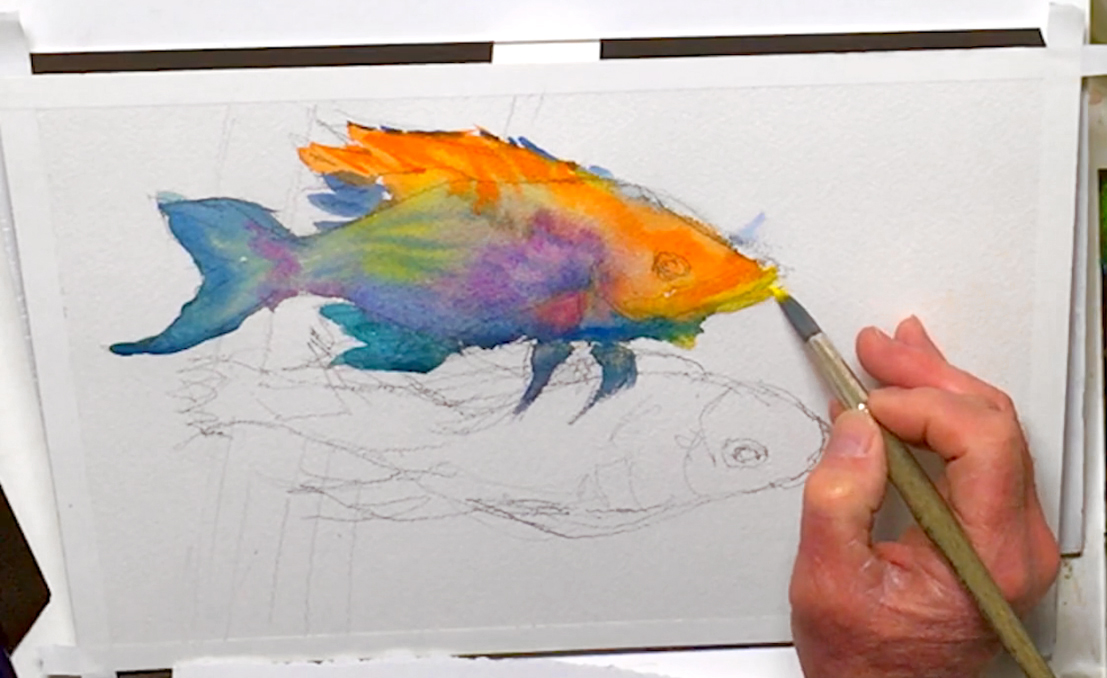 Use the blue mixture for the tips of spikes along the top fin, but try not to overwork your painting or use too many colors. Add a few more details such as the vibrant orange for the face, smoothing out any hard edges with clean water. Paint the last fin along the fish's belly with Cobalt Green, and a touch of Cadmium Red Purple for the fin's muscles and jawline. Create as much contrast as possible by adding some Payne's Gray and Indigo to the darkest shadows. Switch to the no. 12 Escoda Perla round brush, and re-wet the top fin with clear water as it's probably quite dry by now. Using the wet-in-wet watercolor technique again, use Brilliant Orange and add a few skeletal lines for the fin. Use pure Cadmium Yellow Deep to highlight the fish's bottom lip, and work in any finishing touches where necessary.
Step 5: Reusing The Wet-In-Wet Watercolor Technique For A Different Fish
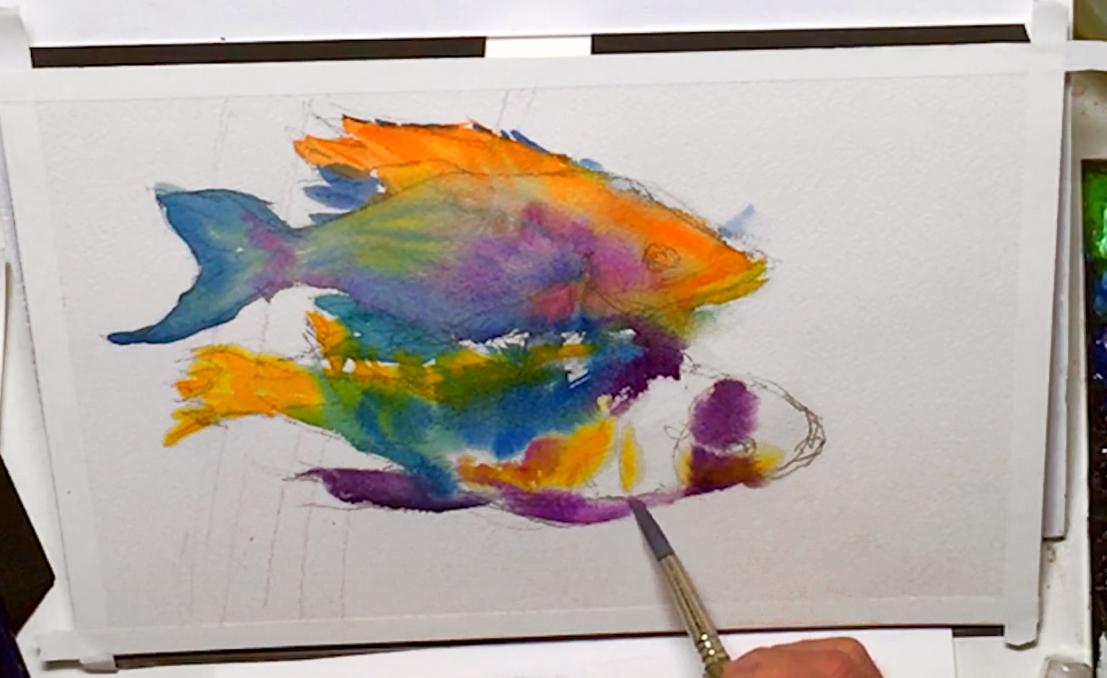 For the bottom fish, since it's in the front, lift out the paint where the fins of the upper fish overlap with the bottom one using a clean brush and water. You can even use the Mr. Clean Magic Eraser to gently scrub over this area to take the paint out completely, although some of the graphite from your pencil lines may be left behind. Even so, this is fine as they'll be covered once there are enough layers of paint on top. Dry the area with a paper towel or rag, and once again, use the wet-in-wet watercolor technique and the no. 12 Escoda brush to wet the second fish with clean water. You'll begin to notice that this technique helps create a very natural and fluid blend of colors that are sometimes unexpected, yet can still create pleasing results, which is perfect for painting undefined areas of color. Once again, you'll be working from light to dark colors to make the most out of the wet-in-wet watercolor technique, so start with the orange-yellow mixture and paint the tail, the spine, and some of the fish's belly. You can leave some white spots for extra "sparkle" or detail if you want. Add a touch of Cobalt Violet Light for the underside, then switch to Indigo. You can use this color to paint next to the orange-yellow areas, allowing some of the paint to glaze over the underlying layer (i.e. overlapping the colors). Try not to mix these complementary colors too much though or else the colors will become muddy! For even more contrast, use Prussian Blue for this fish's main body, and mix a deep purple using Mineral Violet, Cobalt Violet Light, and Quinacridone Magenta for painting the darkest shadows and the lower fins.
Step 6: Splashing Around And Layering Bold Colors For Depth
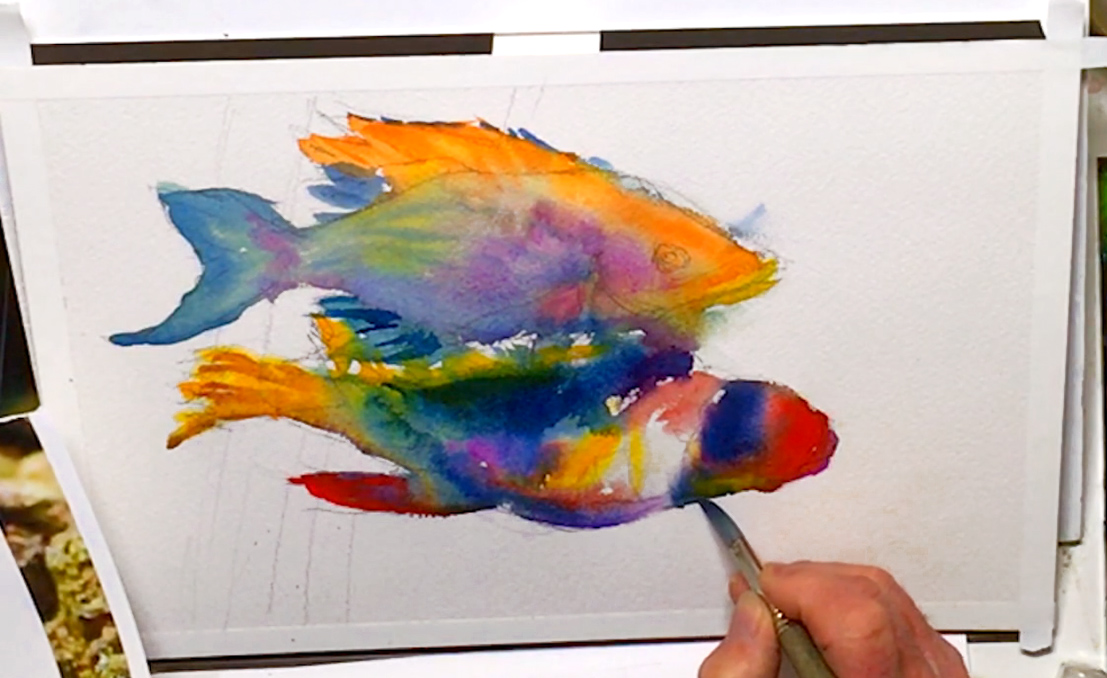 With pure Prussian Blue, add some bold strokes into the fish's body, where it's too yellow. You can even splash some paint around as well to loosen the rigidity of the shapes, and use Cadmium Red Purple for the forehead, around the back of the head, and for the tip of the bottom fin. Touch some Cobalt Violet Light around the mouth, and paint the skeletal lines in the tail. For shadows, use a strong Indigo, especially under the top fin. Remember not to compare your painting to the reference picture, as you are creating a painting, not a reproduction or photocopy! This shouldn't be too difficult as by definition, the wet-in-wet watercolor technique doesn't allow for rigid painting in general. Next, paint some lines to the upper fish's bottom fin for definition, then drop in some Cadmium Yellow Deep into the blue areas to tone them down while adding more depth. Use Brilliant Orange to finalize this layer's details, and try to cultivate an instinct for colors and contrasts, which will help in the color picking process for any watercolor painting. When you're done, leave the painting to dry.
Step 7: More Control With The Wet-On-Dry Watercolor Technique
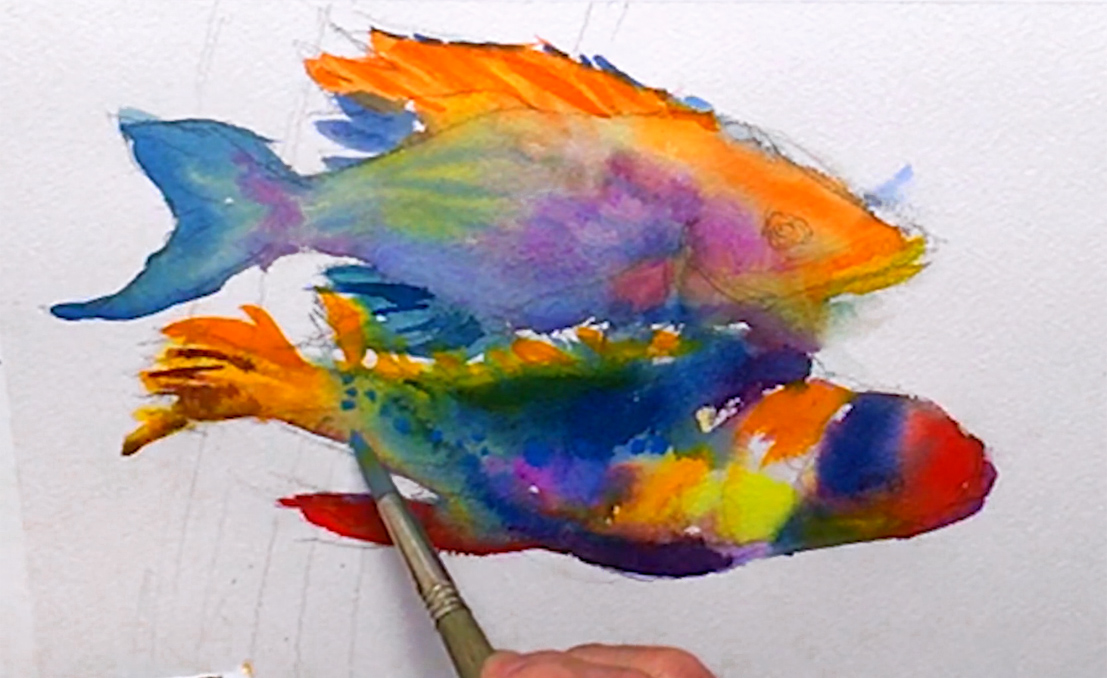 When the surface is dry, use Cadmium Yellow Deep again to paint some of the white areas left, especially the area next to the second fish's gill. And since the surface is dry, you can use the wet-on-dry watercolor technique, where you put wet paint on a dry surface. This allows for much more control over where the paint goes, which makes it a good technique for painting details. Mix Mineral Violent and Cobalt Green for a toned-down purple, and deepen the lines on the tail and in the belly's shadow. Add some last few marks with the yellow-orange mixture to liven up the painting, and with pure Peacock Blue paint, dot in some lighter-colored scales towards the back half of the bottom fish.
Step 8: Jelly Eyes And Bellies
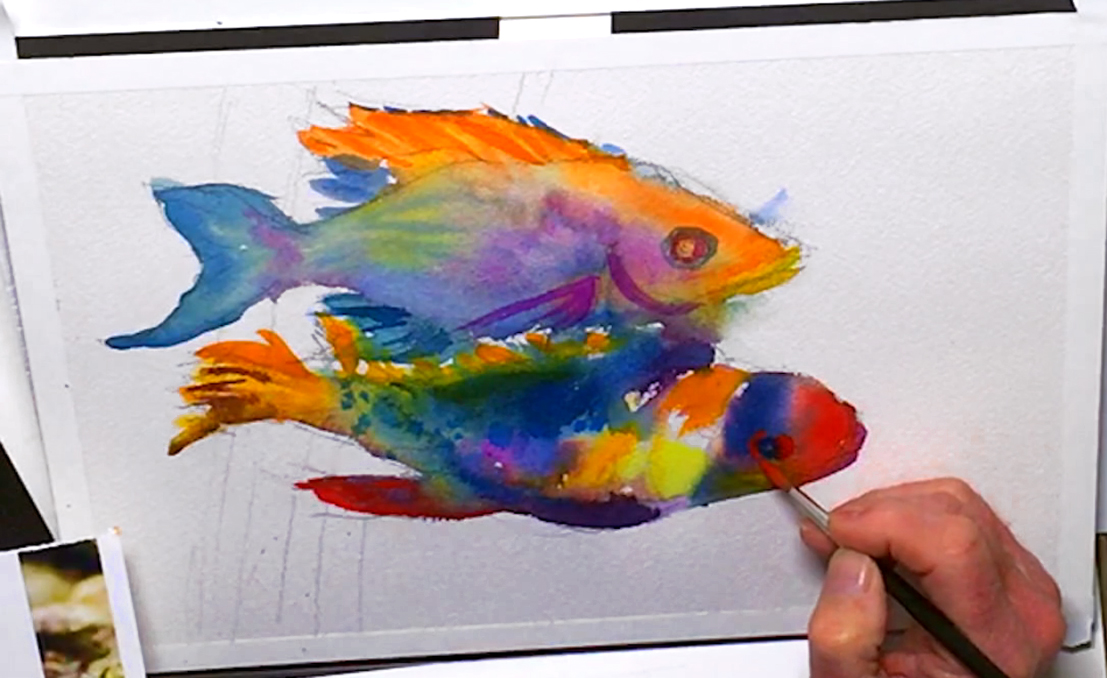 Next, liven the first fish's gills and belly with Cobalt Violet Light paint. Then, for the fish's jelly-eyes, switch to the Winsor & Newton Kolinsky Sable round brush and mix a reddish purple using Mineral Violet and Quinacridone Magenta, diluting it a little for a transparent effect. Use this color to paint a ring around the upper fish's eye, then add in a touch of Prussian Blue and paint a second ring around the first. For the bottom fish, mix Payne's Gray and Indigo for a darker first ring, while the outer ring can be a pure Cadmium Red Purple to match the fish's head color. Be careful not to let the rings touch though, as the colors will bleed into one another like you did when using the wet-in-wet watercolor technique, only this time it will look like a mistake! This is because details like the eyes have to have a specific shape in order to look like an eye, while larger undefined areas have more leeway in terms of blending different colors.
Step 9: Watery Background & Wet-In-Wet Watercolor
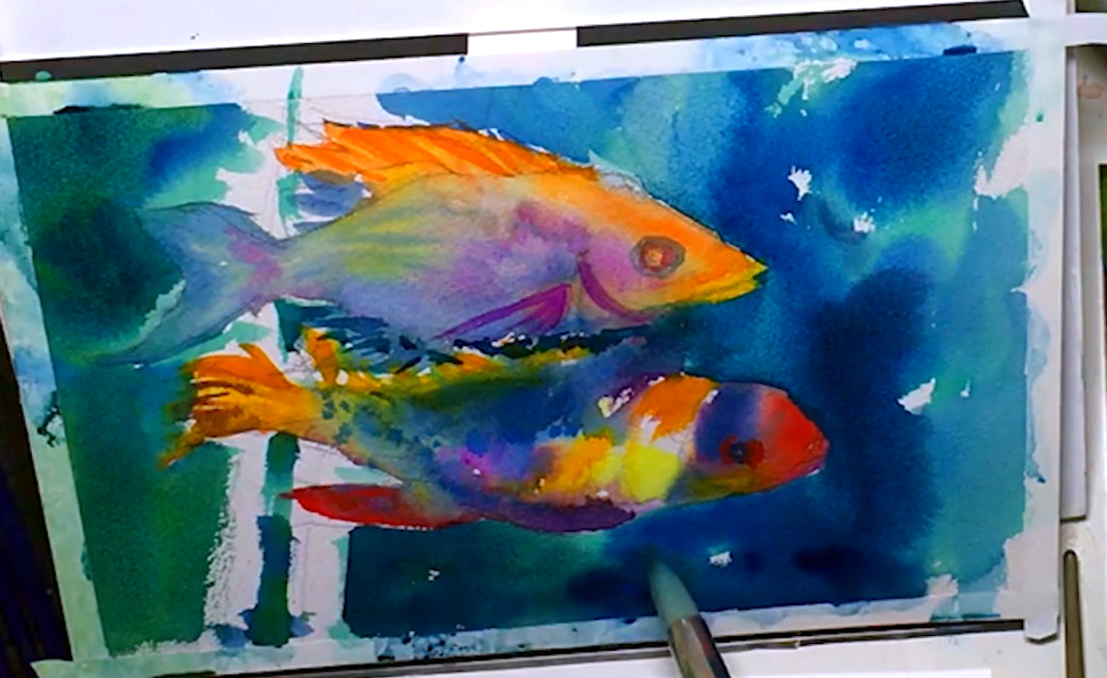 While the first layer for the eyes and other details are drying, it's finally time to paint the empty white background. Going back to the large no. 20 Escoda Perla brush, mix a touch of blues with Cobalt Green to get a good turquoise color and paint the background using the wet-on-dry technique. Make sure to paint around the fish and the two stripes of plant life, although it's fine to overlap a little to tie the fish to the surrounding water. Keep picking up more water and paint when you feel the brush begin to dry, and go quickly to prevent streaks from forming on top of one another. It's fine to leave patches of white; they can be bubbles and add a little "sparkle" to the overall painting. While the background is still wet, mix in some Indigo paint to darken the background (i.e. the wet-in-wet watercolor technique), especially the area around the fish. This adds another layer of depth to the painting while really helping the fish to pop out of the background. Just makes sure not to start painting any patterns or making the background too colorful, as this will distract from the fish, which is where the focus of the painting should be. Layer in Neutral Tint and Indigo for an even darker blue, adding a touch of Olive Green for a slight variation and toning it down if necessary with more Payne's Gray and Indigo. Don't forget to paint the gaps between the two fish as well!
Step 10: An Impression Of Underwater Plant Life
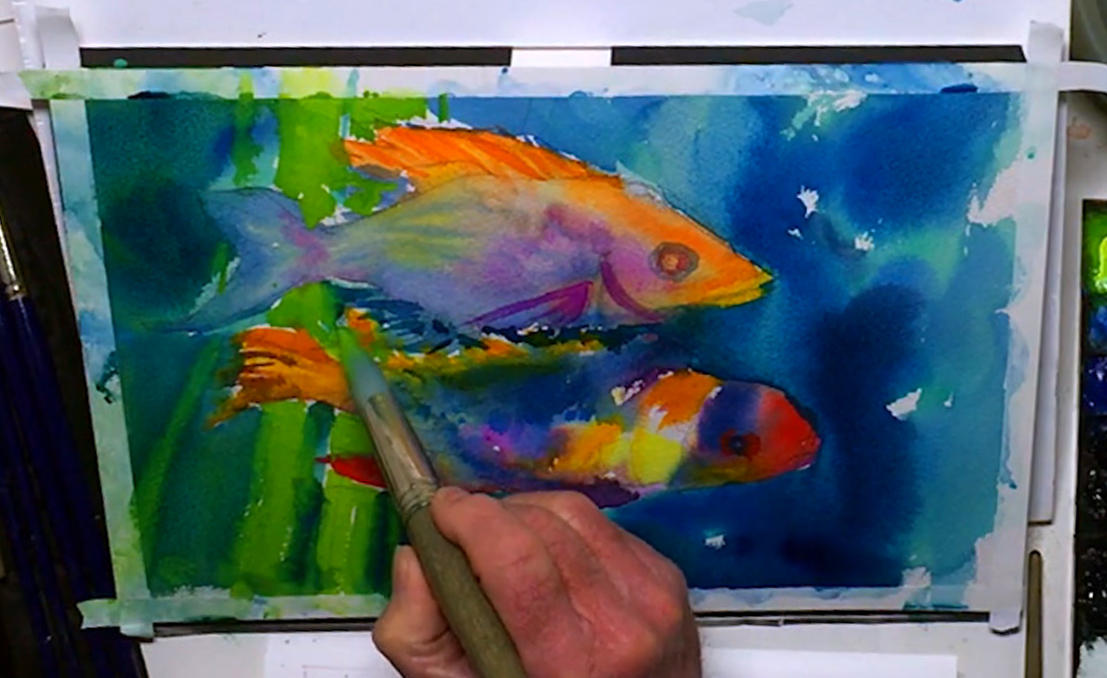 For the underwater plants, mix Permanent Green #1 and Cadmium Yellow Lemon for a lighter green, then fill in the white strips you've left behind. You can also use this color to streak in a few extra leaves in the background as well; just make sure the background is semi-dry so the green won't spread too much into the background. Keep your brushstrokes loose for that impressionistic and fluid feel, and don't worry too much about filling in every white space - the white will help brighten your entire painting, plus you will dot more in later.
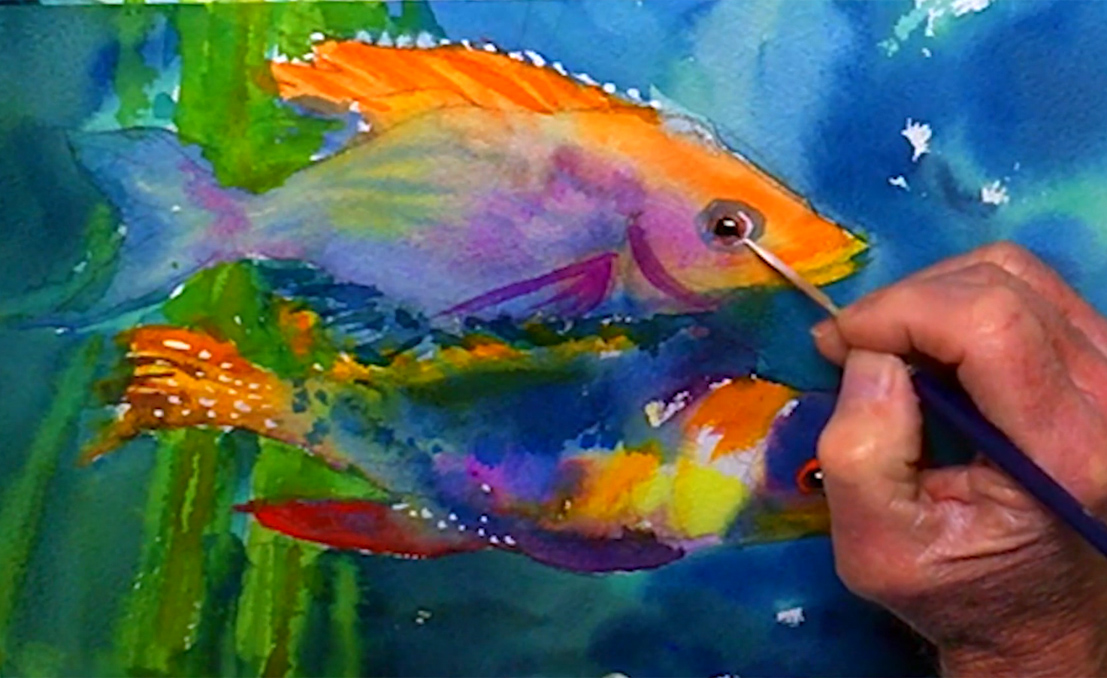
Step 11: Adding Depth To And Around The Fish's Eyes
 While the background dries, work on the next layer for the eyes. Using the no. 6 Neef rigger brush, mix a dark color using Neutral Tint and Ivory Black, and paint in the pupils. Next, squeeze some Permanent White and Cadmium Red gouache paint on your side palette or tray, and use the red to paint around the bottom fish's eye to make it stand out a little more. Try to wait for the pupil to dry first before doing this in case the colors touch and bleed, and be careful not to touch the background or any wet areas while doing this, as this will cause the paint to smudge. For more details, mix Peacock Blue with a little of the Permanent White gouache paint to make it more opaque, then add highlights to both fish's lips and around the top half of the eyes of the upper fish.
Step 12: Touching Up The Watery Background
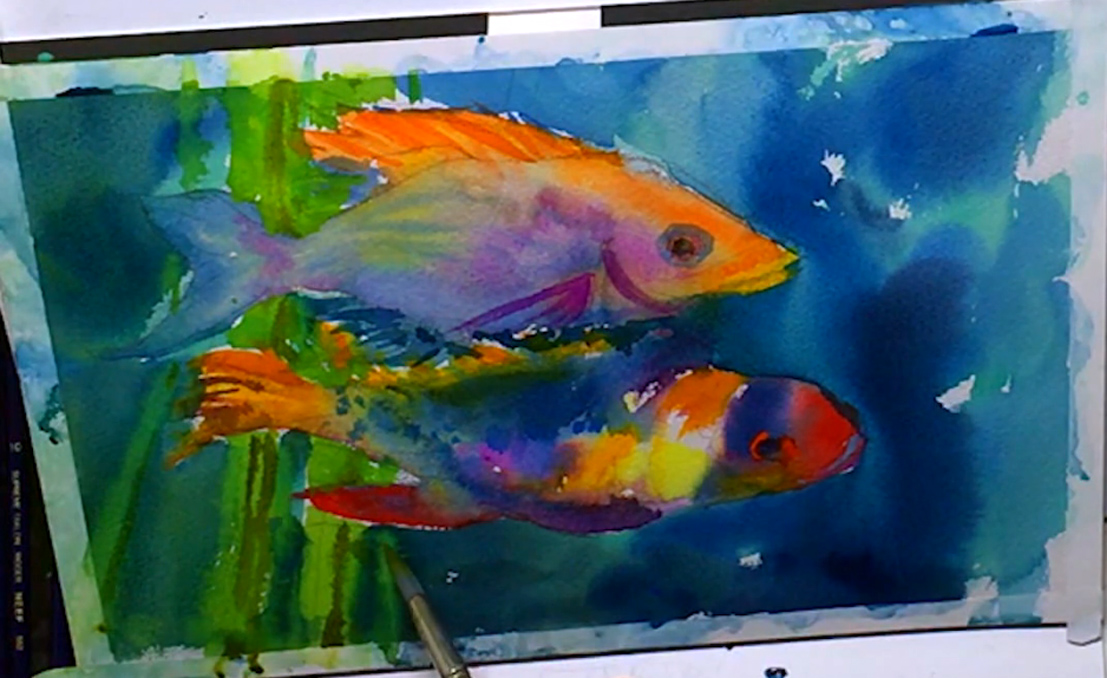 While the eyes are drying, touch up the background by using the no. 12 Escoda brush and Olive Green paint to paint the darker edges of the plants, creating more shadow and depth. Use the blue mixture on your palette to darken some areas in the background, in between the plants, and in between the fish, detailing where necessary.
Step 13: Final Layer For Eyes And Scales, And All Fish Tails
 When the eyes are dry, you can tidy them up with another layer of Ivory Black for the pupils, and Cadmium Red gouache for the ring around the bottom fish's eye. Wait a little for this layer to dry, then use the very thick white gouache paint to dot the pupils and to add the shiniest scales to the fish's body. Put these spotted highlights along the tails, the bodies, and fins, around the eyes, and on top of the spikes of the upper fish. These little details make all the difference in a painting like this, and they really help brighten the overall atmosphere of your artwork.
Step 14: Paint Splattering With A Toothbrush
 For the finishing touch, take out your old toothbrush, wet it, and scrub it on some of the white gouache paint. Hold it about 1-2 inches above your painting, then gently run a thumb over the bristles while you move the toothbrush across your painting. The paint will fall in a small splatter on your painting, and is not too difficult to control where it goes, so have fun with it. Just try not to overdo the splatter - although it won't be as opaque when it's dry, you still don't want it to distract from your colorful exotic fish.
Step 15: Signing Off
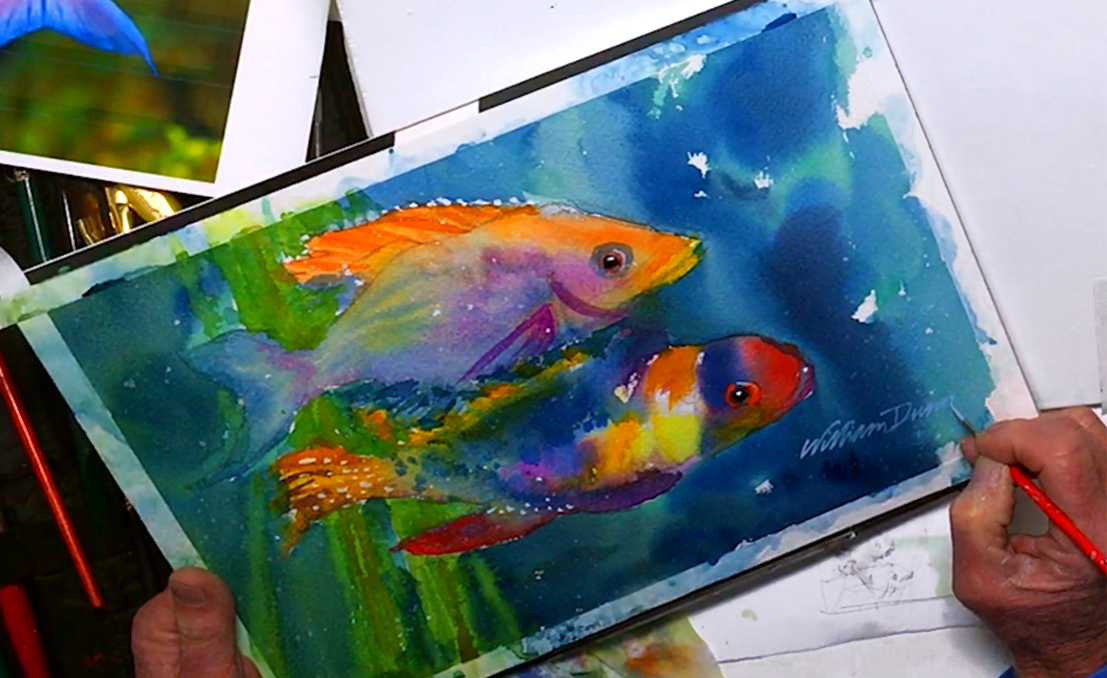 When there's nothing left to fix or add to your painting, feel free to finish off with one last touch - your signature. Bill uses a tiny round brush (Winsor & Newton University Series no. 233) for this, and mixes Peacock Blue with the opaque white gouache before carefully signing in the bottom right corner. You get one shot at this, so make sure you have enough space! Bill also advises using a paintbrush as opposed to a pen or marker, as this will disrupt the continuity of the painting, plus the ink will fade long before the watercolor paint does. When you're done, let the paint dry, gently take off the artist's tape, and voila! You've just completed an entire painting using only the wet-on-dry and the wet-in-wet watercolor techniques, so give yourself a pat on the back for a job well done.


