Kelly Eddington offers an easy-to-follow tutorial of 7 widely used watercolor techniques: 4 application techniques, and 3 wash techniques (thanks Kelly!). Here's a breakdown of the highlights from the entire watercolor tutorial.
Materials used:
- HB pencil
- Postcard (4¼" x 51⁄2")
- 4 sheets of Arches cold press 140-pound watercolor paper (around 14" x 10")
- Kraft paper tape (width 1")
- Painting palette for watercolor paints
- A container of water
- Paper towel
- Cardboard (at least 16" x 12")
Paints by Old Holland Classic Watercolors
- Ultramarine Blue
- Prussian Blue
- Cerulean Blue
- Alizarin Crimson
- Cadmium Yellow Medium
- Permanent Green Light
- Cadmium Red Light
- Sepia
- Dioxazine Mauve
- Turquoise (by Winsor & Newton Cotman Watercolors)
- Opera (by Holbein Artist Materials Watercolors)
Brushes
- Sax: Copper acrylic wooden handle flat brush (size 10)
- Royal: Soft grip golden taklon oval wash brush
- Loew Cornell American Painter (4000 Series): Short handle round brush (size 6)
- Loew Cornell American Painter (4000 Series): Short handle round brush (size 2)
Step 1: Preparing To Practice Watercolor Techniques
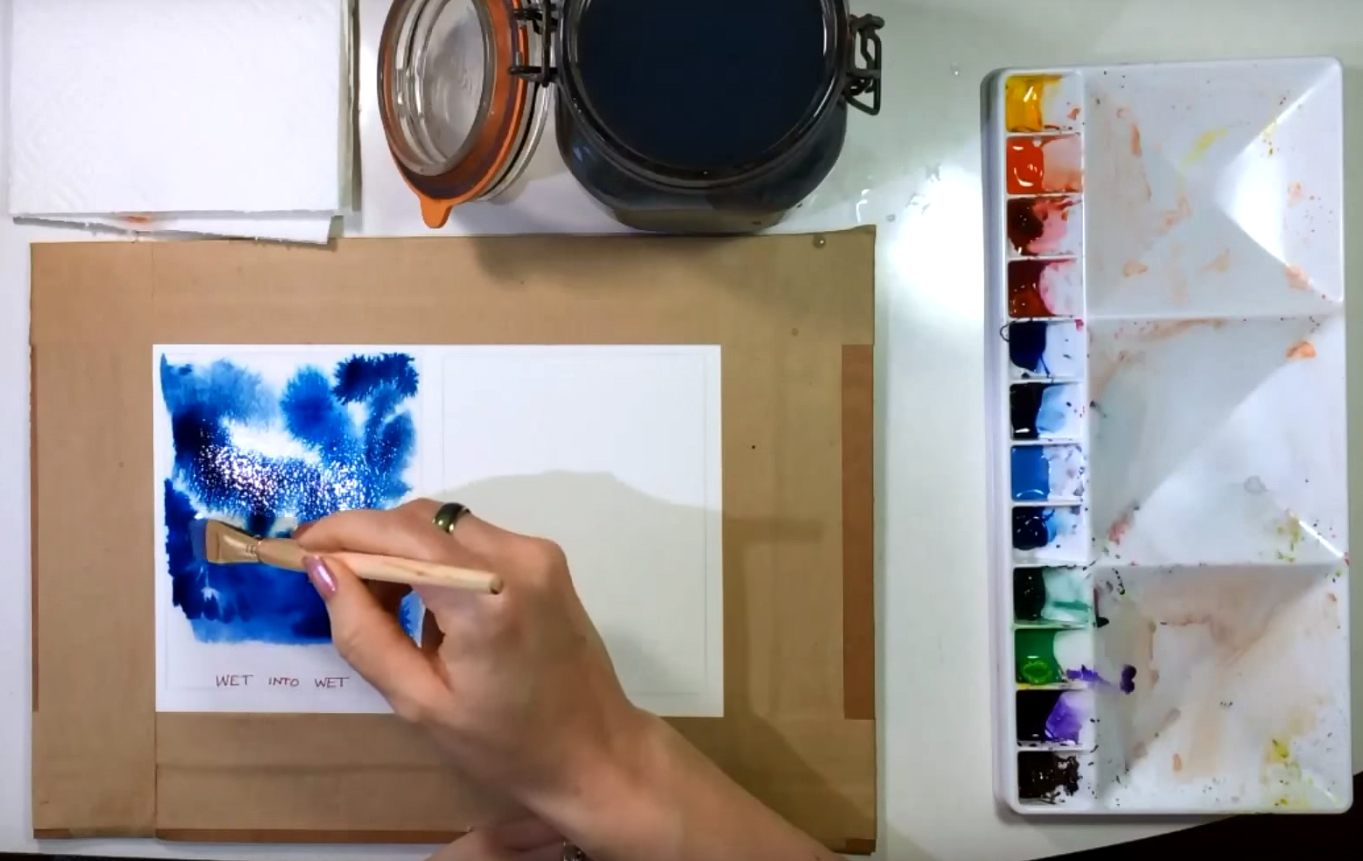 To start, prepare 4 sheets of Arches watercolor paper by tracing around the postcard so you get 8 identical rectangles, 2 per sheet. Then, use the paper tape to tape around the edges of the first sheet of paper to the piece of cardboard. You can also label each rectangle after each technique used in this tutorial. The first technique is a wet-on-wet application, which achieves a very fluid and unpredictable effect. With the Sax flat brush, wet the first rectangle on the watercolor paper with clean water (but not so much that puddles start to form). Then, mixing a moderate amount of water into your paint, drop different blue paints (Ultramarine, Prussian, Cerulean Blue, and Turquoise) using the wet brush onto the wet surface. You can experiment with different colors if you want. This is a good technique to cover large areas of sky, or areas where you need a soft underpainting (i.e. the first layer of paint). When you're done adding all the paint you want, you can tilt the board around to help the paint blend and flow.
Step 2: Wet-On-Dry Watercolor Technique
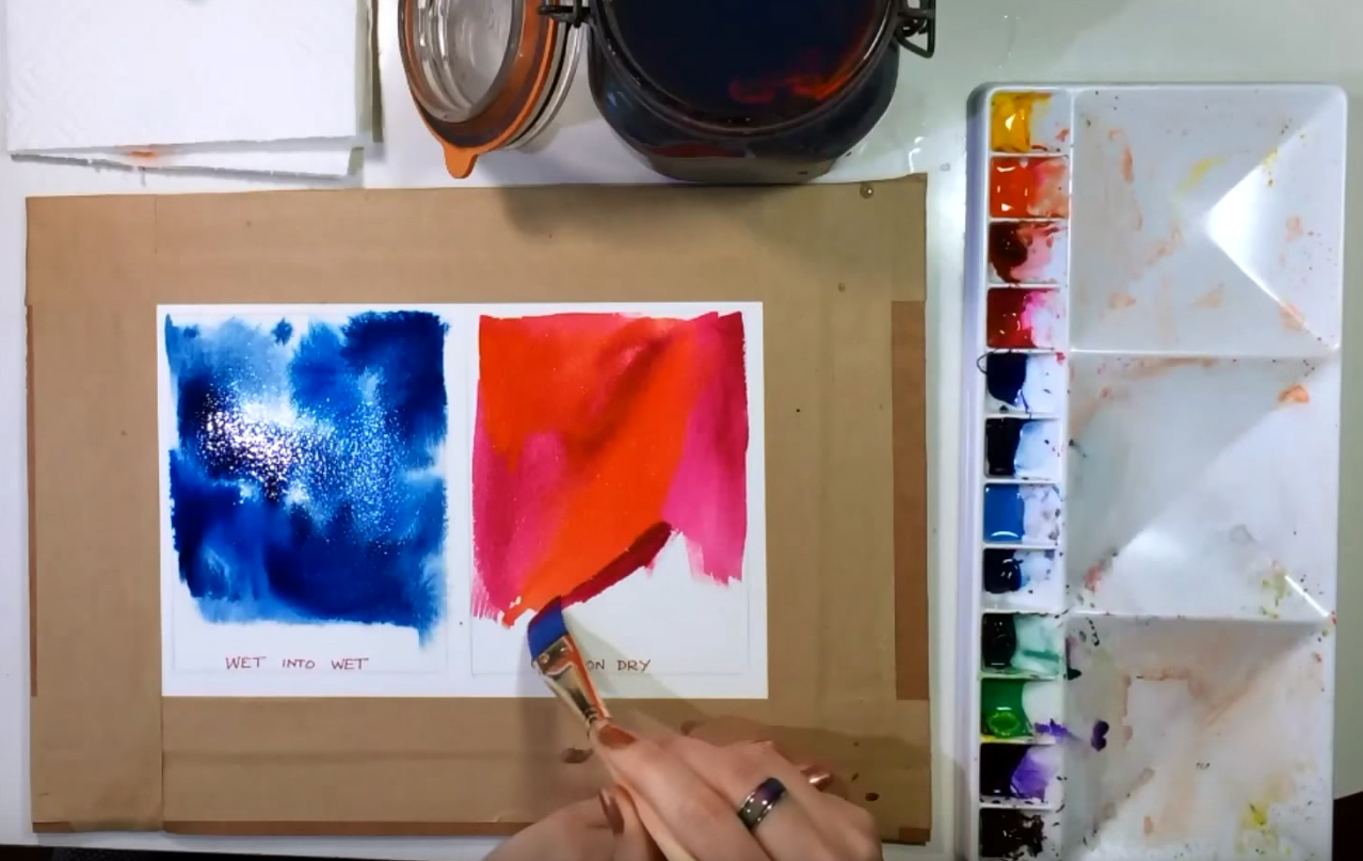 The next technique is the wet-on-dry technique. Mix Cadmium Red Light, Magenta, and Opera paint with some water, then start painting straight onto the dry surface of a different rectangle. This technique allows for more control over where your paint goes, and while the edges of the paint may still blur when it touches another area of paint, it doesn't fade or bleed as much as the wet-on-wet technique. When you're finished, wait for the paint to dry, then remove the paper from the cardboard before taping the next sheet down.
Step 3: Dry-On-Dry Watercolor Technique
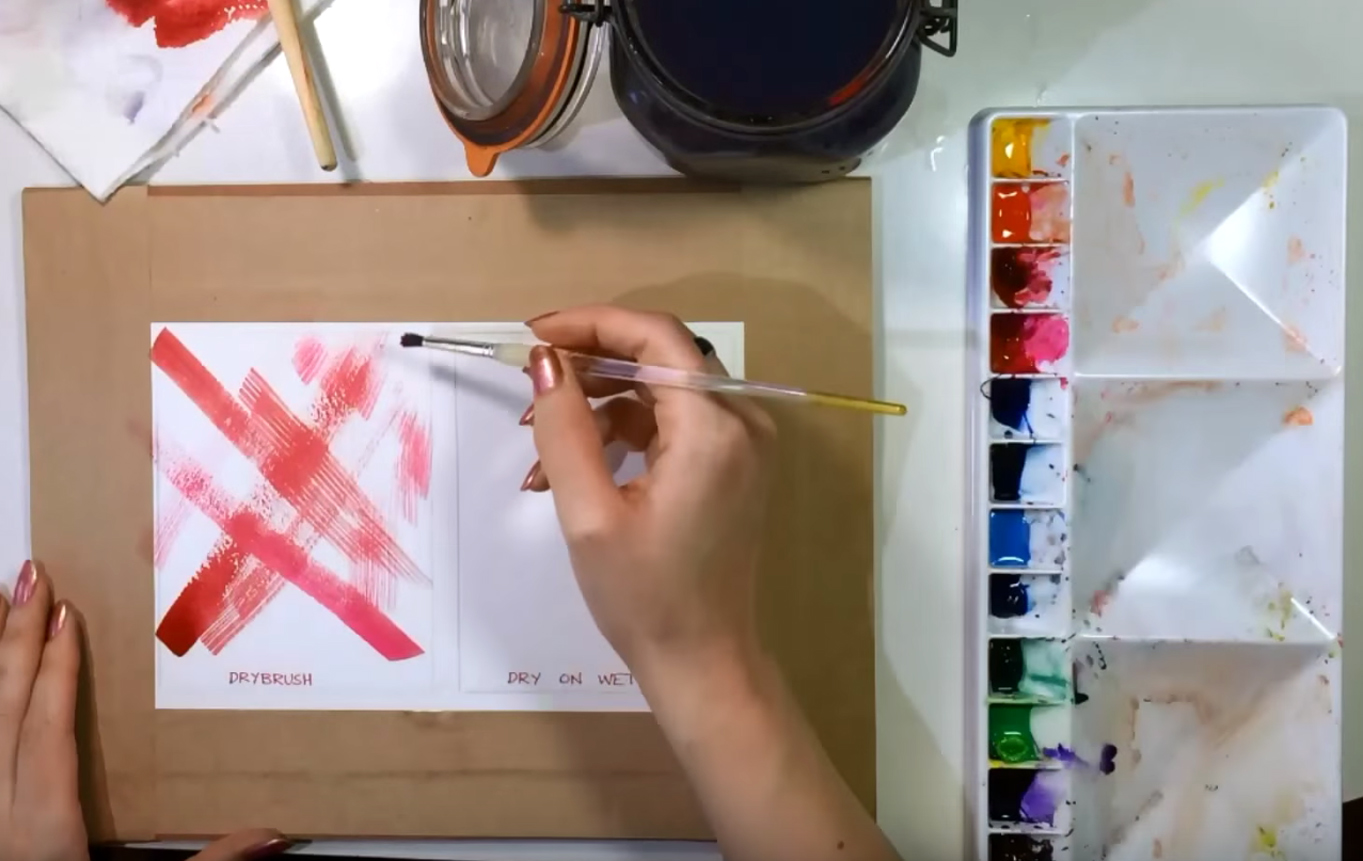 The dry-on-dry technique is also known as a dry brush technique. As its name suggests, use only the minimum amount of water when picking up Alizarin Crimson paint with the Royal oval wash brush, then dry it out even more on a sheet of paper towel before lightly brushing onto your paper. This technique is good for creating a rough-looking texture, or a shimmering body of water. You can vary the pressure you put on your brush, and also use different shapes and sizes of paintbrushes to achieve different results. Since this is a dry technique, the paint pretty much stays the same as when you apply it; it won't fade or bleed.
Step 4: Dry-On-Wet Watercolor Technique
 The last of the application techniques is, as you've probably guessed by now, the dry-on-wet technique. In the next rectangular box, apply a mixture of Cerulean Blue and a moderate amount of water and cover the whole box using the flat brush. Then, switch to the round brush (size 6), and mix Cadmium Yellow Medium, Sepia, Cadmium Red Light, and Dioxazine Mauve with a little bit of water, and blot out the excess water on the paper towel. Start painting in the box while the blue paint is still wet. As the paint on the brush isn't very wet, you'll notice that while the edges are slightly fuzzy, you can still control where the paint goes. If you want to reduce the amount of bleeding, you can wait a little bit for the paper to dry a little before painting on top. Kelly likens this technique to spray painting because of the "fuzzy" texture.
Step 5: Flat Wash Watercolor Technique
 Change your paper, then proceed to the first of the different wash techniques. A wash is a thin, diluted layer of paint applied over a large area, often used in underpainting or to lay in the basic colors in a painting. This first one is called a flat wash, where you wet the rectangular box with clean water, then put wet paint on - almost exactly the same as the wet-on-wet technique, but here, you want a smooth, even layer of color. Use your largest flat brush to help, and paint in one direction to get the best results. You can also tilt the board around to help even the paint out. Kelly uses Permanent Green Light paint for this, but any one color is fine, too. Try to keep the consistency of the paint you mix the same too, or to avoid having to mix it several times, prepare a bigger batch of the color you want to use before applying it to paper. And remember, whenever you're finished with a wash, leave it alone to dry, as going back to change it or taking too long will cause the wash to become uneven.
Step 6: Gradated Wash Watercolor Technique
 The next wash technique is called a gradated wash, also known as the ombré effect. To achieve this in the easiest way, use the flat brush to wet the paper with clean water, then load the brush with Turquoise paint - not too much or else you might get clots of paint in your brush, but enough to saturate the brush with paint. Then, prop the back of the board up so it's slanting towards you, and starting in the top left corner, paint in single, even strokes from left to right, working your way down as you go. Allow the paint to fade out towards the bottom. Gravity should also help pull paint downwards to achieve a soft, consistent wash.
Step 7: Variegated Wash Watercolor Technique
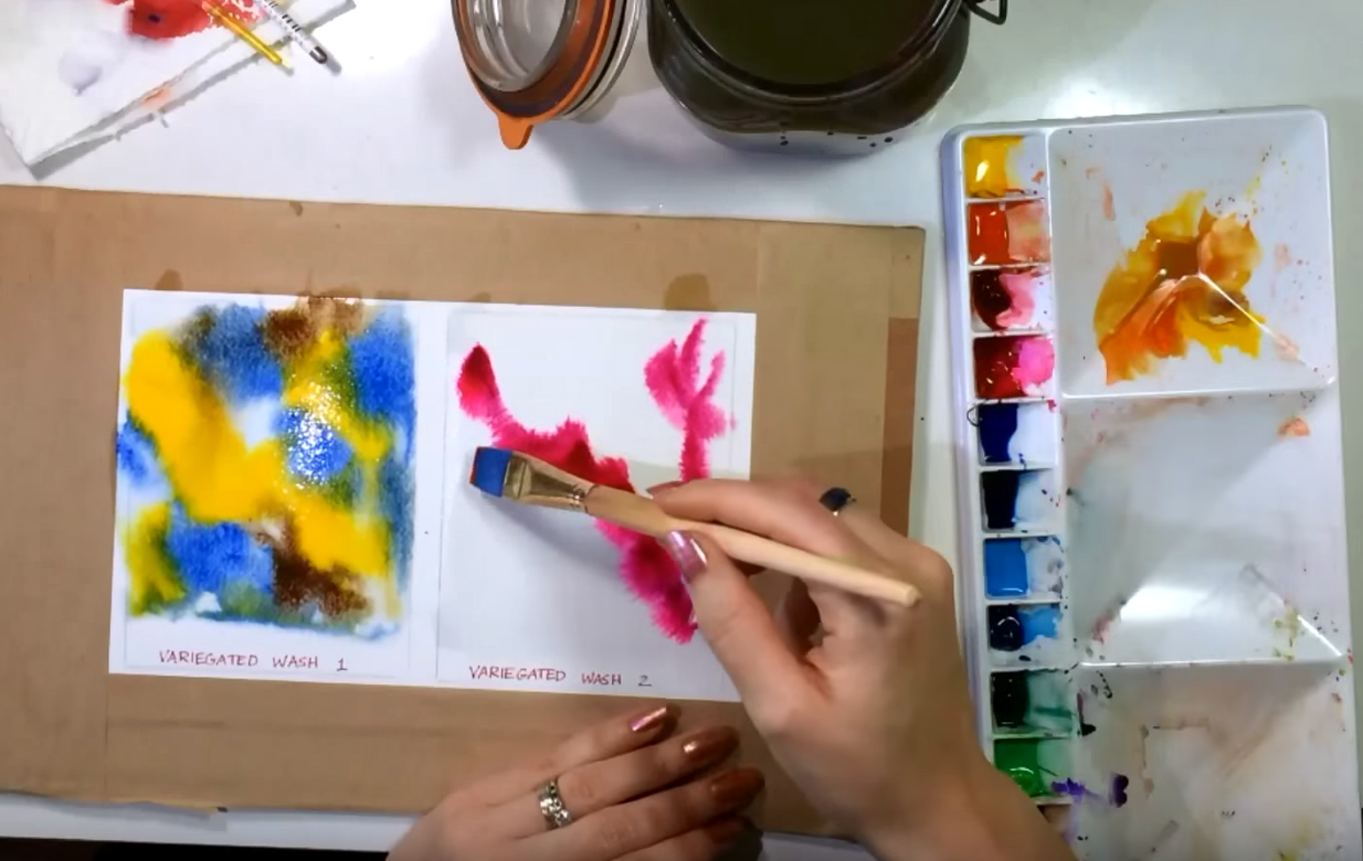 Change your paper for the last technique. The variegated wash technique is good for underpainting layers and painting skies or watery surfaces. Like the wet-on-wet application technique, you wet the surface with a layer of clean water, then start dropping paint in. Kelly uses Cadmium Yellow Medium, Ultramarine Blue, and Sepia paints separately, and swirls them into the wet surface. The paint can be a little more saturated as the colors tend to fade more with wet-on-wet techniques. Again, you can tilt the board around, but try not to blend the paints too much or you'll end up with a muddy puddle. You can experiment with different colors and find your favorite combinations. And finally, keep practicing and allow accidents to happen, as some of the best results are achieved through the random movement of water and paint. Here's Kelly's video if you also want to watch this watercolor tutorial…


