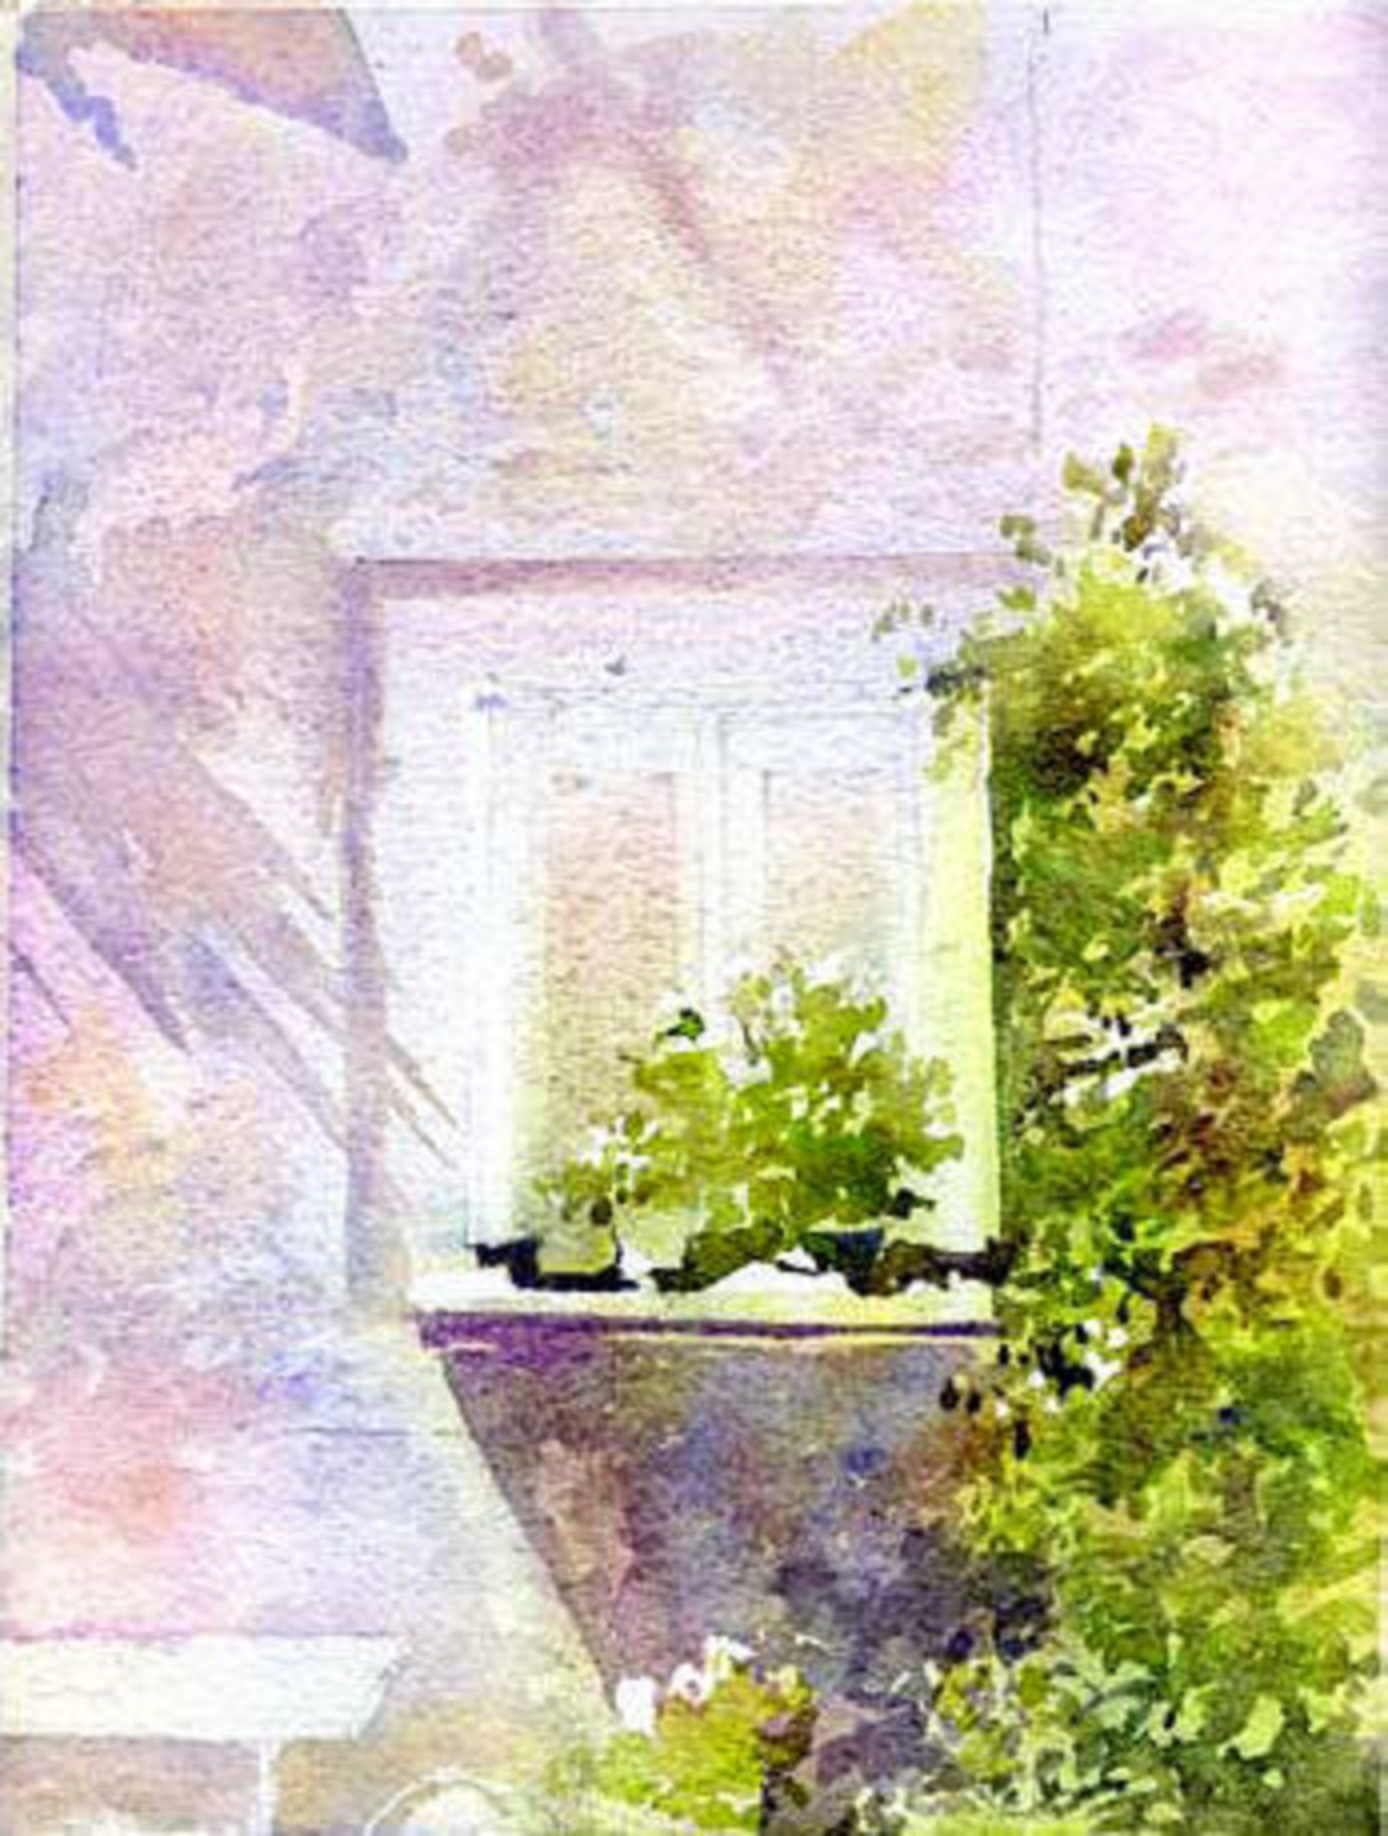
 Original Photo
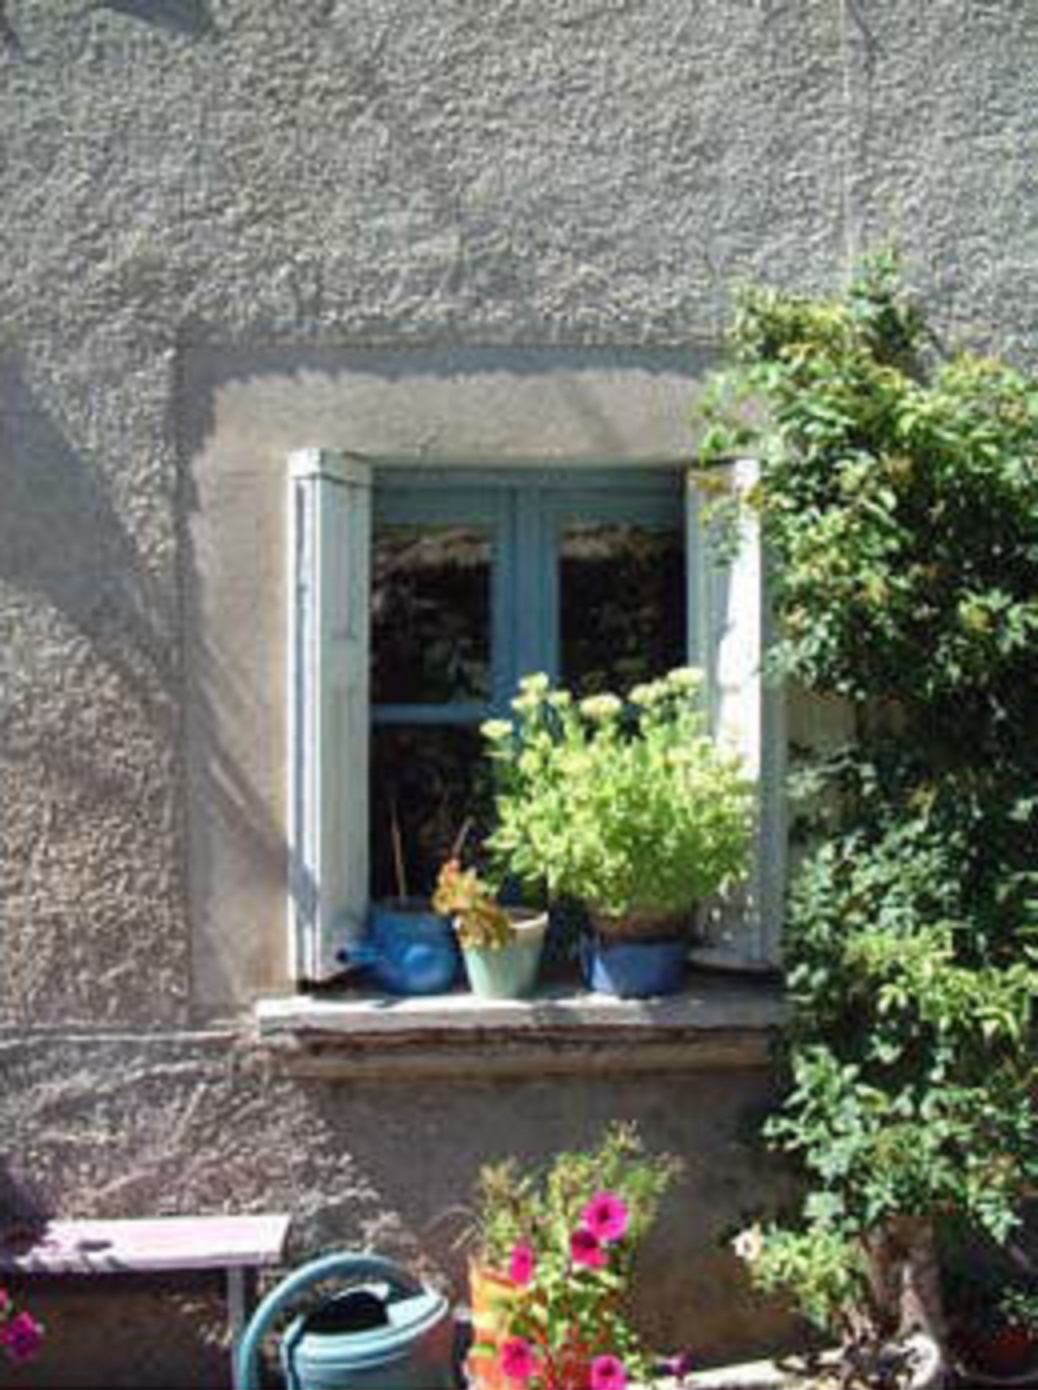
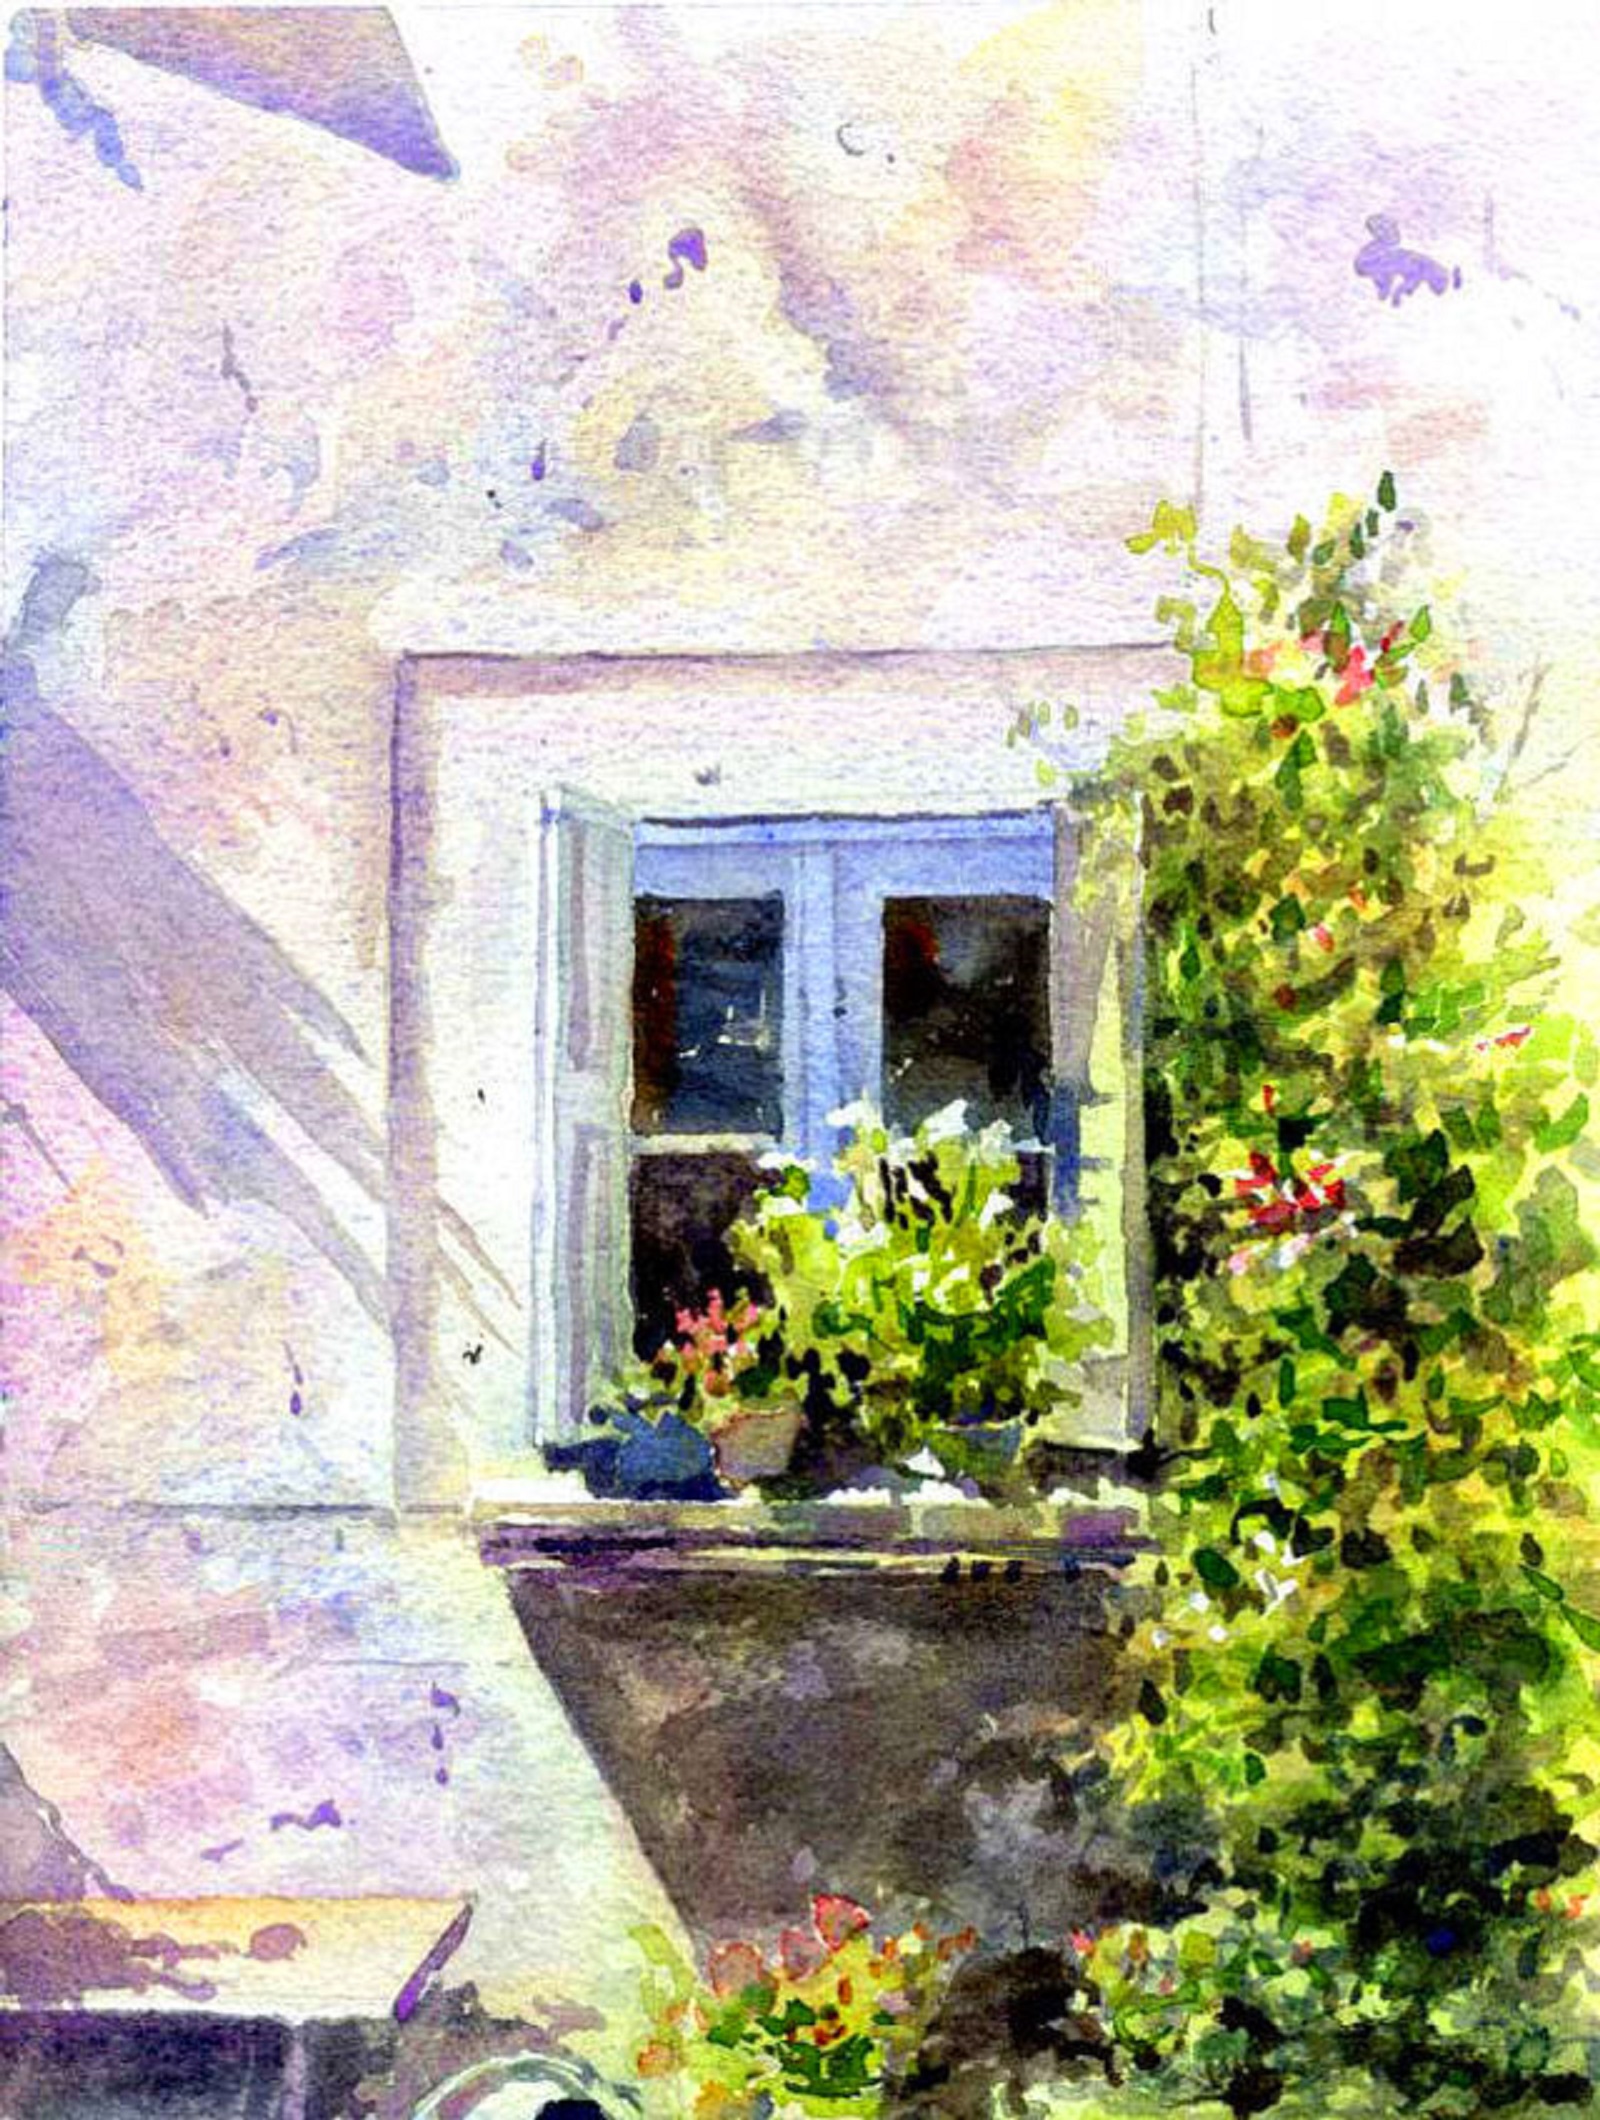
Taken with Fuji Fine pix digital camera at St Antonin in Southern France Allan Kirk's impressionistic watercolor exercise shows how to capture light and present the beauty that can be found in the simplest of subjects. The composition is brought to life by the way transparent watercolor is used to reflect the strong light and dark tones found under the southern French sun. For Allan Kirk, watercolor impressionism is the constant pursuit of light. Living in the south of France, Allan is able to work under strong sunlight in old, dusty medieval towns. It is the combination of light and old buildings that attracts Allan’s interest. With watercolor, Allan has the perfect tools to capture light as it plays on the old buildings, doors, windows, and street furniture of the many medieval towns in the French Midi Pyrenees region. Oftentimes when we choose our subjects we look for complexity and miss the simple beauty that surrounds us. We may find ourselves intimidated by a street scene with many buildings, trees, and vehicles. We can find a way through this complex vista if we simplify our subject choice. In this case Allan was in a small medieval street with numerous old buildings. Narrowing down his subject matter enabled him to concentrate, look, and find the quiet beauty that is often right in front of our eyes.
Material
Paper
- Arches Rough watercolor paper, 140lb (300gsm) (22cm x 28cm or 8½" x 11")
Pencils
- 4B Pencil
Watercolor Paint Colors
- French Ultramarine
- Cobalt Blue
- Winsor Blue
- Permanent Mauve
- Cobalt Turquoise
- Viridian
- Burnt Sienna
- Alizarin Crimson
- Cadmium Yellow
- Raw Sienna
Brushes
- Large Squirrel Mop
- Sable #10
- Pro Arte #8
Masking Fluid
- Any old synthetic brush to apply masking fluid
1. The Process
The finished watercolor was completed in the studio and took around 4 hours. In between washes, I used a hair dryer to hasten the drying process for the next stage. Using a hair dryer may be useful. Without one, it may take some time for a watercolor to dry sufficiently to be worked upon again. Use a palette with deep wells for mixing color, with lots of water. Also use 2 medium-sized jars filled with water - one to wash your initial dirty brush, and one for the second, more thorough wash. The second one should stay mostly clean, which you can also use to wet your clean brush. I prefer to work with my paper at around a 45-degree angle. You should choose the angle that you are most comfortable with.
2. The Composition
The focal point of this finished picture is around the pot of white-petalled flowers on the window ledge. The strong darks of the window provide a vivid contrast to the white of the petals. I have removed the long diagonal shadow in the centre of the photo at the top. It added nothing to the subject. It is fine to change what we see in front of us in order to balance our composition.
3. Painting What You See, Not What You Think
You don’t want to see windows and flowers as separate objects. You want to see only the light and dark tones that you see. In this way, shadows are as important as objects. If you start thinking of the shapes as individual objects, you will tend to over-elaborate and put too much detail into your painting. For example, don’t paint individual leaves; just the rich contrasting grey and green tones that the bush presents to us. If you look too hard at the bush you see more and more detail, and will eventually lose the overall subject.
Step 1: Drawing and Masking Fluid
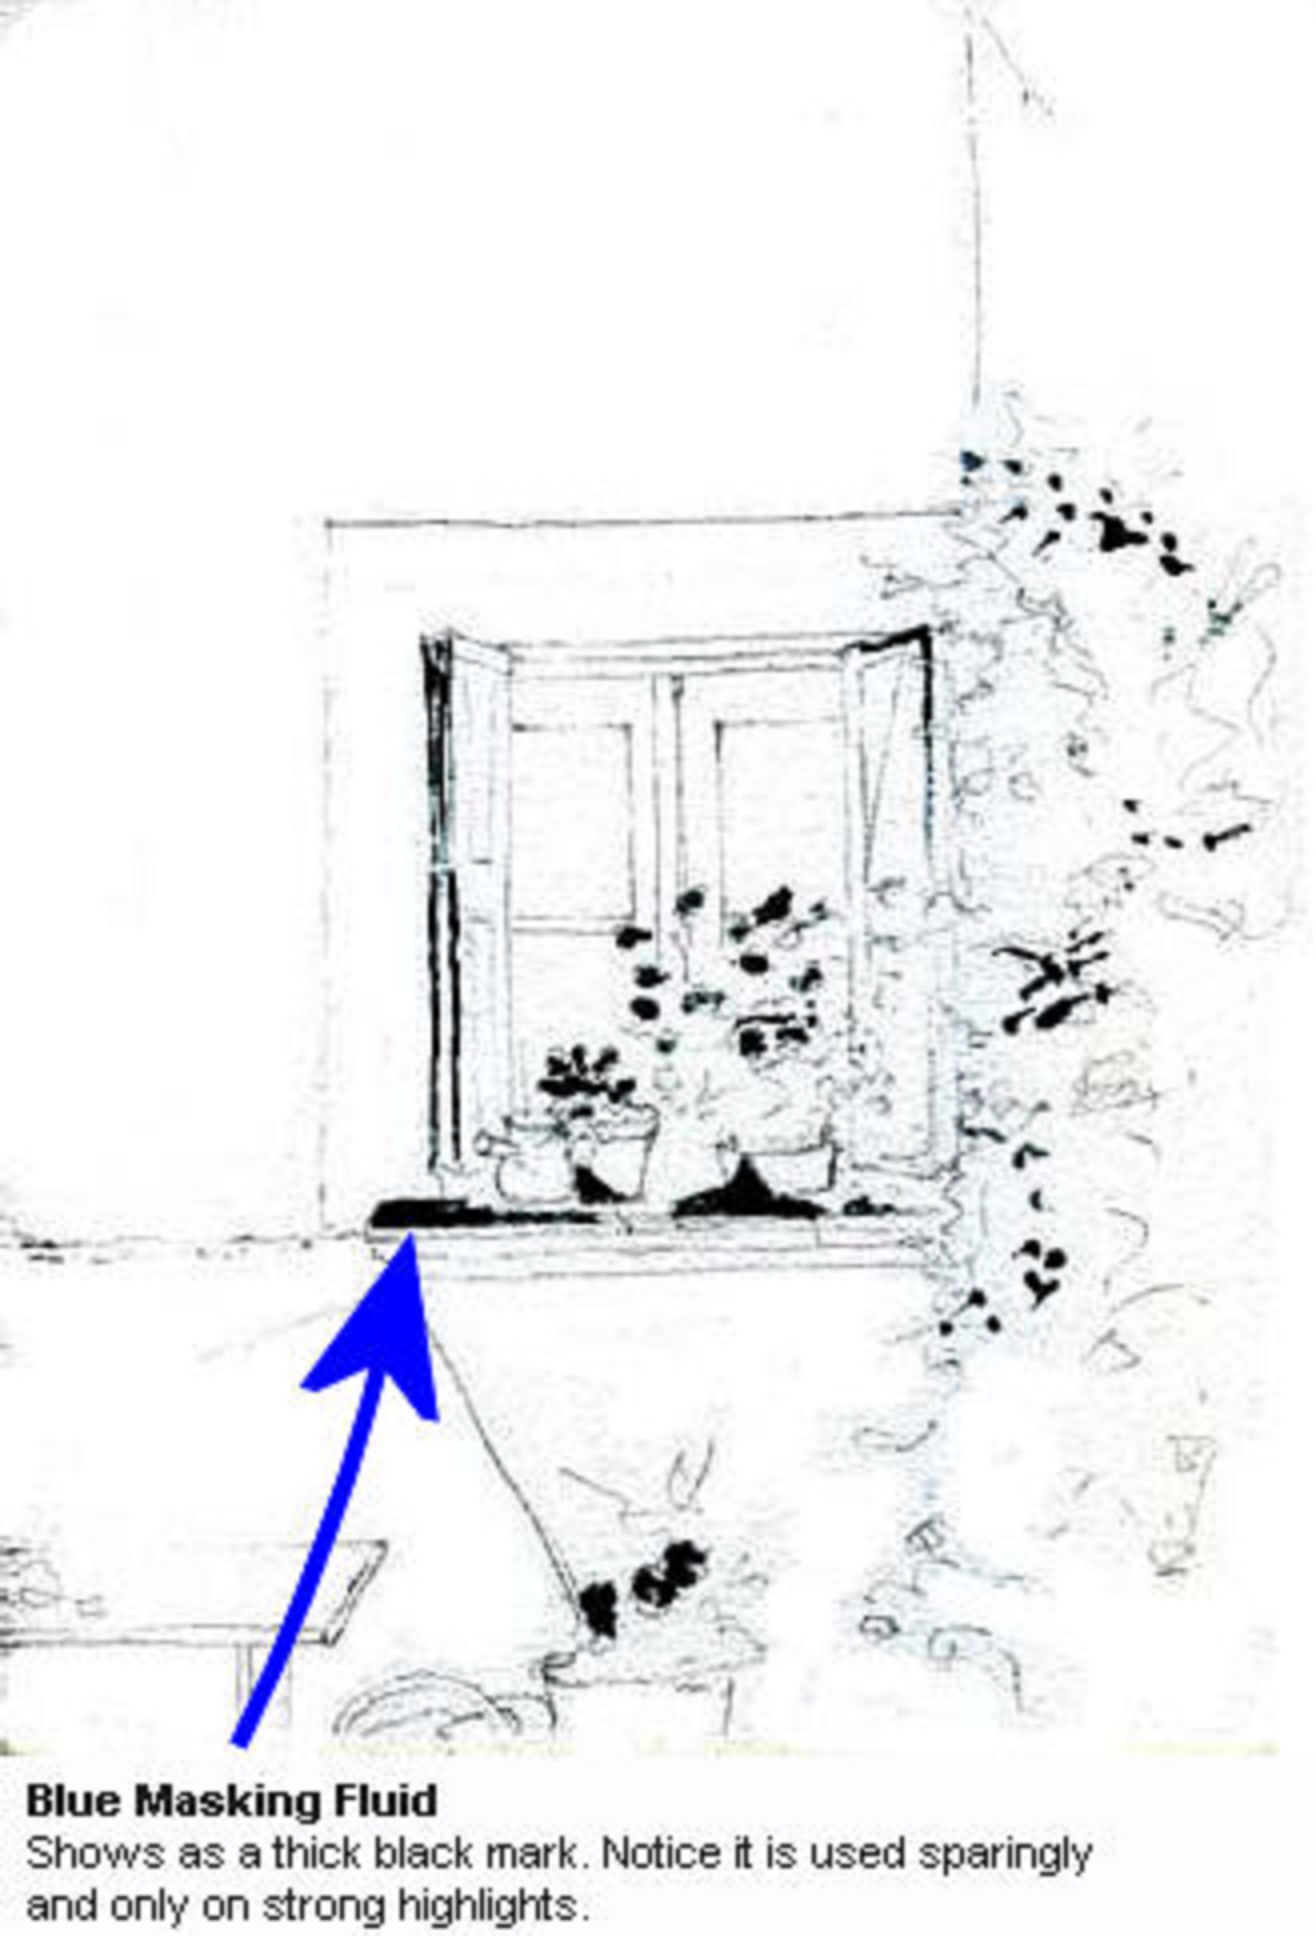
Initial Drawing
To begin, cut the watercolor paper to size (if it isn't already) and use masking tape attach it to a board. You can just use an old piece of hardboard as your painting board. Now complete a simple line drawing using a 4B pencil. Draw lightly, and don’t mind if the pencil is visible on the finished picture. It can be erased, but you don’t need to bother. Concentrate upon your drawing and try to get it to be accurate. You don’t want detail, but you do want accurate proportions at this stage. That is, you want the drawing to look like the shapes you can see. After drawing apply the masking fluid with an old brush; never use a good painting brush. Apply it sparingly - it can be seen on the drawing as the black marks. In this exercise, Allan has shown how a simple window can become an attractive subject where the sunlight hits it. Often when we choose our subjects, we look for complexity and miss the simple beauty that surrounds us. We may find ourselves intimidated by a street scene with many buildings, trees and vehicles. We can find a way through this complex vista if we simplify our subject choice. In this case Allan was in a small medieval street with numerous old buildings. Narrowing down his subject matter enabled him to concentrate, look, and find the quiet beauty that is often right in front of our eyes.
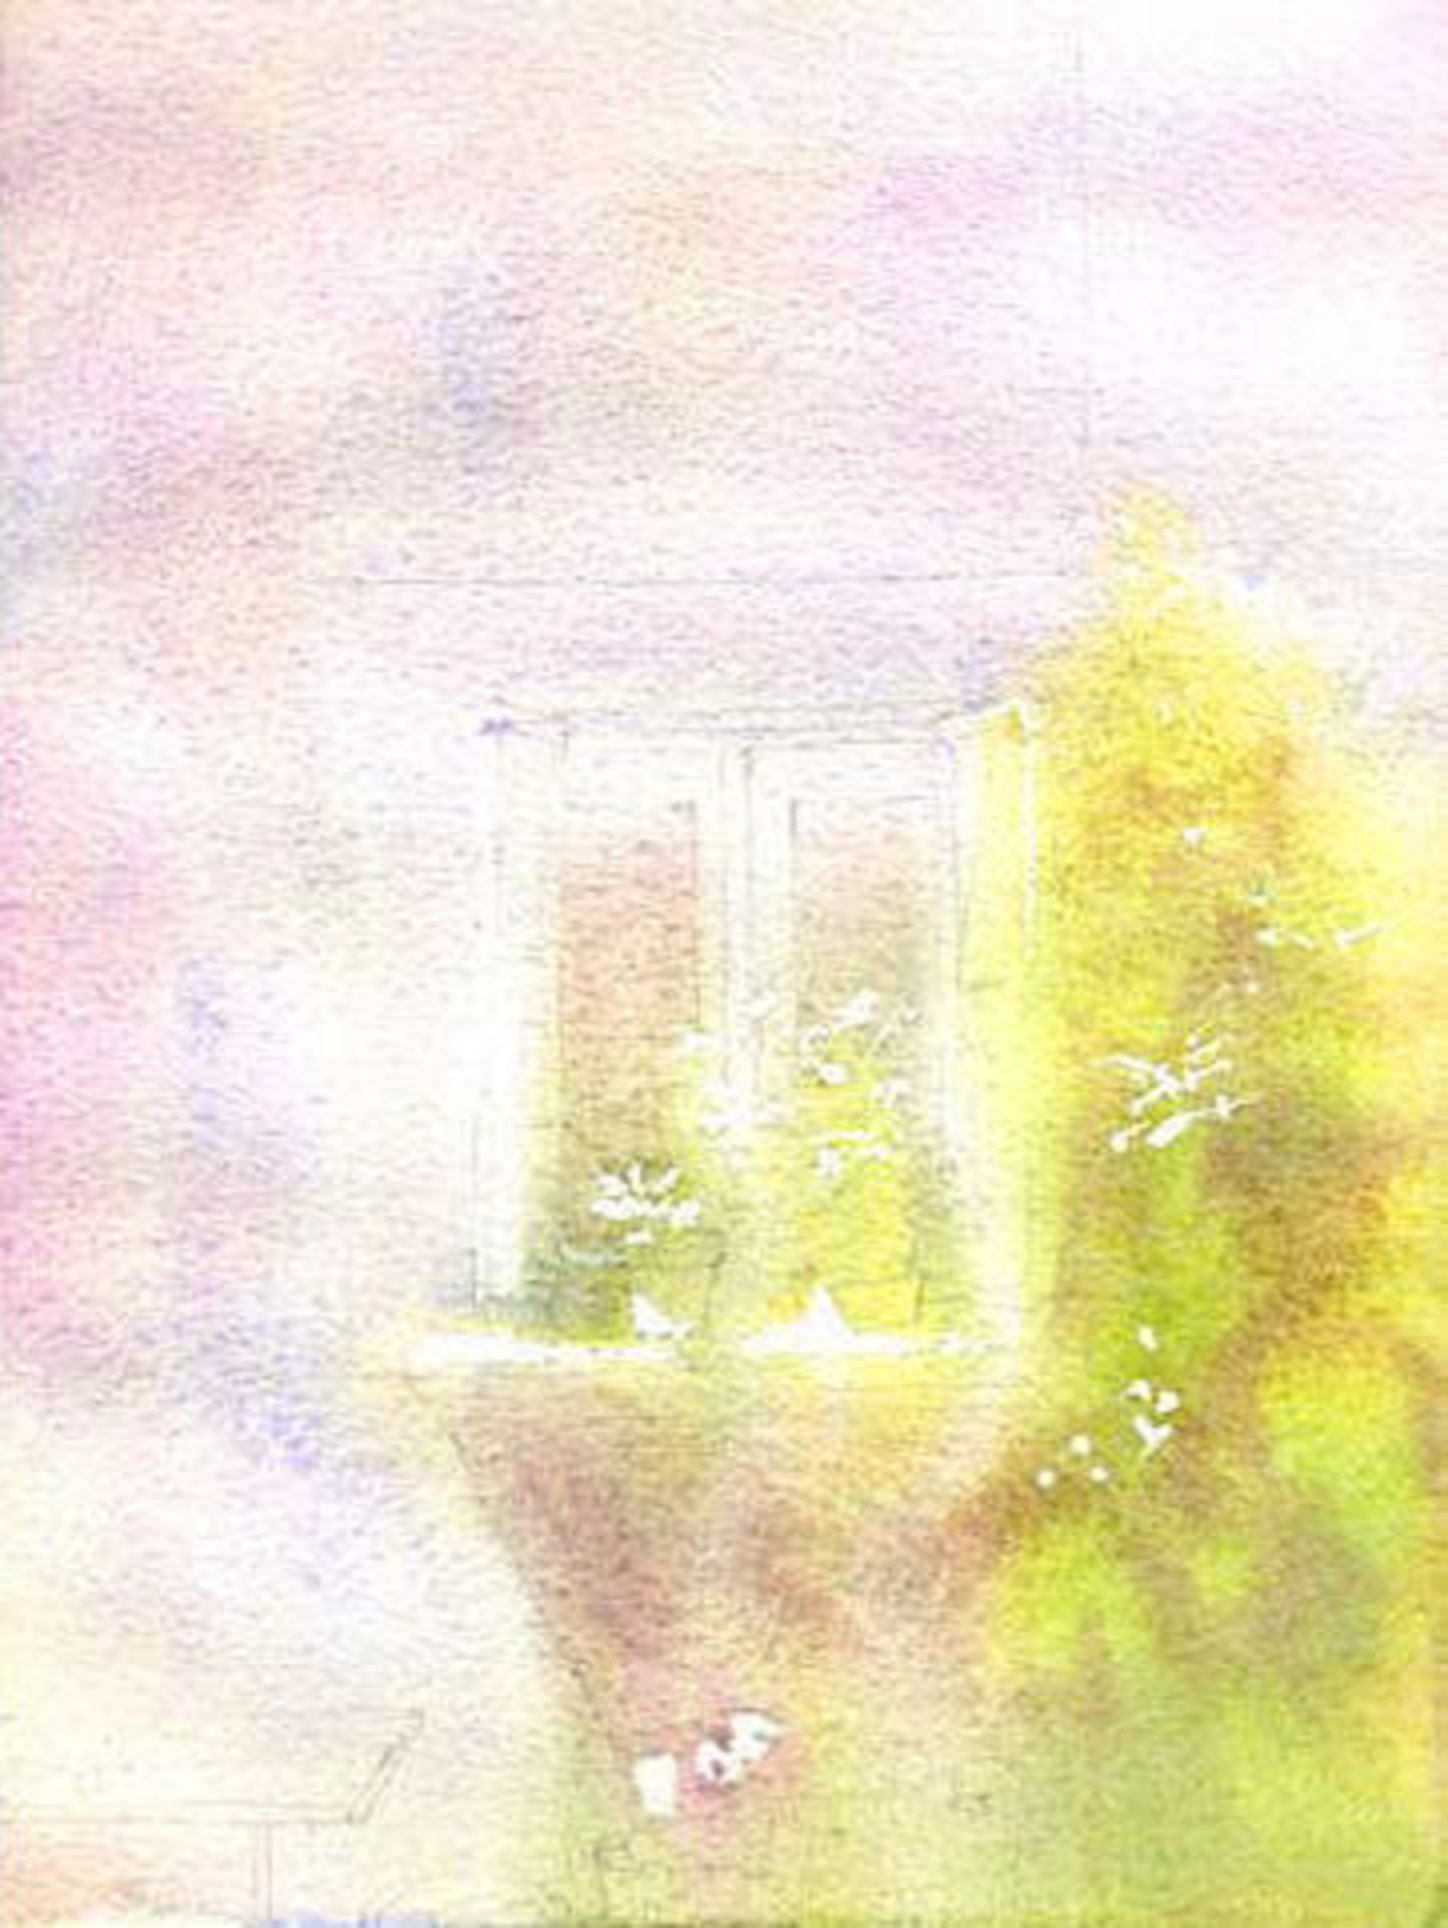
Step 2: First Wash
First Wash
Wait until the masking fluid is completely dry.
1. Wet the Paper Thoroughly
Use your large squirrel mop brush and wet all the paper with clear water. Don't overdo it, though!
2. Apply Color Wash to the Wall and Window
Prepare several colors in the deep mixing wells of your palette. Set up wells of four basic colors: Cobalt Blue, Cobalt Violet, Burnt Sienna and Raw Sienna. These 4 colors are the main colors you will use for the painting. Then, using a number 10 sable brush, apply the color mixes to the paper in a very free and loose way. At this stage, avoid the area where the bush is located, as you will mix a green for this later. Allow the colors to run and mix together on your wet paper. Use mainly Cobalt Violet and Raw Sienna on the wall. Do also add a little Burnt Sienna, and a little Cobalt Blue.
3. Apply a Color Wash to the Bush
Then, mix a green using Winsor Blue and Cadmium Yellow and apply the to the bush area. Also add Cobalt Violet and Cobalt Blue to indicate the deep shadows.
4. Remove the Masking Fluid
When the initial underlying wash is complete and dry, remove the masking fluid. Do this by gently rubbing the masking fluid with your finger; alternatively it could be removed with a natural rubber pickup (erasers tend to be a little too harsh on your paper).
Wash Process
At this stage, your color mixes are wet and have more water than pigment. You do not want harsh marks. Keep the whole process very free, wet, and loose. Do not mind the colors running or mixing on the paper or in the palette. The colors will dry light and provide you with a key to the overall painting. You can call this your Ghost Wash.
Step 3: Second Wash
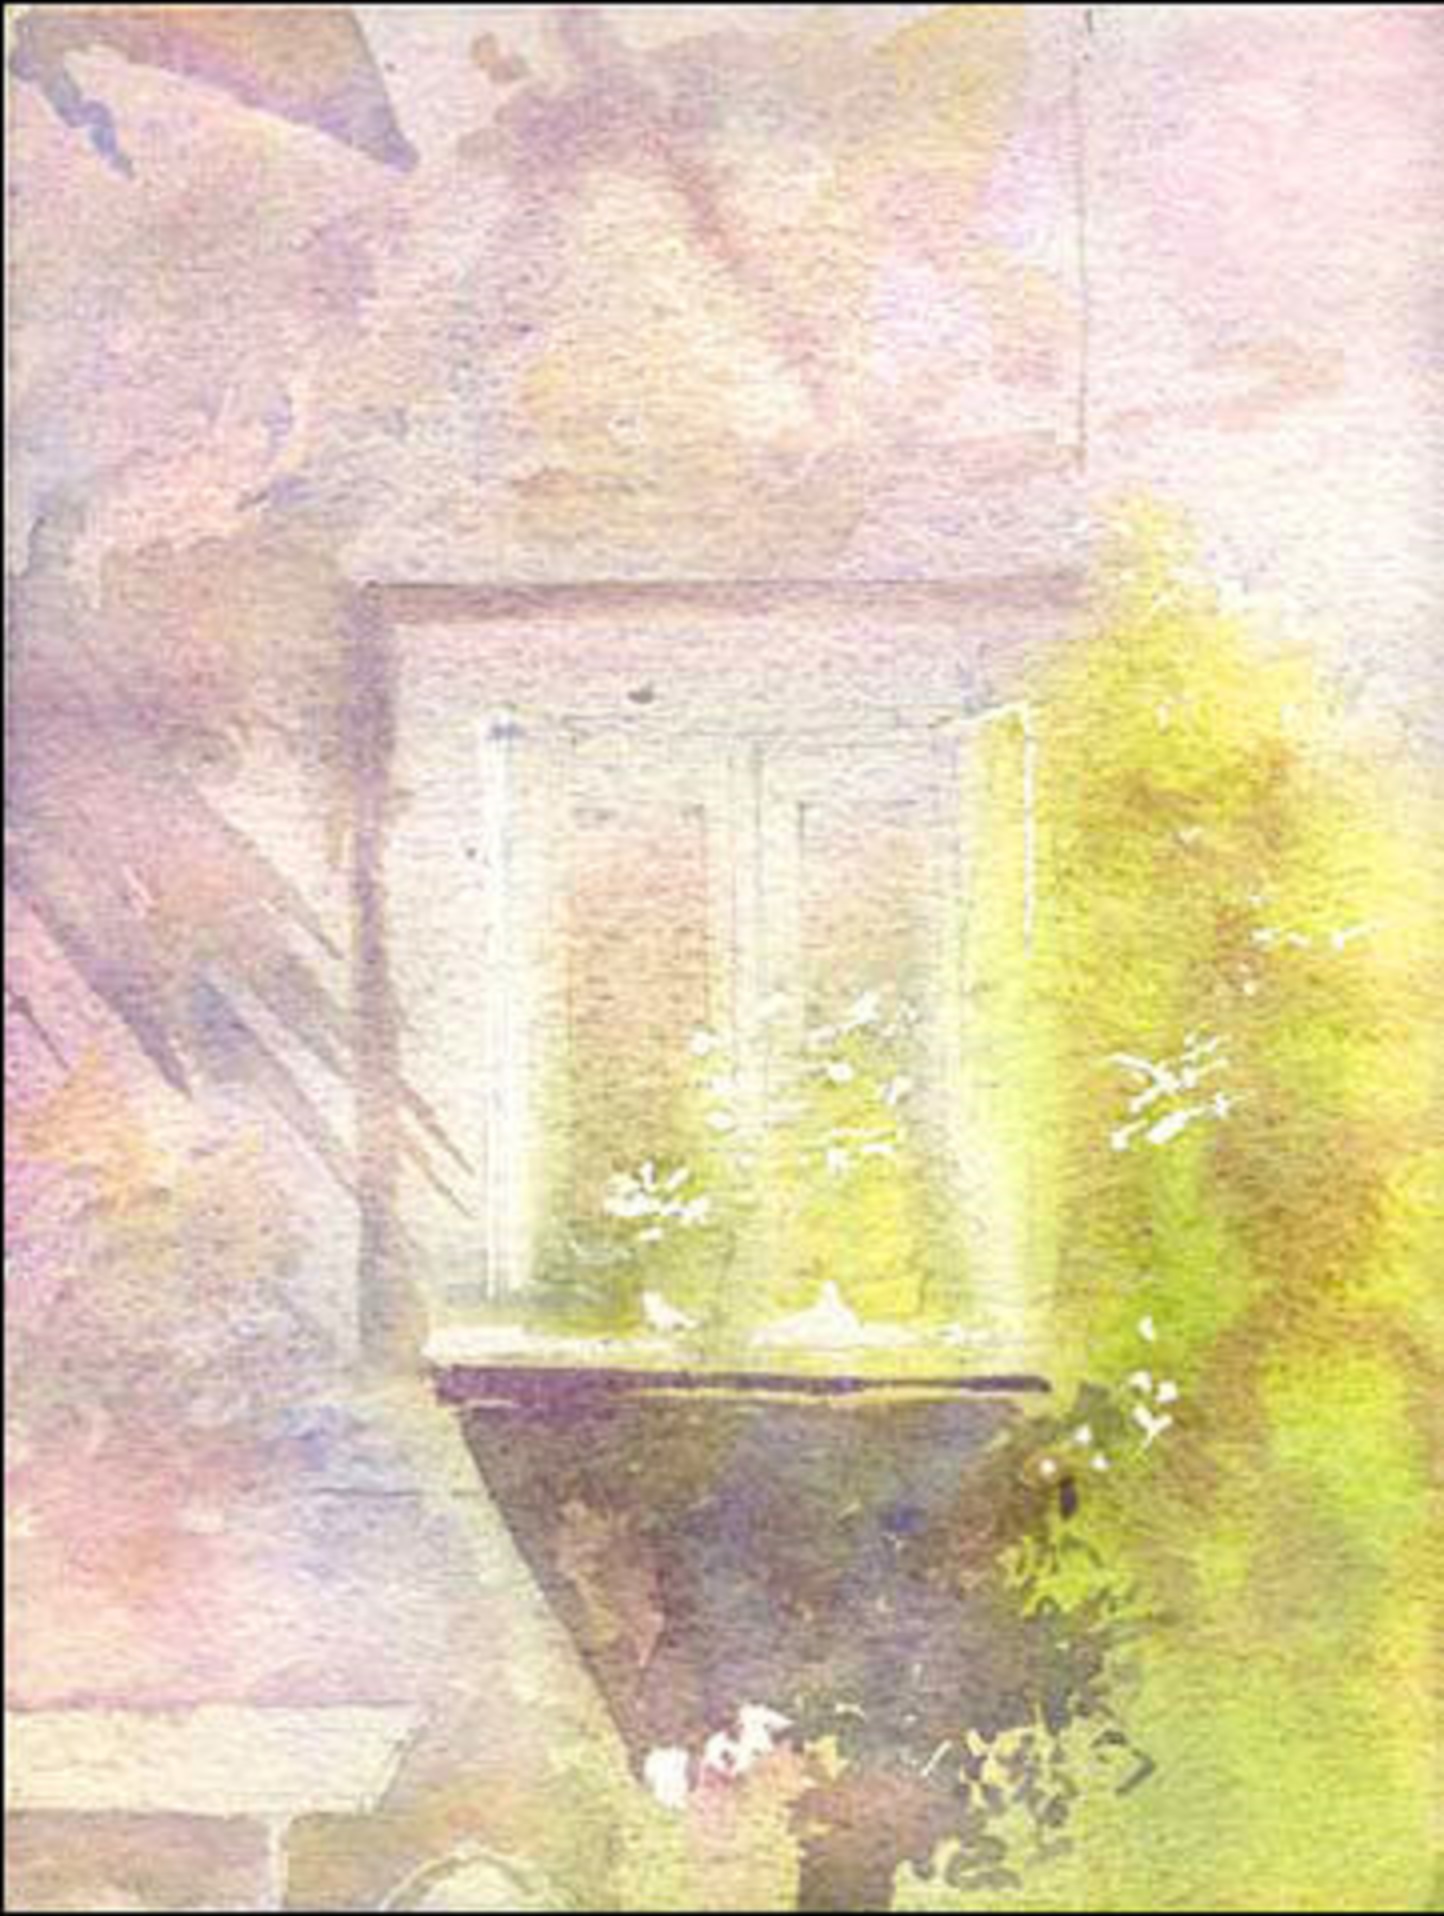 When the painting is completely dry, begin to work up the wall surface texture by adding a second wash. You will really enjoy this process of bringing light, dark, and texture to the wall. Have a basic idea about the main colors (Cobalt Violet, Raw Sienna, Burnt Sienna, and Cobalt blue) and work them loosely and freely into the second wash. You have 2 main tactics - first, to create the shadows and texture that you see in the photo of the wall. Second, take advantage of the marks and colors from the first wash. The first wash will leave some indications of texture and tone because of the way you created it. Use these to build up your picture. From the photo, also leave out the long diagonal shadow that is above the window. Work with mixes of paint that are quite wet, with more water than pigment. You should actually use the paint that is already mixed in your palette from your first wash (even if it has mixed together). This wash should still be applied in a free, loose and wet way. Do add water and pigment to the original mixes as you work. Again, don't worry about mixes running together on your palette or on your picture (you actually want this to happen). Use a Pro Arte Series 007 number 8 brush for this stage. Don't wash the paint off too often, so your wells of color have time to slowly get mixed together. Do take more care to work with the drawing at this stage. Create the main window shadow and paint round the window frames and bench. Also, make sure to paint around the white petals that were created with the masking fluid in the first wash.
Step 4: Bush, Second Wash
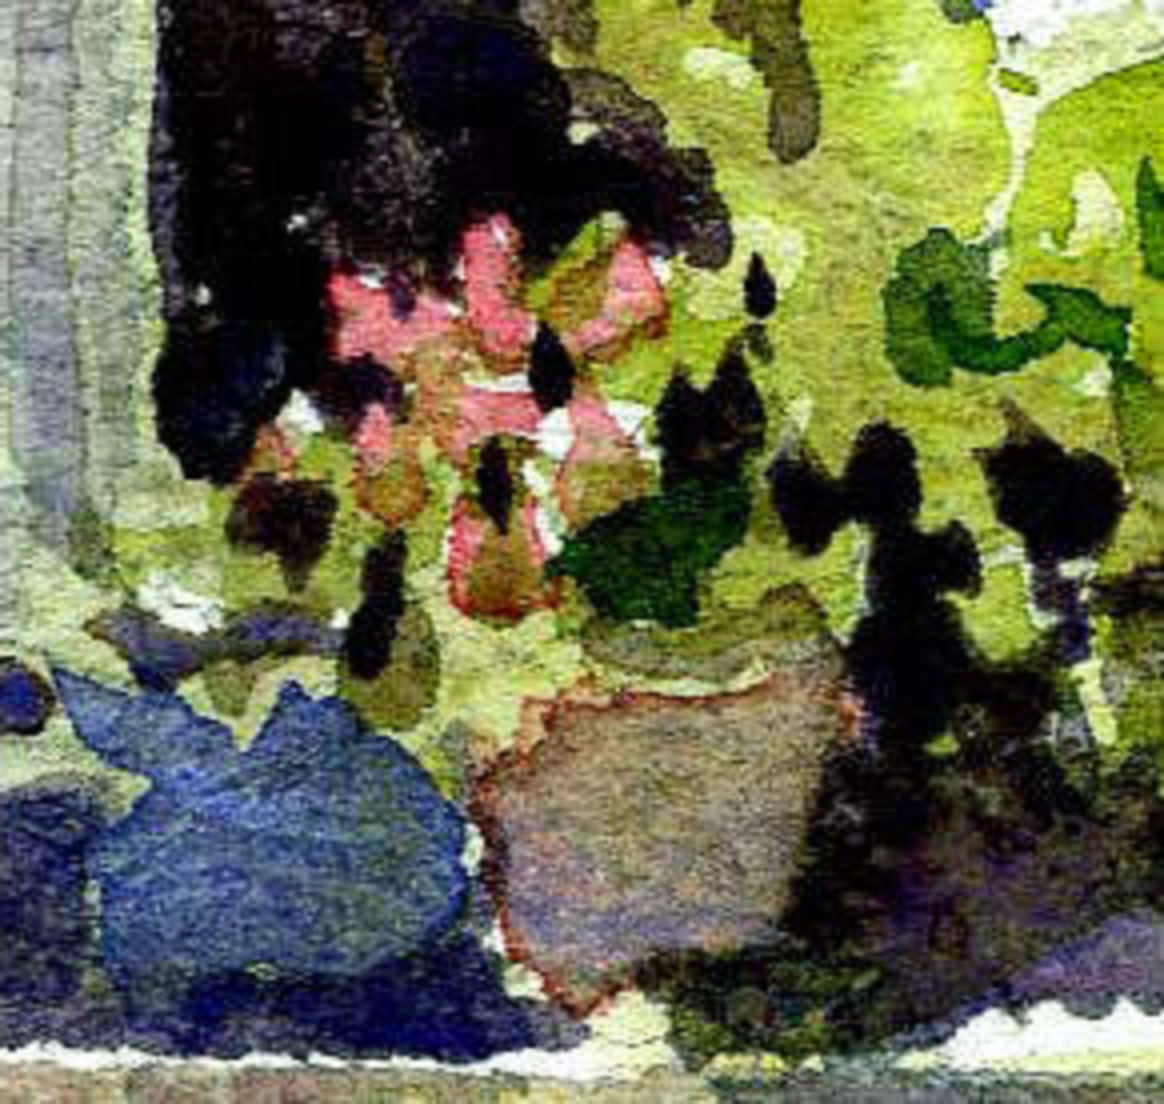
 In this stage you will work mainly on the bush. Really this is the second wash still, but as applied to the bush in the bottom right quarter of the picture. Mix a slightly richer set of greens using Winsor Blue and Cadmium yellow (mixed together) and Viridian and Permanent Mauve (mixed together). As in step 3, do add water and pigment to the original mixes as you work. Again, don't be bothered about your mixes running together on your palette or on your picture. Use a Pro Arte Series 007 number 8 brush for this stage. Don't look for individual leaves or petals; look for darks and lights. Be careful to work with the drawing, especially around the window. Enjoy painting in the pots and their shadows on the window ledge.
Second Wash
For both steps 3 and 4 you are working loosely with very wet paint mixes. Do not pre-wet the paper again; rely on the wetness of your paint mixes to bring that free, loose feel to the work. Use only one brush a Pro Arte Series 007 number 8.
Step 5: The Rich Details
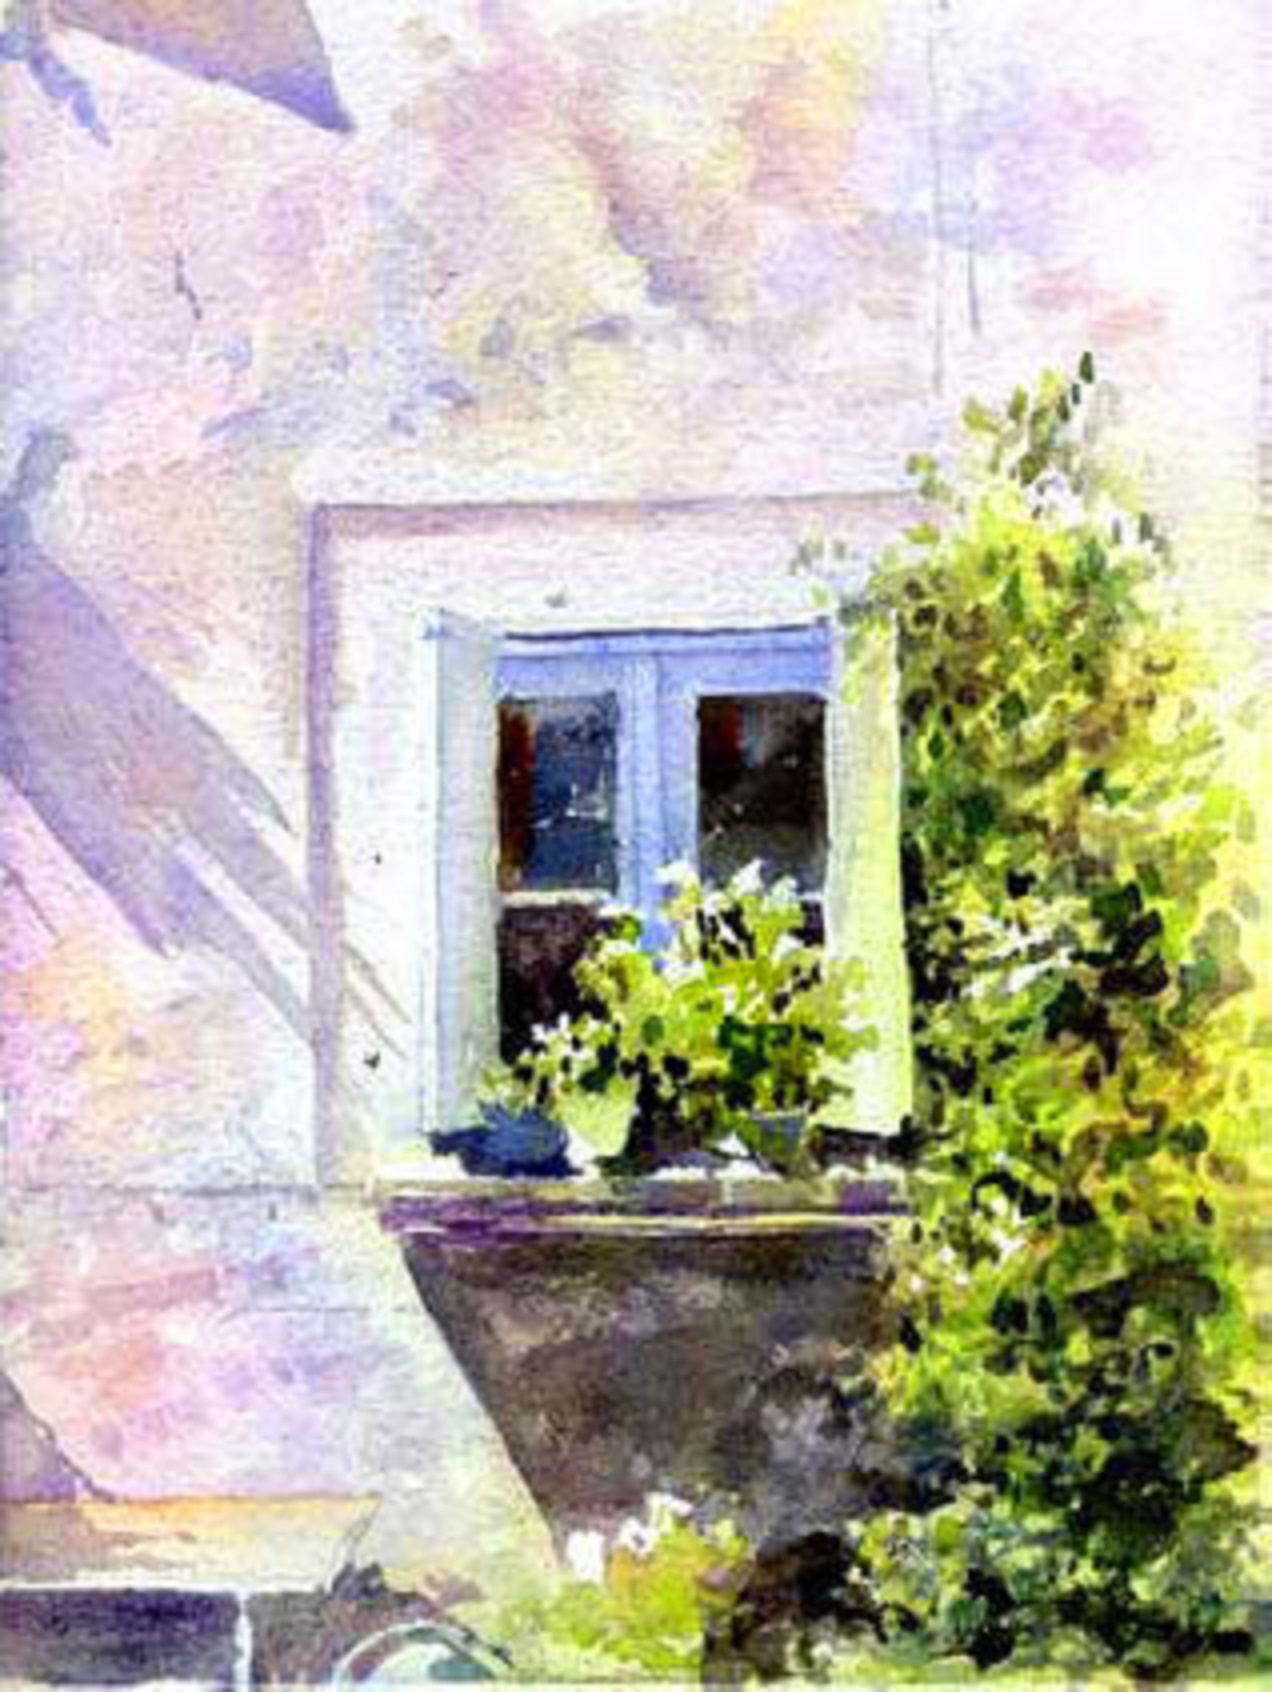 For this stage you use the same basic colors as in step 3 (Cobalt Violet, Raw Sienna, Burnt Sienna, and Cobalt blue). The difference is that you load much more pigment into the mixes for more saturated mixtures. In addition, mix a strong dark from French Ultramarine and Burnt Sienna. This mixture will give you the darkest color you need. Make your working process slower and more careful. You have to be accurate with your detail around the focal point. You want the windows to be dark and yet reflect light and you want to get more depth into your bush and plants. Be careful to paint around and preserve the white flower petals. The petals provide strong contrast with the dark of the windowpanes. In summary, in this phase workup and resolve the key areas around the focal point of the window and bush. This means add the details and paint carefully with a Pro Arte number 8 brush.
Step 6: Final Stage
To Complete the Painting, You Want to:
1. Add some warmth to the window ledge and surrounding bush. Achieve this with Alizarin Crimson and Burnt Sienna. You can see the crimson flowers petals and the warm red added to the plant pot on the ledge. It needs to be subtle and not too loud. 2. Add some darker shadows and marks to the wall. This will help define the wall and balance the picture. You want to bring a richer texture to the wall's surface. 3. Bring more definition to the window's reflection and blue frame around the window. 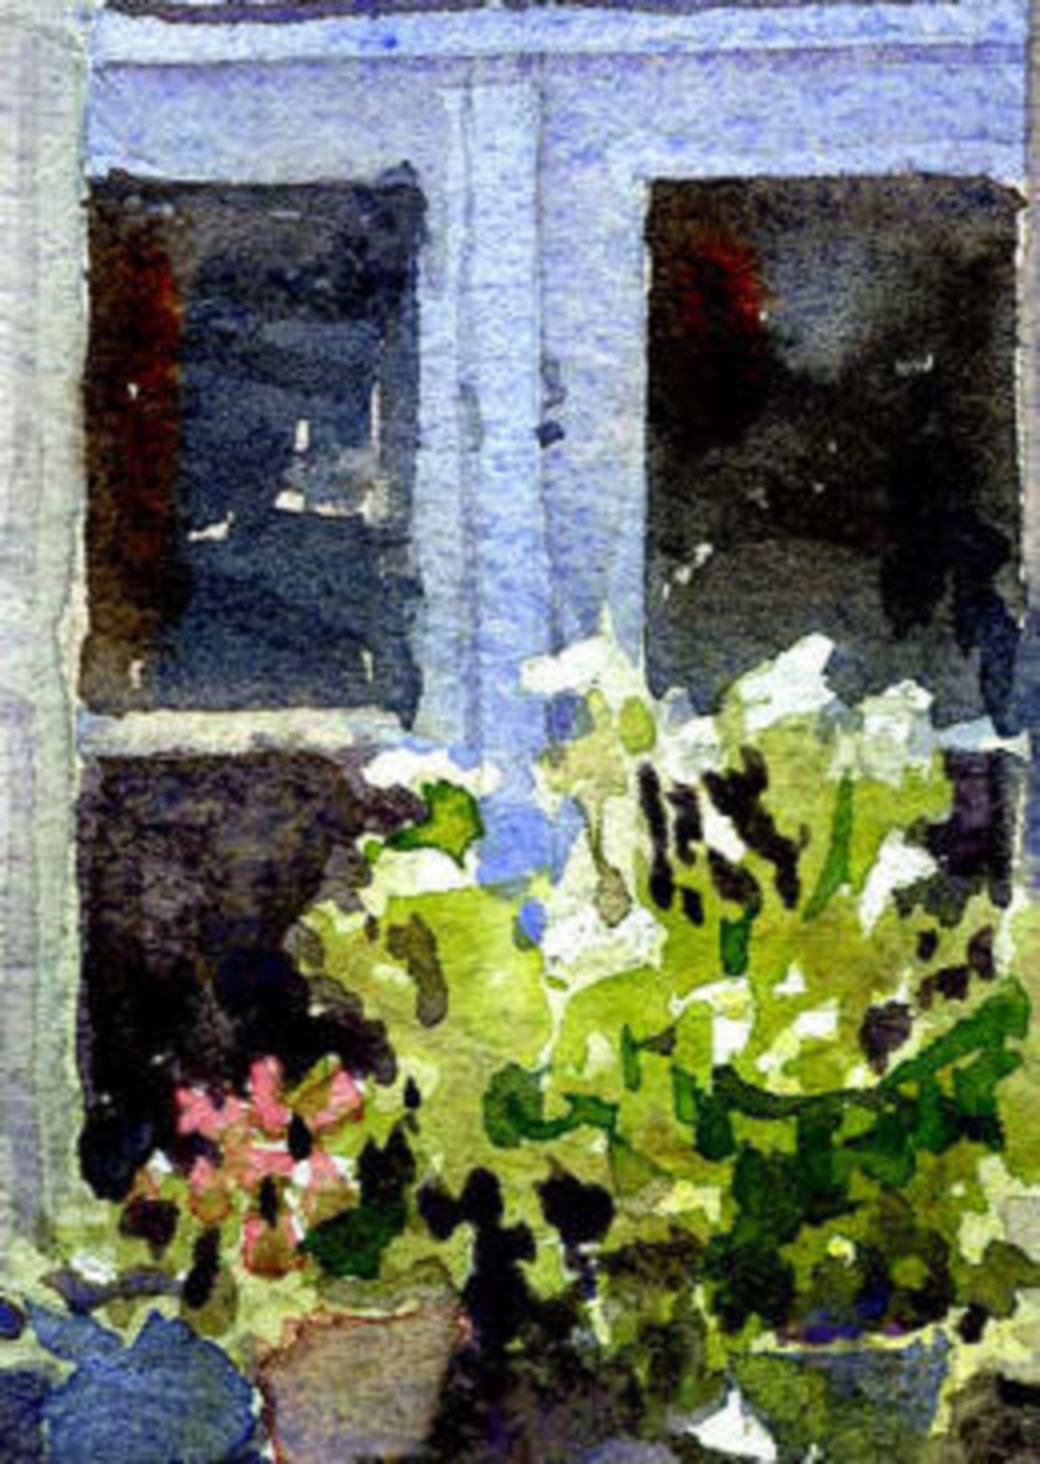 You want to make sure that the windows are dark, but also show the light that is reflected from them. You also want to put a shadow on the window shutter nearest the bush. Complete this stage with a Pro Arte Series 007 number 8 brush. This brush holds a lot of paint and has a very fine point.
Finished Painting
 The Finished Painting, "Blue Window"
Allan Kirk trained to teach Art in the 1970’s and taught for 5 years before pursuing a career in computing. He now lives and works as an artist in the south of France. Allan and his wife Lesley have created TARNINCOLOUR HOLIDAYS where they offer 7-day watercolor painting holidays for small groups from beginners through to experienced artists. Groups stay and work from their renovated farmhouse in the beautiful Lauragais region within the tarn. You can find out more about the holidays and see Allan Kirk’s gallery at http://www.stepbystepwatercolour.com/.


