 Photo: Fuji Finepix Digital Camera
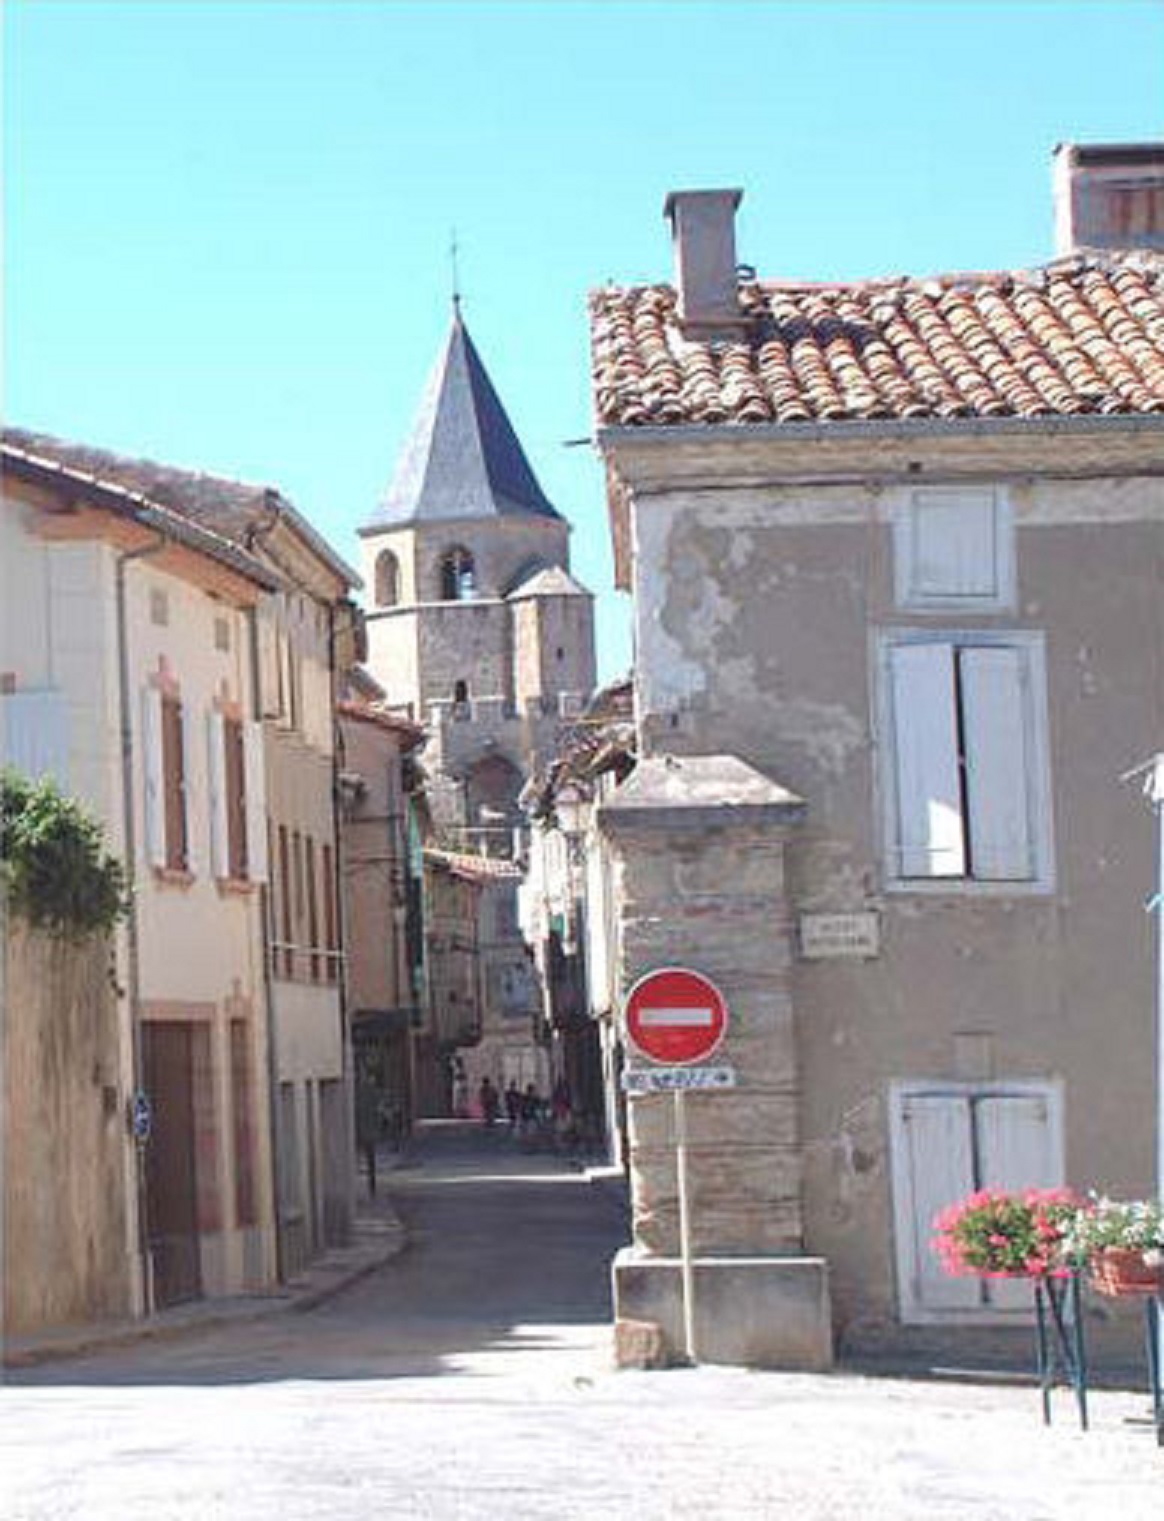
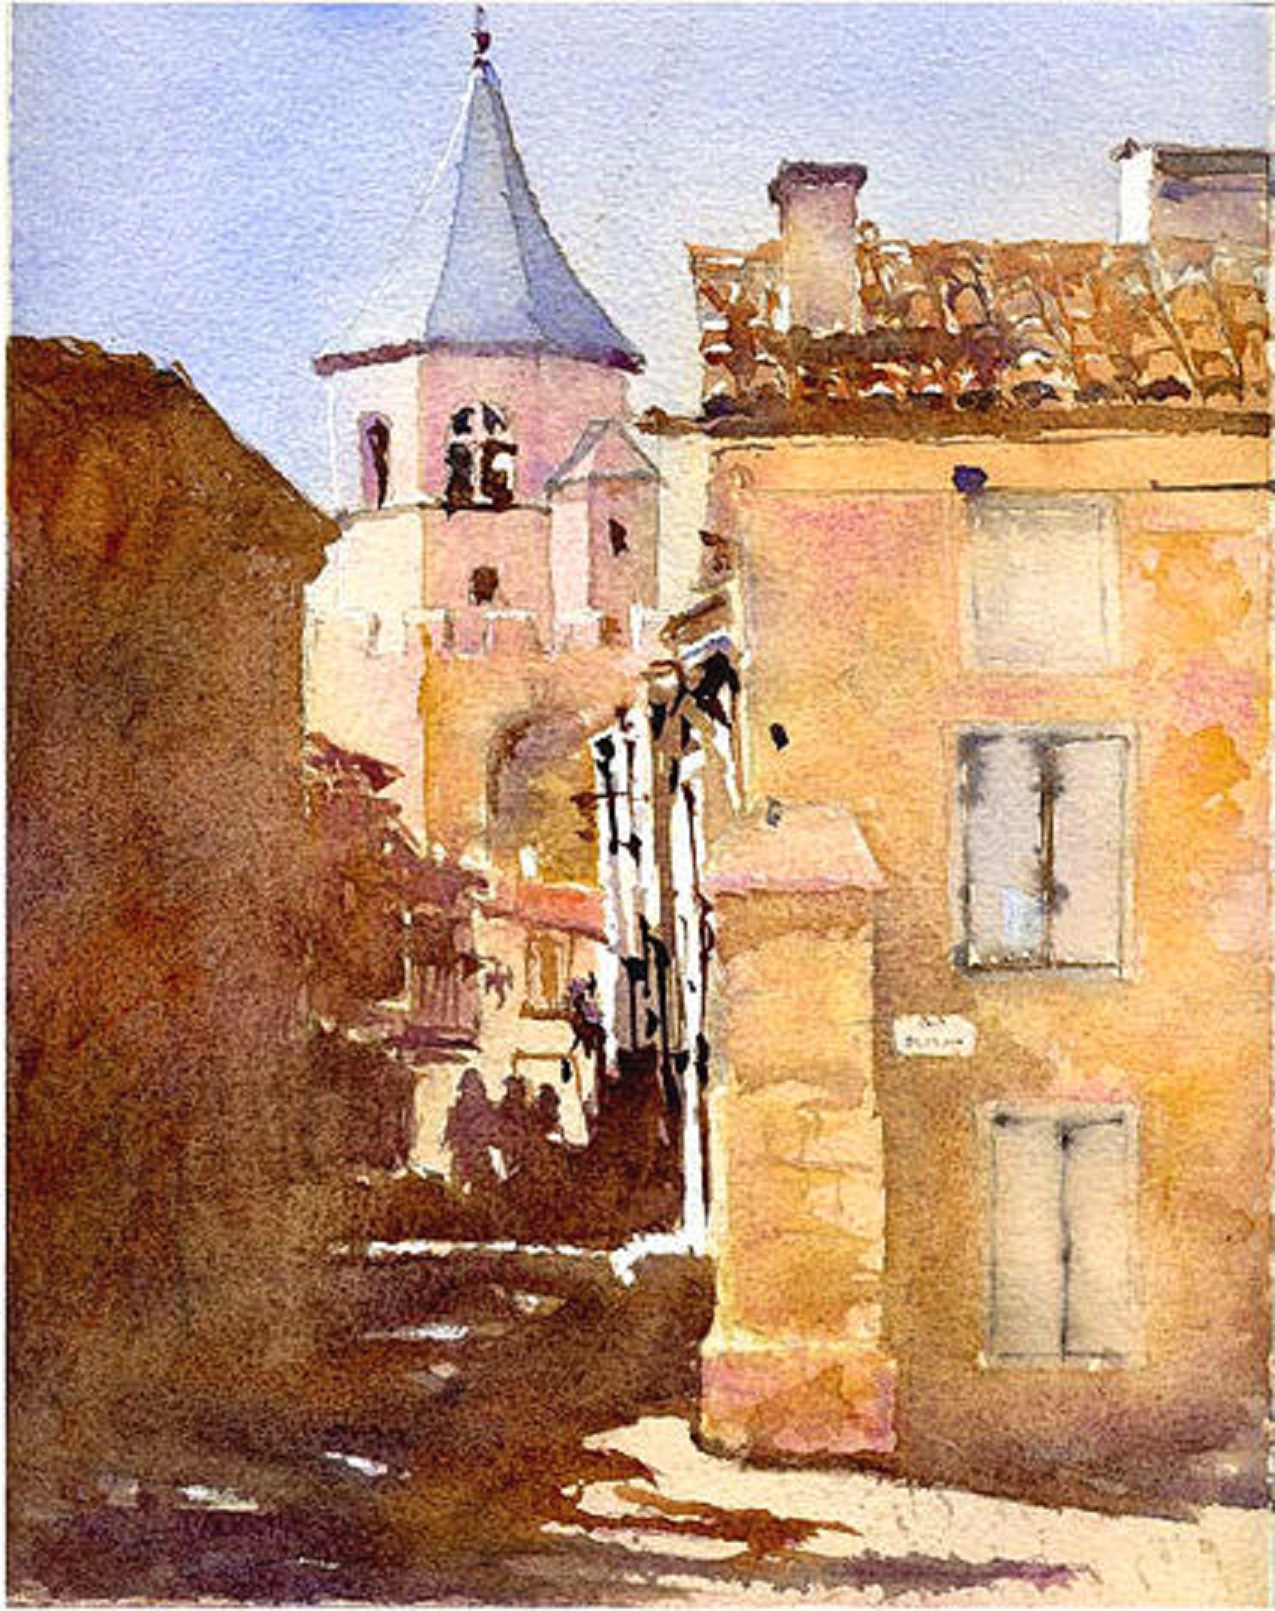
 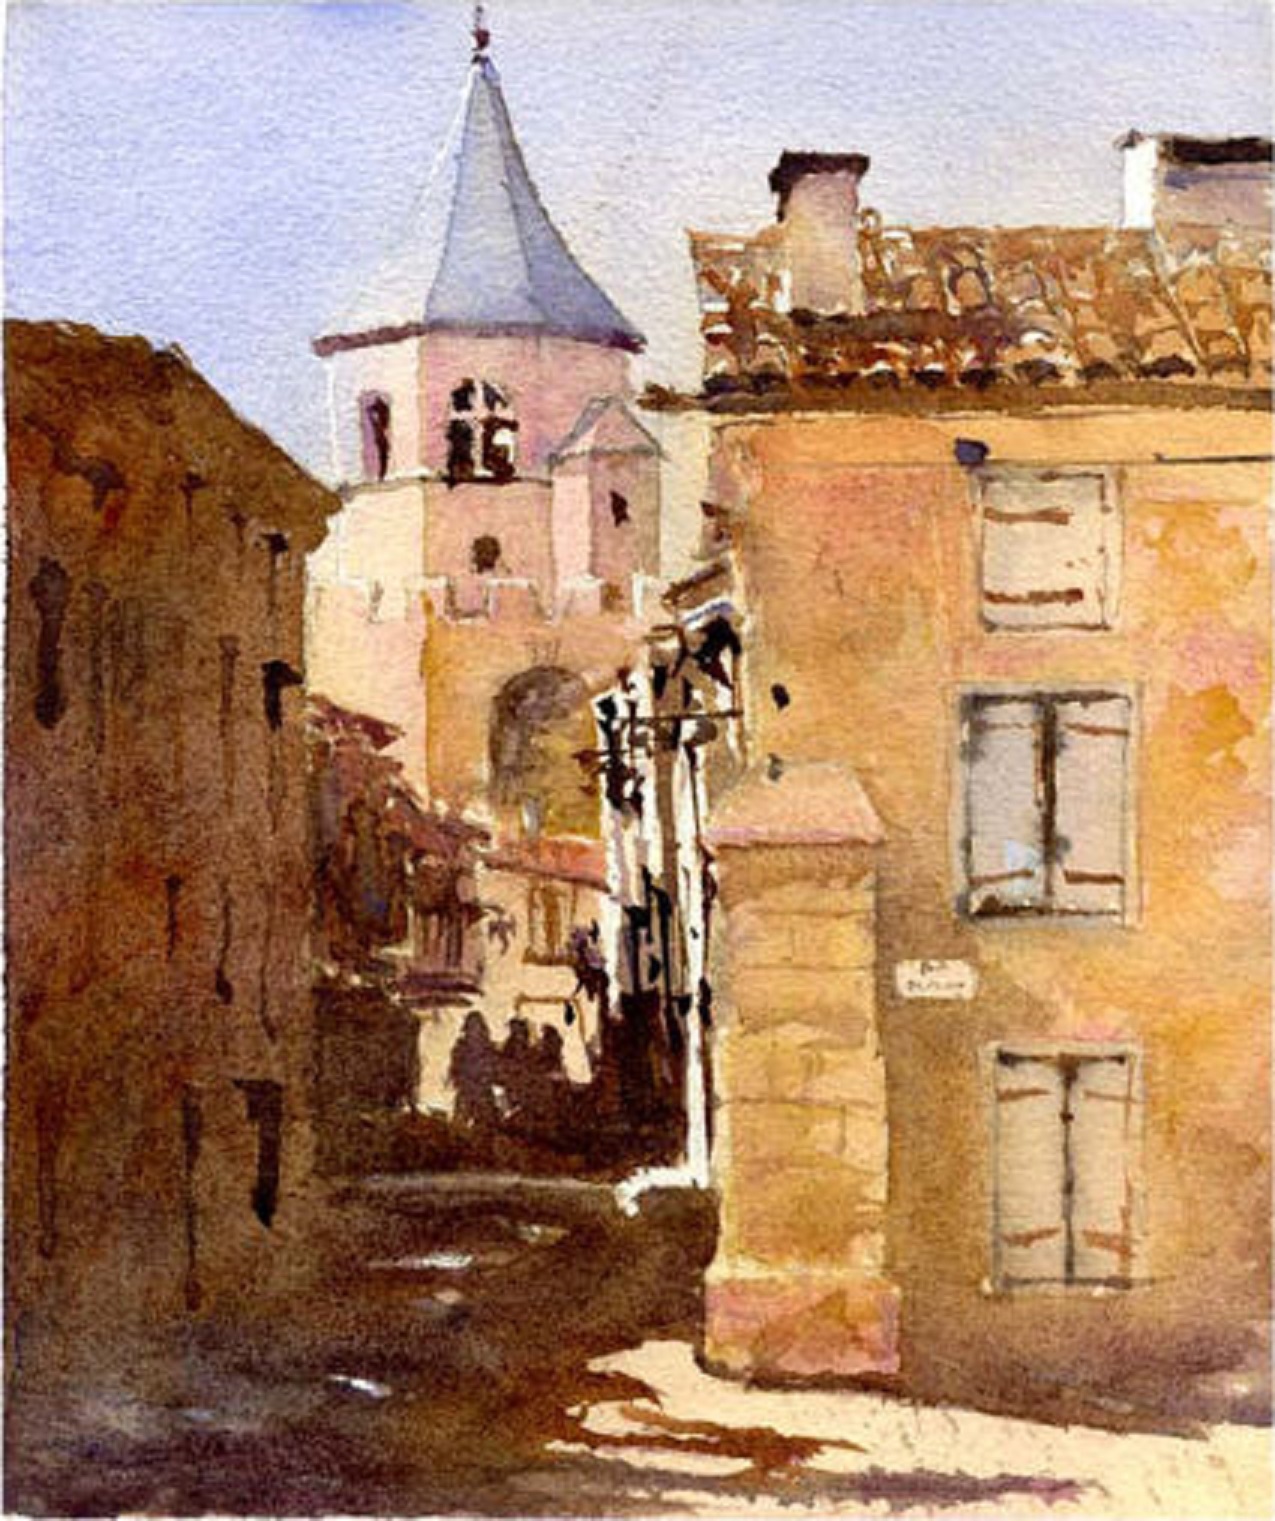 “Tower St. Martin, Soreze” (2009) - 21cm x 27cm Watercolor on Arches Rough 140lb Watercolor Paper Allan Kirk's impressionistic watercolor exercise shows how to capture the mood of a bright, and and sunny day in medieval Soreze in the Tarn in southern France. For Allan Kirk, watercolor impressionism is the constant pursuit of light. Originating from the north east of England, Allan now lives and works as an artist in the south of France. Allan, together with his wife Lesley, runs week-long watercolor holidays at their secluded renovated farmhouse in the Tarn region. Find out more at http://www.stepbystepwatercolour.com. Allan was startled when a friend and inhabitant of Soreze told him it had been sacked by the Vikings. Sure, it was old, but what were they doing in the south of France so far from the sea? Well the medieval history of Soreze is littered with conflict, from the Vikings to 13th century mercenaries. Soreze was established in the eighth century next to a Benedictine monastery, and in foothills of the black mountains. Many of the existing buildings include stone from the monastery after it was abandoned. In this exercise, Allan has taken a viewpoint looking down an old medieval street towards the tower of St. Martin, that so dominates the skyline of Soreze. Overhanging and crumbling medieval houses, shops, and restaurants provide an inviting path towards the tower. It is the way history and the present exist together that gives Soreze its charm. It is not a museum, and working as an artist in its many medieval streets is a real privilege.
Materials
Paper
- Arches rough watercolor paper, 140lb (300gsm) (size 27cm x 22cm, or 11" x 8½")
Pencils
- 4B Pencil
Colors
- French Ultramarine
- Cobalt Blue
- Winsor Blue
- Cobalt Turquoise
- Burnt Sienna
- Alizarin Crimson
- Cadmium Yellow
- Burnt Umber
- Raw Sienna
Brushes
- Large Squirrel Mop brush
- Pro Arte series 007 size 12
- Sable size 10
- Pro Arte sword liner (medium and large)
- Pro Arte series 007 size 8
- Sable size 4
Masking Fluid
- Old synthetic brush to apply masking fluid
1. The Process
The finished watercolor should be completed in around 4 hours. In between washes, use a hair dryer to hasten the drying process for the next stage. Using a hair dryer can be useful. Without one, it may take some time for a watercolor to dry sufficiently to be worked upon again. Use a palette with deep wells for mixing color, with lots of water. Also use a big water container (like a child's seaside bucket). You will need access to a lot of water. I prefer work with my paper between 30 and 40-degree angle. You should choose the angle that you are most comfortable with.
2. The Composition
I have rearranged the composition for this picture - I have made the tower a little more dominant and added a foreground shadow for balance. Also you will notice I have not included the 'No Entry' road sign.
3. Painting What You See, Not What You Think
When you paint, try to paint the light and shadows, and not the objects you can see. Concentrate upon light and tone in the composition. If you worry about individual windows or shutters, you will tend to over-elaborate and put too much detail into your painting. Try to see shapes, color, and tone, not real world objects. Oftentimes, when we put more and more detail into a work, we lose sight of the overall subject. In addition, we kill the spontaneity and transparency of watercolor.
Step 1: Drawing and Masking Fluid

Initial Drawing
To begin, cut the watercolor paper to size (if needed), and use masking tape attach it to a board. You can just use an old piece of hardboard as your painting board. This will help lessen the warping of the paper while making it more secure. Now complete a simple line drawing using a 4B pencil. Draw lightly, and don't mind if the pencil is visible on the finished picture. It can be erased, but you don't need to bother. Concentrate upon your drawing and try to get it to be accurate. You don't want detail, but you do want accuracy at this stage (that is, you want the drawing to look like what you can see). Remember to compose and balance your picture and rearrange the composition to increase the size of the tower, add the foreground shadow and don't include the 'No Entry' road sign. After drawing, apply the masking fluid with an old brush; never use a good painting brush. Apply it sparingly - it can be seen on the drawing as the dark gray marks. Masking fluid is useful in this exercise as it enables you to produce real highlights in a painting of great contrasts, especially looking down the medieval street.
Step 2: First Wash
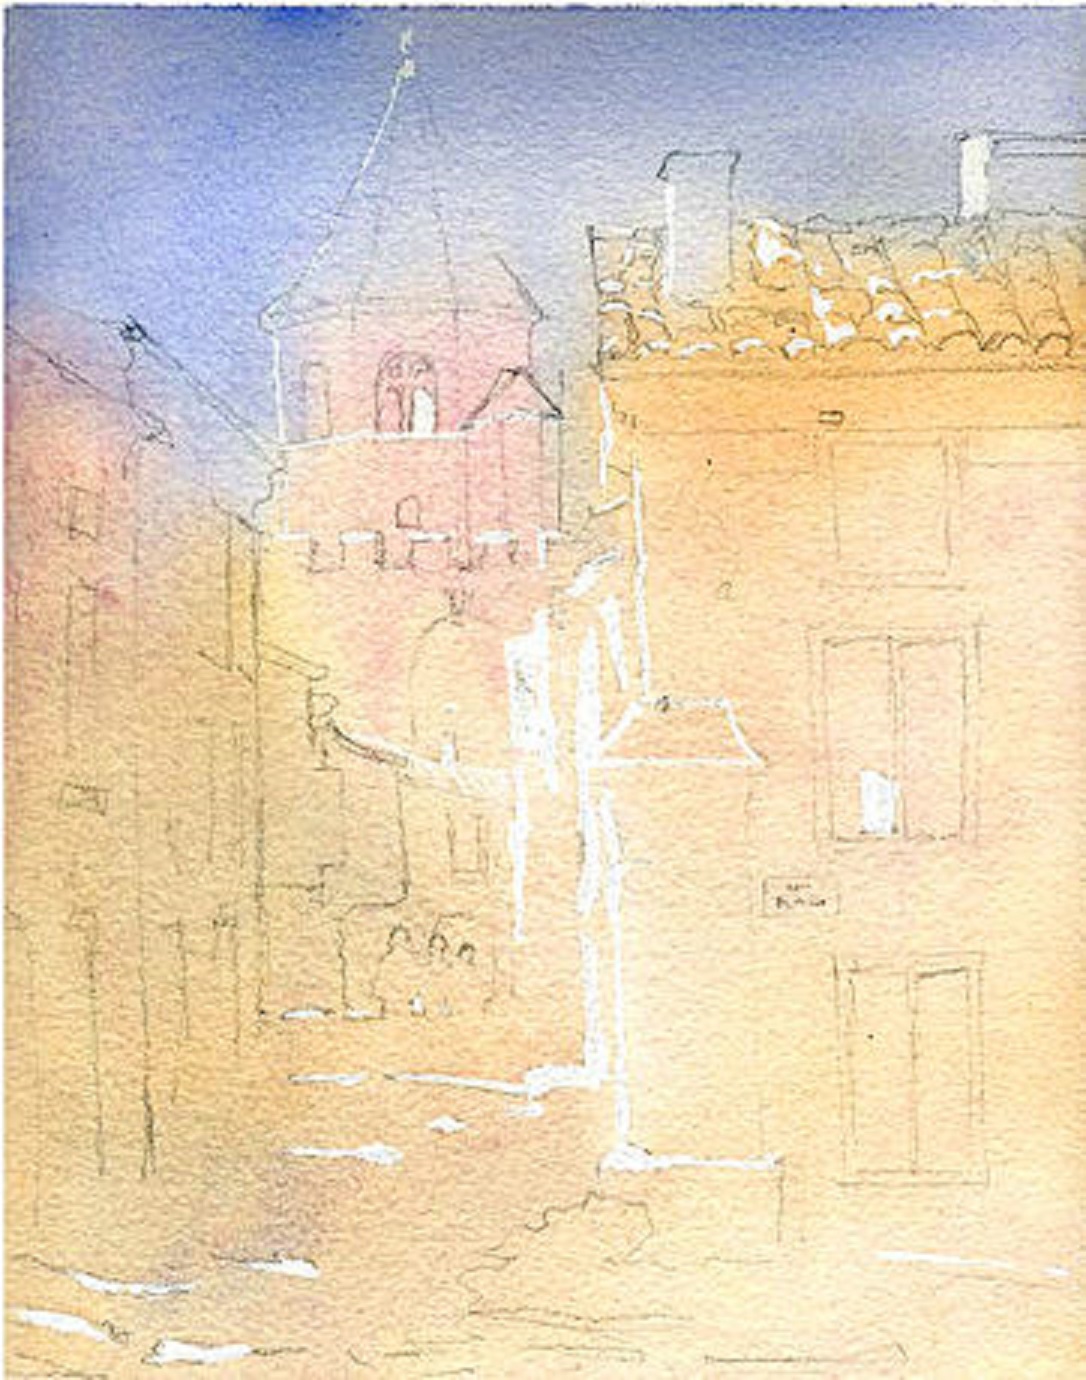
First Wash
Wait until the masking fluid is completely dry.
1. Wet the Paper Thoroughly with Clear Water.
Use your large squirrel mop brush and wet all the paper thoroughly with clear water. Make sure that the paper is wet all over.
2. Apply a Very Wet Color Wash to the Whole Picture.
Prepare several colors in the deep mixing wells of your palette. Set up wells of 4 basic colors: Cobalt Blue, Cobalt Violet, Burnt Sienna and Raw Sienna. In addition, add a well of Cadmium Orange. These colors are the main colors you will use for the painting. Then, using a number 10 sable brush, apply the color mixes to the paper in a very free and loose way. Let the colors run and mix together on the wet paper. Apply mainly Cobalt Blue to the sky and tower roof. On the buildings and street mix apply Raw Sienna, Cobalt Blue, and Burnt Sienna. The wet paper will cause the colors to keep blending with each other organically until the paint is almost dry.
3. Remove the Masking Fluid
When the initial ghost wash is complete and dry, carefully remove all the masking fluid. Do this by gently rubbing the masking fluid with your hand; alternatively it could be removed with a rubber pickup.
Step 3: Second Wash
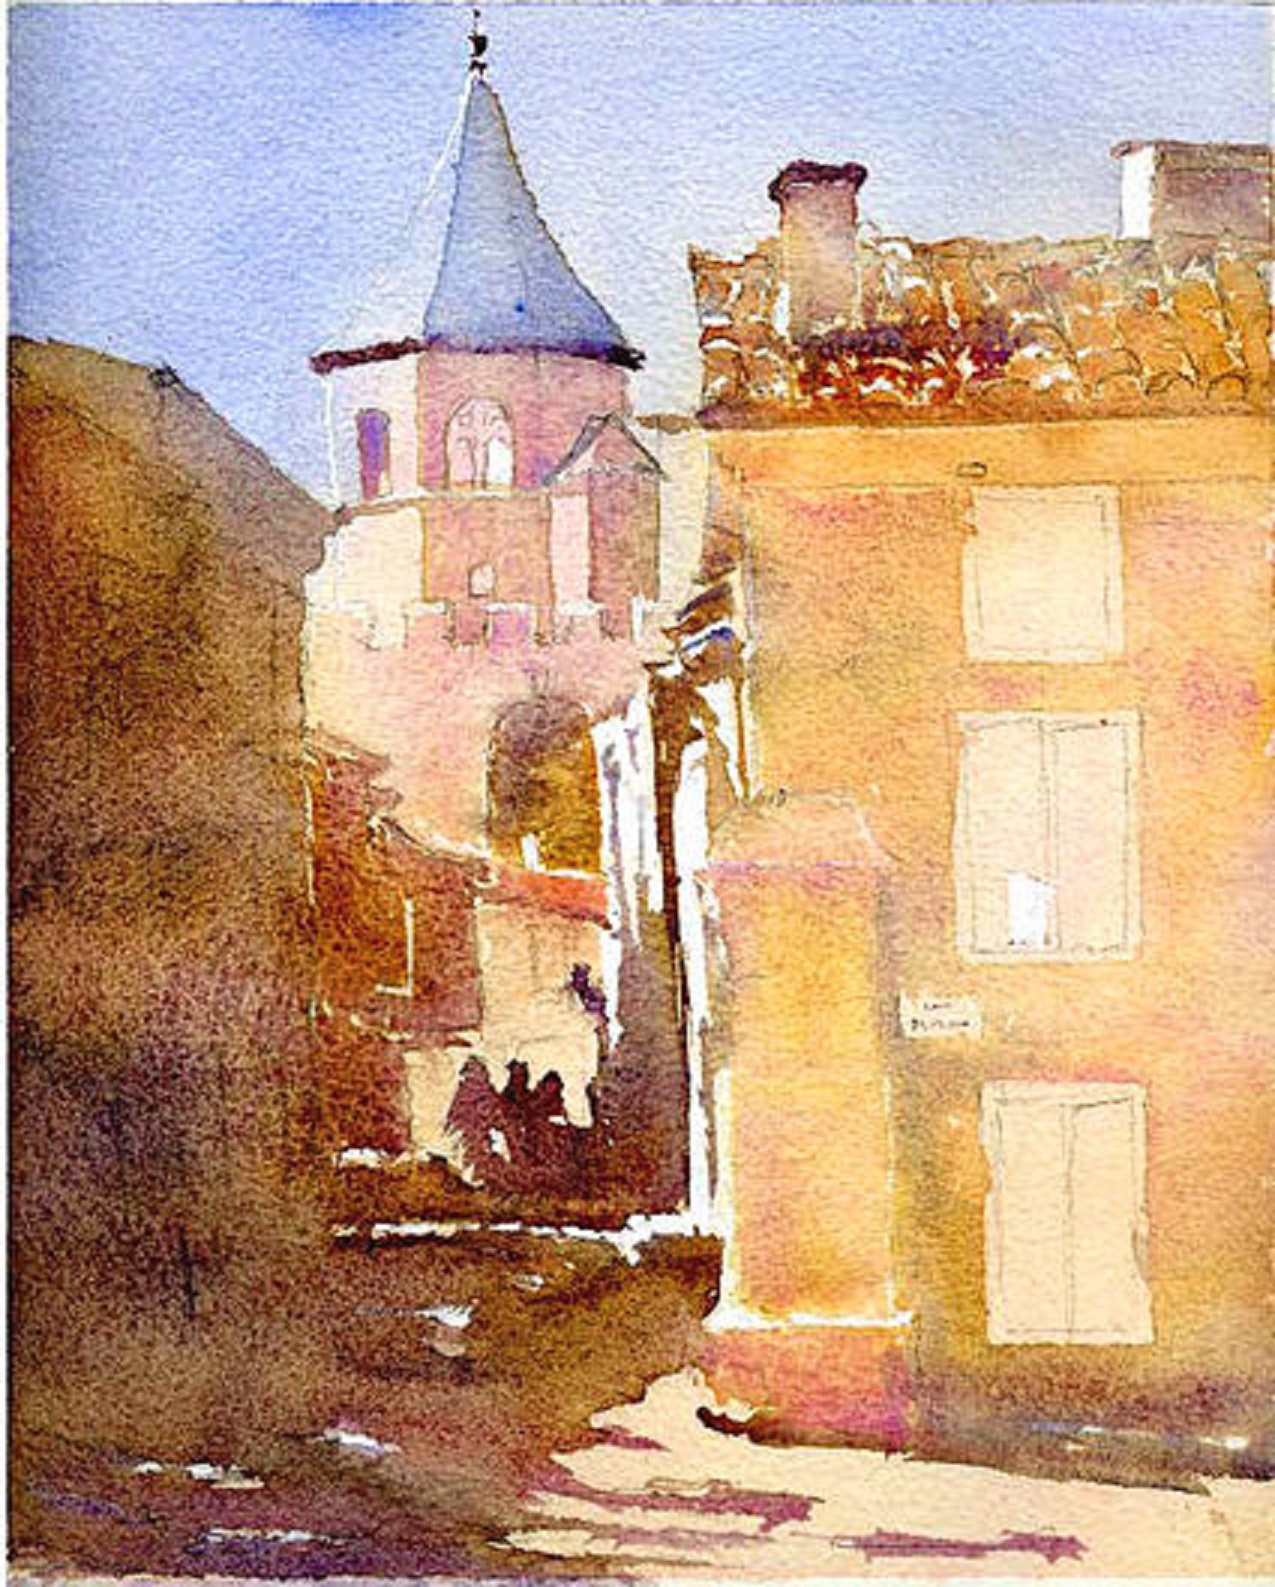
Second Wash
In this step you will apply a second wash to the buildings and street. Use your existing color mixes in your palette. In addition, add a mix of Cobalt Blue, Cobalt Violet and Burnt Sienna. This will be used to create the shadows under the tower roof and the chimney top. Use a Pro Arte Series 007 size 12 and Pro Arte sword liner brushes. Do not worry if your palette mixes are contaminated, and do not worry about mixes running together on the paper. Letting the colors mix on the paper is key to this picture. Arches watercolor paper is very good at mixing colors well; some other papers may not achieve this to the same extent. For this painting the qualities of Arches paper is ideal.
The Process
1. Do add water and pigment to the original mixes as you work. 2. Do not worry if your palette becomes messy. 3. Let the mixes run together on the paper; as you apply color, make sure it touches the existing color applications so that they will mix together. 4. Do be careful to leave highlights where you had placed masking fluid. 5. Use mainly Cobalt Violet, Raw Sienna, and Burnt Sienna on the lighter parts of the building. 6. On the shadows use Cobalt Blue, Cobalt Violet, and Burnt Sienna. Keep your shadows warm by using more Burnt Sienna than Cobalt Blue. 7. Mix your shadows on the paper, it provides the deep contrasts and variations within the shadow (you do not want one boring tone across all the shadow).
Step 4: Shadows
Deep Shadows and Shutters
Wait until the work from step 3 has dried completely before beginning this step. In this step, you will use the Pro Arte sword liners and develop the intricate dark tones in the street, on the tower and round the front building. Use the existing color mixes in your palette. You will also deepen the buildings and shadows that exist. For example, there is a little Raw Sienna on the front building. If you look closely you will see that it is wet on dry and has a harder edge that other washes. The front shutters are a gray color, and you can add the shutter shadows when it's dry. In this exercise, the shutter shadows on the front building were added when the gray shutter color was quite wet. If this happens you will get bleeding, but this in itself can add interest to the whole picture.
The Process
1. Apply pigment and water to your palette regularly as you work. Mix a dark tone of Cobalt Blue and Burnt Umber for the darkest sections. 2. Work carefully on the dark tones down the street, using your darkest mix. 3. Add Raw Sienna to the front building in a haphazard way that indicates the crumbling render. 4. Apply another wash to the building shadows on the left. Keep the shadows varied and interesting. 5. Add the dark tones to the roof and chimneys. 6. Work quickly and freely; don't get bogged down in details.
Step 5: Final Details

To complete the work:
1. Add suggestions of windows to the buildings in shadow. 2. Add suggestions of hinges on the shutters. 3. Add hanging lamp to street in dark tones. 4. Touch up dark shadows all over the painting. 5. Do not overdo the darks; keep the work loose and free. Keep the mystery of lost and found edges in the shadows.
Finished Painting
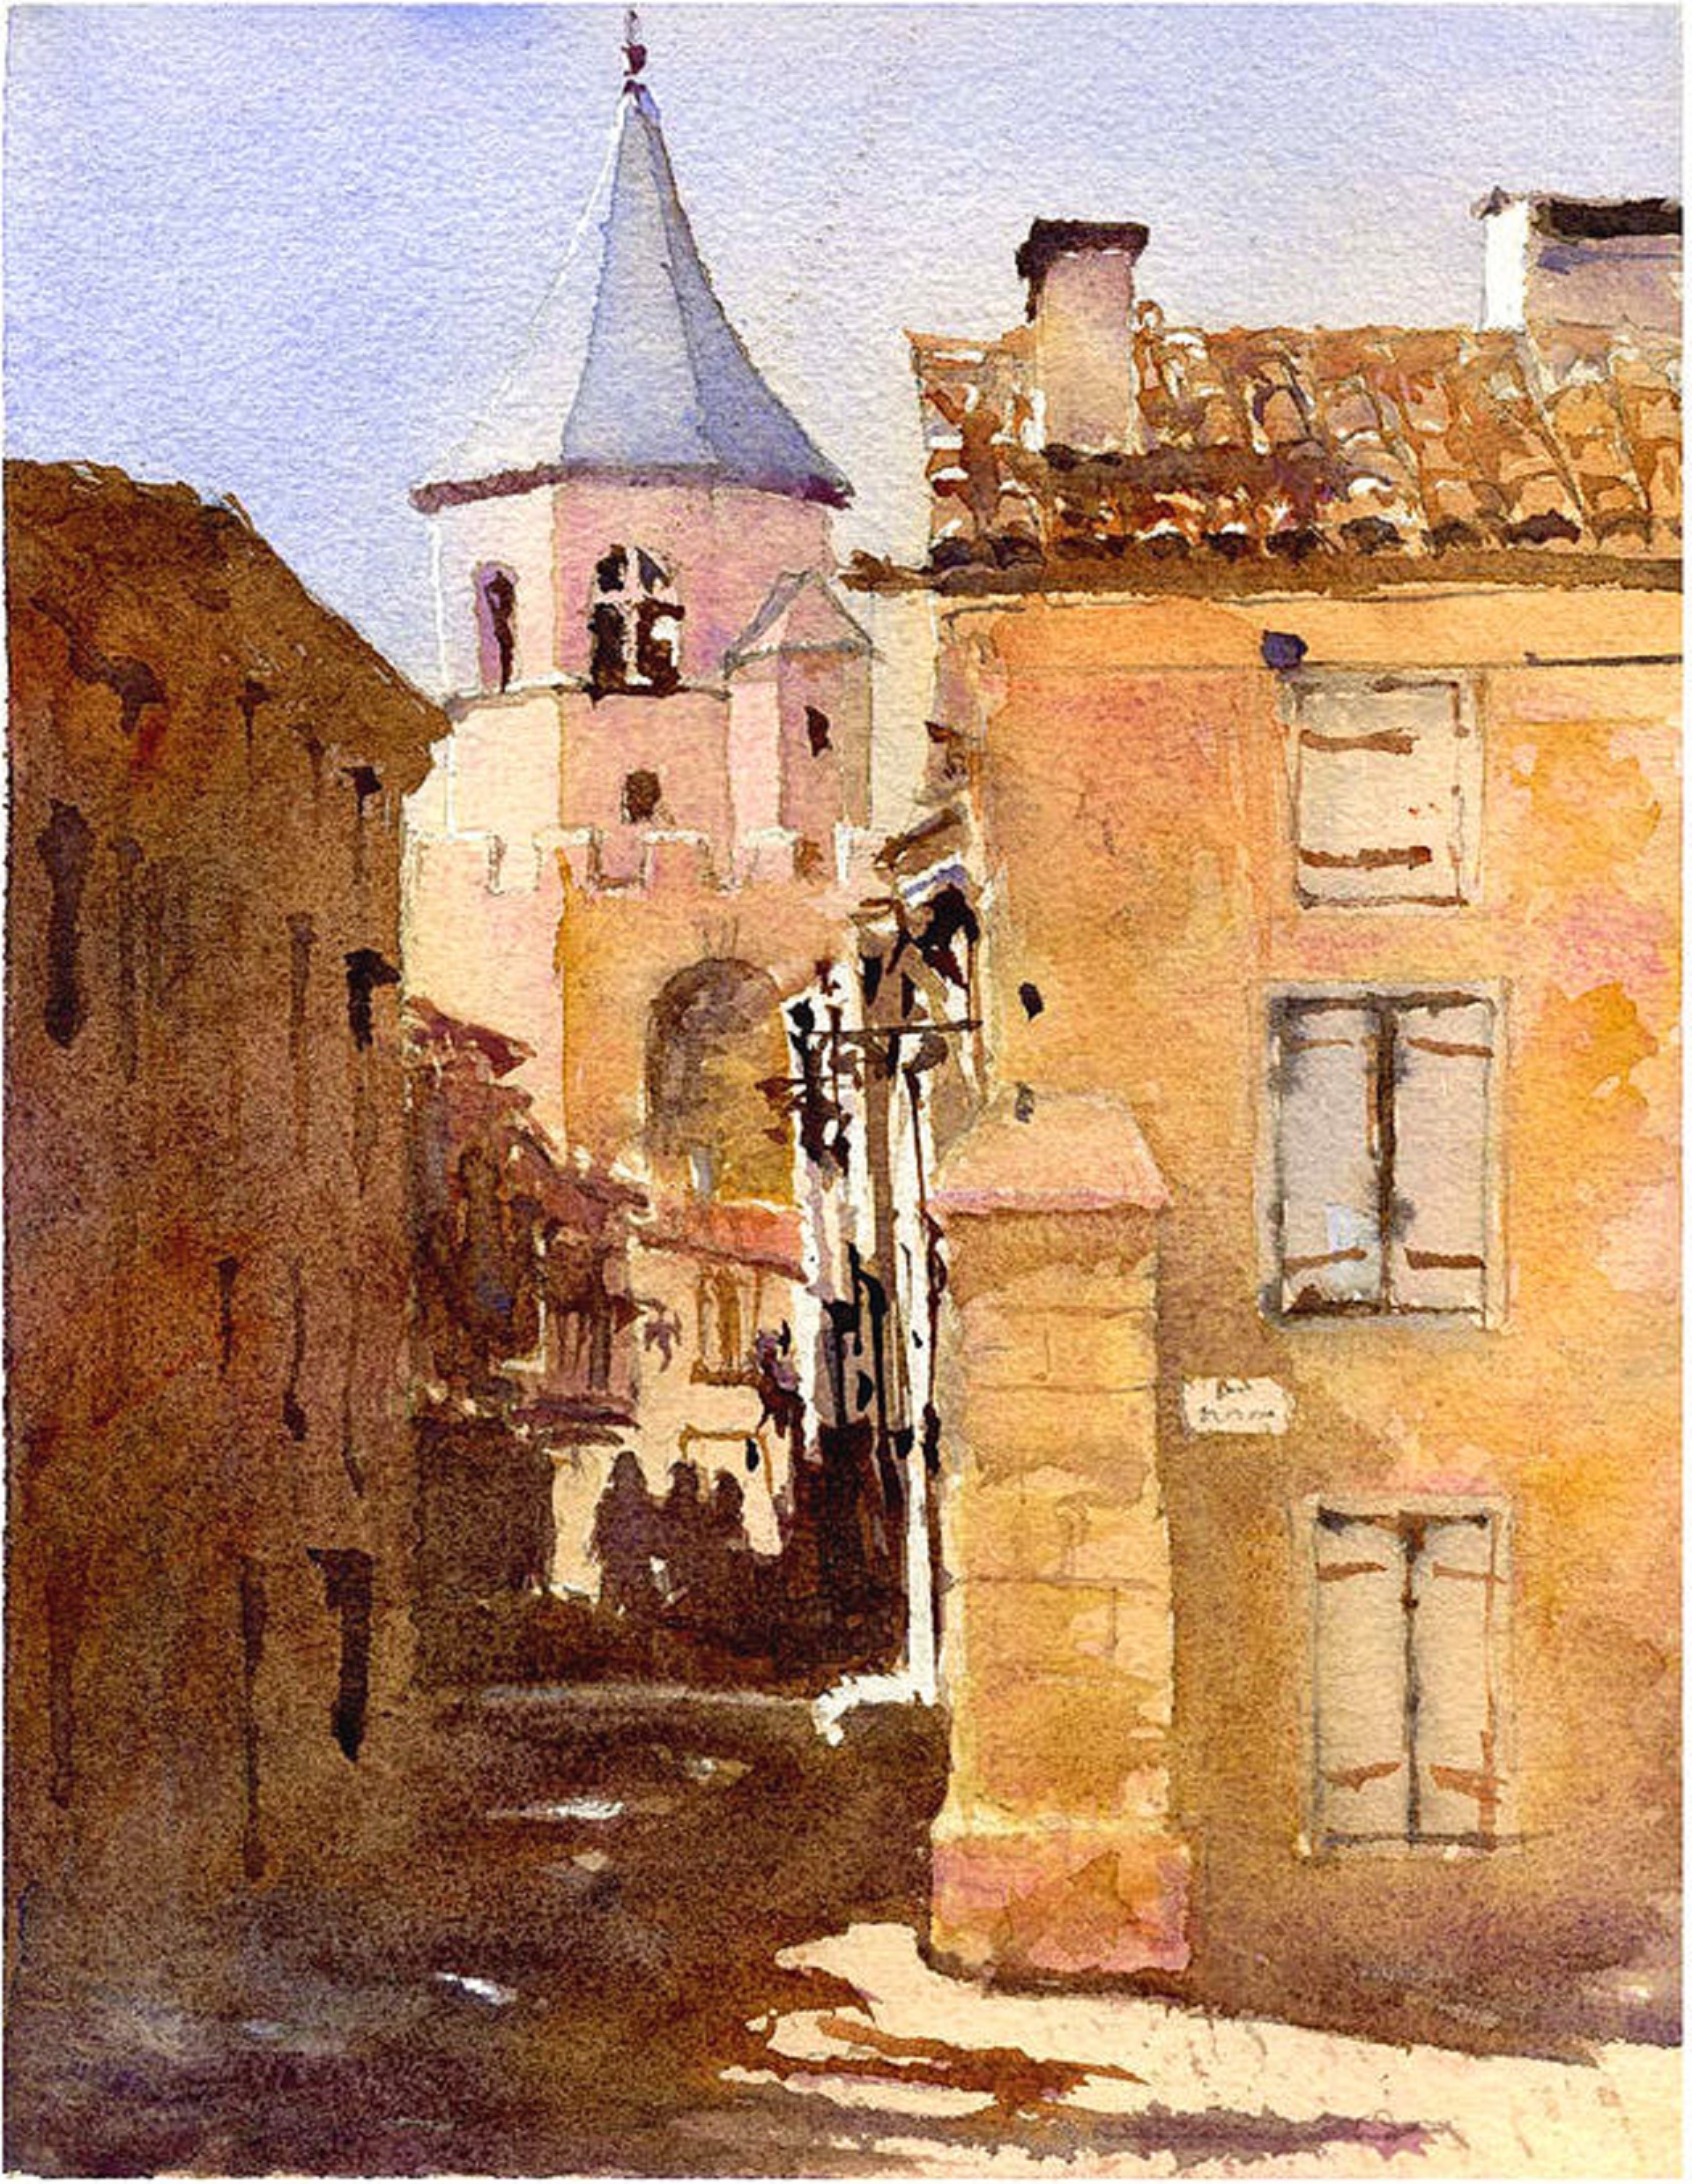 Tower St. Martin, Soreze
Allan Kirk trained to teach Art in the 1970’s and taught for 5 years before pursuing a career in computing. He now lives and works as an artist in the south of France. Allan and his wife Lesley have created TARNINCOLOUR HOLIDAYS where they offer 7-day watercolor painting holidays for small groups from beginners through to experienced artists. Groups stay and work from their renovated farmhouse in the beautiful Lauragais region within the tarn. You can find out more about the holidays and see Allan Kirk’s gallery at http://www.stepbystepwatercolour.com/.


