A weird composition, but a fun painting to build using liquid frisket technique. I used some interesting all over glazing techniques and a lot of detailed and textured brushwork.
Materials used:
Brushes
- 1 1/2" (381mm) Flat Winsor & Newton Series 965
- 1" Flat Grumbacher Red Sable w/beveled handle
- #6 Grumbacher Watercolor Classic Red Sable
- #5 Marx Scripto Red Sable Rigger
- #6 Liquitex Synthetic Basic Round 690 (For Frisket use)
Grafix Incredible Nib
Frisket
- Grafix Incredible White Mask Liquid Frisket
Paints
- Sap Green
- Hooker's Green Dark
- Cerulean Blue
- Cobalt Blue
- Dioxazine Purple
- Alizarin Crimson
- Permanent Rose
- Raw Sienna
- Buhttps://amzn.to/3kzlkQmrnt Umber
- Lamp Black
- Phthhttps://amzn.to/3kxYpoBalocyanine Green
Paper
- Arches rough 140lb watercolor block (14" x 20")
Miscellaneous
- Natural Rubber Pickup Square (for frisket removal)
- #2 Pencil
- Kneaded Eraser
- Palette - Your choice. Mine is an old Robert E. Wood model.
- Water container (2) and water
- Hair dryer (optional)
Step 1: Drawing and Masking
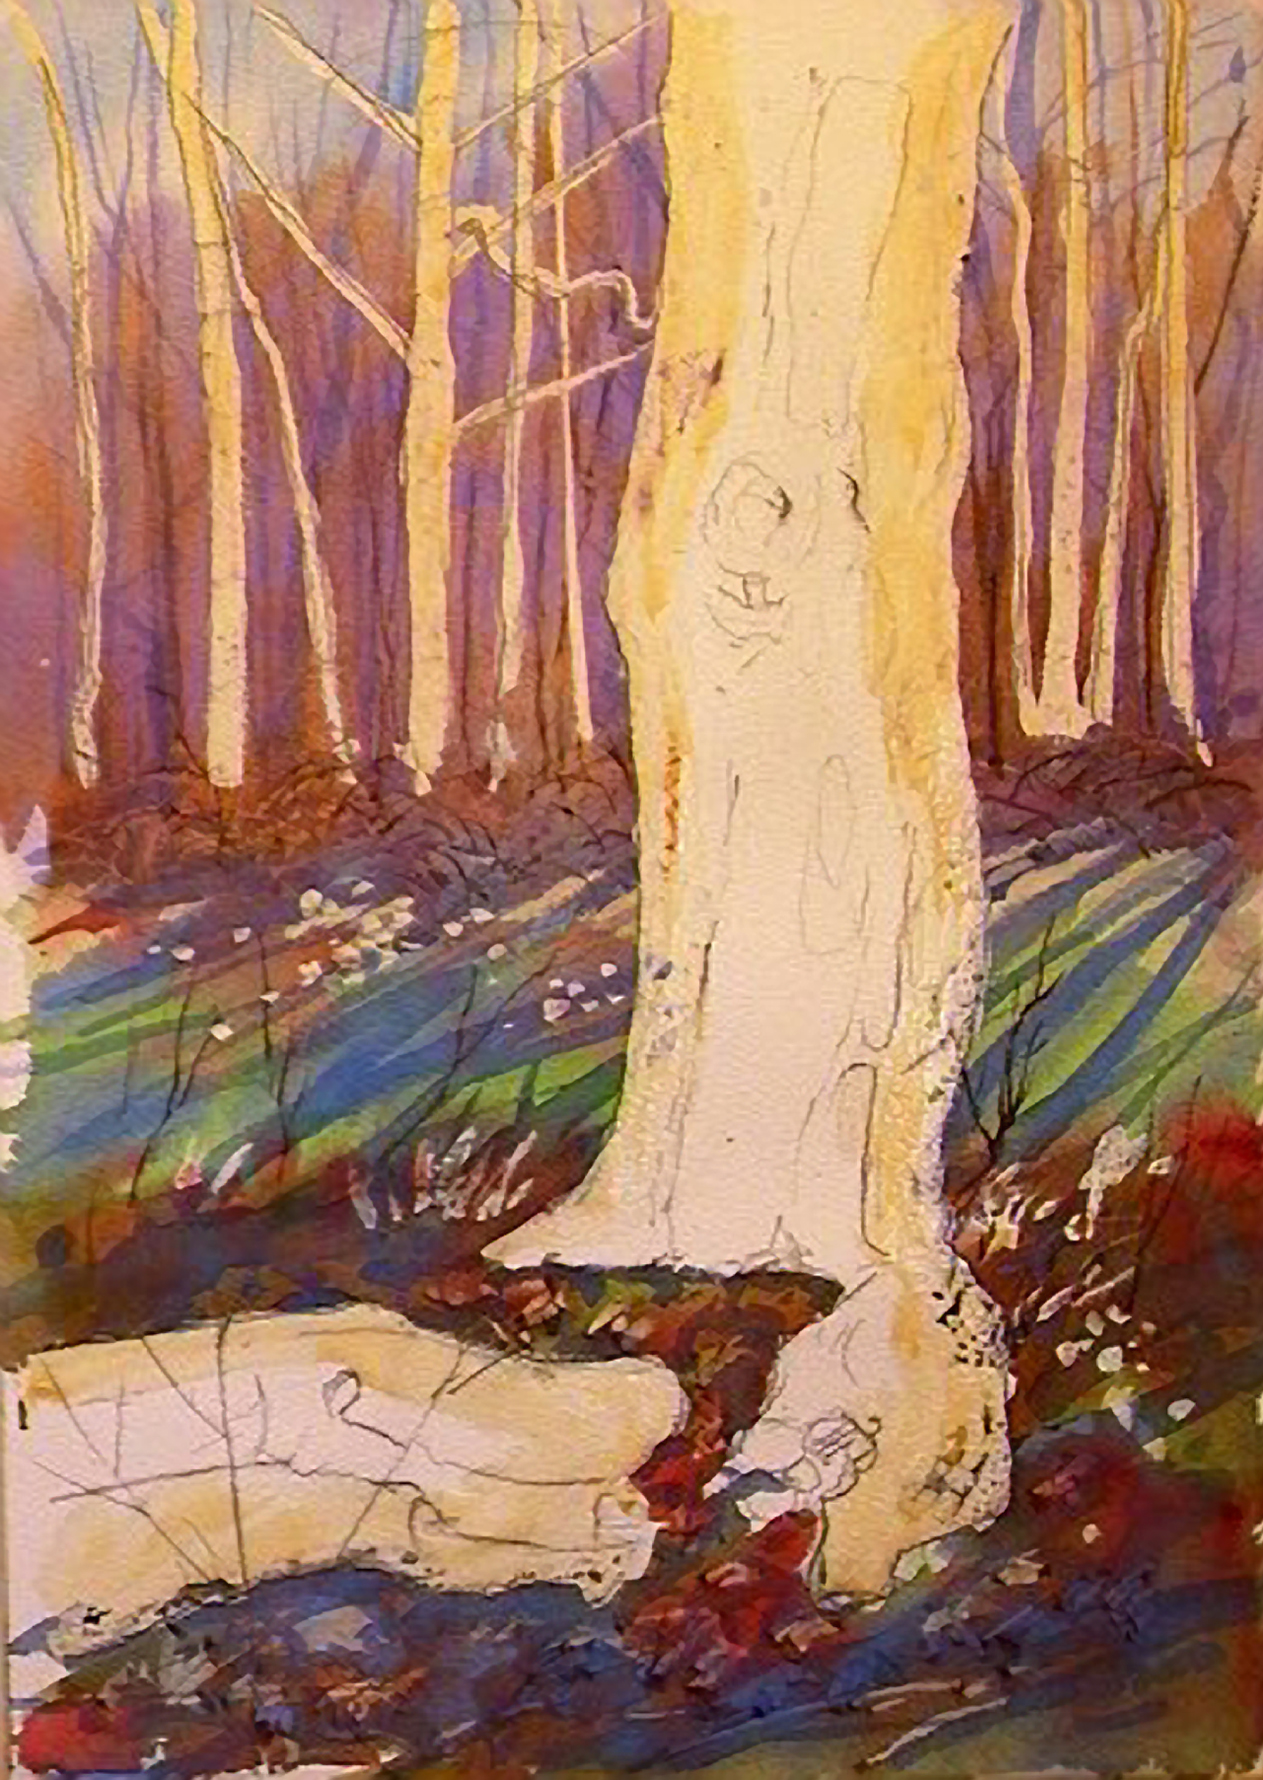
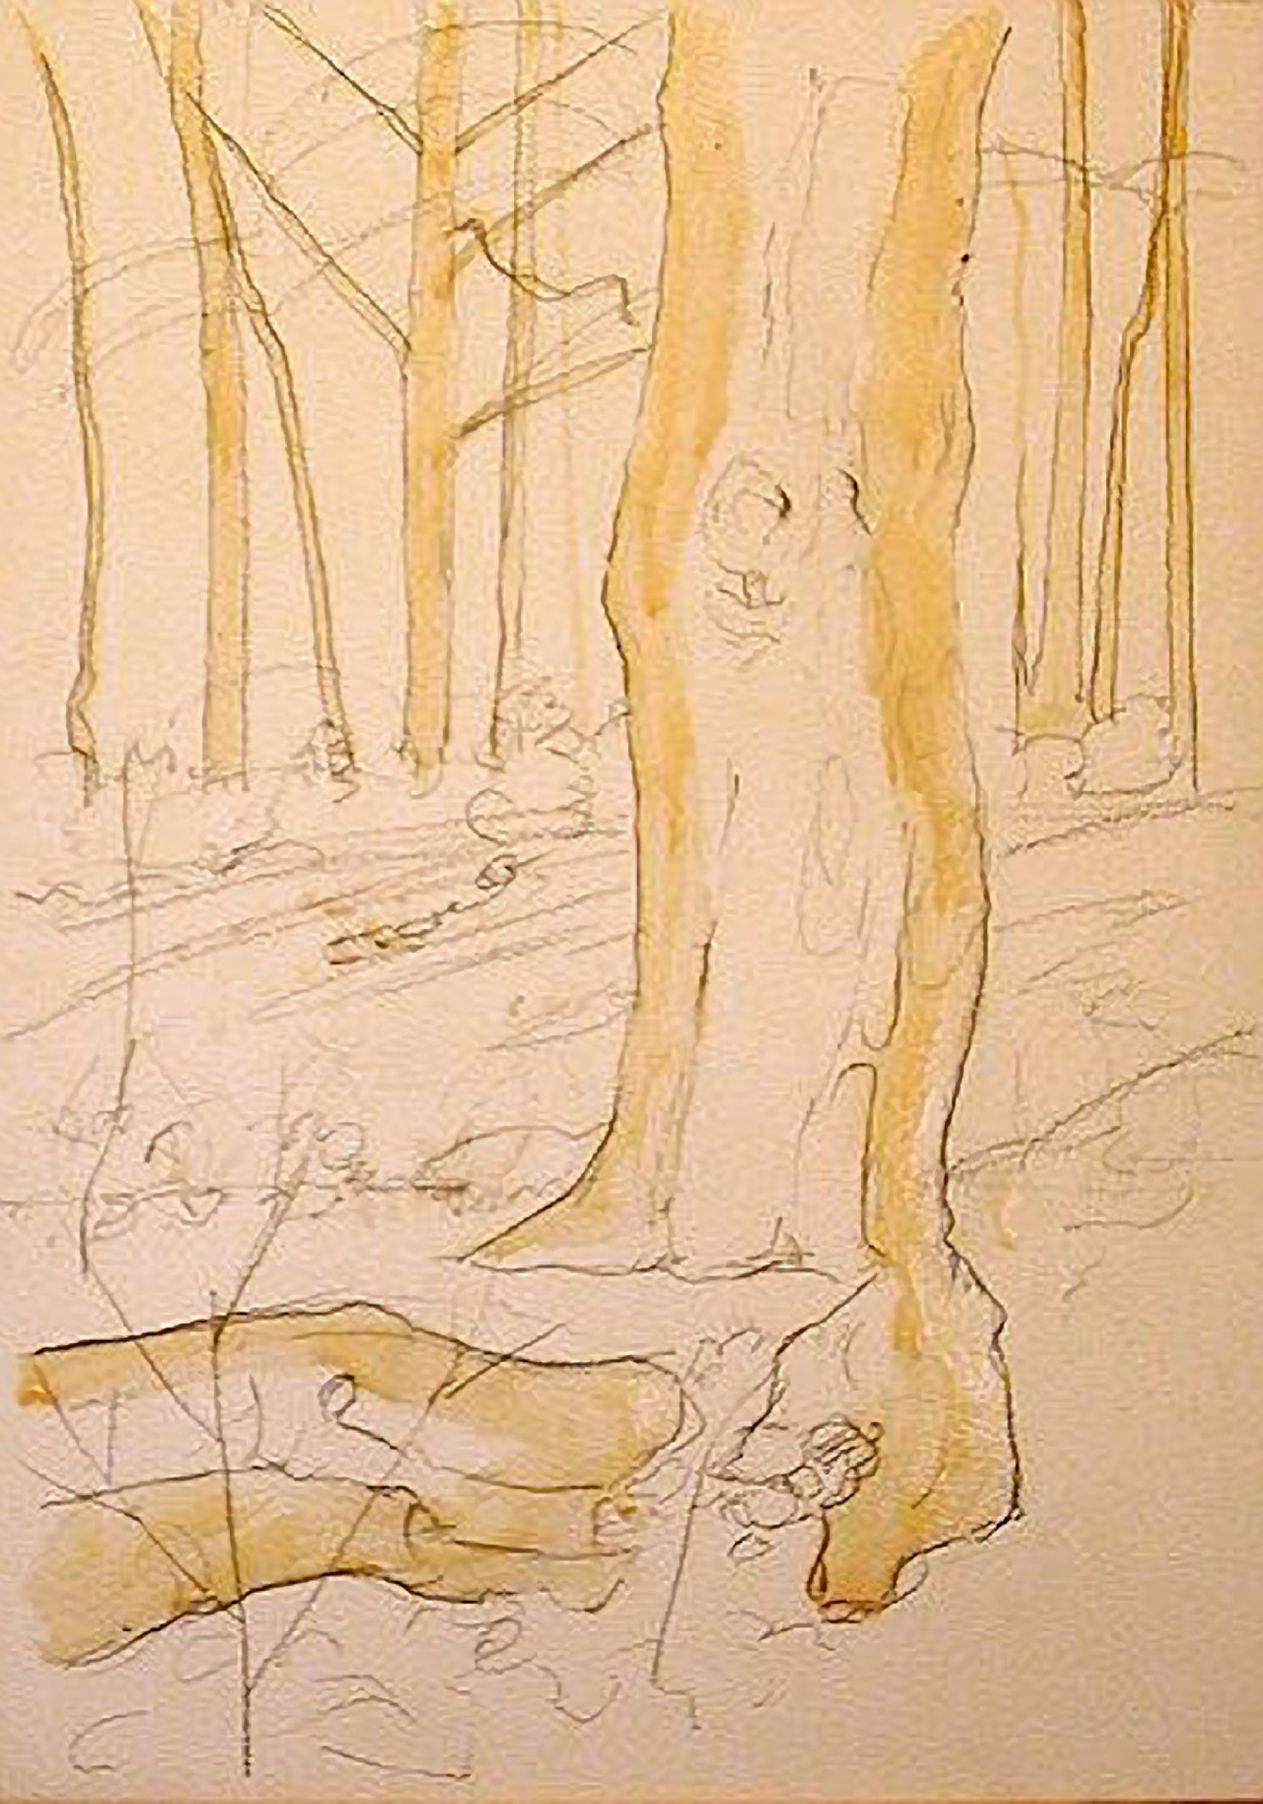 For this lesson, I will paint a portrait of a singular, rather ugly, tree. I had an old digital image from a group of thumbnail printouts of various shots I take in the woods that are so abundant around here. A literal "Green Necklace" surrounds the Greater Cleveland area. I roughly blocked everything in, having to extend the top height by about a fifth to compensate for different aspect ratios between the reference photo and the working surface. Well, to be honest it didn't quite fit so I fudged it. Once the drawing showed some possibilities, I took my #6 synthetic brush, sloshed it in the water, and shook it out. I opened an older bottle of Incredible White Mask frisket I had, removed the "clot" that had skinned over inside, stirred it and proceeded to pick out background trees that I would leave white with the frisket. I applied mask to the outlines of the foreground tree, and used a Grafix Incredible Nib with the frisket to add some texture to either side of the tree base.
Step 2: First Washes, Decisions, and Commitment
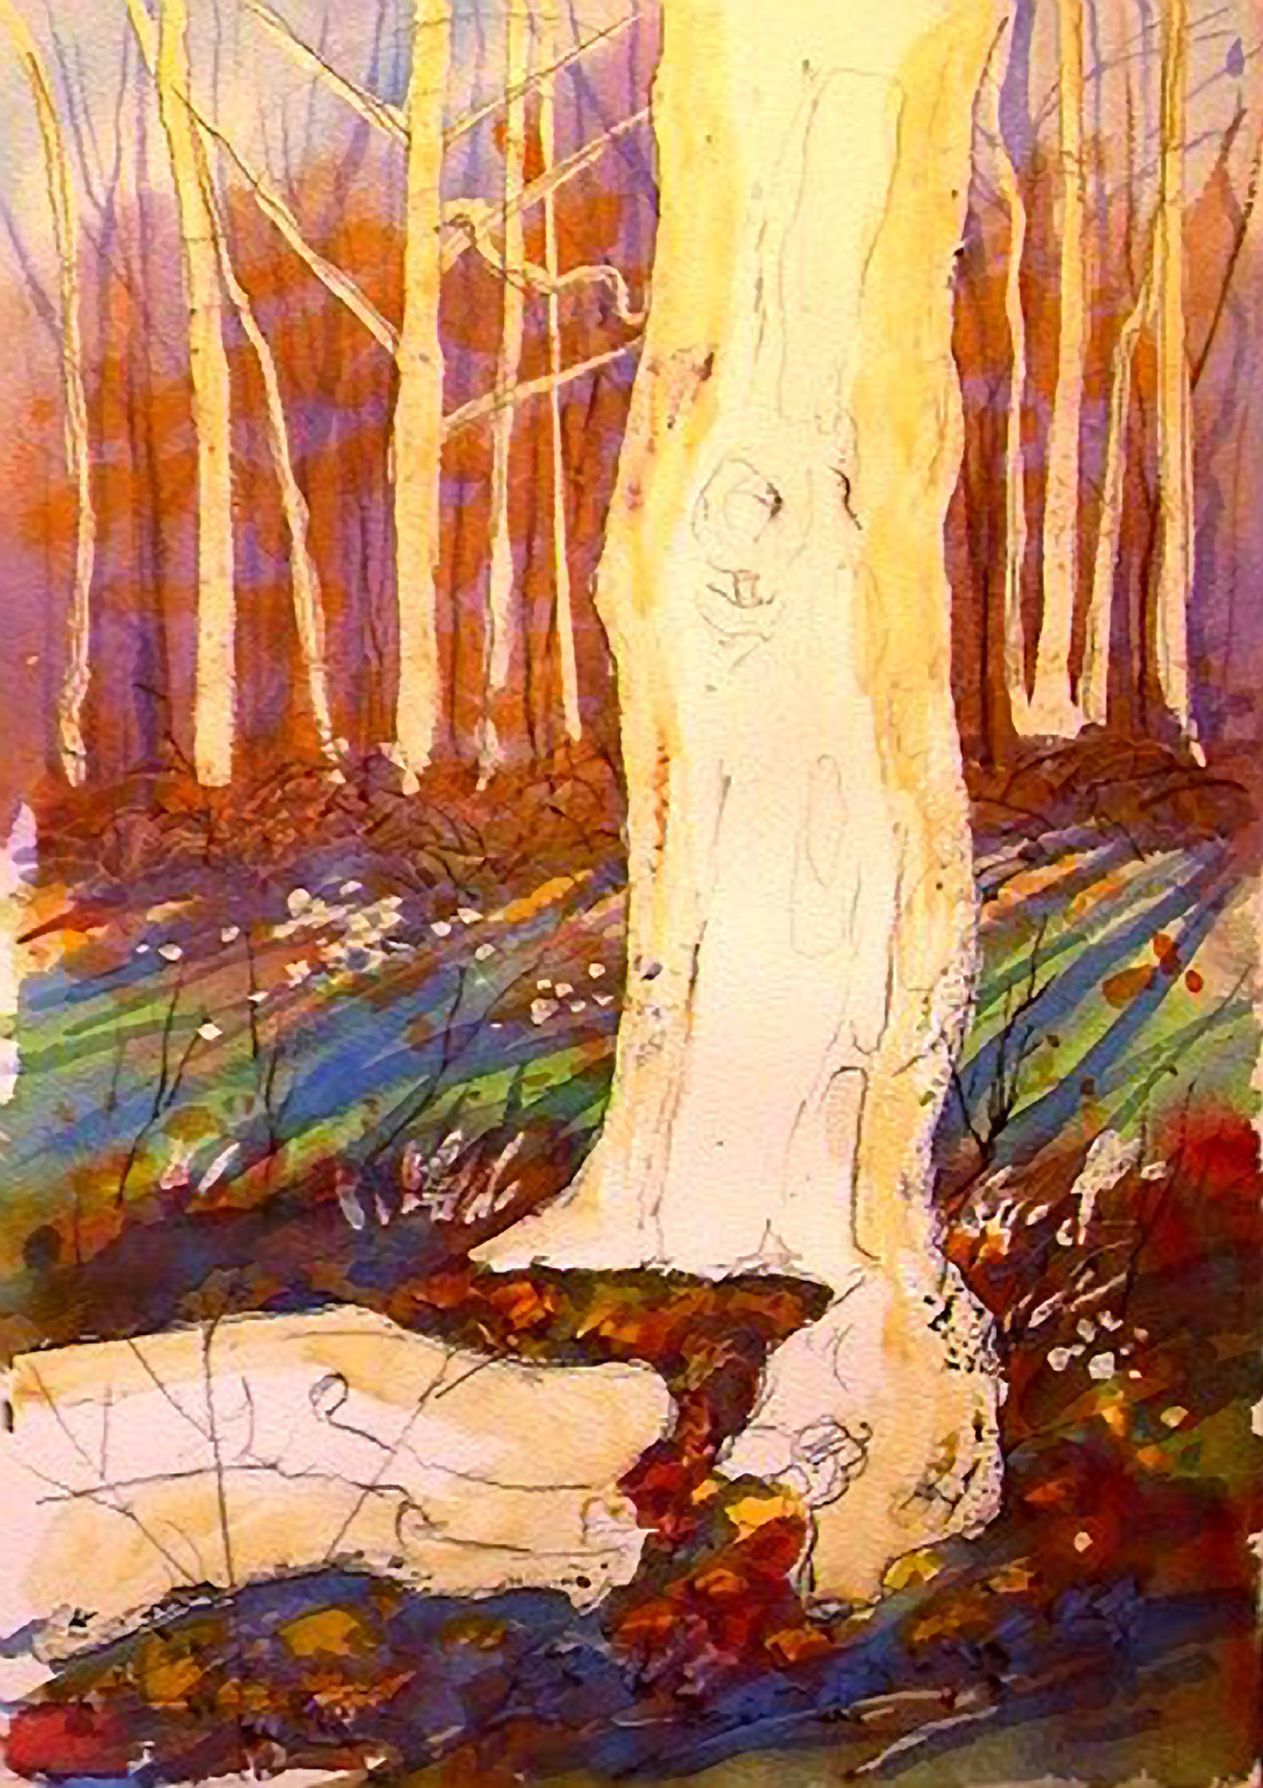
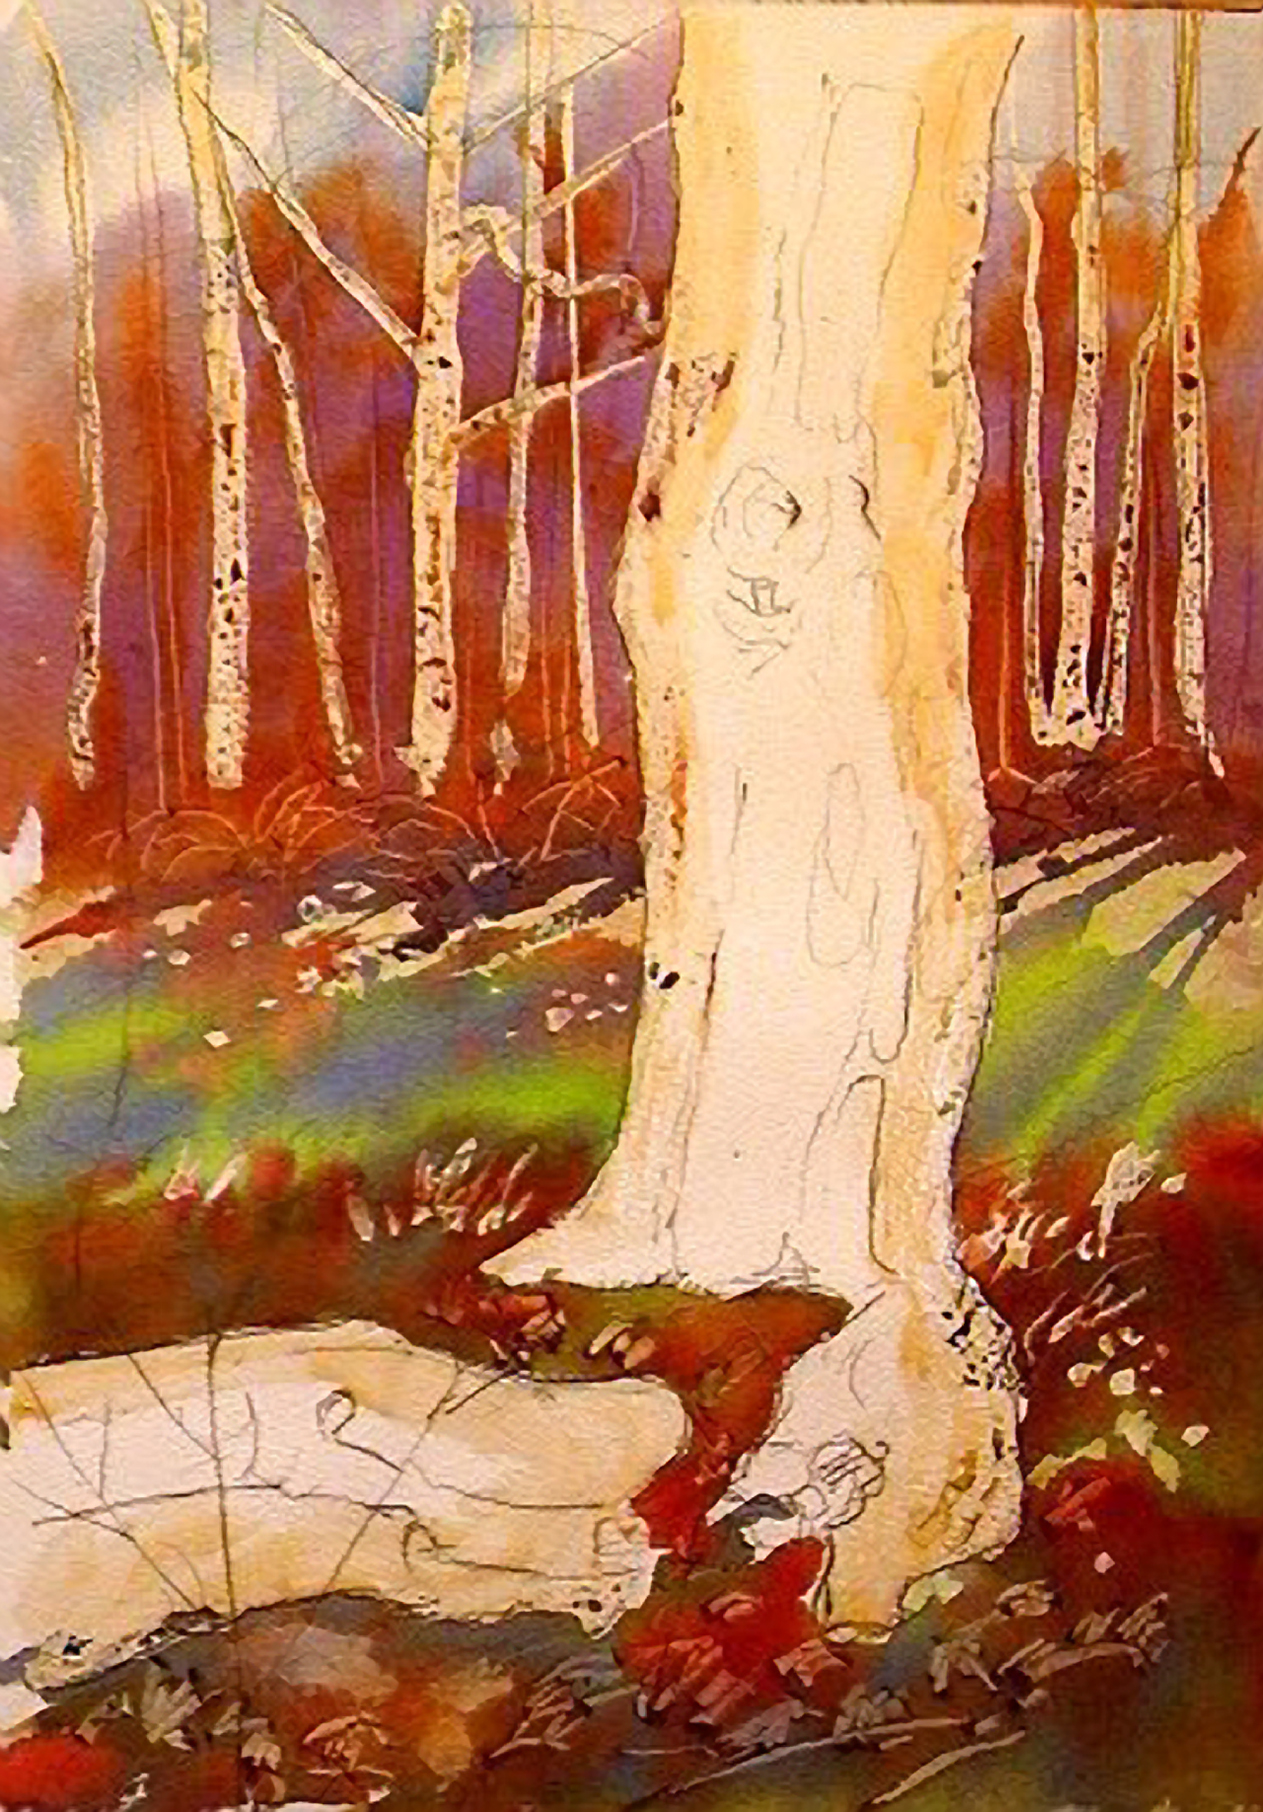 So the reference thumbnail I had was shot in the winter. It was all grays and browns, and there was no light source to speak of. It was one of those bright gray days. I decided to push the season back a bit so there was a bit of green and the autumnal colors were still in evidence. And then I asked the light to come in from stage right at a low angle, which it quite appropriately proved to do. Using my 1 1/2" flat wash brush I mixed up several different puddles of pure color: Cerulean Blue, Dioxazine Purple, Burnt Sienna, and Sap Green. I then prepared smaller puddles of Alizarin Crimson, Cadmium Orange, and Permanent Rose. Rinsing my 1 1/2" flat wash brush clean, I then used clean water and wet the paper everywhere except on portions of the large tree. When it looked fairly uniform, I picked up the Cerulean Blue and laid a bit of sky tone on top through the trees. I then mixed purple with Burnt Sienna and laid in the background clutter and ground debris. Using the wide flat brush again I picked up some Sap Green and laid it across the middle-ground through to the foreground. Using my #6 round sable, I added purple and cobalt accents to the raking shadows in the middle-ground. Burnt Sienna, Alizarin Crimson, Cobalt Blue, and Sap Green were all used in the mid to foreground textures. A smattering of cadmium orange accents were distributed for local color. Using the beveled handle of my 1" wash brush, I scratched some saplings in the background, bushes in the middle-ground, and leaf shapes in the foreground. I also blotted a few foreground areas to keep some highlights.
Step 3: Trees of Doom
 After using a hair dryer to make the painting dry (I only recommend this if you are using a quality frisket and a quality paper, on some softer-finished watercolor papers. The frisket tends to bond with the fibers instead of the finish, especially under heat.) I mixed up some Dioxazine Purple, Cobalt Blue, and Burnt Sienna and laid in some darker trees in the background. Using a #5 rigger sable, I made a dark mixture of Hooker's Green Deep and Alizarin Crimson with a touch of Burnt Sienna to soften it a bit, and added more brush and weed detail to the edge of the background woods. I followed to the mid-foreground and flicked in a few more random weed stems. These additions I allowed to air dry.
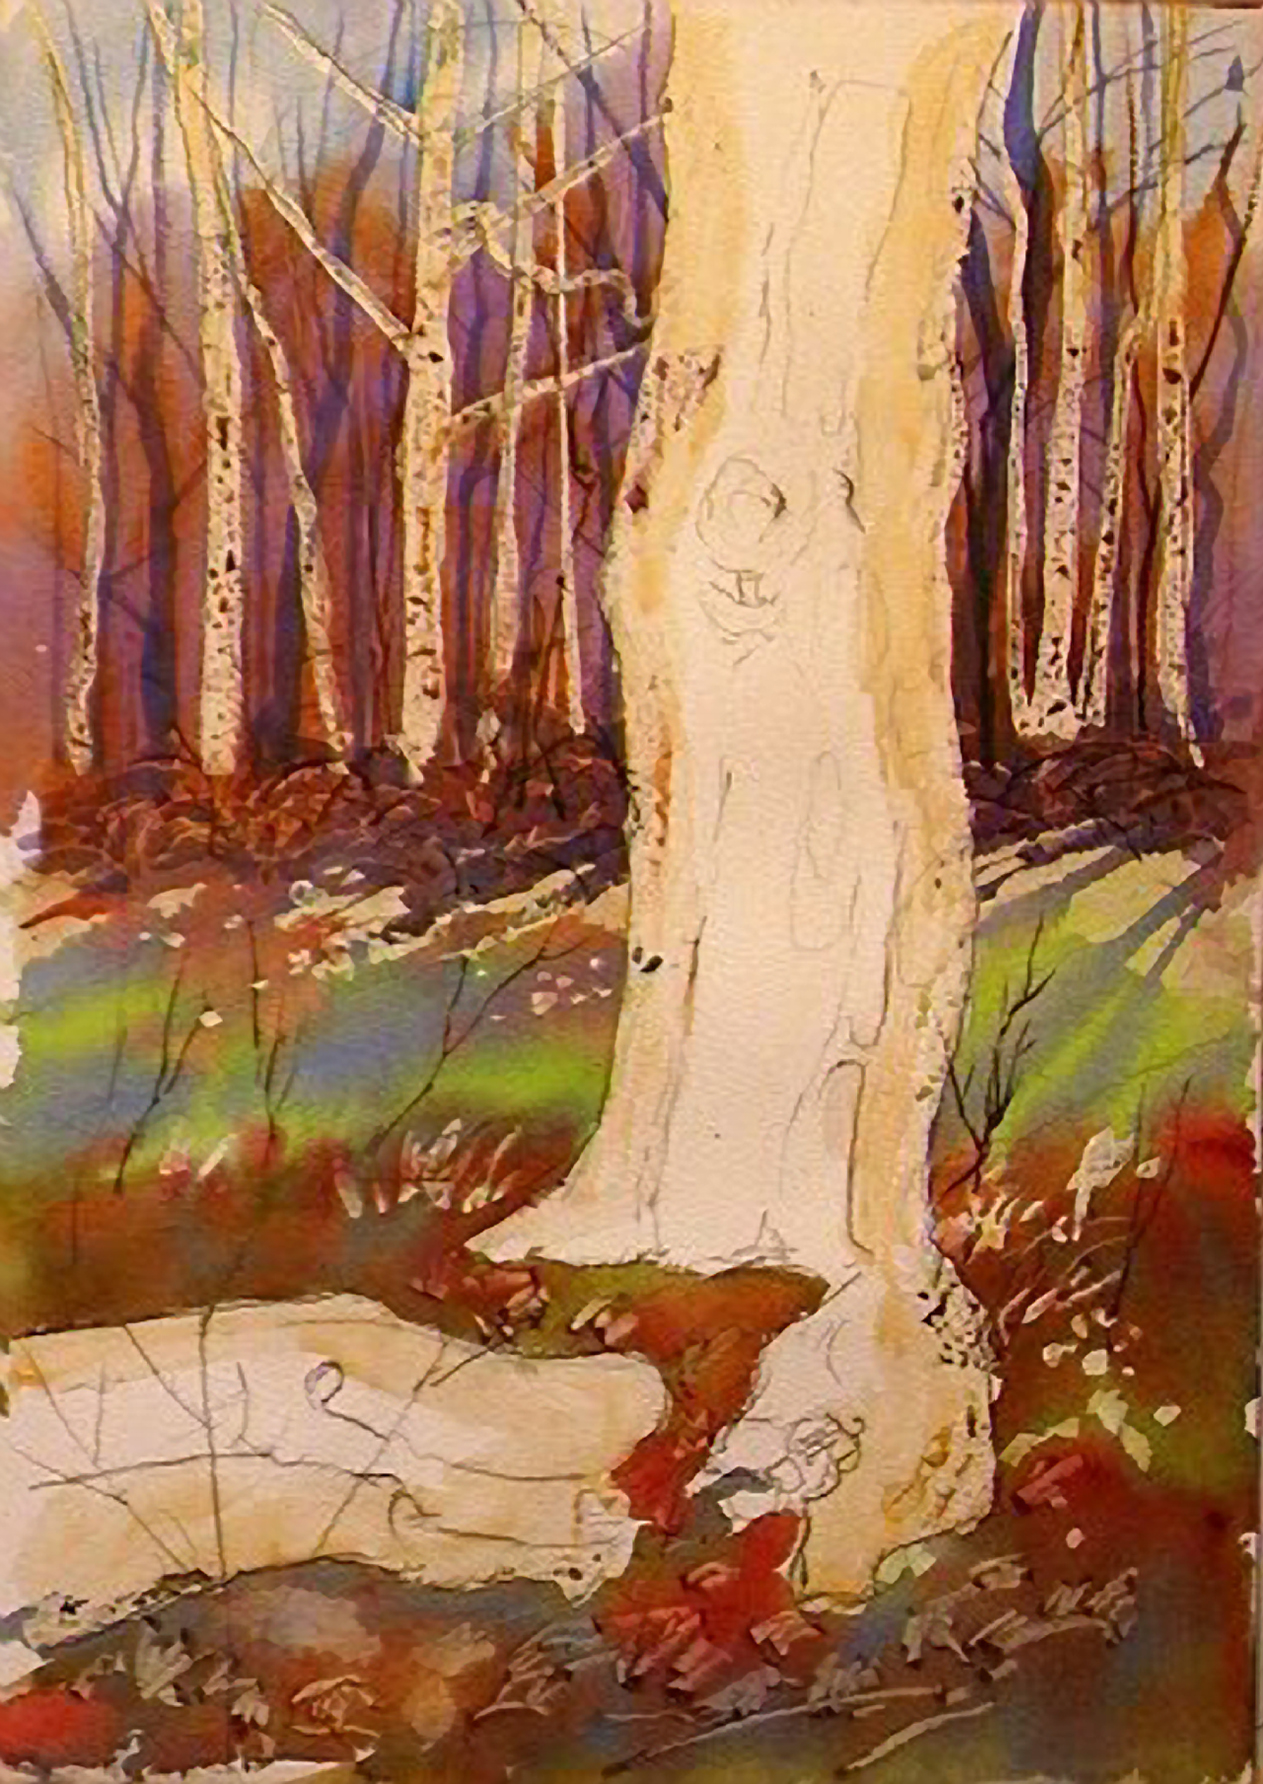
Step 4: In Deeper and Deeper
 Trying to get some drama going in this painting, I turned to the middle-ground. I reinforced the scratchy tree shadows using my #6 round sable with some Cobalt Blue and a touch of Lamp Black, hoping I had enough of an "idea" of shadows to pull it off. The old joke of an artist staring at a tree: as time passes, people begin to gather around him in hushed whispers to see if this man is all right, he appears to be in a trance or pre-epileptic seizure. When a knowing person in the back says in an excited voice, "Oh, he's an artist!", they simultaneously lift their hands to their chins, give an knowing nod and say "Ahhhh" and quietly walk away as if in deep thought. Ten of one, half dozen of the other. But I digress. I added more Cobalt Blue to the mix and continued on down the foreground "scribbling" the ground textures and shadows to life. All throughout this process I haven't referenced the original photo; all I needed from the photo were the natural forms with which to play with.
Step 5: Rethinking Matters... Or Do I?
 After all that thoughtful work was accomplished, I dried the piece again. And then realized I should have left it damp. Looking at the background woods, I decided it was coming on too strong. I flipped the painting upside down and moistened both sides and flushed the surface with clean water and a loaded wide brush. Have a towel under your board when you tilt and rinse this way. After a bit of scrubbing, I finally had it lightened back to where I thought it should be. Had I left it damp and not gone ahead and dried it first, this step would have been quicker and the paper would have had less heat stress. Once more I fired up my trusty hair dryer and dried everything before proceeding.
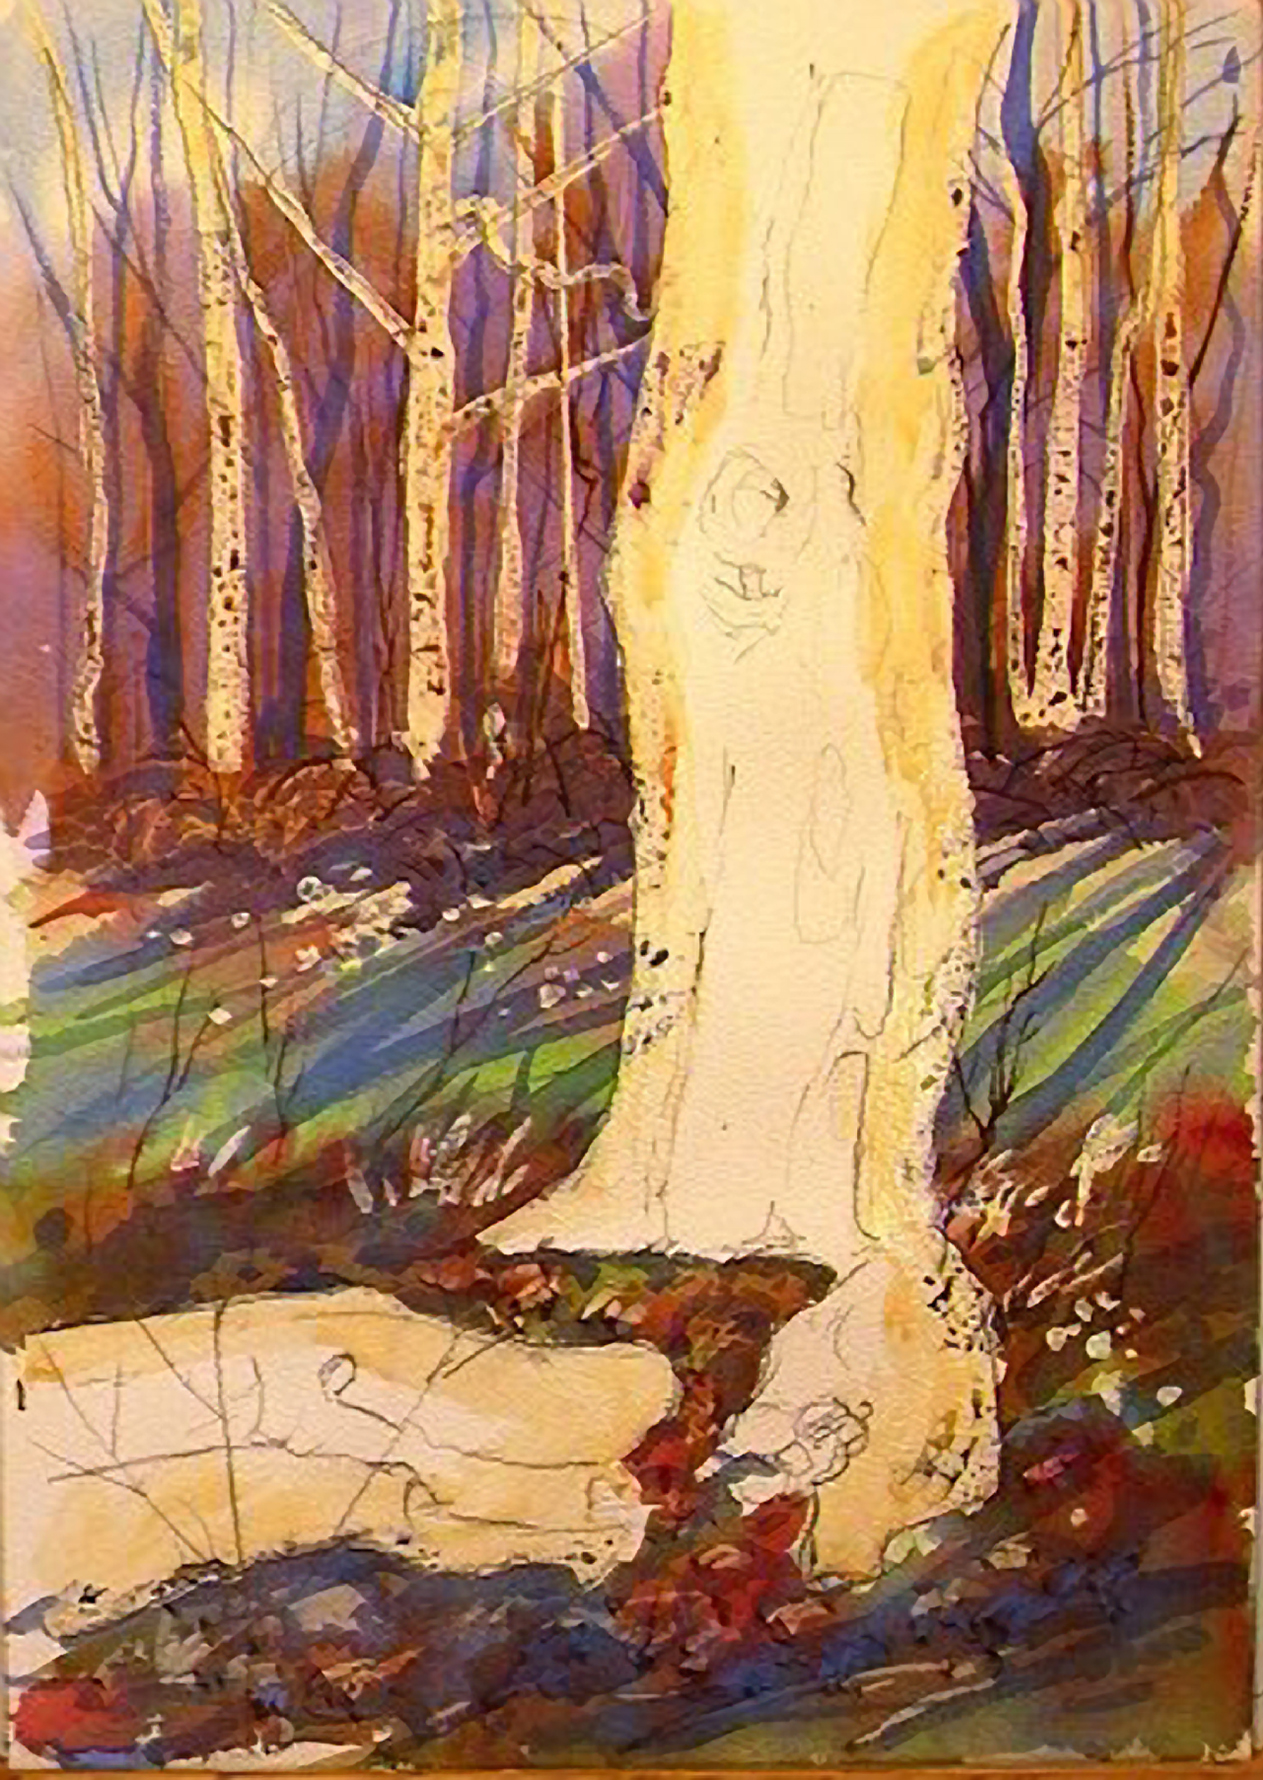
Step 6: Is it Warm in Here?
 I didn't like the chill I was getting from the overall coloring, so I attacked the whole piece with mixtures of Cadmium Orange, Raw Umber, and Permanent Rose. I needed a warmer background to play off the coolness of the large foreground tree in shadow. Warm and cool here refer to color temperature, not the actual temperature of the painting. I spent a few more leisurely minutes heating a sheet of paper until it was dry.
Step 7: So There You Are
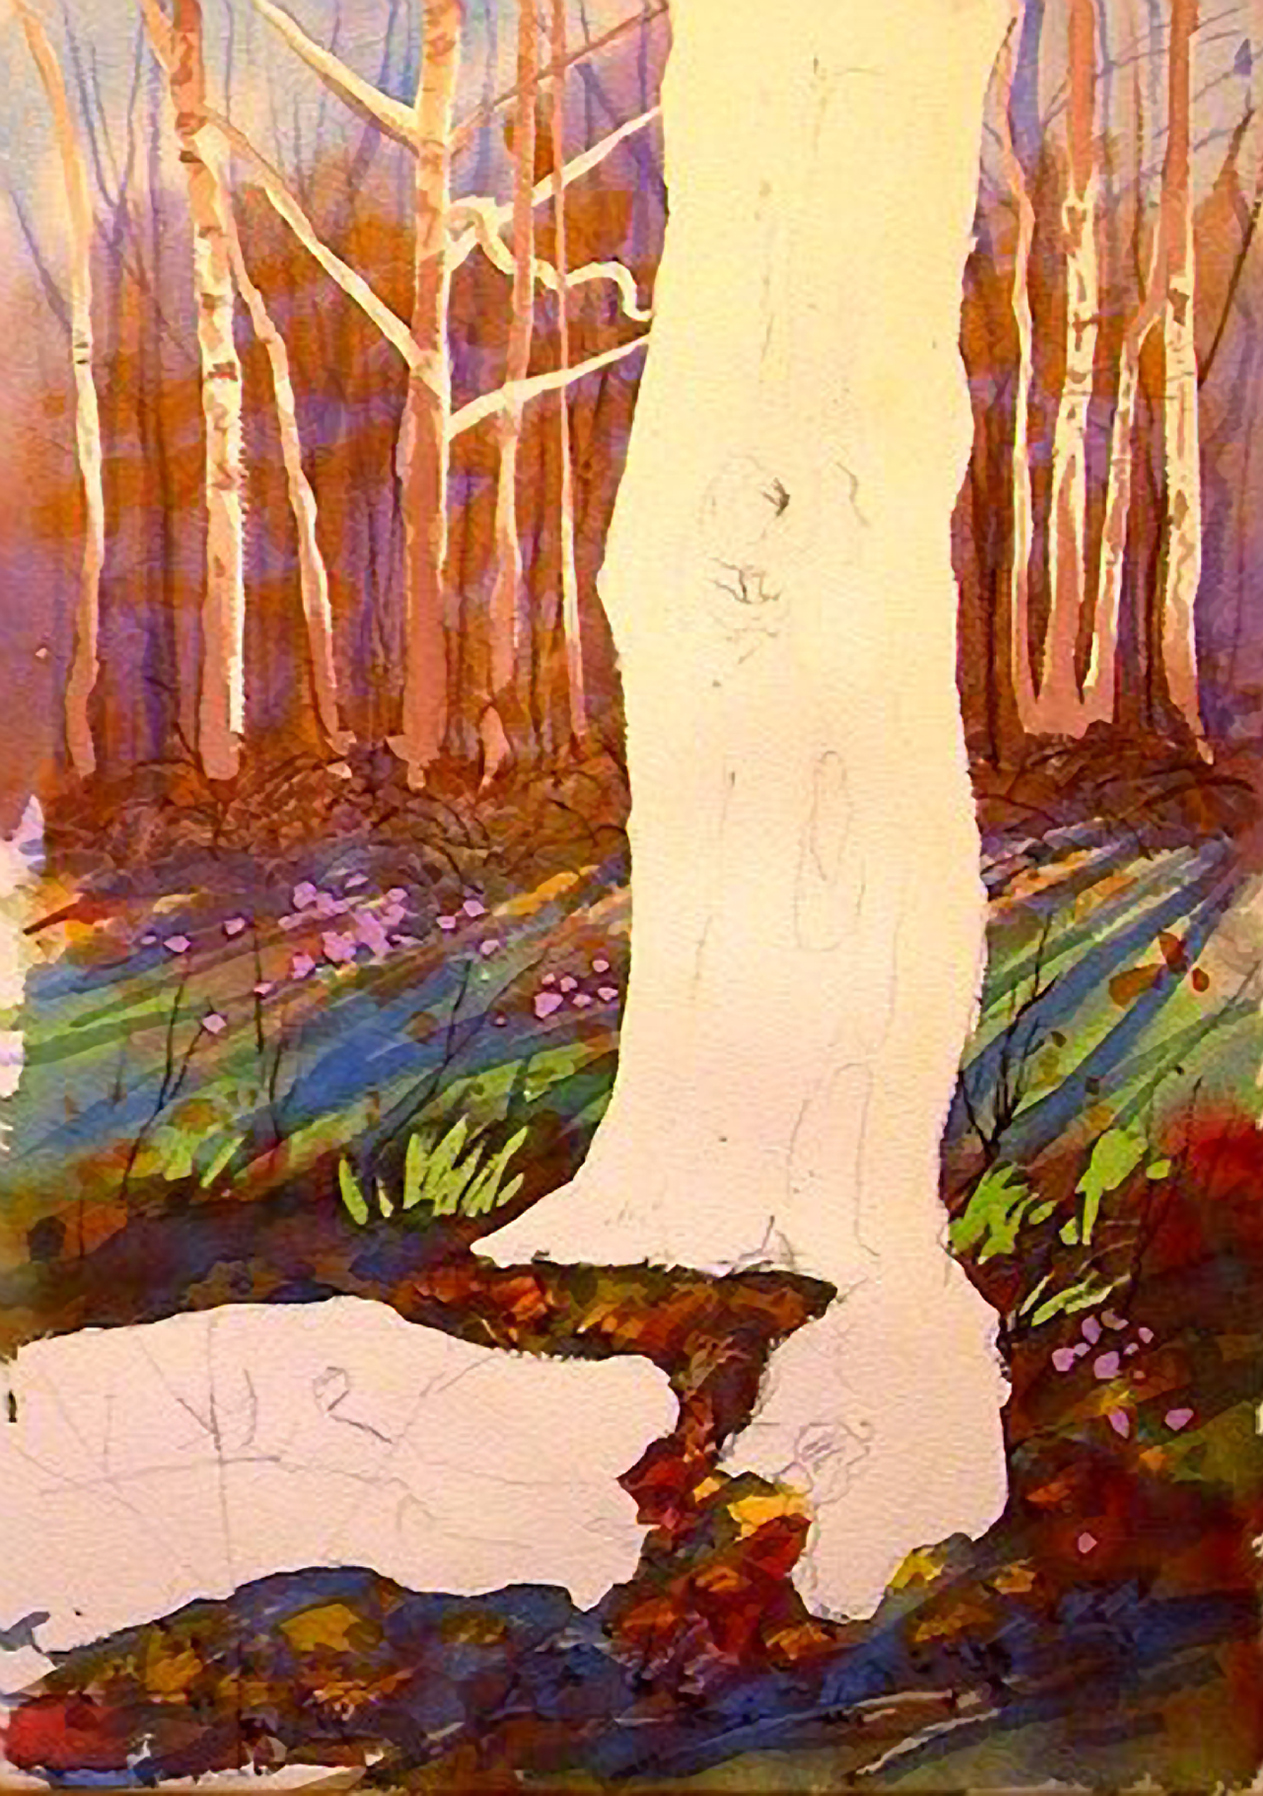 Make sure your painting is absolutely dry. Then, take the natural rubber pickup, and using a gentle but strong stroking pressure, roll off ALL the masked areas on the painting. With the new white paper exposed things change, and you have a whole new set of parameters to play with. Using a mix of Burnt Sienna, Raw Umber, Dioxazine Purple, a touch of Burnt Umber, and the 1 1/2" wash brush and #6 round sable, I made some gradations to the white trees in back and layered darker details of the same mix in the forest and trees. I threw a quick wash of Sap Green over the newly exposed areas on either side of the tree's base. I had left some random dots in the clearing behind the tree for an indication of flowers. Using a #6 round sable I make a mixture of permanent rose and a slight bit of Dioxazine Purple and made a light pinkish lavender color I used on the middle- and foreground flower forms.
Step 8: Flip-Flopping in Negative Space
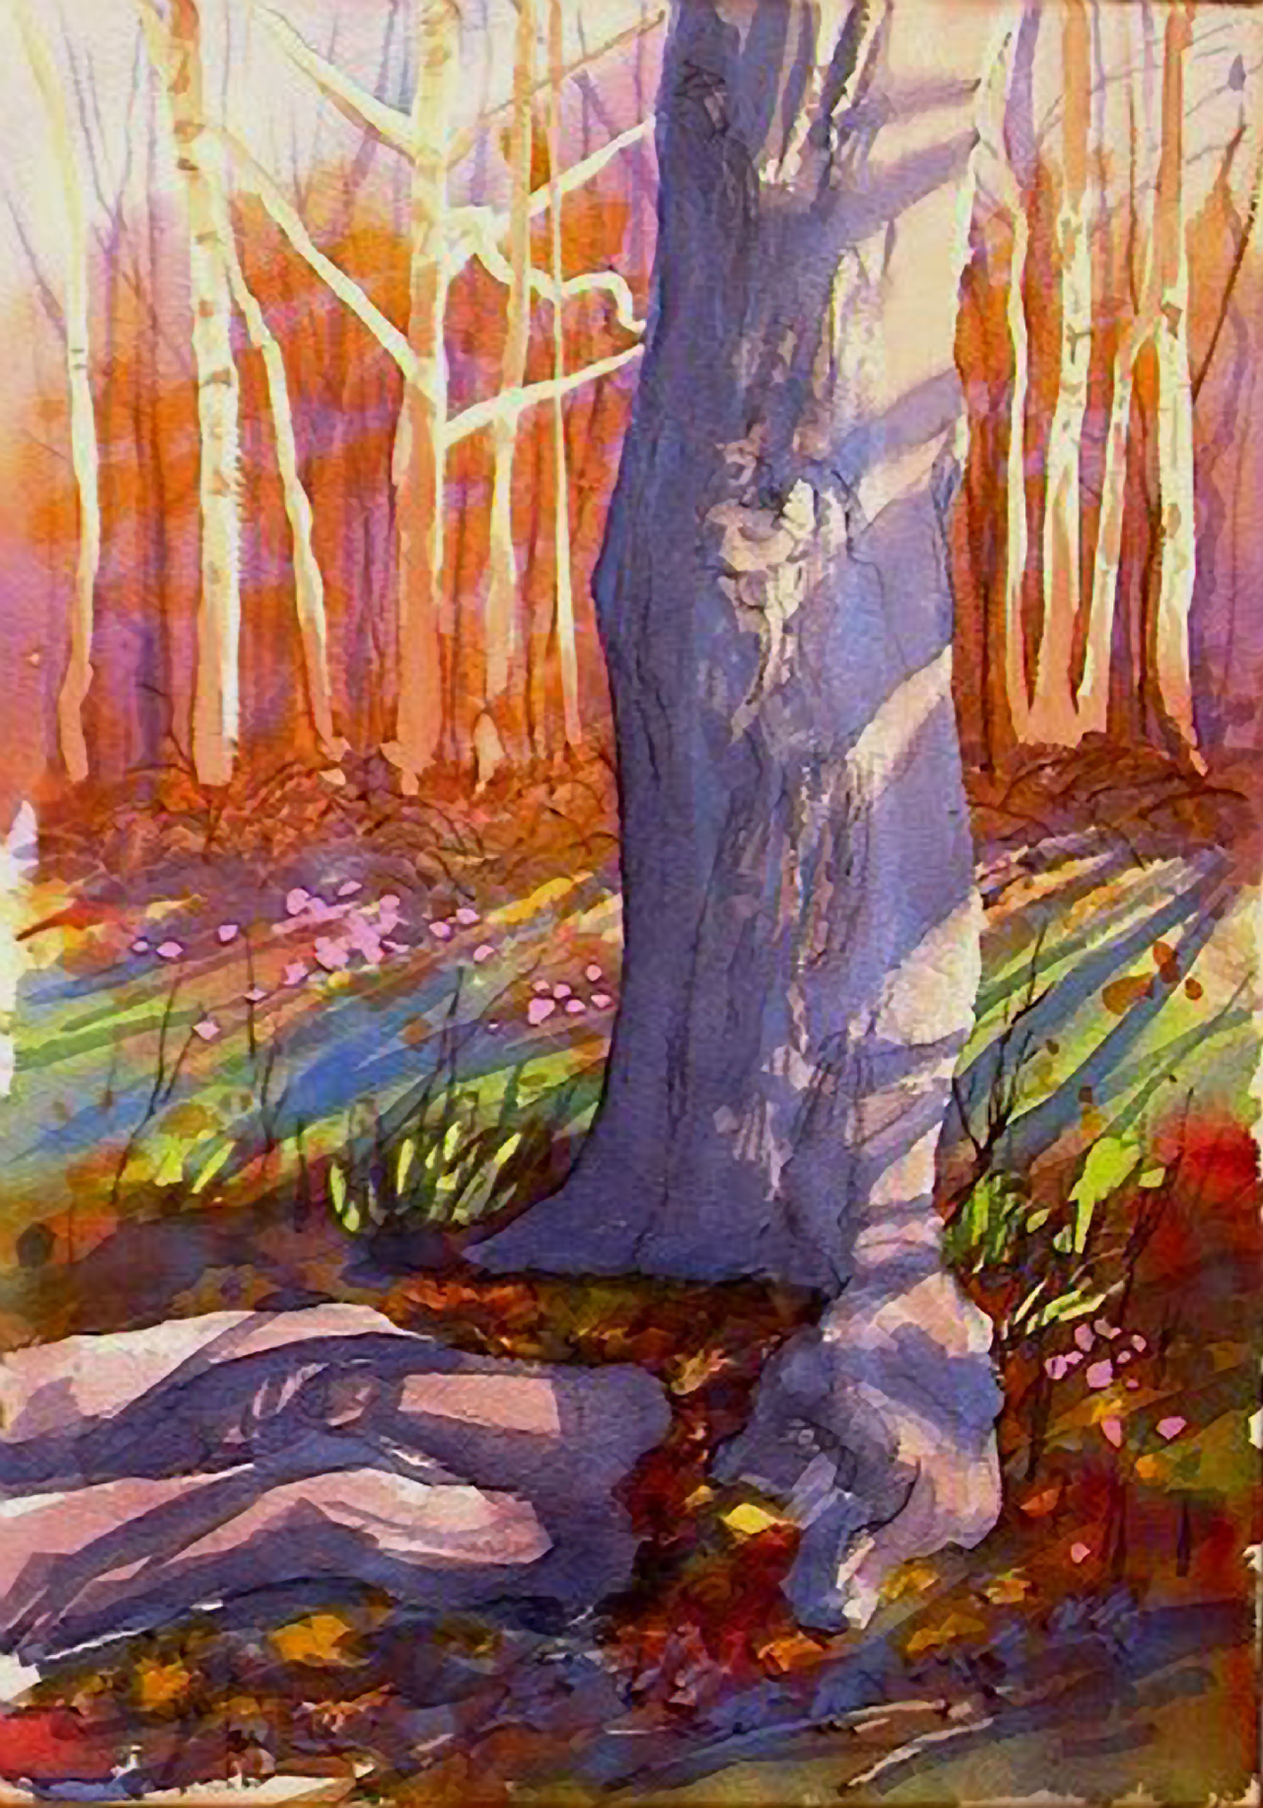 I then turned my attention to the main foreground tree. Using my 1" flat wash brush, I mixed some Dioxazine Purple with some Cobalt Blue and Burnt Sienna, creating a fairly intense purple-gray-brown. I cut in the shadow areas on the left side of the tree, taking care to drop in shadows for the textures and surface details of the tree and its roots. When that first shadow layer had dried, I mixed a lighter tint of the same mixture. Then, holding my 1" brush nearly parallel with the paper, I dragged the flat side of the brush down the trunk, picking up a bunch of surface highlight textures that looks remarkably like bark. I pull this same wash over the entire tree, leaving only the highlights. After the area was dry again, I moistened the entire tree with clean water. Using a #6 round and a strong mix of Cobalt Blue with a touch of Lamp Black on darker edges, I slashed in the diagonal tree branch shadows when the paper had dried enough to be of controllable dampness. I also pulled the intense blue wash over the textured shadows, picking out the last few highlights as the paper dried.
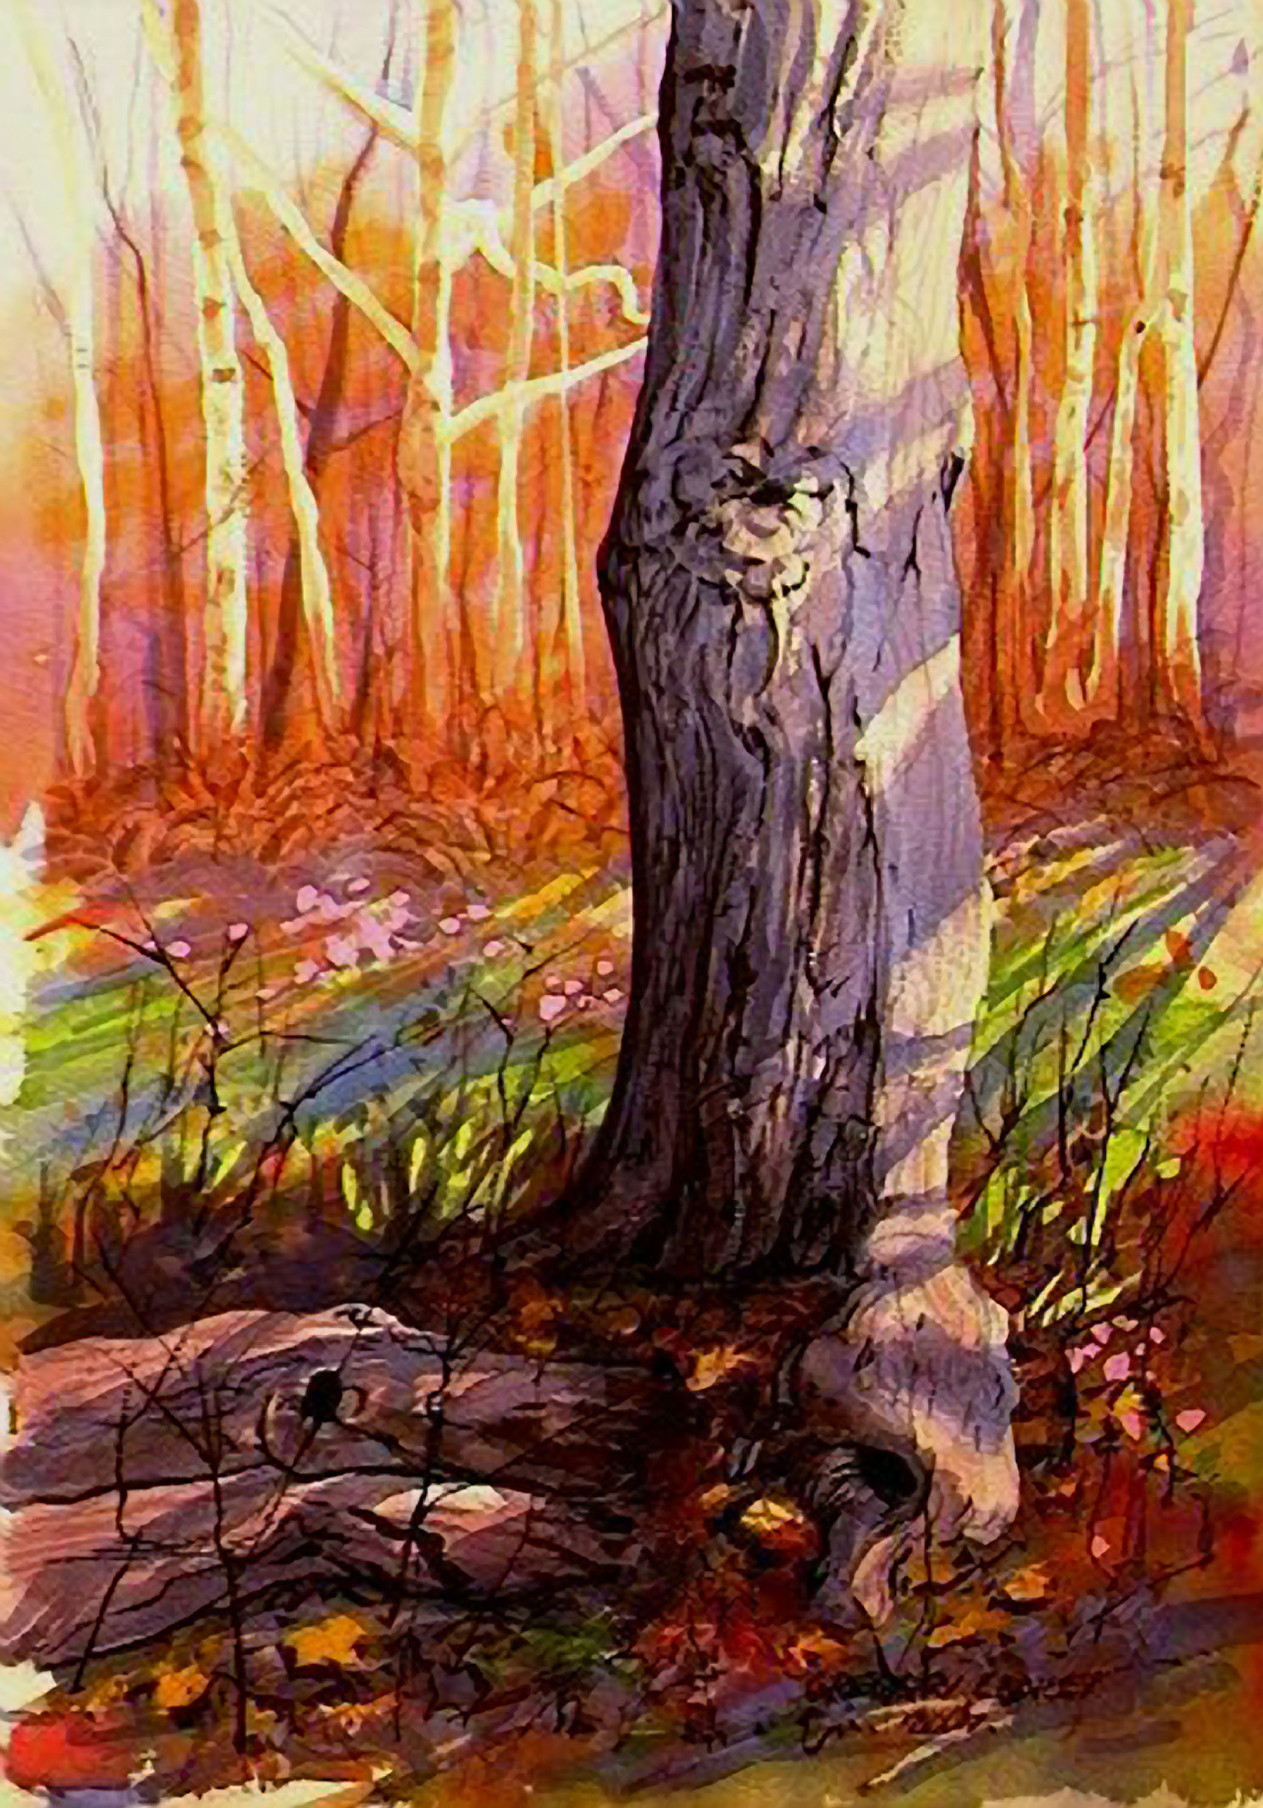
Step 9: Getting a Grip on Things
 Alternating between a #6 round and a #5 rigger brush, I gradually built up and intensified the forms within the shadow of the tree trunk. This was done with a Dioxazine Purple, Cobalt Blue, and Lamp Black mix. The linear flow of the bark was indicated with the rigger. In the lighter areas I used a lighter tone of the same mix as before with Burnt Sienna added for warmth.
Step 10: Polish and Refine
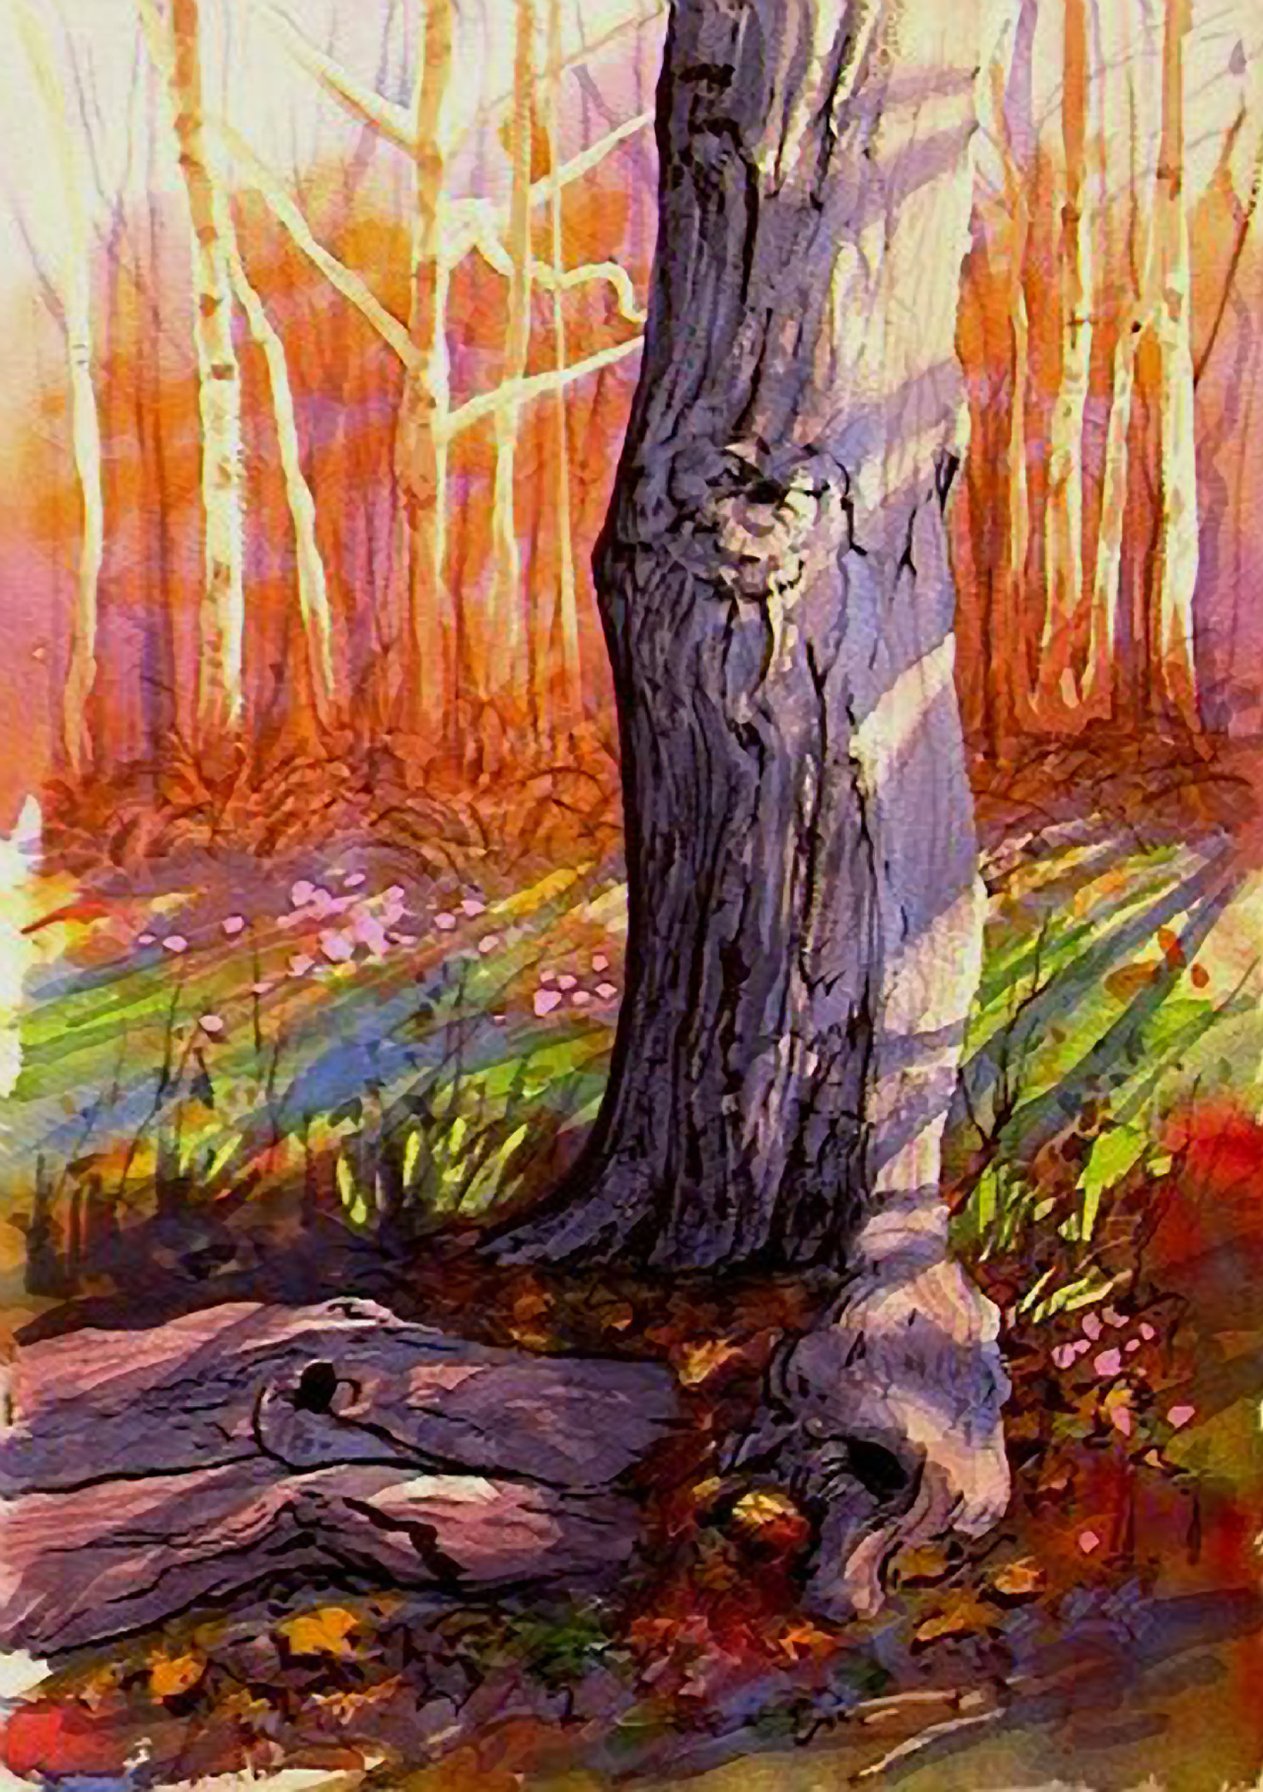 Upon closer examination of the background trees, I realized the white trees weren't finished at their bases. I mixed a close proximity of the colors I used before on these trees and added darker graded washes at their bases to root them (sorry) to the background. I then reworked the brush and debris at the base of the background trees. With a mix of the darker purple grays I had puddled around, I used a #6 round brush and added texture to the ground at the base of the tree, drawing random shapes reminiscent of leaves. I wanted to punch the big tree up a bit. The darks were not dark enough for my tastes. I made an extremely dark mix of Hooker's Green Dark and Alizarin Crimson, and using some fancy brushwork (a #6 round), I "drew" the darks in again. I used the brush edge to pick out some heavy textures at the base of the tree.
Step 11: All Done!
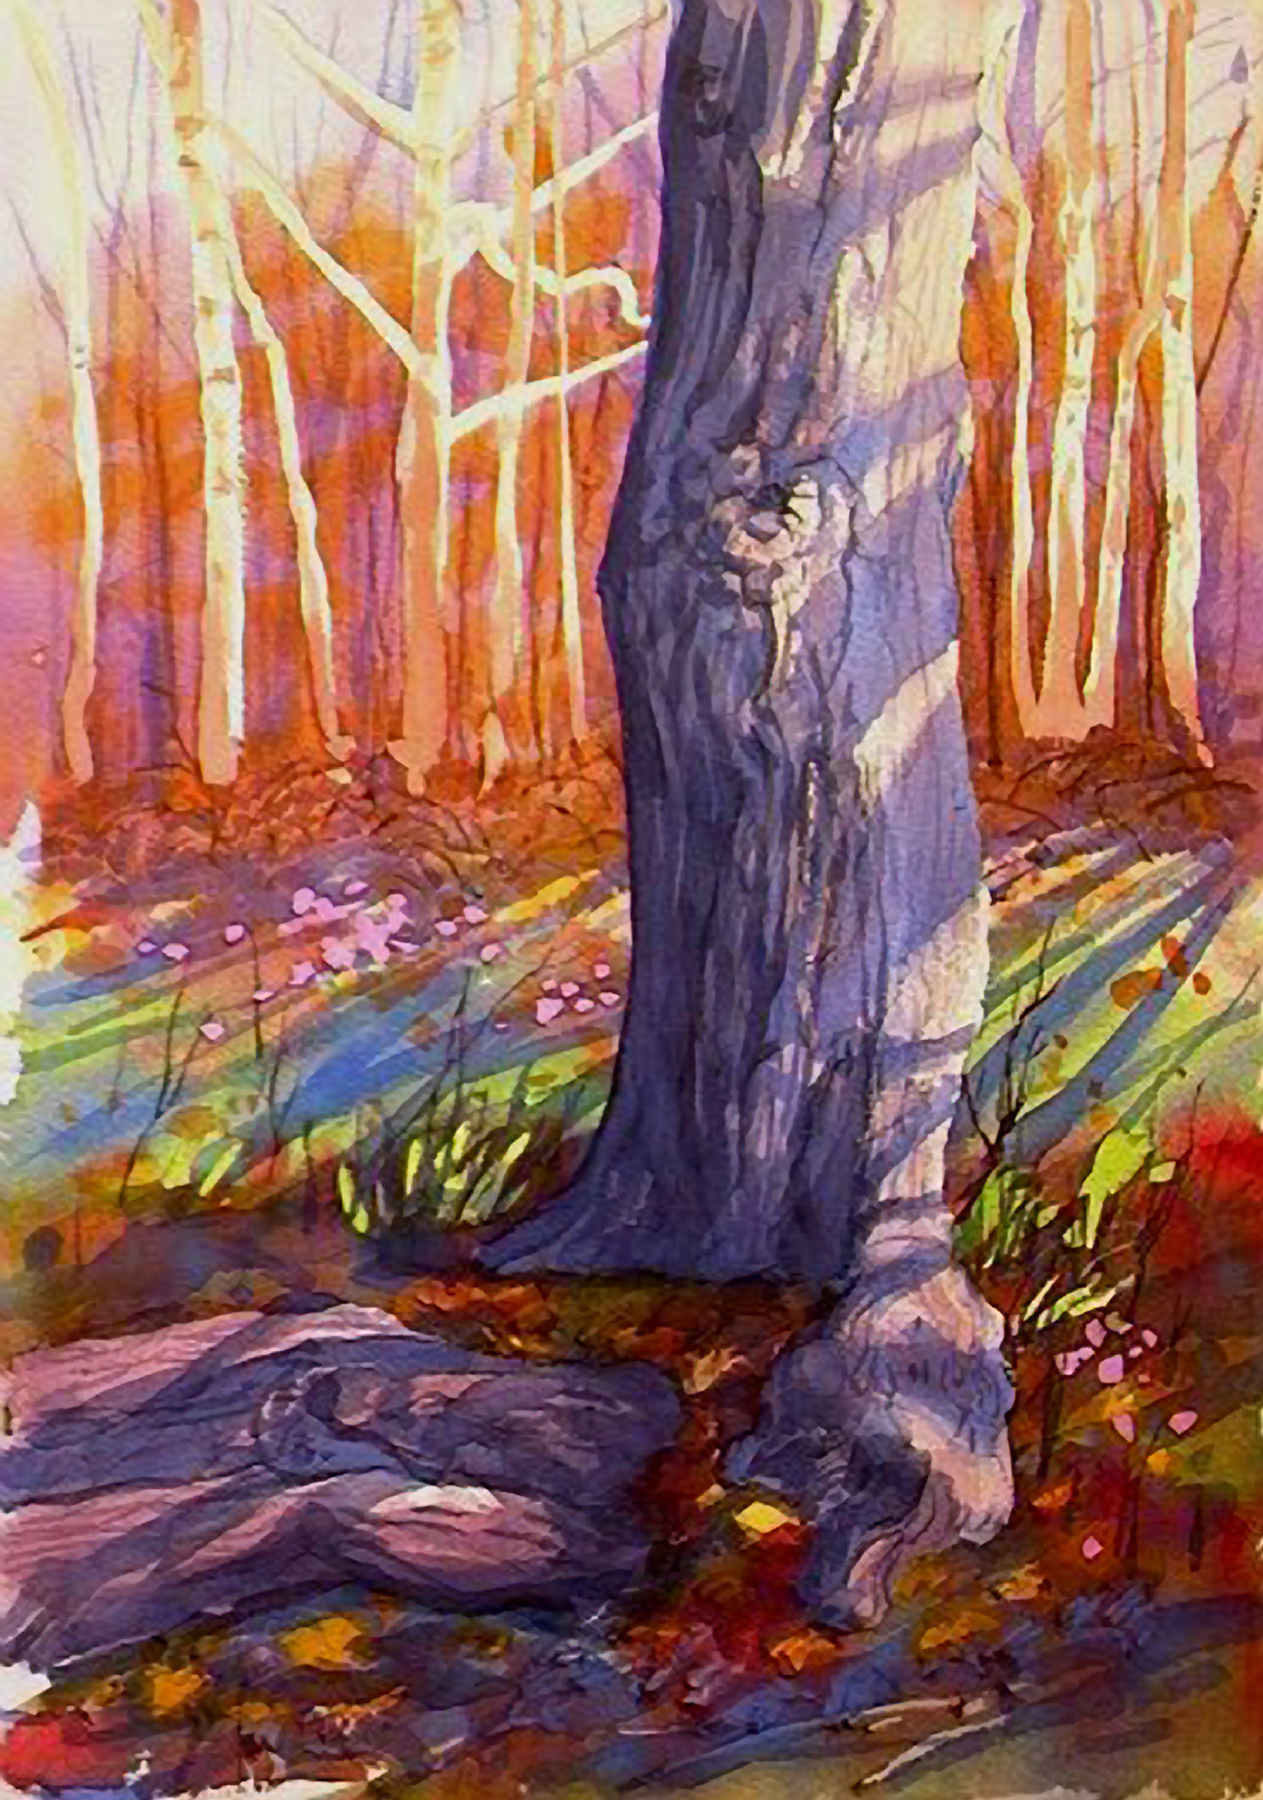
 For some final touches, I picked up the darkest colors laying around with a #5 rigger and picked out stray weed stems and ground debris in the foreground. Next I reintroduced a few darker tree silhouettes in the background. I warmed up the roots twisting to the left and repainted the shadows laying across those roots. I thought about it a bit... ...then I decided I'd do more harm than good by continuing to pick at it so I declared this one "done" and mixed a dark red using Alizarin Crimson and Phthalocyanine Green to sign the painting.


