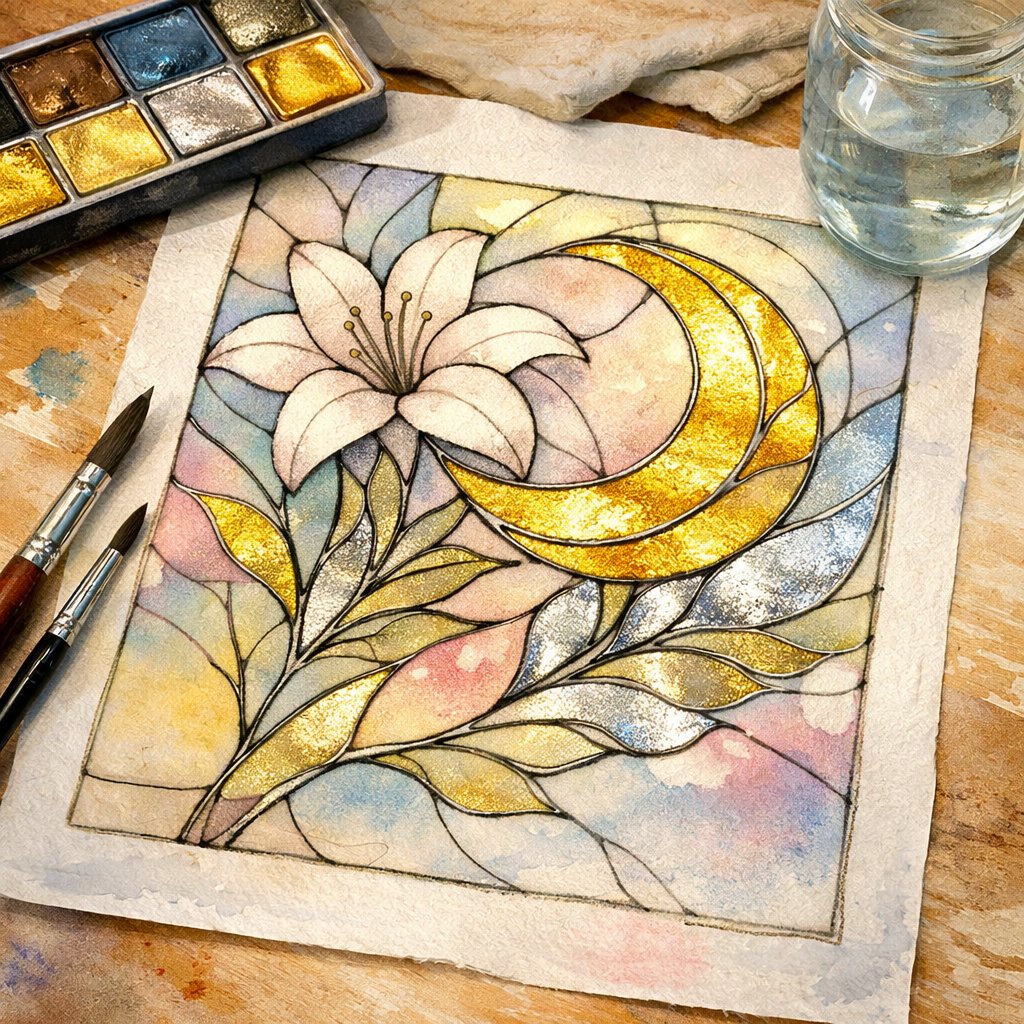
There is something inherently magical about the way light interacts with stained glass. From the towering rose windows of Gothic cathedrals to the intricate, organic curves of a Tiffany lamp, stained glass captures light and transforms it into a symphony of color.
As watercolor artists, we are already in the business of “painting with light.” By borrowing the structural techniques of glasswork—specifically the bold “lead” lines and the shimmering metallic solder—we can create paintings that glow with a unique, graphic intensity.
In this comprehensive guide on Stained Glass Watercolor, we will explore how to recreate this look on paper, focusing on the two most interesting elements: The Faux Lead Line and The Metallic Finish.
Part 1: The “Lead” Line – Building the Skeleton of Your Stained Glass Watercolor
In traditional stained glass, the “cames” (the lead strips) hold the glass pieces in place. In watercolor, these lines serve as a visual anchor, providing the high-contrast border that makes your colors “pop.”
Choosing Your Medium
Not all black lines are created equal. Depending on the look you want, you should choose your “lead” medium carefully:
- Waterproof Technical Pens (The Precision Method): If you want a clean, modern, and highly detailed look, waterproof pens like the Pigma Micron or Faber-Castell Pitt Artist Pen are the gold standard.
- Pros: No smudging, consistent line width, easy to control.
- Cons: Can look a bit “flat” if the line is too thin.
- Tip: Use a thicker nib (08 or 1.0) for the main structural lines and a thinner nib (01 or 03) for internal details.
- Black Gouache or Mixed Black: For a more authentic, slightly irregular look that mimics hand-poured lead, use a brush.
- Pros: You can vary the line thickness; it has a matte, heavy finish.
- Cons: Requires a very steady hand. If using gouache, you must apply it after your watercolor, or it will bleed.
- Tip: Use a “liner” or “rigger” brush with long bristles to pull long, smooth lines.
- Dimensional “Puffy” Paint (The 3D Method): If you want your painting to have a tactile feel, you can use a dimensional relief outliner (often sold for glass painting).
- Pros: It creates a physical “well” that holds your watercolor in place.
- Cons: Takes a long time to dry and can look a bit “crafty” if not done carefully.
Part 2: The Metallic Upgrade – The Tiffany-Style Finish for Your Stained Glass Watercolor
The “Tiffany Method” of stained glass involves wrapping glass edges in copper foil before soldering them together. This often results in beautiful copper, gold, or silver seams.
Why Metallics Are Fun
Metallic accents do more than just shine. They interact with the light in your room. As the viewer moves past the painting, the “lead” lines will shimmer, mimicking the way real solder reflects light.
Top Tools for Metallic Accents:
- Kuretake Starry Colors / Finetec: These are professional-grade metallic watercolors. They are incredibly opaque and offer a “liquid metal” look once dry.
- Oberon Metallic Set: A solid choice for artists, these medium-priced watercolors are known for their exceptional shimmer and smooth, highly pigmented finish that stands out beautifully on both light and dark paper.
- Posca Acrylic Paint Markers: Excellent for adding gold or bronze outlines over the top of dark watercolor washes.
- Liquid Leaf: For the bravest artists, liquid gold leaf provides the highest shine but is permanent and requires mineral spirits for cleanup.

Part 3: Step-by-Step Tutorial: Painting A Stained Glass Watercolor Piece
Step 1: The “Cartoon” (The Sketch)
In the glass world, the blueprint is called a “cartoon.” On your watercolor paper, lightly sketch your design.
- Rule of Thumb: To truly capture the look of a master-crafted window, avoid “cross-junctions” where four lines meet at a single point. In real-world stained glass, these create a “hinge” that weakens the piece; instead, ensure your lines meet in “T” or “Y” shapes where only three lines converge. By using metallic paints or markers to define these junctions, you can mimic the heavy, lustrous look of lead came or solder.
Step 2: Laying the Foundation Lines
If you are using waterproof pens, draw your lines now. Ensure every “pane” is a closed shape. This is the most meditative part of the process—take your time to ensure your curves are smooth and your angles are sharp.
Step 3: The “Glass” Wash (The Variegated Technique)
One way to make your watercolor look like glass, avoid flat colors.
- Wet one “pane” with clean water.
- Drop in your primary color (e.g., Cobalt Blue) at the top.
- While wet, drop a tiny bit of a secondary color (e.g., Viridian Green or Deep Violet) into the bottom corner.
- Let them mingle. This creates the “swirled” look of hand-blown cathedral glass.
Step 4: Adding the Metallic Solder
Once your painting is 100% dry, it’s time for the magic. Take your metallic gold or copper medium and trace alongside or over your black lines.
- The “Highlight” Technique: You don’t have to cover the whole black line. Just adding a gold highlight to the “top” side of every line creates a 3D illusion of light hitting the metal.
Part 4: Troubleshooting Common Mistakes
1. My colors are bleeding into each other!
- The Fix: This usually happens because the paper is too wet or you aren’t letting one “pane” dry before painting the one next to it. Work in a “checkerboard” pattern—paint one cell, skip the neighbor, and come back to it once the first is dry.
2. My metallic lines look dull.
- The Fix: Metallic watercolors often need two coats. Alternatively, ensure you are using a “lifting” motion with your brush rather than scrubbing, which can dull the mica particles in the paint.
3. The black ink is smearing.
- The Fix: Even “waterproof” ink needs time to “cure” on the paper. Wait at least 20–30 minutes after inking before you touch it with a wet brush.

Final Thoughts: Finding Your Style
The stained glass watercolor style is incredibly versatile. You can go “Art Nouveau” with flowing, floral lines and gold or copper accents, or “Art Deco” with rigid, geometric shapes and silver “lead.”
The key is the contrast between the rigid, dark lines and the fluid, glowing watercolor.
I have recently written a couple of other articles on the Stained Glass Watercolor technique; you will find them in the blog.