Ready your watercolor painting materials, friends! Today we're learning how to use the underpainting technique to create a vibrant, textured apple. Thanks for walking us through the steps, Matt!
Materials used:
- Arches cold press watercolor paper (140lb, size 6" x 9")
- Container with clean water
- Palette for watercolor paints
- Paper towel
Winsor & Newton Professional Watercolors
- Winsor Violet (Dioxazine Purple)
- French Ultramarine
- Winsor Orange (Red Shade)
- Cadmium Lemon
- Permanent Mauve
- Winsor Green (Yellow Shade)
- Alizarin Crimson
- Cerulean Blue
Brushes
- Loew Cornell White Nylon Series 795: Round brush (no. 4)
Step 1: How to Begin the Underpainting
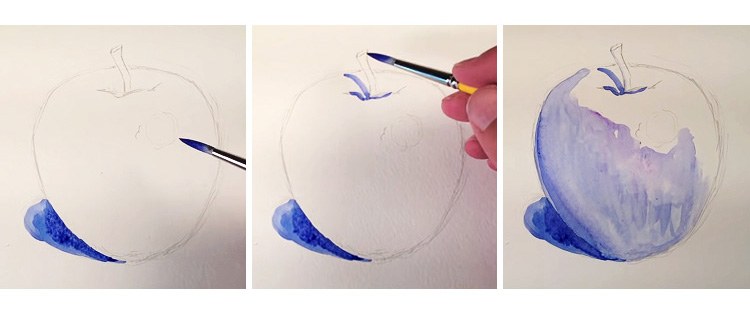 Have you ever tried starting your work with an underpainting? It's a common technique used in both watercolor and oil painting where you establish important tonal values in the first layer. This base layer then acts as a contrasting guide for the rest of the work. Using an underpainting is a great way to create more expressive work, and you'll see why in this apple painting! For this tutorial, prepare a sketch of an apple on a sheet of 6" x 9" watercolor paper. Keep the sketch simple because you want your colors to do all the talking. Next, take a no. 4 round brush and mix a blue-violet tint out of Winsor Violet and French Ultramarine. We'll be using this blue-violet tint to indicate the shadows on the apple. Weird, right? Don't worry about the unusual color choice; it'll blend right into this watercolor painting by the time we're done. Load your brush with this paint mixture and block in the shadows. Start with the shadow underneath the apple, working via the wet-on-dry technique (i.e. adding wet paint to a dry surface). This shadow is the darkest in value but fades into a lighter shade as it pulls away from the apple. Dilute the tint for the shadows across the top of the apple, then block in the shadows on the apple itself starting from the bottom-left curve. Keep the tint darkest towards the bottom left area, then dilute as you fill in the apple. Remember to keep the contours of the apple in mind as you paint. To do this, allow your brushstrokes to follow the apple's curve. This gives your apple a more 3D look. By the way, here's a closeup of Matt's sketch:
Step 2: Creating a Guide for the Highlights
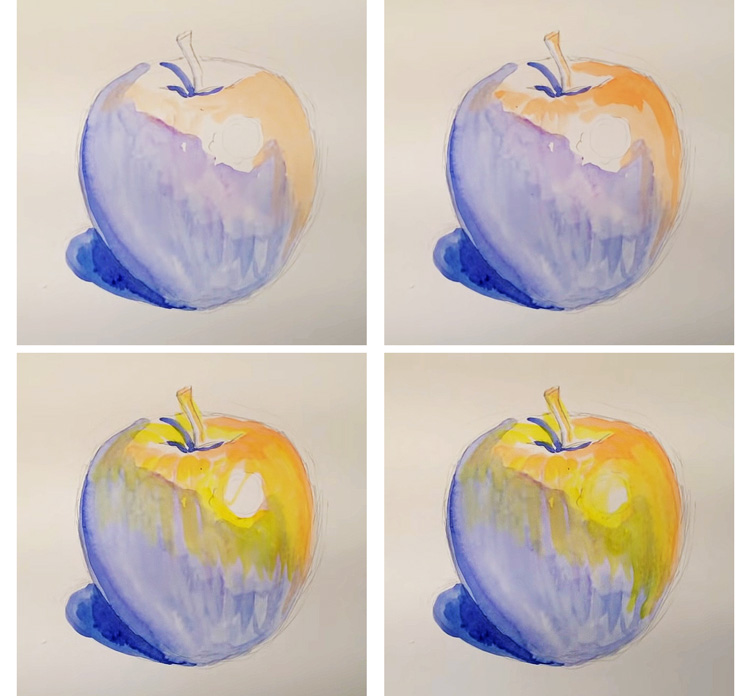 Now that we've got the shadows down, it's time to work on the highlights! Load your paintbrush with diluted Winsor Orange (Red Shade) and block in the top-right area of the apple, working wet-on-dry. Avoid painting the topmost part of the apple and the highlight to preserve the white of the paper. These two parts should be the lightest in value so don't cover them up yet. Next, darken the outer curves of this section with more orange, and add a sliver of orange on the right side of the apple's stem. By using complementary colors (i.e. colors that are on opposite sides of the color wheel) to indicate light and shadow, we are creating the highest levels of contrast in this painting. This clear interplay of light and dark values is key to the foundation of a more expressive watercolor painting. We're not done yet though! Pick up diluted Cadmium Lemon and go over that orange layer to brighten it up. Block in the top section of the apple and the top half of the stem while you're at it, but paint around the highlight. Allow the yellow tint to overlap parts of the blue layer, keeping the yellow tint diluted and subtle. Finally, cover part of the highlight with a subtle yellow layer to blend it into the apple. Like in the previous step, remember to allow your brushstrokes to follow the shape of the apple.
Step 3: Developing Your Shadows
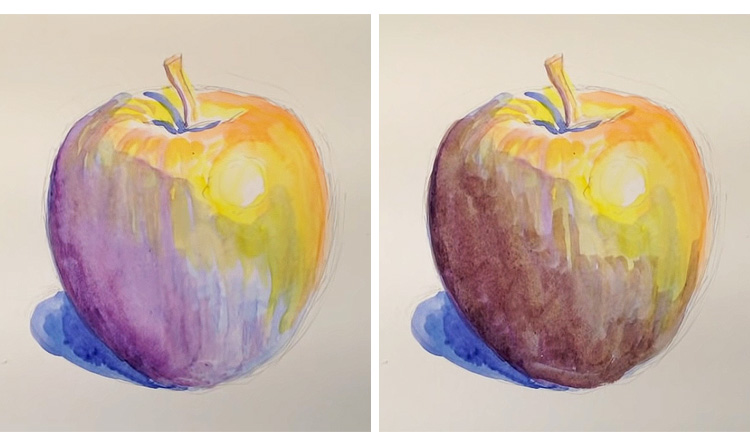 The shadow layers should be dry by now, so for this step, we'll focus on strengthening them. First, mix a red-violet tint out of Permanent Mauve and Winsor Violet. Next, load your brush with this color and block in a second shadow layer starting from the bottom-left curve of the apple. Work in a graded wash by gradually adding water to the paint so that it fades into the other watercolor layers. Add a strip of paint to the left side of the apple's stem as well. Once that layer has dried, use French Ultramarine with Winsor Orange and a hint of Alizarin Crimson to create a brown tint, and block in a third shadow layer. Do the same as before and do a graded wash on the body of the apple, then add more color to the left side of the stem. Notice how we haven't used any black to strengthen the shadows? This is because black takes away from a shadow's depth, which can deaden a painting if used too excessively. When darkening a color, it's best to use its complement to desaturate it, like what we did by mixing a brown out of blue and orange. This brown tint will help to give the shadows a more natural look when you start adding in the local colors (i.e. the main colors you see on any subject).
Step 4: A Splash of Green and Darker Shadows
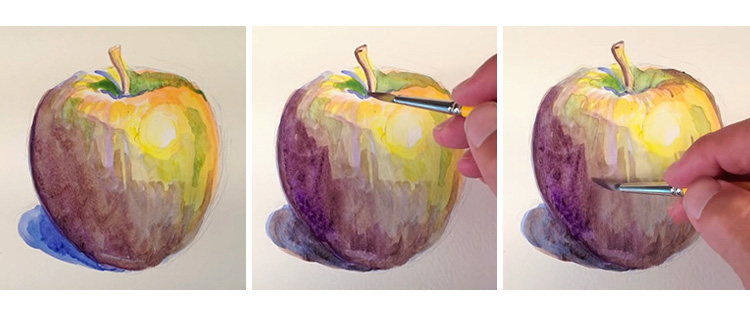 For this step, pick up some Winsor Green (Yellow Shade) and Cadmium Lemon. Then, block in the top of the apple. Keep this layer watery and thick, and leave it to dry. You can also add strokes of diluted yellow-green to the body of the apple to create interest, but do this sparingly. Next, pick up the violet tint from earlier and use it for one final layer to strengthen the shadows. For this watercolor layer, concentrate on letting your strokes follow the body of the apple. This will add more natural-looking texture to the surface of your watercolor painting. Finally, add the violet mixture to the shadow under the apple and on the stem.
Step 5: As Red As A Rose
 If you've spent this whole time wondering when this apple will start looking like an apple, wonder no further! In this step, we'll be adding some much needed red to bring this watercolor painting to its full depth. Pick up Alizarin Crimson with your round brush and start blocking in most of the apple, working wet-in-wet (i.e. adding wet paint to an already wet surface). Remember to follow the shape of the apple as you put down your strokes. It's okay to allow some of the underpainting below to shine through, which should happen naturally anyway as watercolor is a transparent medium. As you approach the highlights on the apple, fade out the red by adding water. Paint around the brightest parts of the highlights to preserve their brightness. Next, pick up Winsor Orange (Red Shade) and dab it into the sections between the highlights. To increase the contrast even more, add dabs of Cerulean Blue to the shadow side of the apple, working wet-in-wet into the red layer. Add some blue tint to the shadows on the stem as well.
Step 6: Textured Touches
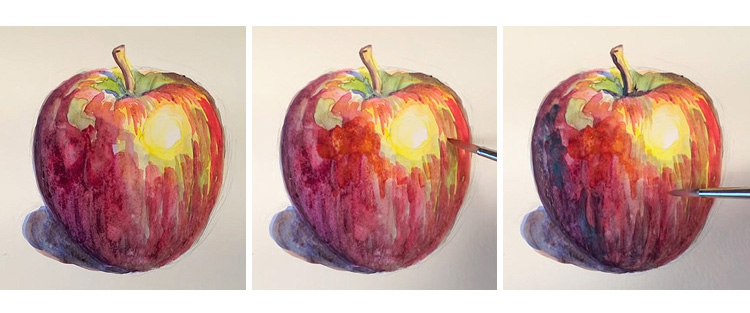
 Let's focusing on tying down the texture next. First, pick up some Alizarin Crimson, then add a dark stroke of paint via the wet-on-dry technique to the upper-right curve of the apple. Next, paint the left side of the apple, working wet-in-wet. Manipulate the paint with your brush to create visible brushstrokes and lines. Doing this will also cause the colors to mix together, creating even more interesting textures. Mix Cerulean Blue with French Ultramarine, and add a layer to the shadow under the apple. Add some water and pull a diluted line of blue shadow over to the right underside of the apple.
Step 7: More Splashes of Green
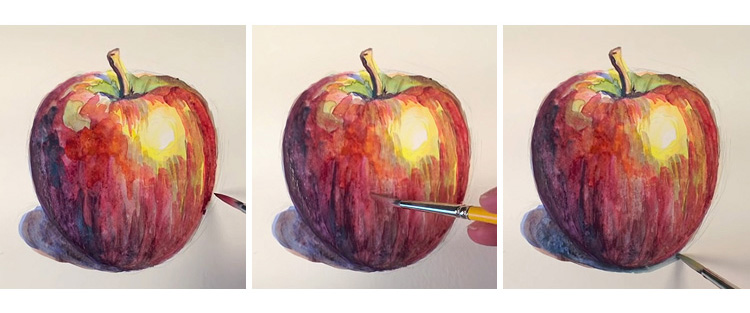
 For this step, use the yellow-green mixture and dab small puddles of it into the apple. Like with the green on top of the apple, keep the paint thick and watery. Now for something fun! Clean and wipe your brush before use the tip to lift the excess paint from your watercolor painting. This creates an interesting faded effect with a dark outline, much like how the top of the apple turned out.
Step 8: Creating Natural-Looking Shadows in a Watercolor Painting
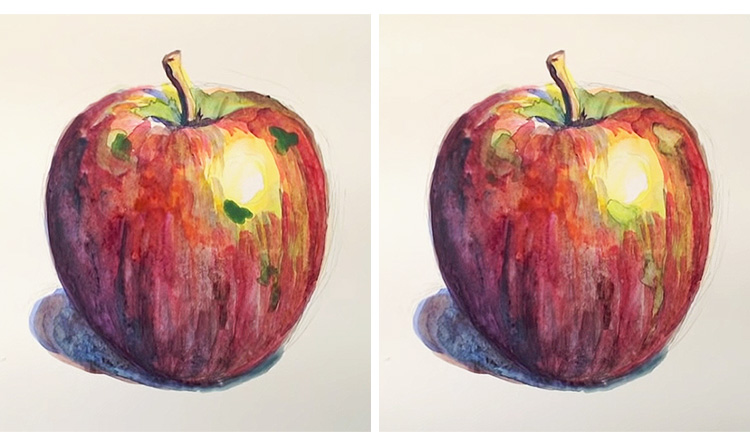
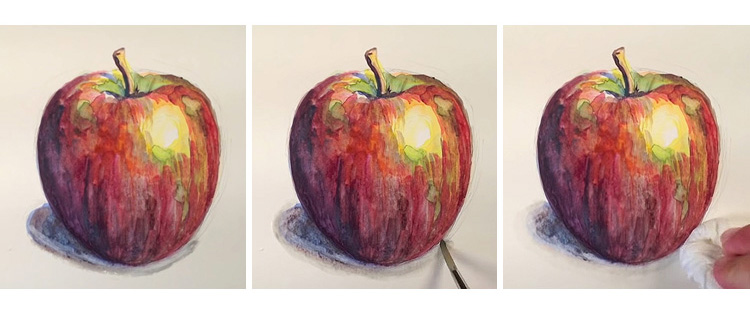 For the final step, pick up your paintbrush once more, and this time, load it with water. Now go over the edges of the apple's shadow to soften them. While the edges are still wet, take a paper towel and lift off the paint with a gentle dabbing motion. This creates a natural-looking shadow that fades into the white of your paper. Congratulations! You've just learned how to use the underpainting technique! If you'd like to watch how Matt demonstrates these tips, here's his video:


