Paint a majestic bald eagle portrait in this feathery watercolor lesson! Award-winning watercolorist William "Bill" Dunn shows a quick and easy way to paint the iconic bird mascot of America. Want to watch the video version? The full tutorial is available to members of our Beeblys WatercolorPainting.com.
Materials Used In This Watercolor Class:
- Reference picture of a bald eagle (click here for Bill's picture)
- A block of Fluid 100 hot press watercolor paper (140lb, size 9″ x 12″)
- Pentel Graphgear 1000 automatic drafting pencil, 0.7mm lead size with 2B lead
- ½" Artist's or masking tape
- Painting palette for watercolor paints
- Auxiliary plate or palette
- A container of water
- Paper towels or a rag
- A tabletop easel or a box to prop your painting on
Paints (Holbein Artists' Watercolors)
- Lemon Yellow
- Gamboge Nova
- Brilliant Orange
- Cadmium Red Purple
- Viridian
- Cobalt Blue Hue
- Quinacridone Gold
- Yellow Ochre
- Burnt Sienna
- Burnt Umber
- Indigo
- Neutral Tint
- Ivory Black
Winsor & Newton's Professional Watercolors
Holbein Artists' Designer Gouache
- Permanent White
Brushes
- Neef Rigger Supreme Taklon Series: Long handle rigger brush (no. 6)
- Escoda Perla Joseph Zbukvic Series: Round brush (no. 8)
- Escoda Perla Joseph Zbukvic Series: Round brush (no. 12)
- Escoda Perla Joseph Zbukvic Series: Round brush (no. 20)
- Winsor & Newton's Cotman Brush Series 111: Round brush (no. 2)
- Winsor & Newton's Cotman Brush Series 333: Rigger brush (no. 1)
- A small Chinese brush
Step 1: Sketching A Bird Of Prey
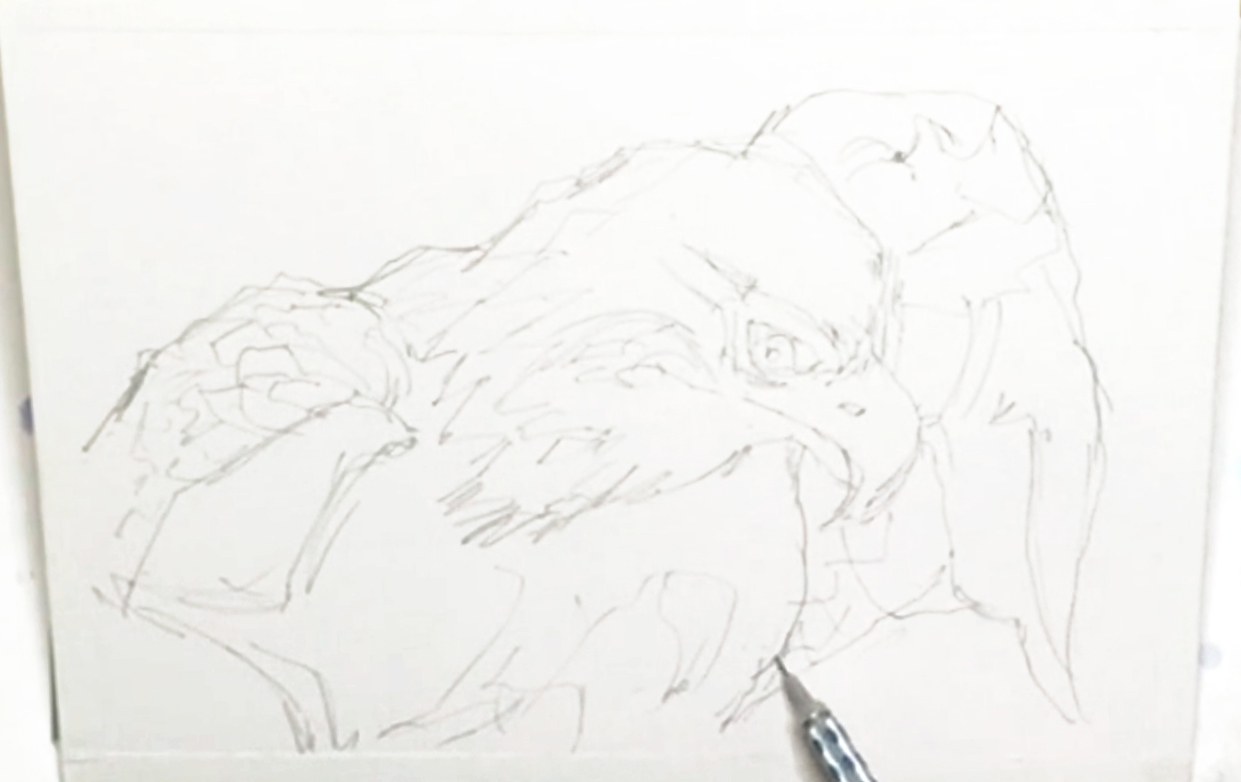 Let's switch it up in this tutorial by painting an animal; more specifically, a bald eagle. Bill has taken a picture of a stuffed one in a museum in Nevada, that has been composed so the eagle's pose looks more dramatic and intense. To begin, tape the edges of the paper block using artist's or masking tape. This creates a clean border around for future framing purposes, and keeps the paper as flat as possible while painting. Next, do a simple outline sketch of this bald eagle portrait, starting with the head. Like a human portrait, the focus should remain with the head and eye's expression, so take your time to get them right. Go as slow as you need, and plan out the proportions and measurements to scale with the reference picture. Lastly, add the wings and body, and some feather details. Leave most details out though, as you can always draw them with a paintbrush later. Below is a close-up of Bill's sketch:
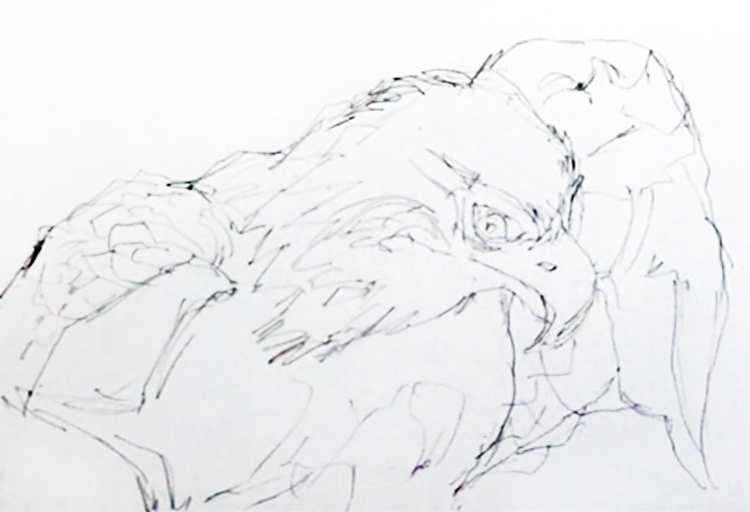
Step 2: A "Wet-On-Dry" Base Color Layer For Feathers
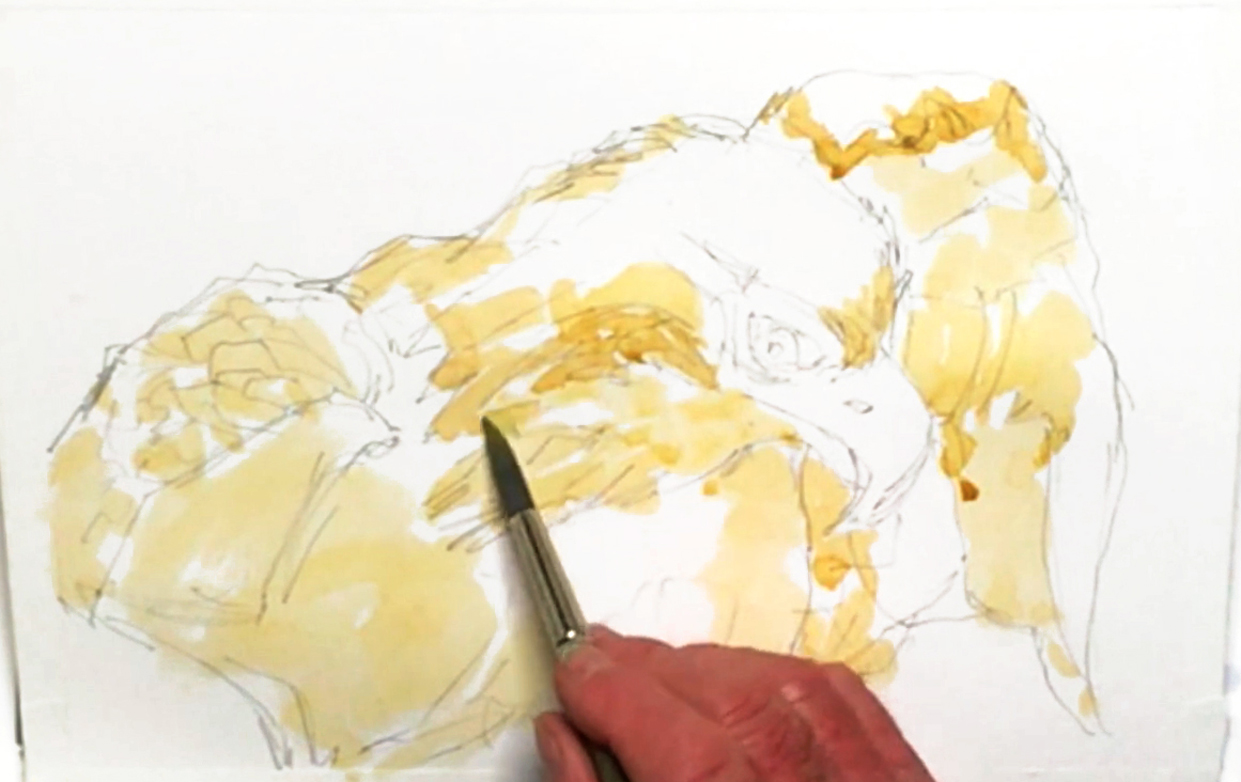 About 10 minutes before painting, spray your paints with clean water to make them easier to pick up and mix later. Prop your paper block on an easel or thick book, and tape the corners down if you're worried about your painting slipping off. Start with a base color for your bald eagle portrait, using a no. 12 round brush and diluted Yellow Ochre. Avoid the white highlights, and paint in layers of tapered brushstrokes to mimic a feathery texture. Keep painting from the head to the neck and forehead, then the inner area of the eagle's left wing. Move to the chest area and the right wing, and remember to leave some white spots showing through. All this is done with the "wet-on-dry" technique, which is using wet paint to paint on a dry surface.
Step 3: Mid-Tones And Layering With The "Wet-In-Wet" Method
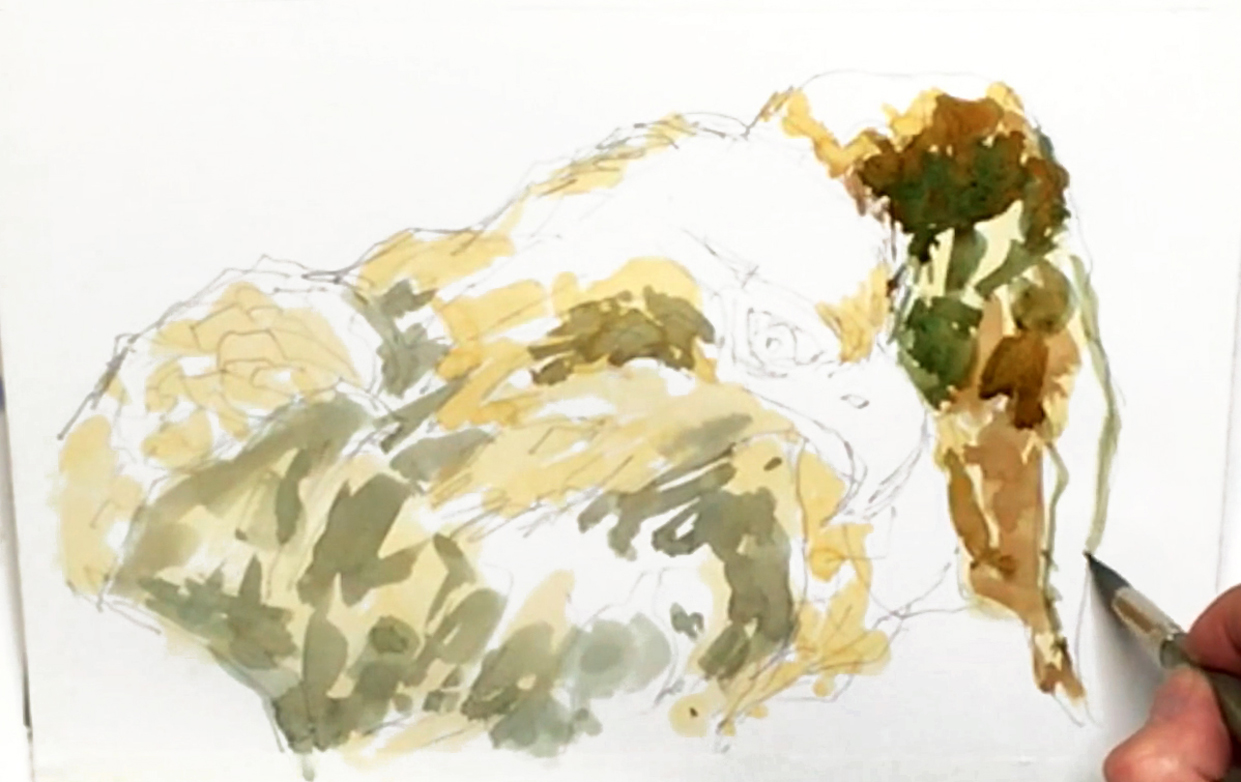 For the next layer, mix Burnt Umber with a touch of French Ultramarine. You can mix on the palette before dropping it on top of the wet base layer, which will result in a softer blend. With this color, paint the mid-tones of your bald eagle portrait - in the chest, around the neck, and under the right wing. With Burnt Sienna, paint under the left wing, and build up colors by layering in the same tapered brushstrokes as before. Paint in the same direction of the feathers as well, and keep checking the reference photo to see where the different values (i.e. lights vs darks) go in this bald eagle portrait. Mix in more Ultramarine, and add this to the left wing via the "wet-in-wet" technique (i.e. wet paint on a wet surface). Next, add more Burnt Sienna to your mixture, and paint the area next to the beak for a better contrast and composition. Use more Burnt Umber to paint the left side of the eagle, and add Cobalt Blue Hue to it for a darker brown for the shadows. For even darker areas, mix more saturated Burnt Sienna with Ultramarine, then paint under the right wing. Note that watercolors always dry lighter, so factor that in when mixing your paints!
Step 4: Amber Eye
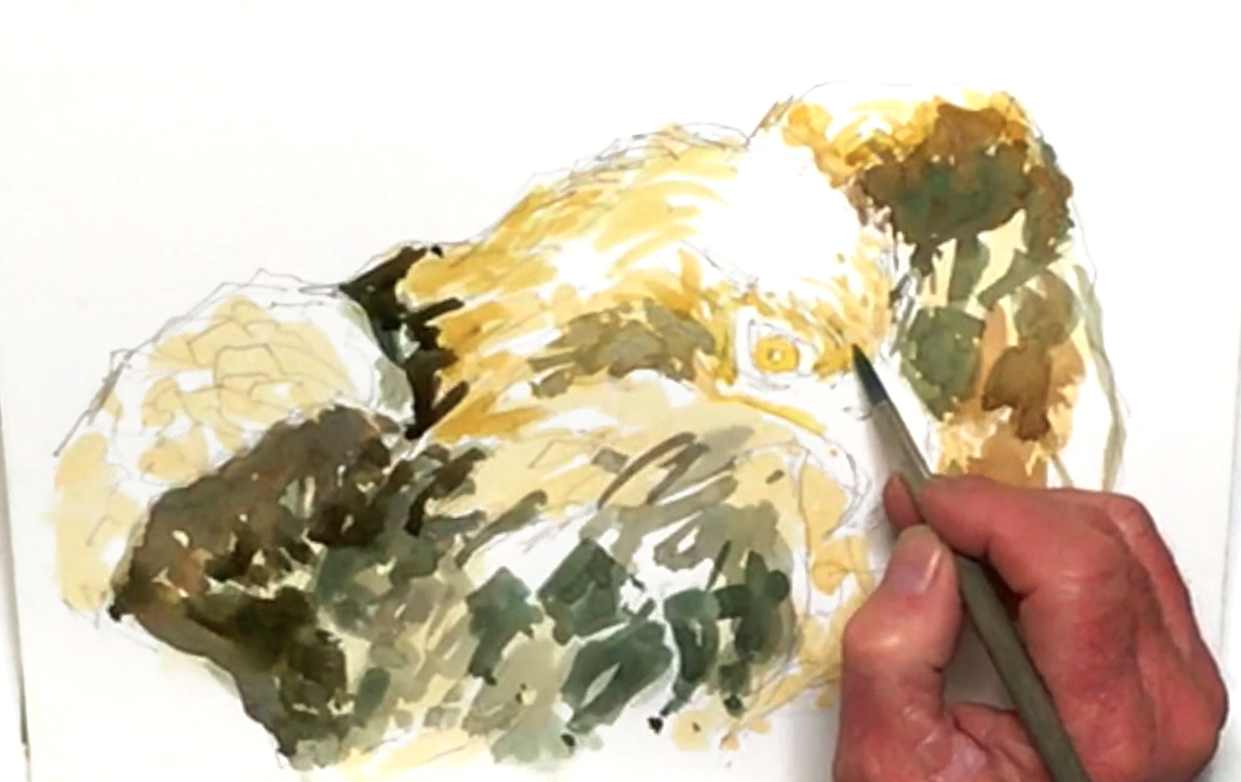 Switch to the Escoda no. 8 round brush, then mix Quinacridone Gold, Gamboge Nova, Lemon Yellow, and Yellow Ochre for a bright amber color. Use this to paint the bald eagle's iris and the edge of the beak. Next, use a more saturated Yellow Ochre to paint around the eye, forehead, head, and neck while still avoiding the highlights. Make smaller feathered textures, and paint around the other highlights for a little more color.
Step 5: Layering More Feathers For A Bald Eagle Portrait
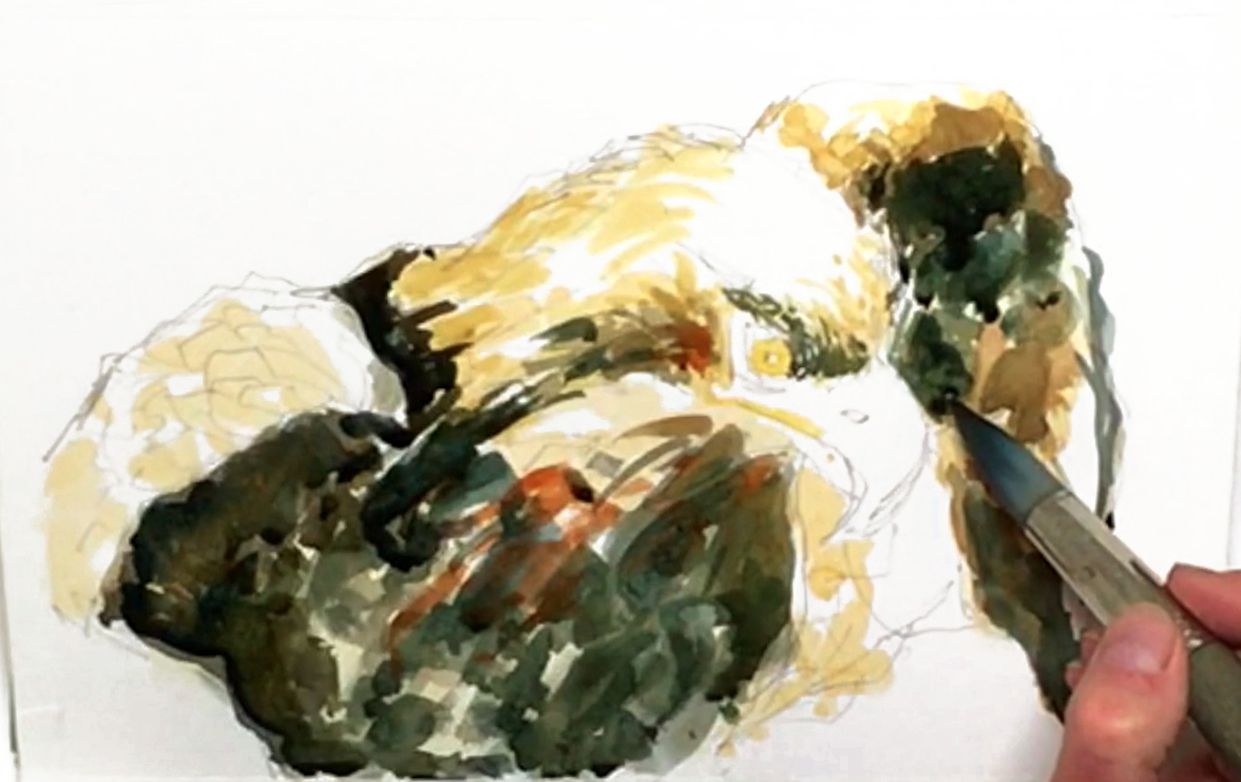 With the Burnt Umber and Ultramarine Mixture, paint around the eye, forehead, and the curve of the neck. Layer with more Burnt Sienna, and think of each brushstroke as another feather on the bird's body. Next, mix in Brilliant Orange with the Sienna for more color in the corner of the mouth and in the chest. To prevent the feathers from looking too similar in size, change to a large no. 20 round mop brush. Mix Burnt Umber with a touch of Indigo and the darker brown mixture, and paint larger feathers in the darker areas, such as under the wings, and the tip of the left wing. Watch your values! Lastly, darken the area above the beak even more to create more contrast in your bald eagle portrait.
Step 6: Wings And Contrast
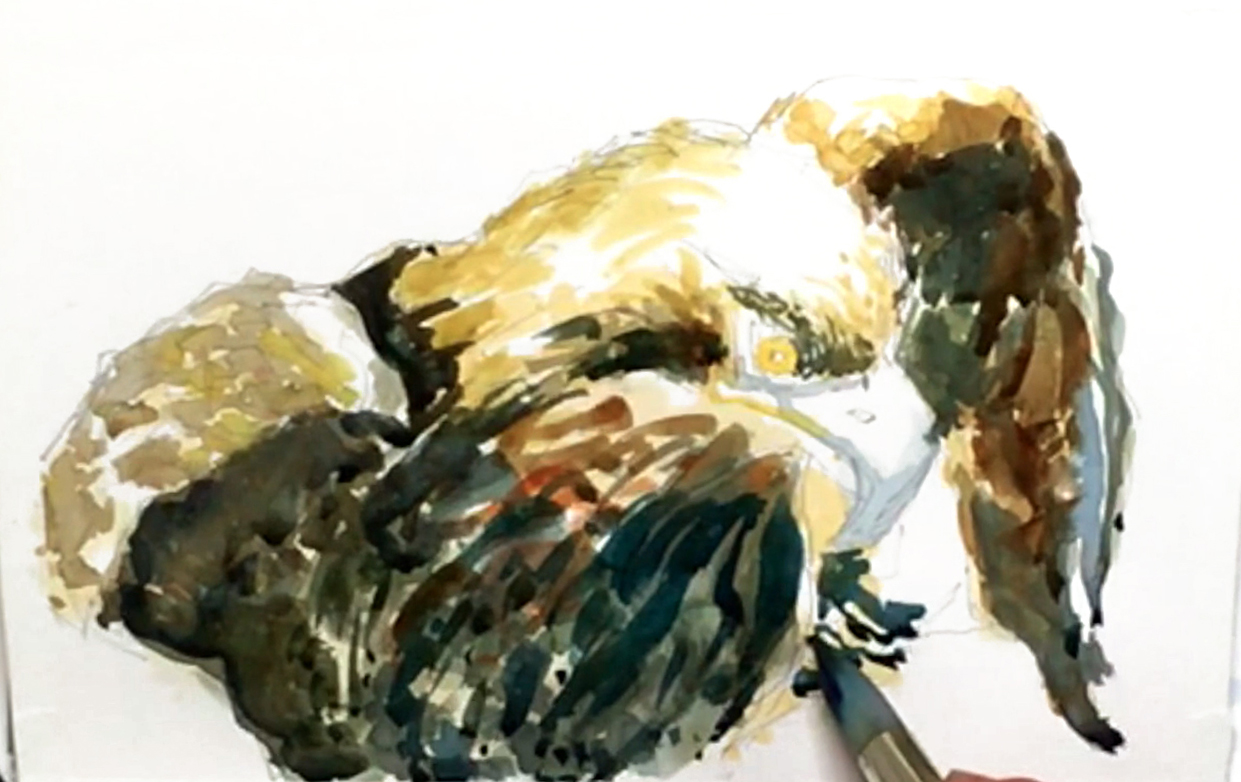 With Burnt Sienna, add more feathers in the left wing, then switch to Indigo to paint the long tip feather. Paint the beak's tip and edges too, and lift out any puddles of paint with a dry, "thirsty brush". Work on the right wing next by diluting the dark brown mix and adding feathers in the top area. Then, touch in some of the yellow mixture into the lighter areas. Go back to the Burnt Sienna, and keep layering along this wing, switching to Neutral Tint for the darkest feathers. Put the same color under the tip of the beak as well to bring the beak to the foreground via contrast. TIP: While you paint, move from the wet to the dry areas so no area becomes too saturated with liquid, as this may damage your paper.
Step 7: Even More Layering
 Pick up Burnt Umber, and layer more feathers onto the right wing and neck. Next, mix Burnt Sienna with some Cadmium Red Purple for a redder brown. Use this color under the beak, and to brighten any areas that need it. Again, it's fine to leave some white spots showing through, as this will help define your feathers more clearly!
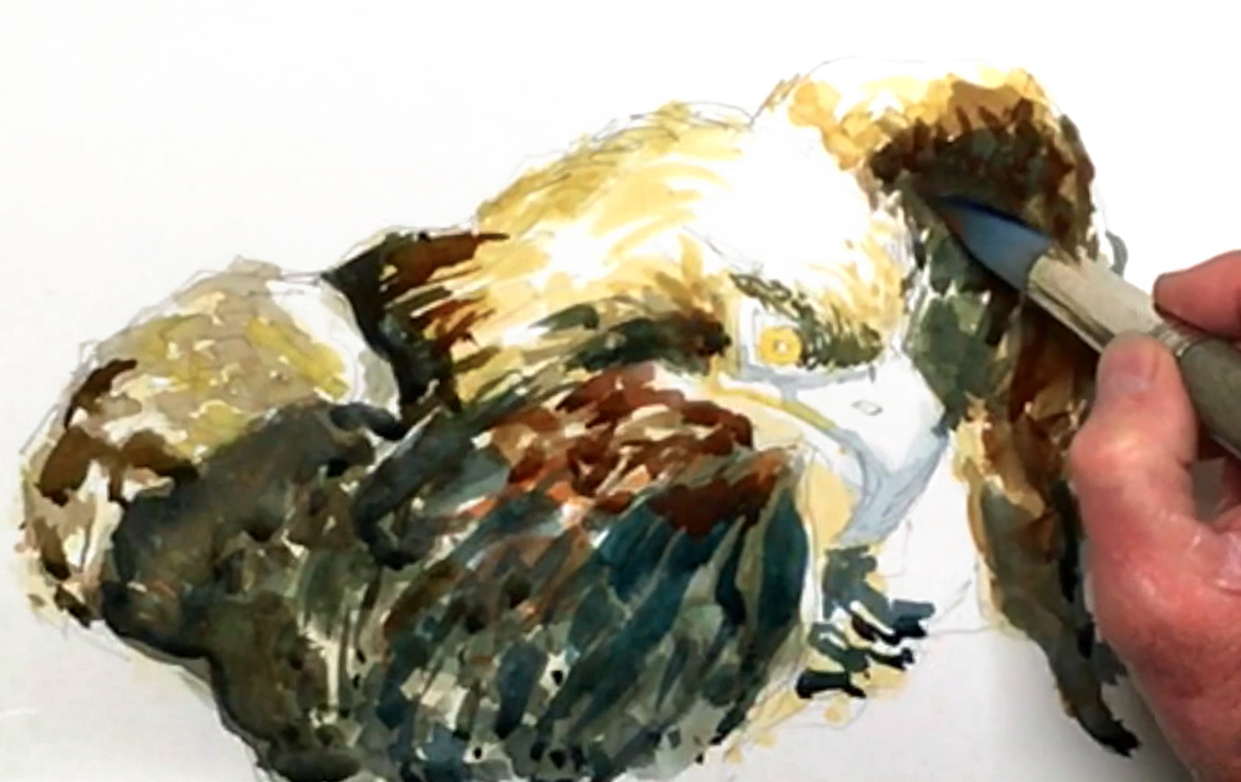
Step 8: Painting A "Fowl" Expression
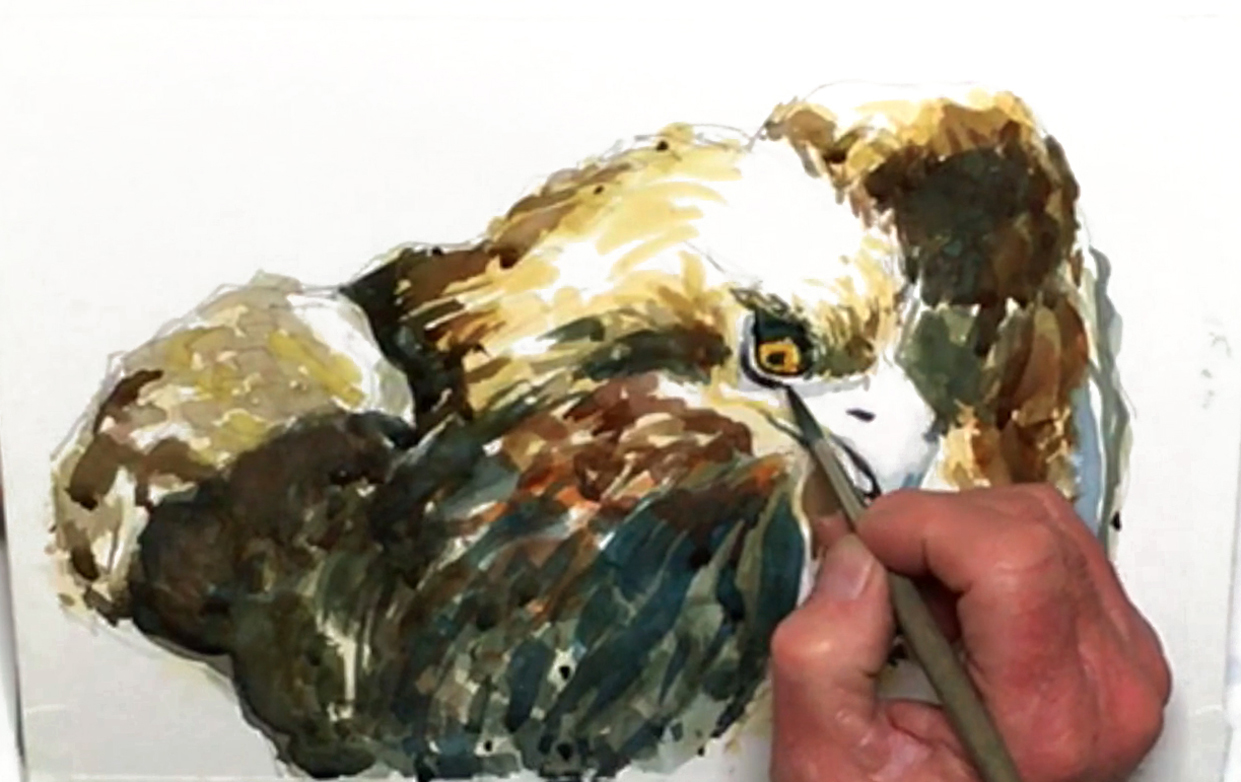 Switch back to the no. 8 round brush, and use pure Gamboge Nova to darken the iris. Go back to the blue/brown mixture, and exaggerate the area next to the beak and beak tip. With this dark color, dot in the nostril as well. Since the head area is a more prominent part of this painting, use Ivory Black for some of the details here. This includes the edge of the beak and its underside. Mix in Burnt Sienna, and paint in the spot under the beak's tip. Add more details in and around the head too, and outline the eye area using the dark blue mix. Once the iris is dry, you can dot the pupil with pure Ivory Black, before going around the area again with this powerful color. The eye is the pinpoint focus of the entire composition, so make sure you get it right!
Step 9: A Quick Background
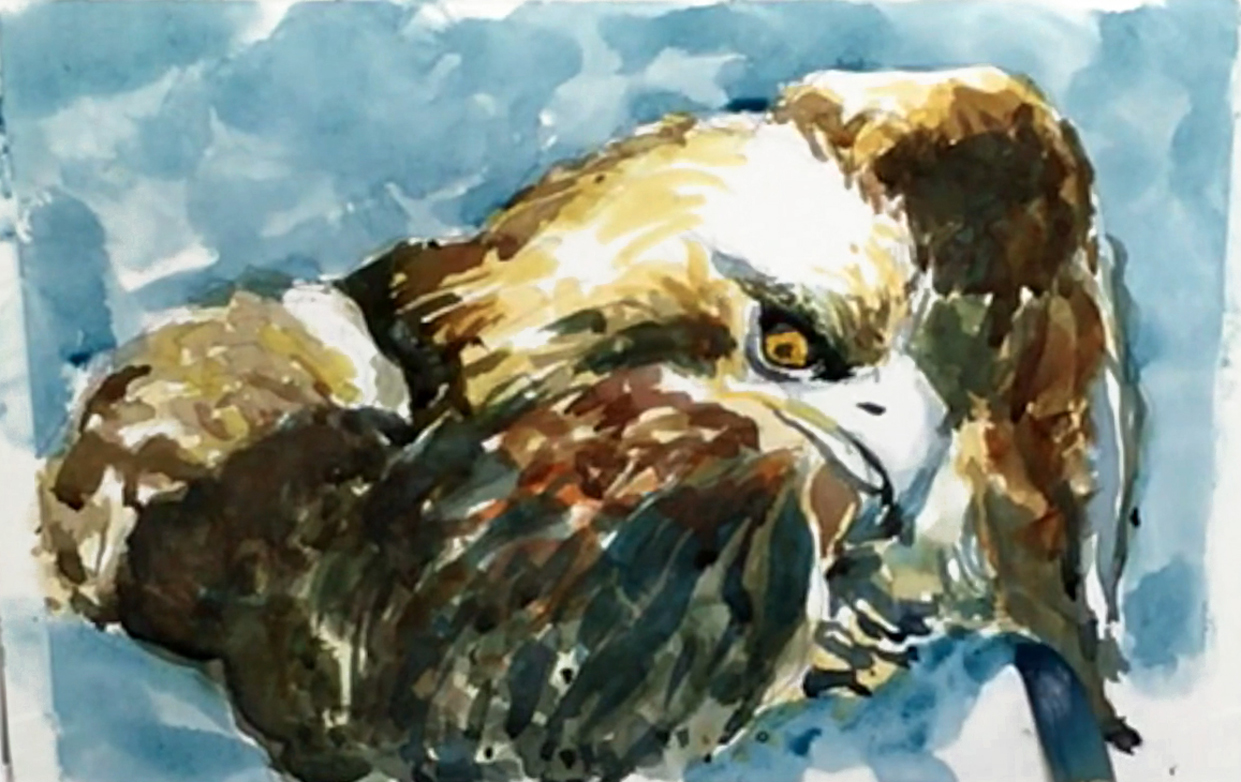 It's time to work on the background! Mix Cobalt Blue Hue, Neutral Tint, and Viridian for a dark blue that will help contrast with the white highlights on the eagle's head and wing. This will make the eagle stand out more. When painting, use the large no. 20 round mop brush and the "wet-on-dry" method here to quickly fill in the background. It's okay to pull the paint into parts of the eagle and overlap some of its edges, as this will help tie the whole piece together.
Step 10: Finishing Touches And A Finishing Flourish
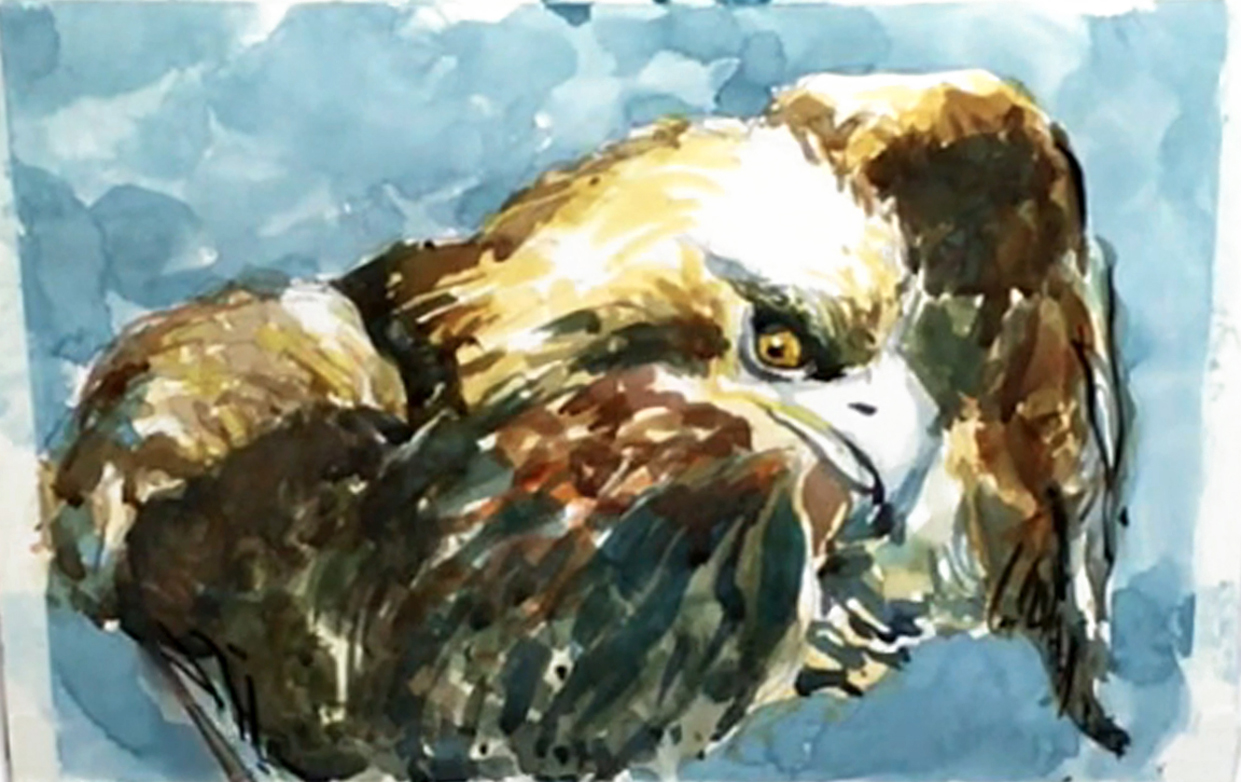 With a no. 1 rigger brush, darken the pupil again using Ivory Black. Then, squeeze some Permanent White gouache paint onto an auxiliary palette, and with the Cotman no. 2 round brush, use a very saturated white to paint a smaller dot just off-center to the pupil. As you near the end, step back to look at the overall painting, and add any finishing touches you feel your painting needs. For example, Bill uses a no. 6 rigger brush to add some lighter feathers, then switches to Ivory Black for some small dark feathers along the wings and in the chest. When you don't know what else to add, gently peel off the tape, and complete this bald eagle portrait with your signature in white.


