Get a jumpstart on 13 easy watercolor techniques with Isabella Kung as she demonstrates a few tricks of the trade. This tutorial is perfect for practicing beginners and for introducing texturizing tools like salt and alcohol. Interested in more? Watercolor courses like this are available to members of Beeblys WatercolorPainting.com.
Materials Used In This Easy Watercolor Class:
- A block of Arches cold press watercolor paper (140lb, size 16″ x 12″)
- Painting palette for watercolor paints
- 2 containers of water
- Paper towels or a rag
- A tabletop easel or a box to prop your painting on
- Grumbacher's Miskit Liquid Frisket (i.e. masking fluid)
- Liquid soap
- Rubber cement pick-up (2" x 2") or a normal eraser
- Spray bottle with clean water
- Alcohol (90%+ isopropyl alcohol)
- Glass pipette
- Salt
- Chopstick (optional)
Paints (Winsor & Newton's Professional Watercolors)
- Cadmium Red
- Winsor Red
- Winsor Red Deep
- Indian Red
- Oxide of Chromium
- Viridian
- Perylene Green
Winsor & Newton's Cotman Watercolors
- Intense Blue (a.k.a. Phthalo Blue)
- Winsor Violet (a.k.a. Dioxazine Purple)
Brushes
- Utrecht: Synthetic round brush (size 2)
- Escoda Primera Series: Synthetic round brush (size 6)
- Escoda Perla Series: Angular brush (size 10)
- Rosemary and Co.: Pure squirrel hair mop brush (½" cat's tongue/oval wash)
- Raphaël Kaerëll Series: Synthetic pointed round brush (size 12)
- Raphaël Oleo Mixed Media Series: Flat brush (11⁄4", size 30)
Step 1: Preserving White Shapes With Masking Fluid
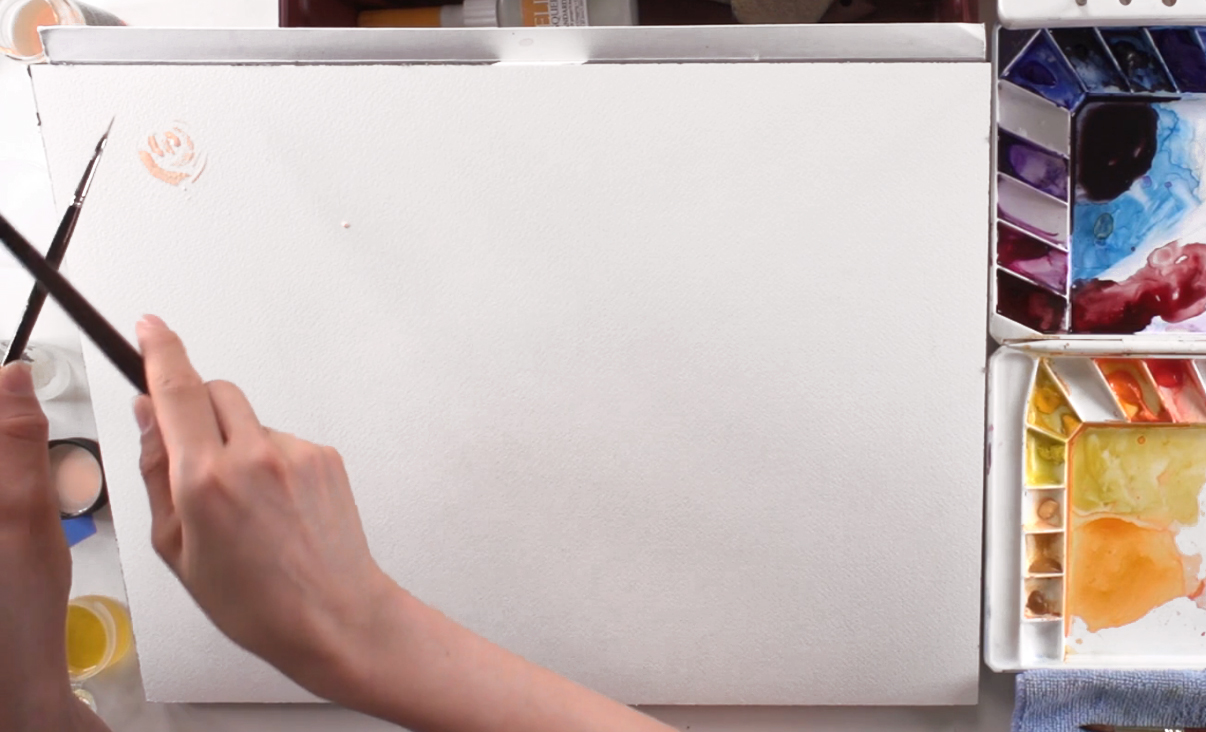 Kicking off this demonstration of easy watercolor techniques is the introduction of liquid frisket, a.k.a. masking fluid. Popular with "watercolor purists" who don't use white paint, masking fluid preserves the white of a painting instead. It's especially good for strong highlights or reflected light, and any small details that would be a pain to paint around. Since masking fluid is essentially liquid plastic mixed with some dye, you need to take care when you use it. For instance, use a chopstick to mix it, as the dye settles at the bottom of the bottle. You also need to prepare your brush before using by coating the bristles with a layer of liquid soap. While masking fluid is good for preserving white areas, it's fine to use thicker paint like gouache to add the whites later. The only downside is that white is a cool color, so it won't work as well on a painting with a warmer theme (such as a sunny day). Isabella quickly paints a rose with the size 2 round brush and masking fluid and adds a little splatter before leaving it to dry for a later exercise. NOTE: Masking fluid must be completely dry before you can continue painting on top! Also, make sure to clean your brush thoroughly afterwards as you don't want to ruin the bristles.
Step 2: The Intuitive Wet-On-Dry Technique
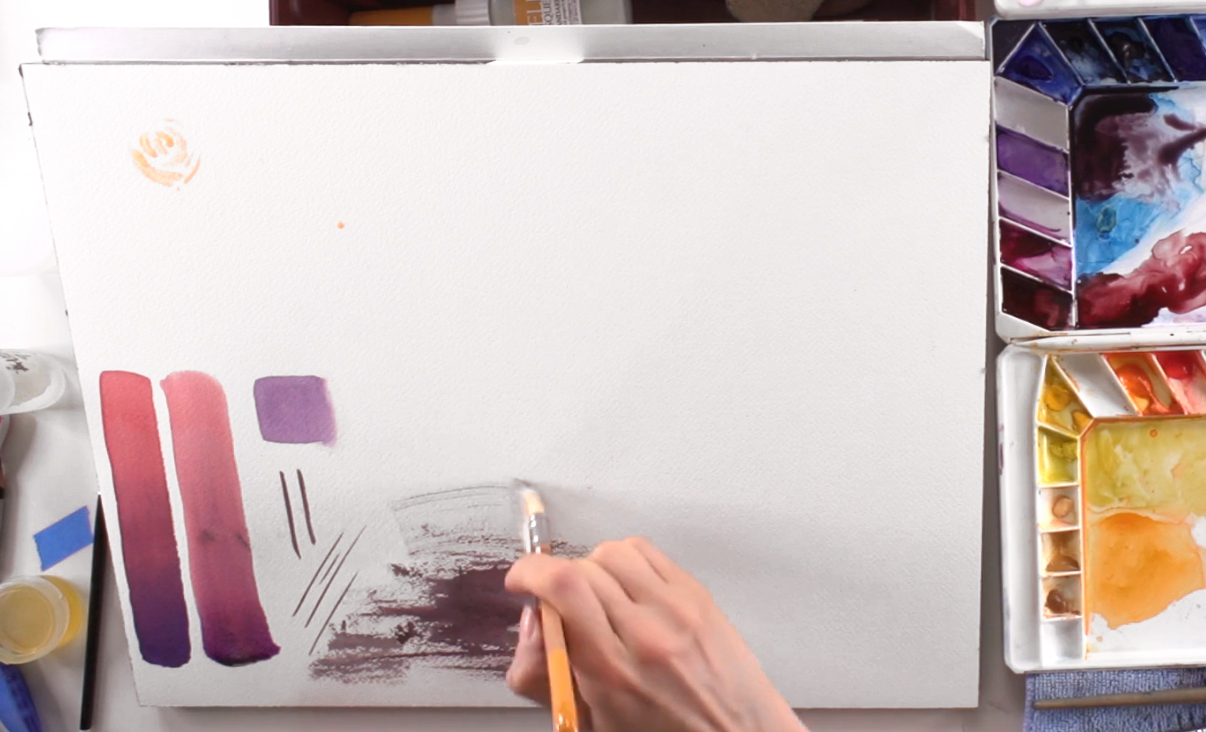
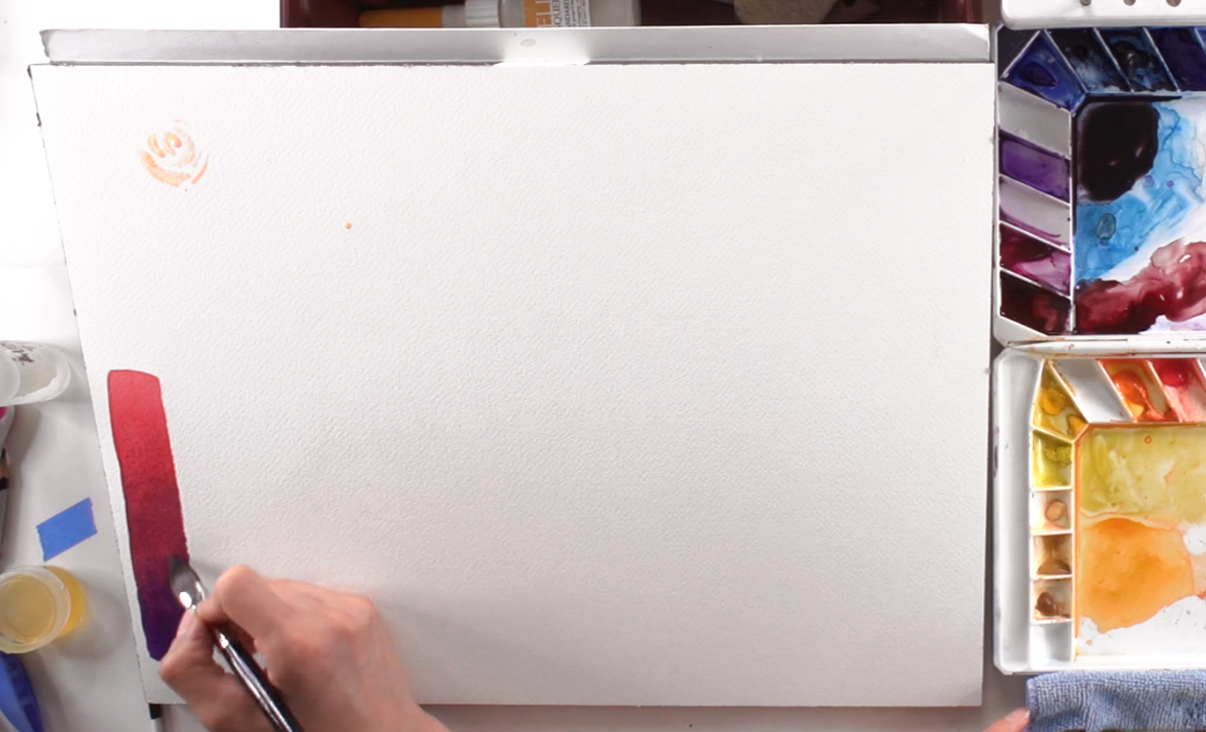 Next on the list is painting a gradient bar using 2 different methods. While you can choose any color you want, Isabella uses Winsor Red Deep and Winsor Violet to demonstrate. With the Raphaël size 12 round brush, prep your 2 colors separately on the palette. Starting with the Winsor Red Deep, paint vertical brushstrokes to make a rectangle on the left side of the paper. Wash your brush before switching to the Winsor Violet, then add it below the red. When you reach the midpoint, combine the two while leaving each end of the rectangle at its original color. Also, try to paint it so the red gradually transitions into the purple. This is called the "wet-on-dry" technique, where you put wet paint on dry paper. Paint dries quite quickly with this easy watercolor method, and hard edges are created because of this. The colors are also more saturated as there's less water to dilute the paint.
Step 3: Soft Blends With The Wet-On-Wet Technique
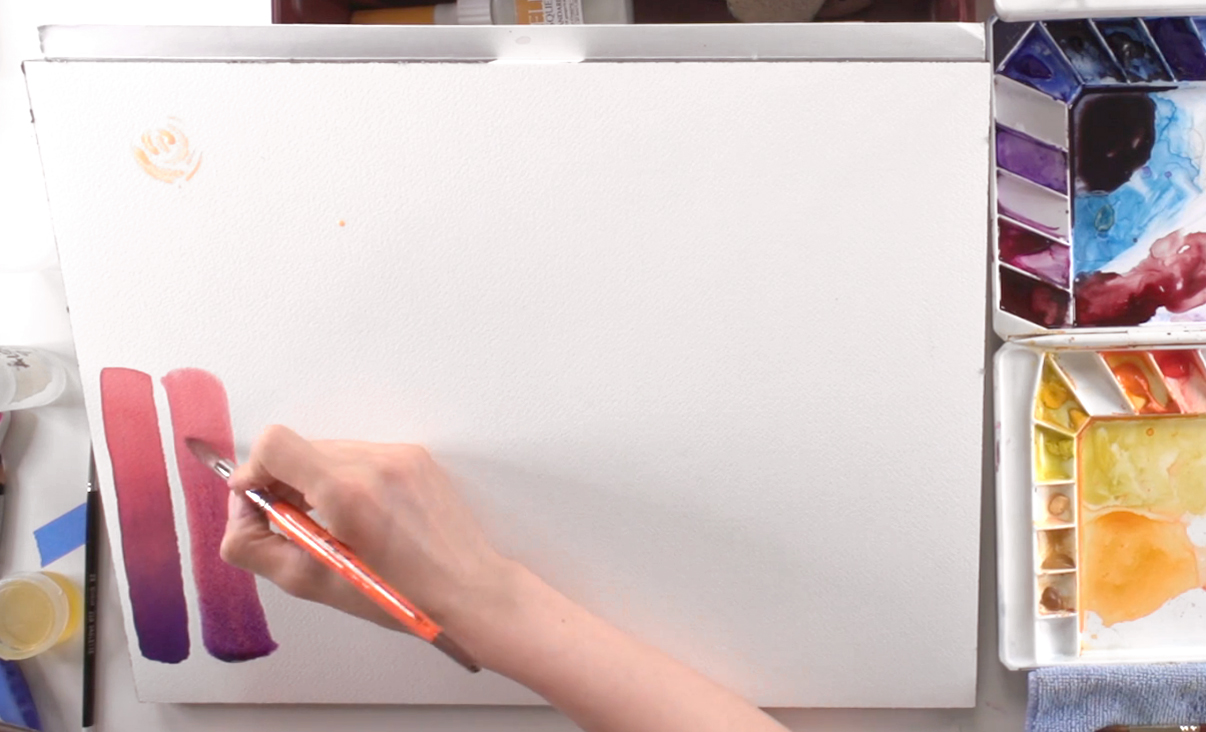 For the second rectangle, switch to the ½" cat's tongue brush, then paint a layer of clean water. If you lose track of where it's already wet, tilt your paper around, which will help you see the sheen. Next, change back to the Raphaël round brush and paint the same red and purple gradient on top, allowing gravity to help pull the top paint down to mix with the bottom color. If the paper gets too wet, you can lift out the excess by touching the tip of a dry brush to unwanted puddles. You'll notice that because of the wet surface, paint mixes much more easily than the previous gradient bar. It also dries slower compared to the wet-on-dry method, which means you have more time to work on it. This also gives it a flexibility that the wet-on-dry technique doesn't have. This easy watercolor technique is called "wet-on-wet", where wet pigment is placed on a wet surface. Unlike the wet-on-dry rectangle, the edges are softer and fade out towards the sides. The colors tend to be a little more diluted as well. This is ideal for painting things that require soft blends, such as clouds or oceans. As such, the wet-on-wet technique is often used for the base layer of a painting. Trying to do this on top of an already painted area can over-saturate the paper, or ruin the underlying layer as rewetting the paper will cause the colors to shift.
Step 4: Turning Hard Edges Into Soft Ones Via A Lifting Technique
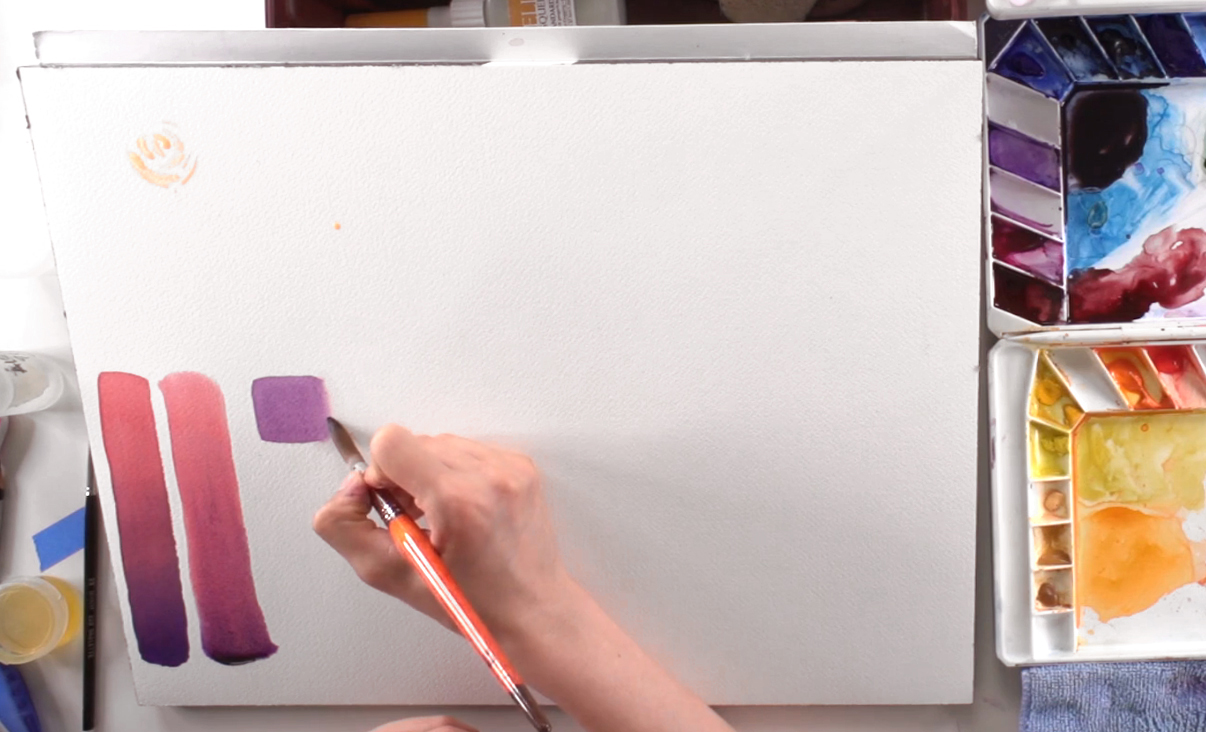 Isabella then shows how to create soft edges in a different way, which also counts as a lifting technique. To demonstrate, she returns to the size 12 round brush to paint a purple square using the wet-on-dry technique. While the paint is still wet, she uses the tip of a clean damp brush to brush around the edges of the square. Since the paint is still wet, it will bleed into the dampened area created by the paintbrush, turning the hard edge into a soft one.
Step 5: Getting Easy Watercolor Textures Using The Dry Brush Method
 Moving on, Isabella combines the next two techniques as they both fall under painting easy watercolor textures with a brush. The first is a simple one; it is varying the pressure and type of brush to paint different brushstrokes. Having good brush control also means being able to paint consistently thin yet steady lines. She also shows how you can taper each line by gradually lifting the brush off the paper. This is perfect for painting grassy or hair textures, while other brushstrokes will have different uses too. The other easy watercolor technique to create texture using a paintbrush is called dry brushing, or the "dry-on-dry" technique. This is as simple as wiping off most of the paint in your brush on a rag before brushing it over your paper. You can use the large flat brush to cover larger areas, although a small size 2 round brush works just as well. The dry brush technique is great for getting a furry or rough-looking texture, and can also be layered for a denser effect. Just remember to eliminate as much moisture from the brush as you can before applying to paper.
Step 6: Painting On Top Of Masking Fluid
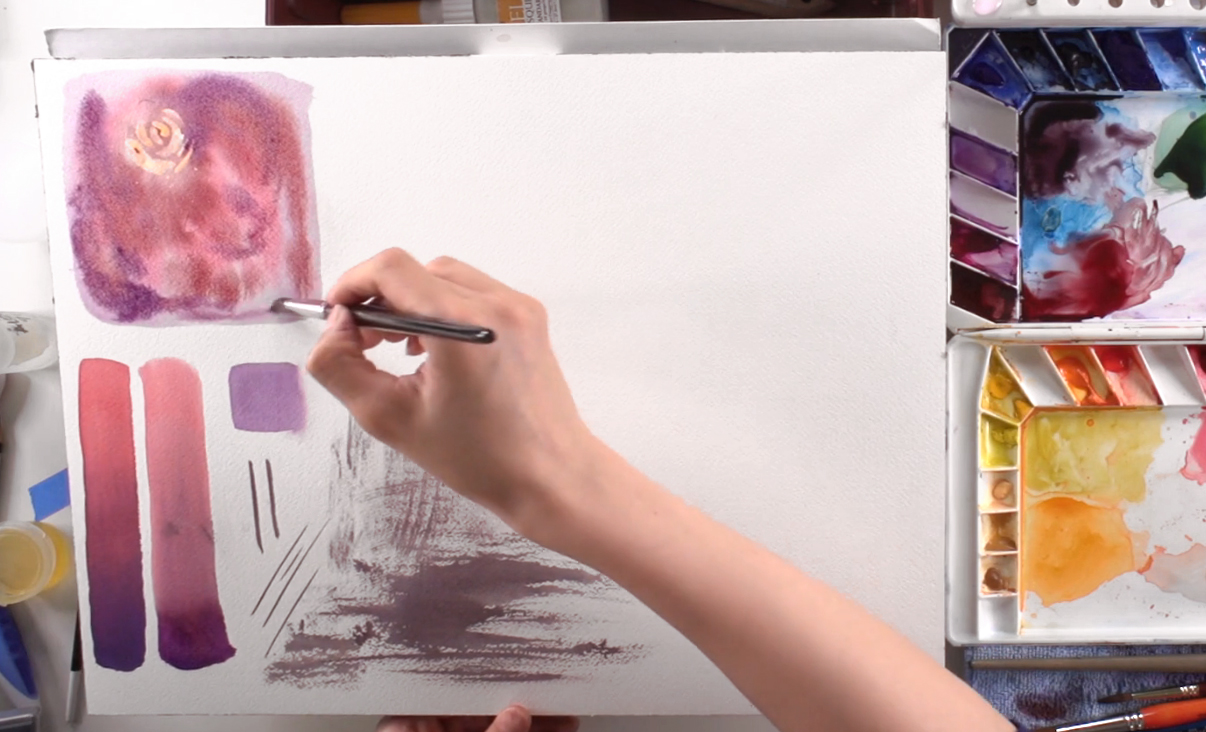 When you've finished the previous easy watercolor practice, go back to the top left corner of your paper, where the masking fluid is now dry. Use the cat's tongue brush and the wet-on-wet technique again to paint a large square on top of the masking fluid. Drop in different colors to experiment, such as Winsor Red, Violet, and Indian Red, and observe how the paint spreads and blends as you go. You can also play with gravity by tilting your paper, laying it flat only when you're satisfied with the pattern that's been created. Once you're done, leave the paint to dry completely before removing the masking fluid, as paper is very delicate when it's wet.
Step 7: A Chemical Breakup - Using Alcohol On Paint
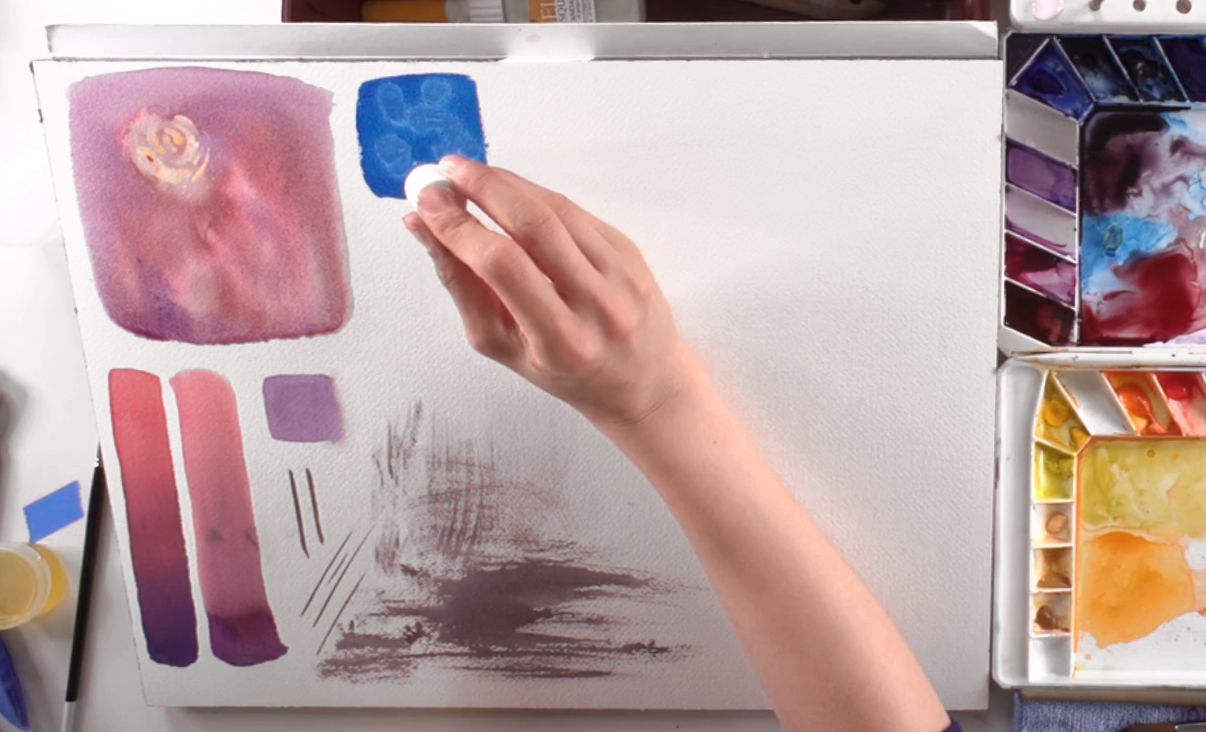 In the next 2 easy watercolor techniques, Isabella shows how to use alternative materials as ways of manipulating watercolor paint. The first will be the effect of alcohol. To experiment, use the cat's tongue brush to paint a small square with Intense Blue (Phthalo Blue) paint. This is quite a strong color, so try not to use too much of it. Next, drop in 90%+ alcohol while the paint is still wet. Use a glass pipette for more control over your alcohol drops, as you don't want to put too much. You'll see that the alcohol creates a spotty texture in the blue paint, which can't be done with a paintbrush. This texture is made because alcohol pushes pigment away to the side, making bacteria-like spots in the paint. It's also possible to add layers of paint on top without affecting the underlying texture too much.
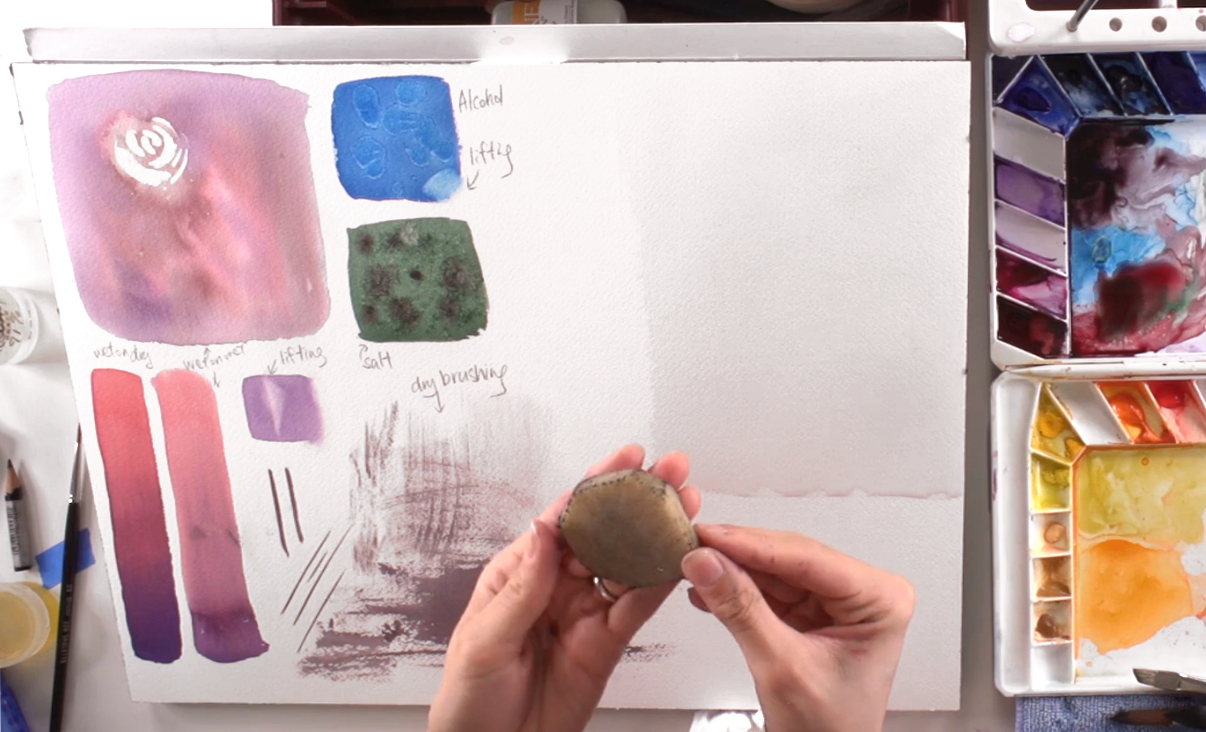
Step 8: A Sprinkle Of Salt
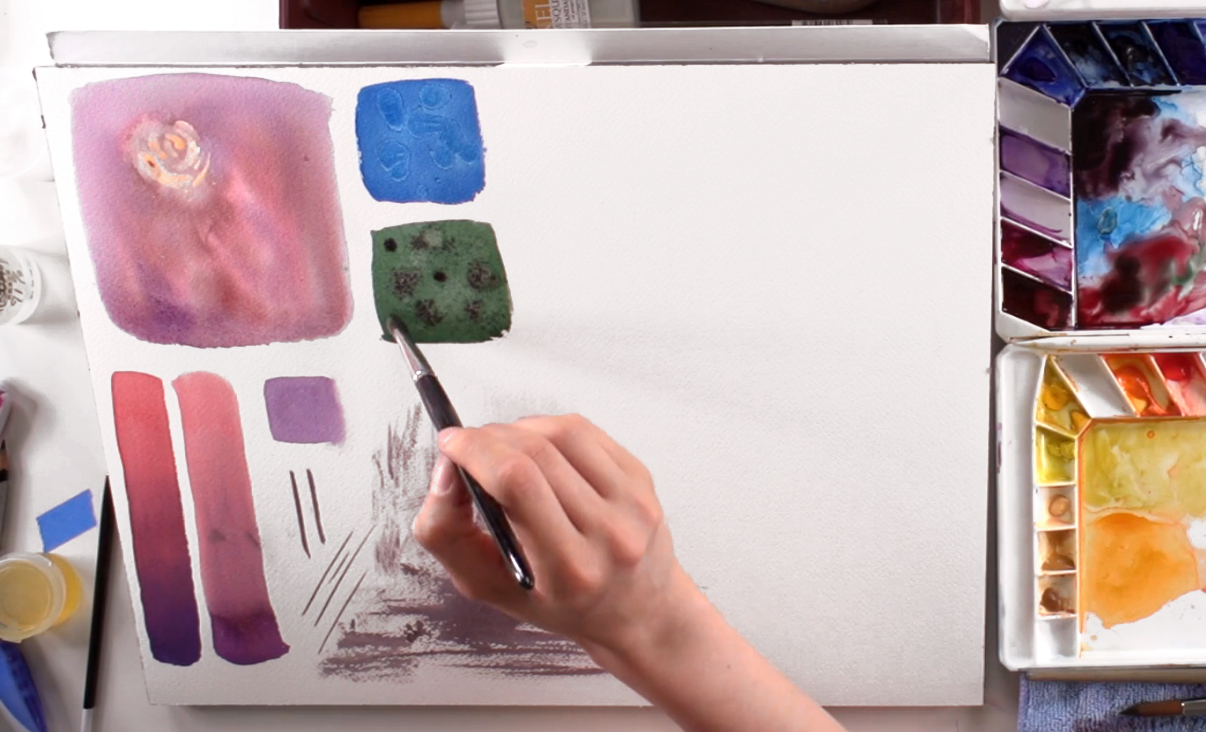 Another "chemical" you can use to create texture is salt. Here, Isabella uses common table salt, but other variants like bath or sea salt will work too. To experiment, use the round brush (size 12) and prep a bunch of green paints on your palette. Isabella mixes Viridian, Perylene Green, and Oxide of Chromium to get a dark green color. With this, paint another square just below the square you used for your alcohol technique. Gently sprinkle some salt throughout your green square. Again, this only works while your paint is still wet, as it's easier to create a reaction with liquids than with solids. Once you lay down the salt, don't touch it, or you'll lose the texture. You can, however, drop in extra paint colors in this stage. Just be careful not to disturb the salt grains while you do so. The added salt also means it will take longer for the paint to dry, so don't try to scrape the salt off until then! When it's dry, the salt should fall off with a little gentle rubbing. If you want, you can experiment with other types of salt that have different grain sizes. The larger grains will create a texture that can be seen more clearly, as they absorb more pigment before pushing the rest away. In general, using salt will create a frost or crystal-like texture, and Isabella shows some pre-made examples. You can see this in the picture below:
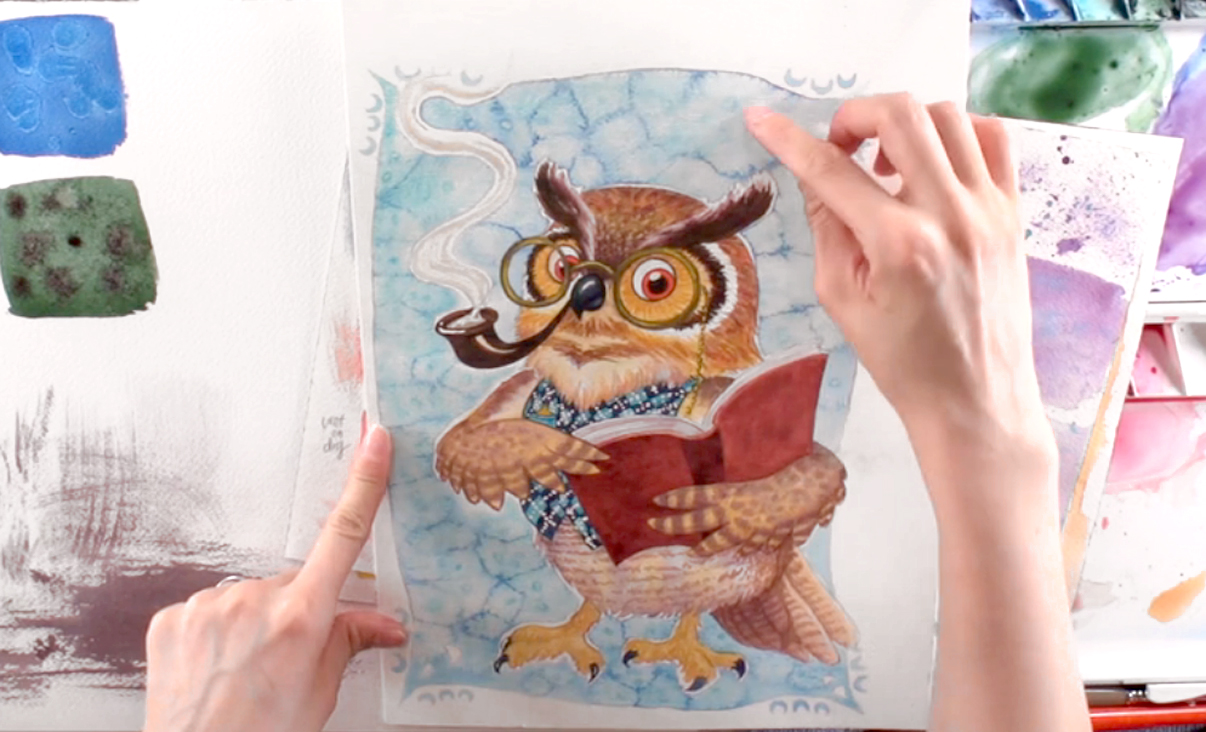
Step 9: Fixing Mistakes With Two Lifting Techniques
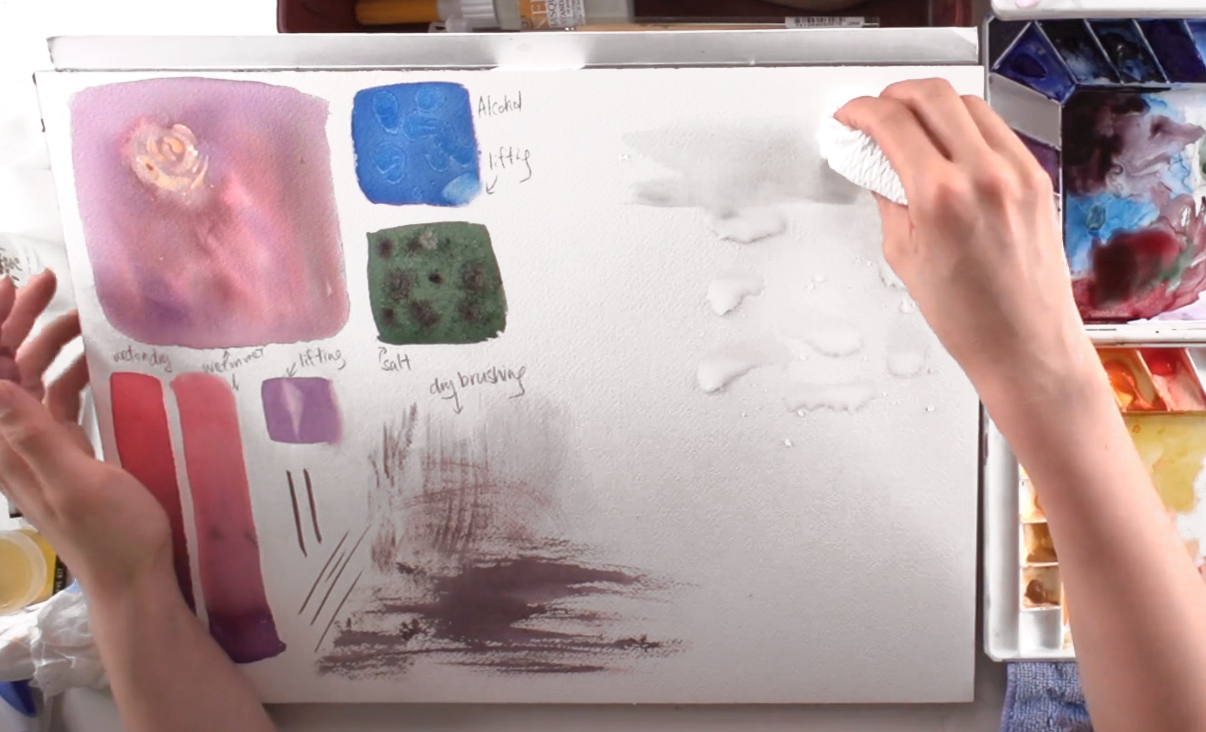 Continuing on, the next technique is mostly used to fix mistakes, but can also be used to add a different kind of detail. This is the lifting technique, and Isabella shows 2 variations. The first is called a "wet lift", and is done while the paint is still wet (pictured above). Simply use a paper towel or rag to dab the area you want to take out, and most of the paint will be absorbed. The second is called a "dry lift", and is done when the paint is dry (pictured below). This easy watercolor technique is usually used to fix mistakes after the paint is dry, but can be done to add negative shapes in positive ones. For example, Isabella uses a wet angled brush to scrub the dry purple square painted in step 4 in order to take out the paint. She goes for a triangular white shape, although she notes that it won't be possible to make it completely white. This is because some of the paint will stain the paper, especially if it's a chemically made color. Natural colors (the Cadmium ones) will be easier to lift and manipulate, but it's still a good idea to plan ahead for every painting so you minimize on having to lift out mistakes.
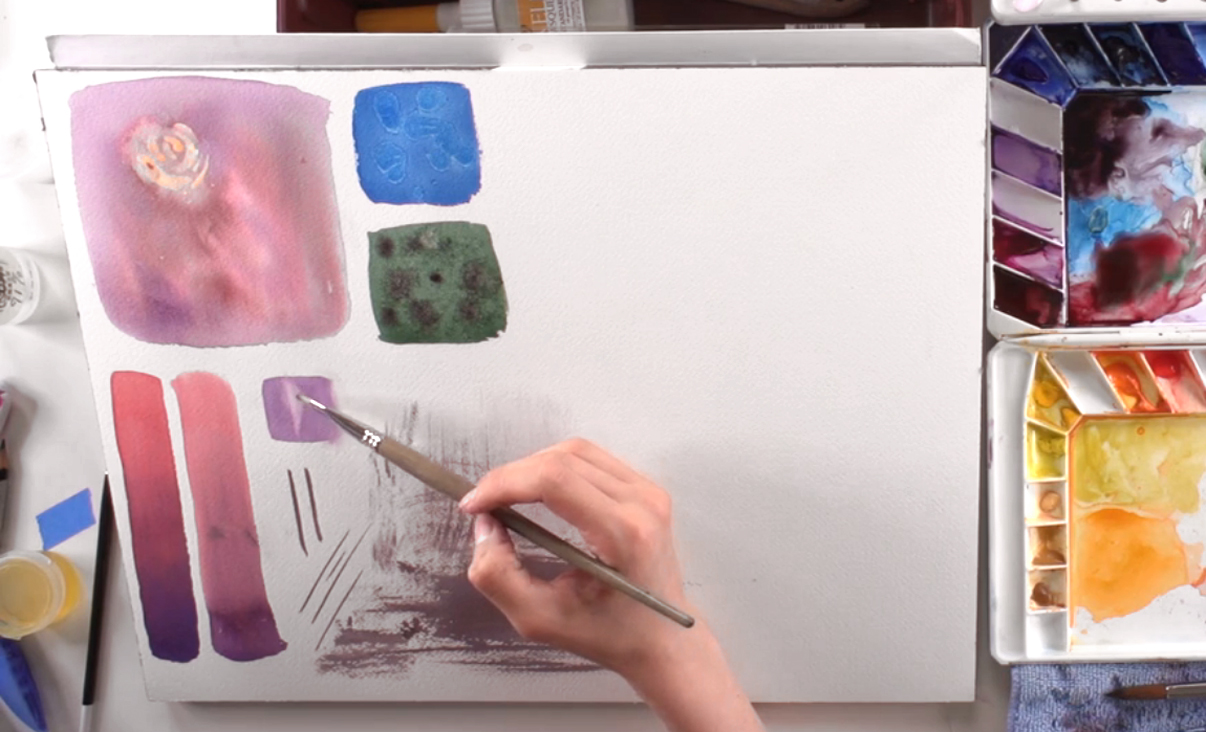
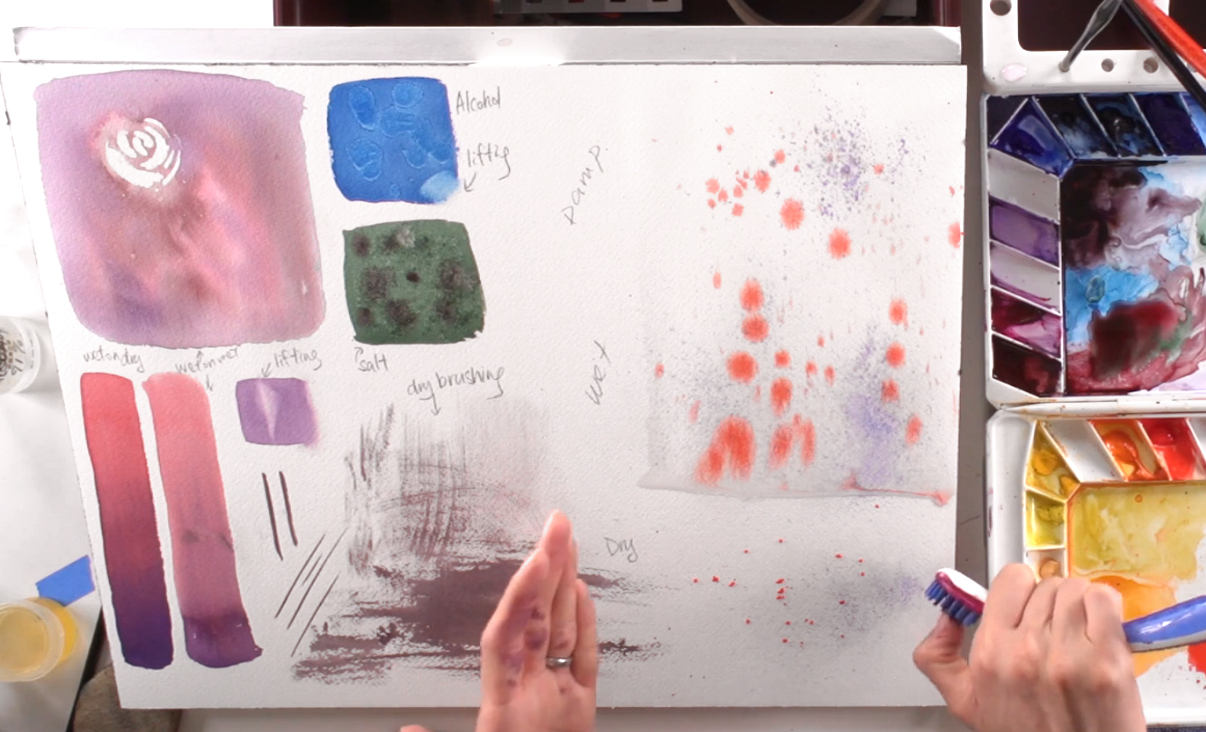
Step 10: Water Control And Paper Saturation
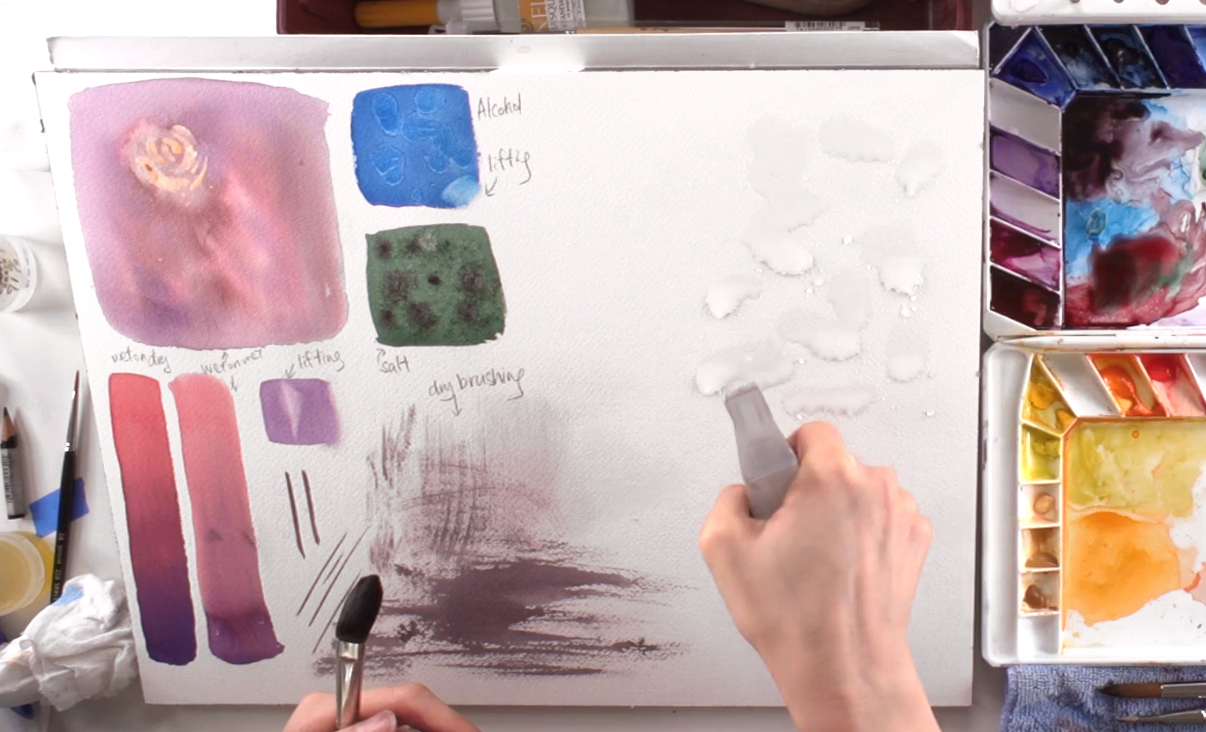 Now, let’s practice on water control and paper saturation. When applying water to your paper, keep in mind how wet you want it to be, as this will affect how much the paint spreads. To test, use the spray bottle to spray a large area with water, being careful not to overdo it. Then, use the cat's tongue brush to spread the water evenly over the top half of the right side of your paper. You'll have to wait for it to dry a bit before continuing, as you want half of the wet area to be completely wet, and the other half damp. Again, you can tell how wet paper is by its sheen and touch. Just be careful when touching the paper by using the back of your fingers so you don't leave fingerprints. Damp paper will still feel slightly moist and cool, while dry paper will be at room temperature. The more you paint, the easier it will be to control the wetness of your paper, so keep practicing these basics! In the meantime, you can move to the next step before coming back to see how water saturation affects paint spread.
Step 11: How To Remove And Make The Most Out Of Masking Fluid
 As the masking fluid and paint on top should be dry by now, you can remove the masked area with the rubber cement pick-up. If you don't have one, a normal eraser will work too. Just be careful to remove everything without damaging the paper or removing the paint as well. Due to the protective layer of masking fluid, the white of the paper will show through. Note that this technique always creates hard edges for the shape you've masked off, so use this effect accordingly. For example, soft clouds should be done wet-on-wet and not with masking fluid. You can keep experimenting to see the effects you can create with this handy tool, and keep record of the results.
Step 12: Splattering With A Paintbrush, And Seeing How Water Affects Paint
 Going back to the large wet area made in step 10, re-wet the bottom half so it's wetter than the top half. While leaving the bottom area dry, take the Raphaël round brush to create some splatter. This is another easy watercolor technique: simply load your brush with Cadmium Red, then tap it against another brush's handle so the paint drops onto the paper. You can create splatter over all 3 areas to see how the wetness of the paper affects the droplets of paint. The results should be quite clear - the wettest area will cause the paint to spread the most, while the drops in the dry area will be quite small and beaded. You can also try splattering with the size 2 brush, and find that a smaller brush will create smaller droplets. In addition, if you ever need to, you can protect the rest of your painting by covering the areas that don't need splatter with a piece of scrap paper.
Step 13: Splattering With A Toothbrush
 Another way to create splatter is to use an old toothbrush to create a finer spray with the paint. Isabella has modified her toothbrush by gently applying heat halfway down the neck area, then bending it backwards to make it easier to hold. This is an optional step, but helps provide a better grip and increased control over the splatter. To test the paint splatter created by the toothbrush, prep French Ultramarine on your palette using any clean brush. Then, scrub the bristles of the toothbrush into the paint, picking up as much as possible before running your thumb over the hairs. In addition, the bristles should be pointing down over the surface you want the spray to appear. If all goes well, a mist-type splatter will be created. Again, the sprayed paint will spread in size depending on how wet the paper is, which you can see as the blue contrasts to the previous red you used. Depending on how you rub the bristles and the direction it's pointing in, you can even control exactly where the spray goes. Play around to get familiar with splattering, and the different paintings that would utilize this method. In conclusion, watercolor relies heavily on water, and how you manipulate it will affect any watercolor painting. This tutorial only briefly introduces the most common of easy watercolor techniques, but by practicing these basics, you can learn how to use water to your advantage while exploring the medium of watercolor. So keep practicing and experimenting! And maybe one day, the secrets of watercolor painting will reveal themselves to you.


