Learn from Steve Curl as he returns to show us watercolor techniques for painting snow-laden trees & bushes, and turn them into winter scenes. Want to watch the video version? This tutorial is also available to members of our Beeblys WatercolorPainting.com.
Materials used:
- Reference picture of Yosemite trees in February (you can print one out here)
- A sheet of Arches cold press watercolor paper (140lb, size 16" x 12")
- HB or 2B pencil
- Kneaded eraser
- Painting palette for watercolor paints
- A container of water
- A towel or rag to rest brushes on
- Tissue or paper towel
Paints (Holbein Artist's Watercolors)
- Opera
- Permanent Alizarin Crimson
- Permanent Violet
- Mineral Violet
- Cobalt Blue
- Cerulean Blue
- Peacock Blue
- Manganese Blue Nova
- Ultramarine Deep
- Prussian Blue
- Hooker’s Green
- Cadmium Green Deep
- Burnt Sienna
- Burnt Umber
- Indigo
- Payne’s Grey
Brushes
- Stratford & York Warwick Series: Round sable brush (size 8)
- Stratford & York Warwick Series: Round sable brush (size 4)
Step 1: Studying And Sketching

Print out a good quality photograph of snow-covered trees. Steve uses a picture taken in February of Yosemite National Park, which you can find here. Start by studying a single pine tree and the shape its branches and the snow on top make, and lightly sketch in simple outlines with your pencil. Try to draw without preconceptions on what the tree or snow should look like, and remember that nature is always random and unpredictable, so your tree should end up looking quite uneven. You can also sketch in the trunk and the snow on the ground. Clean up any extraneous lines with a kneaded eraser, especially in snowy areas, before continuing.
Step 2: Painting Natural Branches
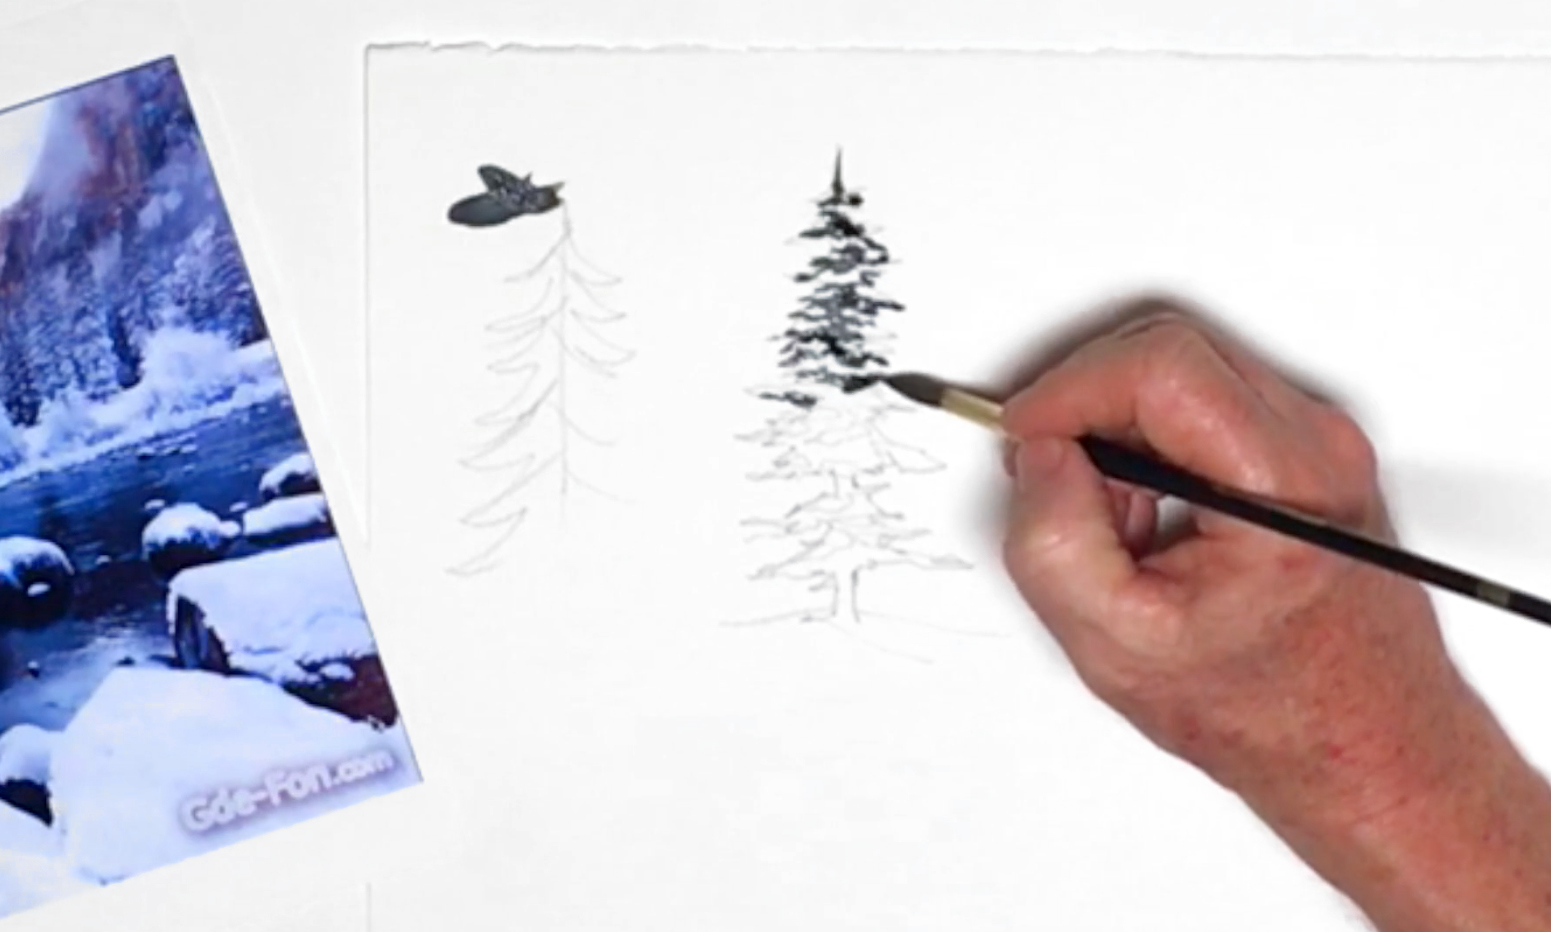
With the size 8 brush, mix a batch of Indigo, Prussian Blue, Ultramarine Blue, Cadmium Green Deep, and Payne's Grey for a very dark green-blue. You can add a touch of Burnt Sienna to tone down the blue, and test the color on a piece of scrap paper beforehand. Start painting the branches, in the areas with no snow. You don't have to paint every single detail; instead, focus on painting the feeling the snowy tree gives and the way it's growing in its environment. Remember to keep your brushstrokes irregular - too much consistency in nature makes it look manufactured.
Step 3: Tree Trunk, Branches, And Leaves
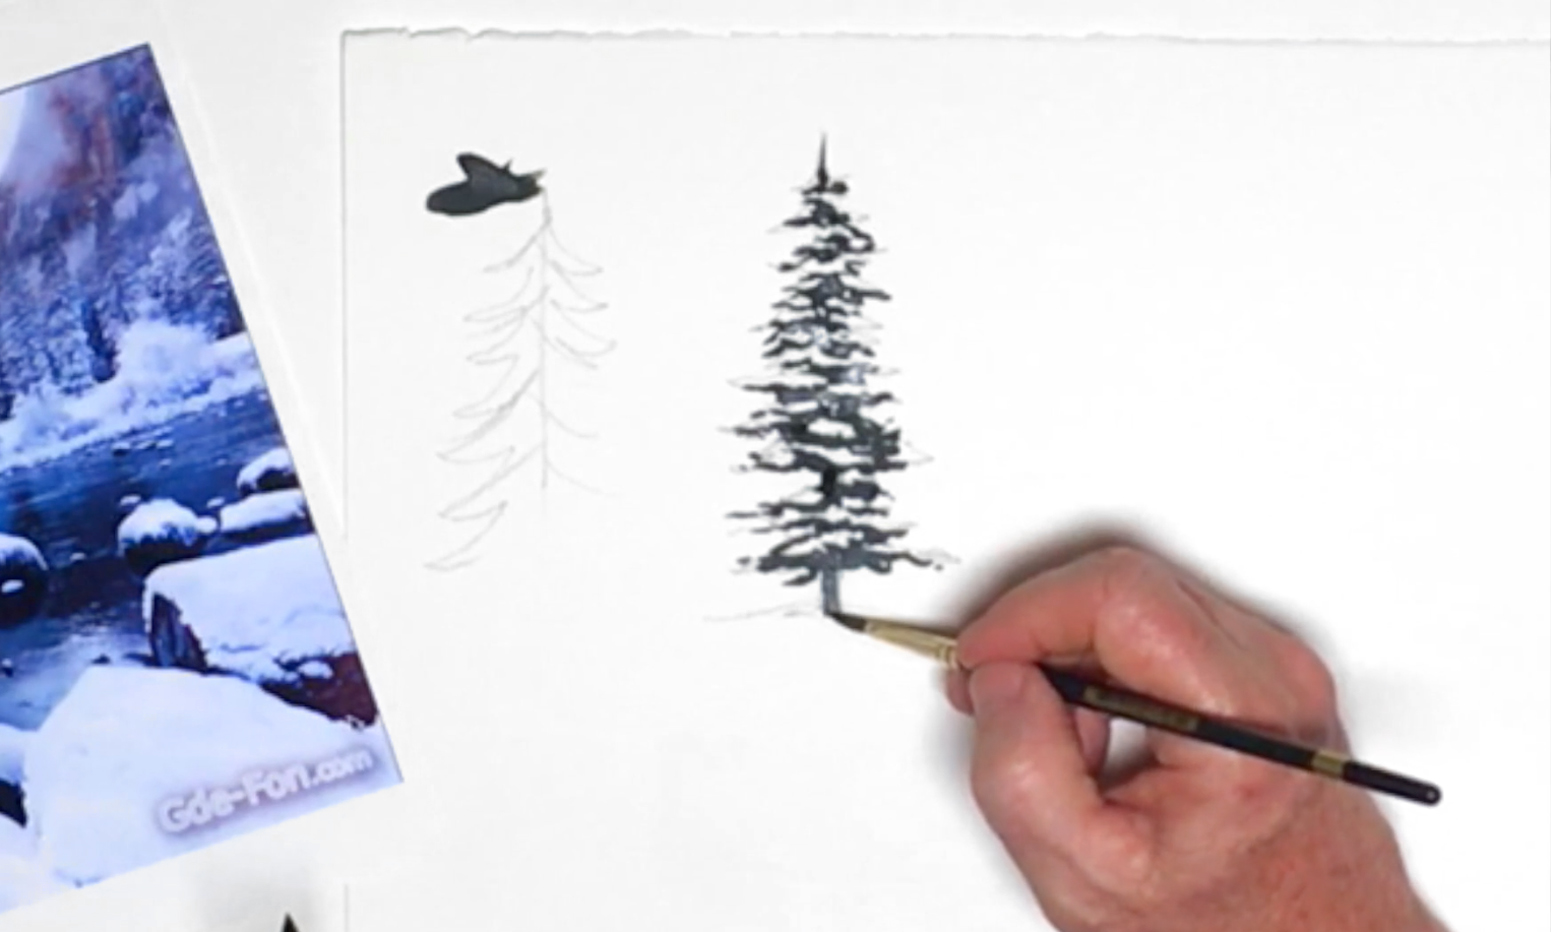
With the size 4 brush, mix Burnt Umber with some Cadmium Green Deep, Payne's Grey, and a touch of Alizarin Crimson, Permanent Violet, and Mineral Violet. You can also add in some of the branch's color if desired. With this color, paint the tree trunk where it shows through the branches and where it comes out from the ground. Then, switching back to the branch's color, add any finishing touches to the branches and leaves.
Step 4: Painting Snow By Painting Its Surroundings
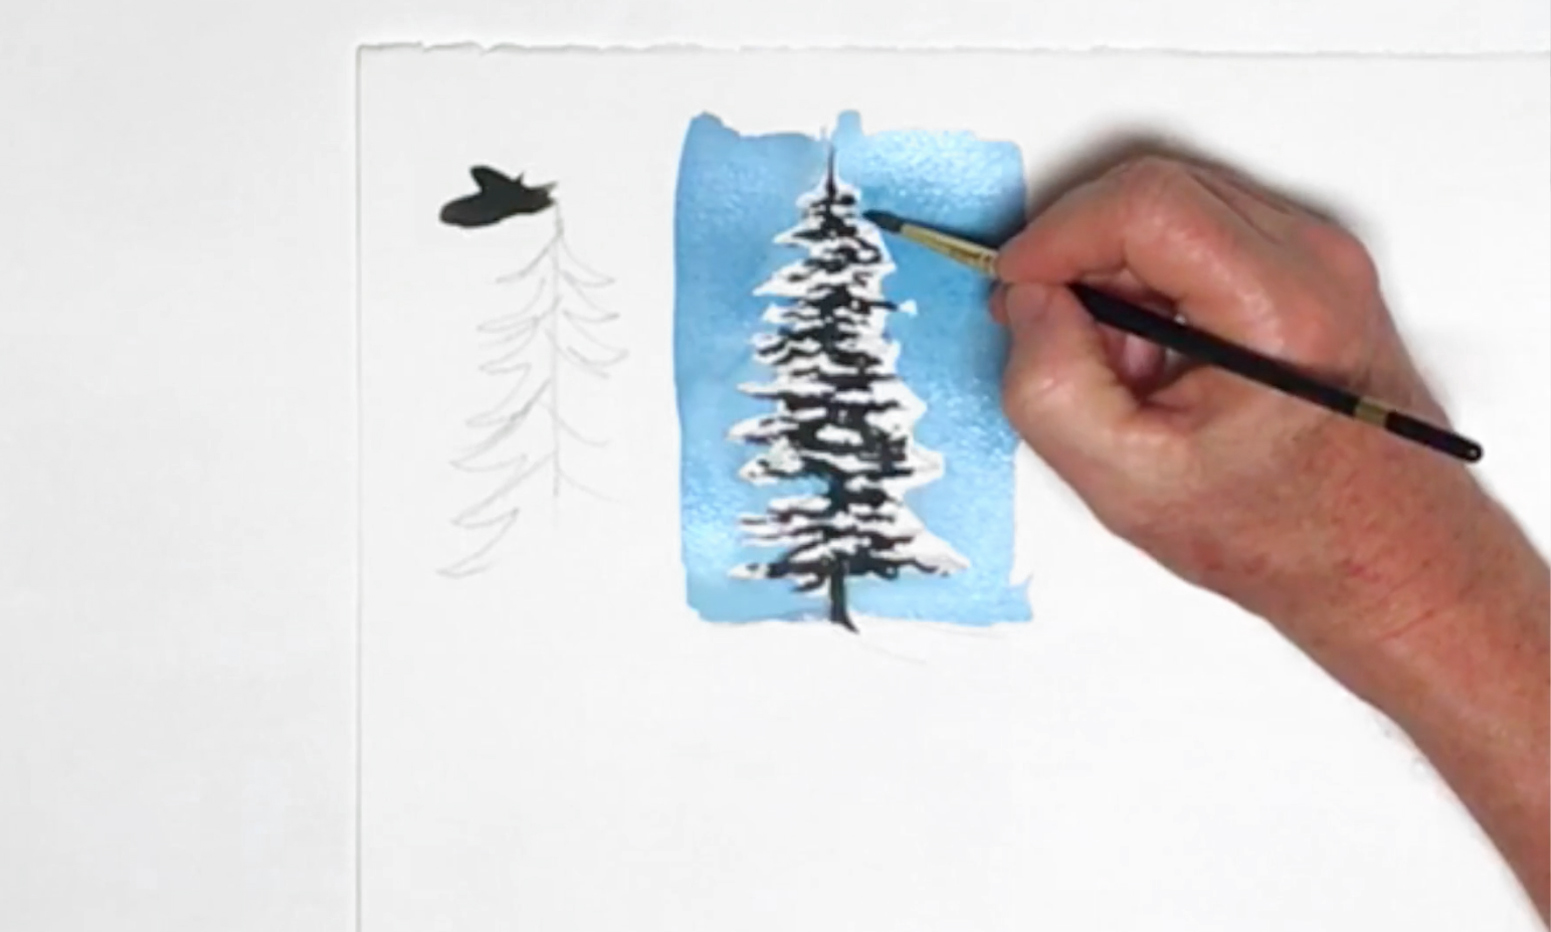
When the tree is dry, wash your brushes, and with the size 8 brush, mix a sky color with Manganese, Cerulean, and Peacock Blue. Add this sky blue wash in the area around the tree, and as you get closer to the branches, switch to the smaller brush to paint around the snow sitting on top. Don't forget to paint around the snow on the ground as well! This is called painting the "negative space", where you paint the space around an object to define it.
Step 5: Shadows On Snow
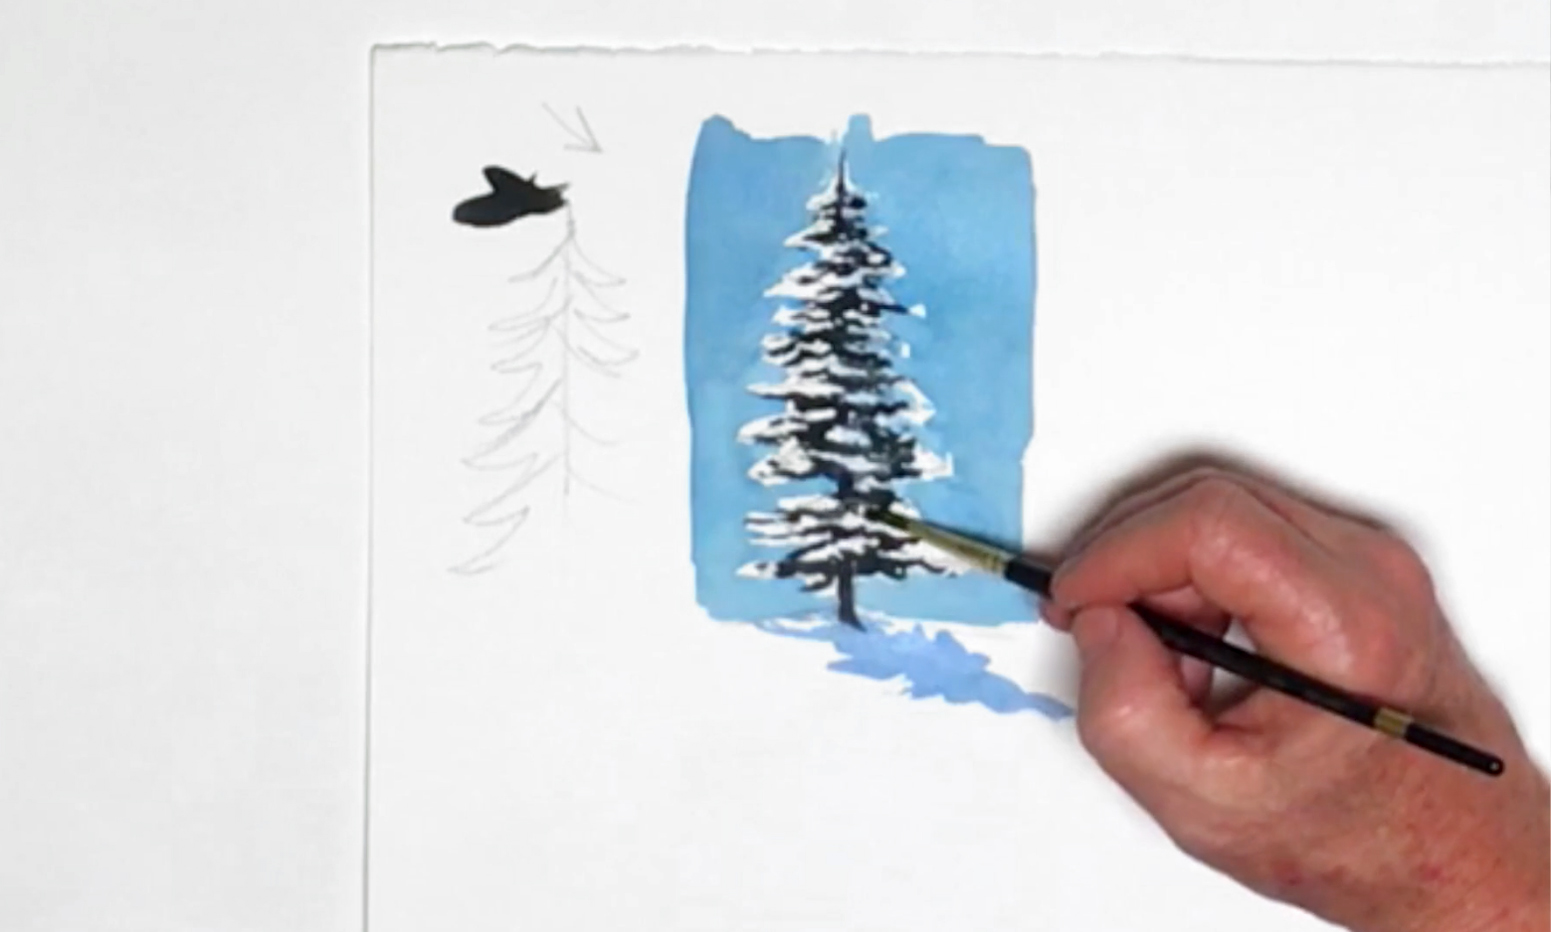
Add Ultramarine Deep to the sky blue mix, then paint in any shadows that fall on the snow, including the one cast by the tree onto the ground, and the shadowed side of the tree. Try to avoid using grey as it will cause the snow to appear dirty. When all the paint is dry, you can even add more trees in the background, although the snow on these trees won't be as bright as they are in the foreground.
Step 6: Sketching A Snowy Scrub Bush
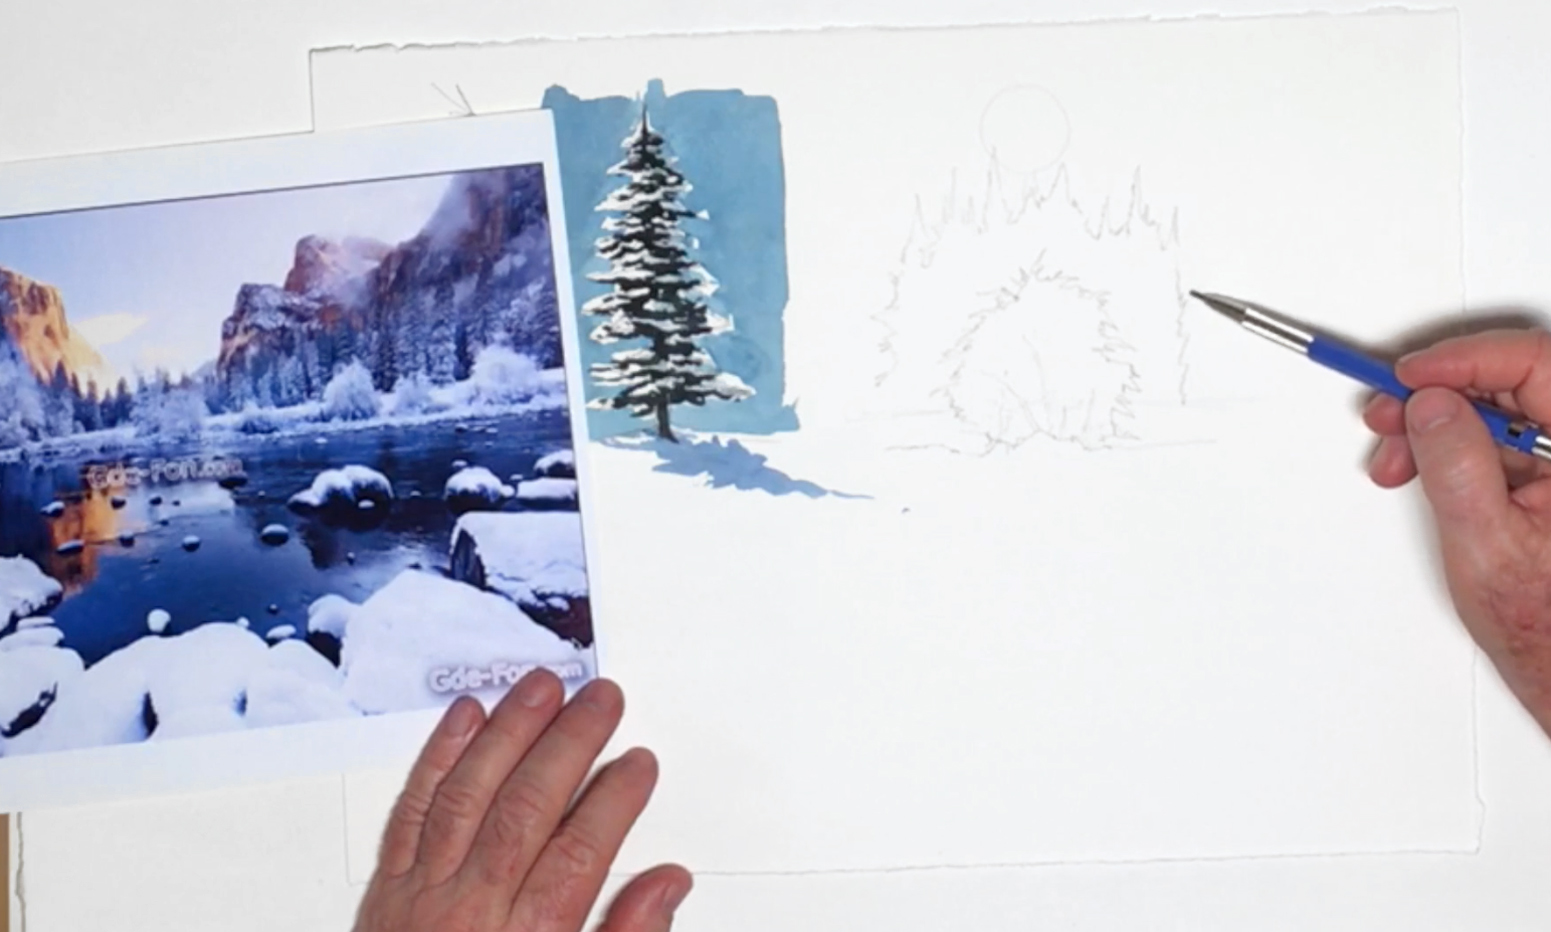
To better understand how to create a winter forest scene, you can work on another section on the paper. Start again with a simple sketch of a scrub bush with evergreen trees in the background, once more using careful observation to mark out exactly where snow and shadows fall, and varying the shapes you create so no tree or bush is too symmetrical. For the trees in the background, vary their heights and sizes to make them look natural while creating a sense of depth. Erase any stray lines with the kneaded eraser.
Step 7: Centering A Bush
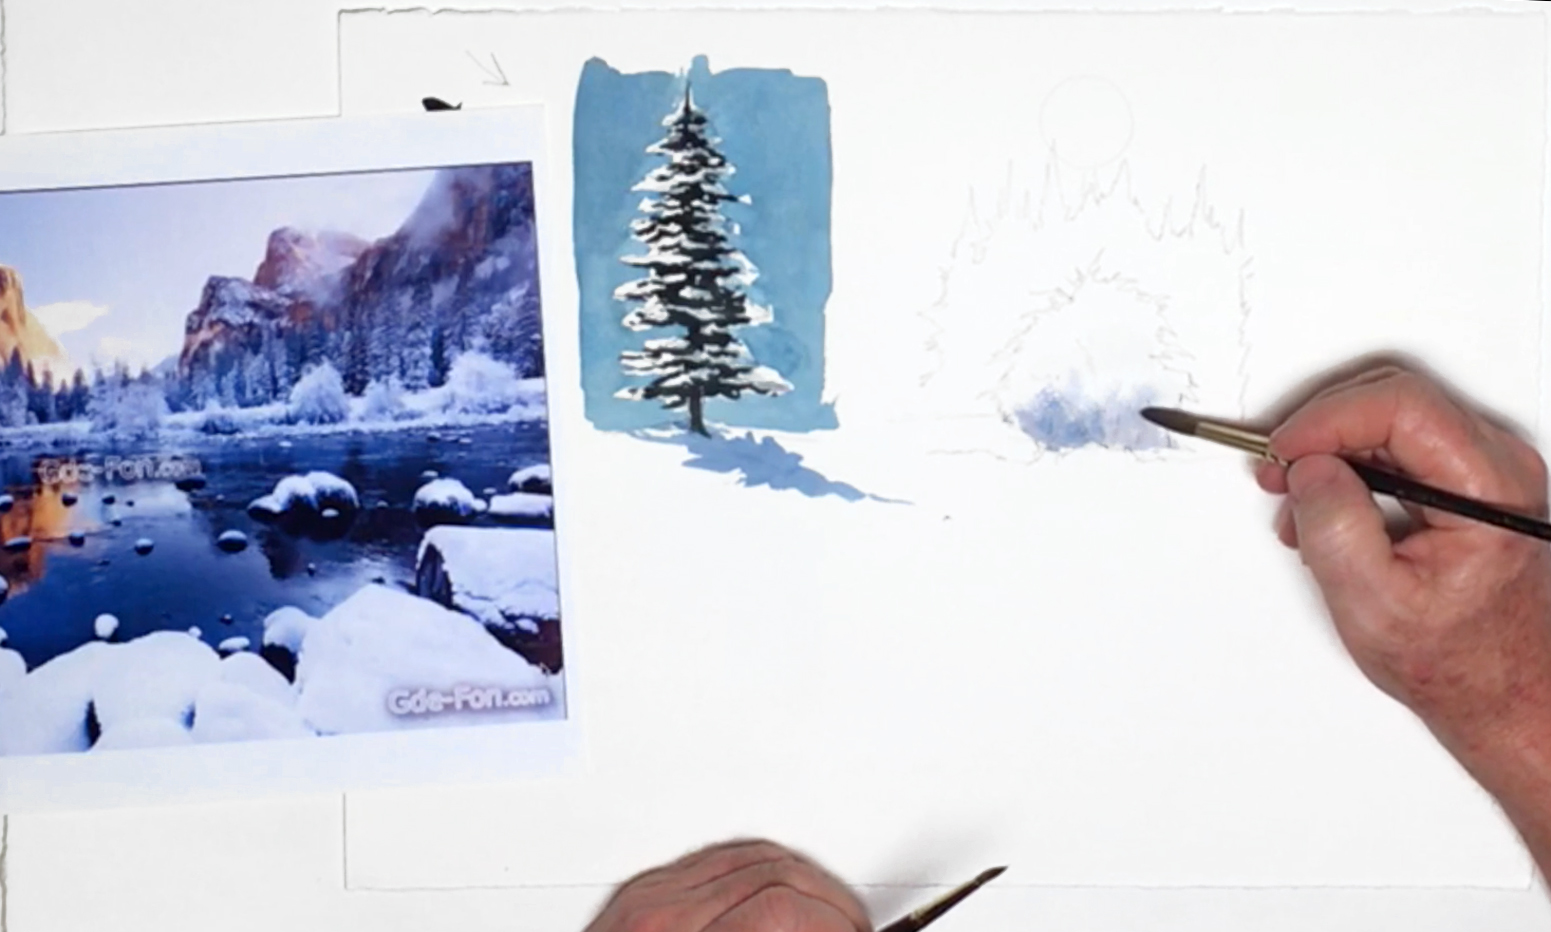
With the size 8 brush and clean water, wet the underside and center of the bush, then drop in a mixture of the sky color mixed with Cobalt Blue and a touch of Alizarin Crimson for the snow in shadow. The result should be quite a light purple-blue. You can add some pure Cobalt Blue with the size 4 brush to intensify some of the shadows as well. Soften the edges of the shadows with clean water to create a rounded effect for the bush, and remember to leave the snow area white.
Step 8: Background Forest
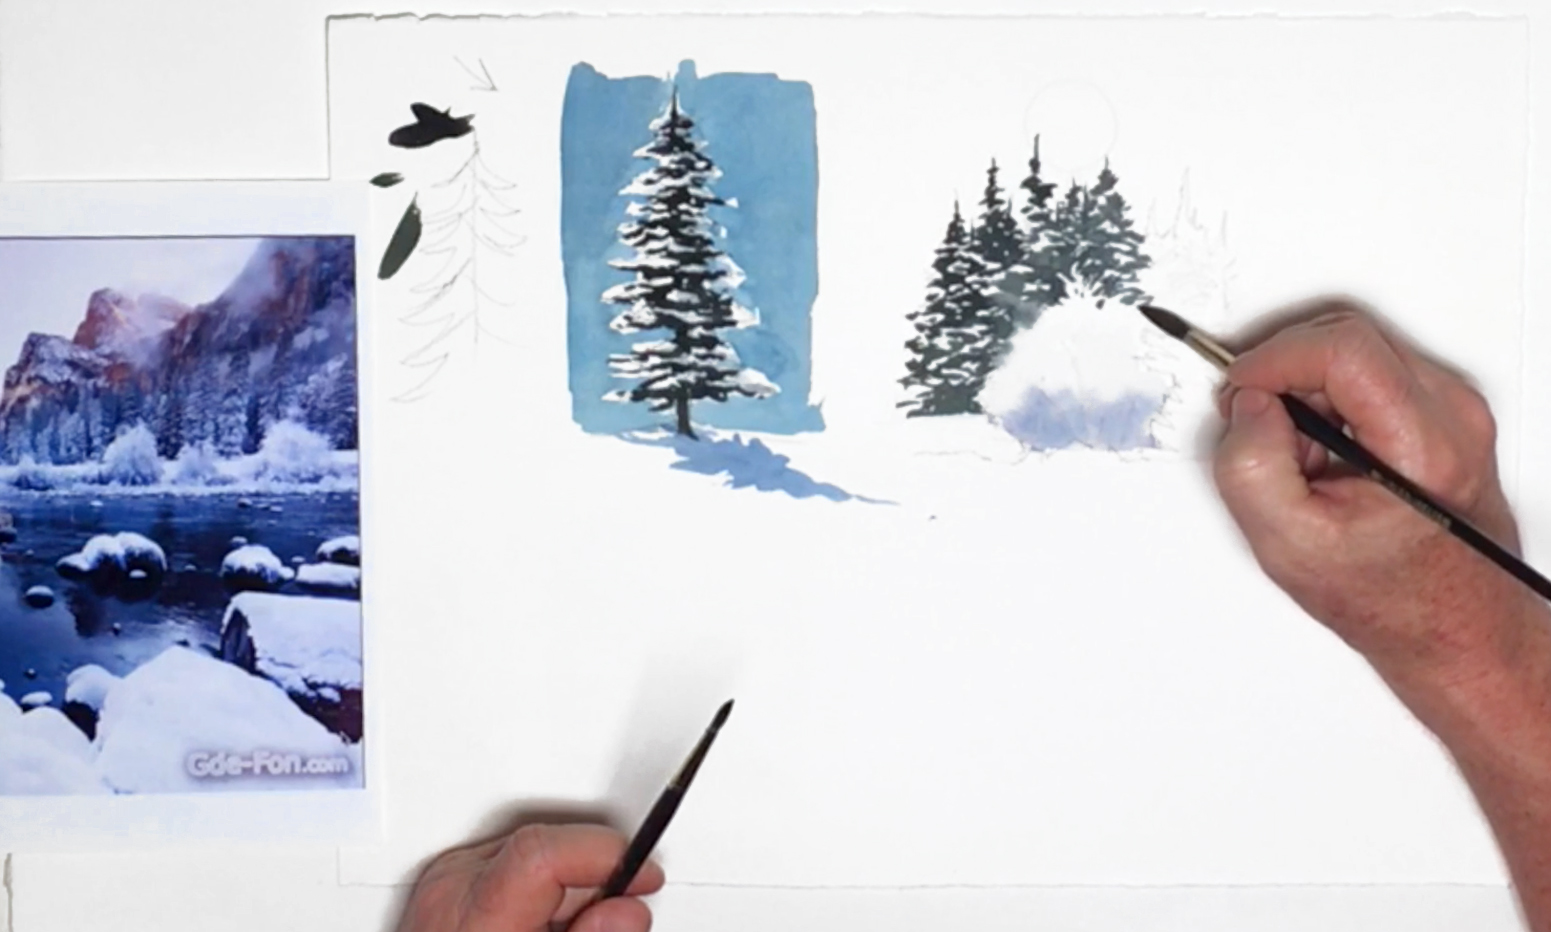
Using the same technique and colors you used for the branches in the previous painting, paint in the evergreen trees in the background. Be careful while painting around the snow on the bush - make sure to switch to the size 4 brush whenever you're painting more detailed areas. You can "feather" the edges where the background trees meet the bush; that is, to gently brush lines spreading out from the original line. This adds a more leafy effect to the foliage. Keep painting the negative space around the bush and snow, occasionally cutting in to the bush to break up any symmetry that begins to form. You can also make any compositional changes to the reference picture. This means making a conscious decision to add in, leave out, or change anything in the picture to help improve the aesthetics of the painting, and to shift the painting's focus to what you want it to focus on.
Step 9: Adding Contrast And Value
As the forest of evergreen trees is in the background, paint the snow on these trees using the same purple-blue color used for the underside of the bush, so the white snow on the bush stands out even more (make sure the paint for these trees has dried before doing so). With the size 4 brush, use the same color to pull out the shadow underneath the bush. Remember that you don't have to paint every single shadow, and that you can make compositional changes.
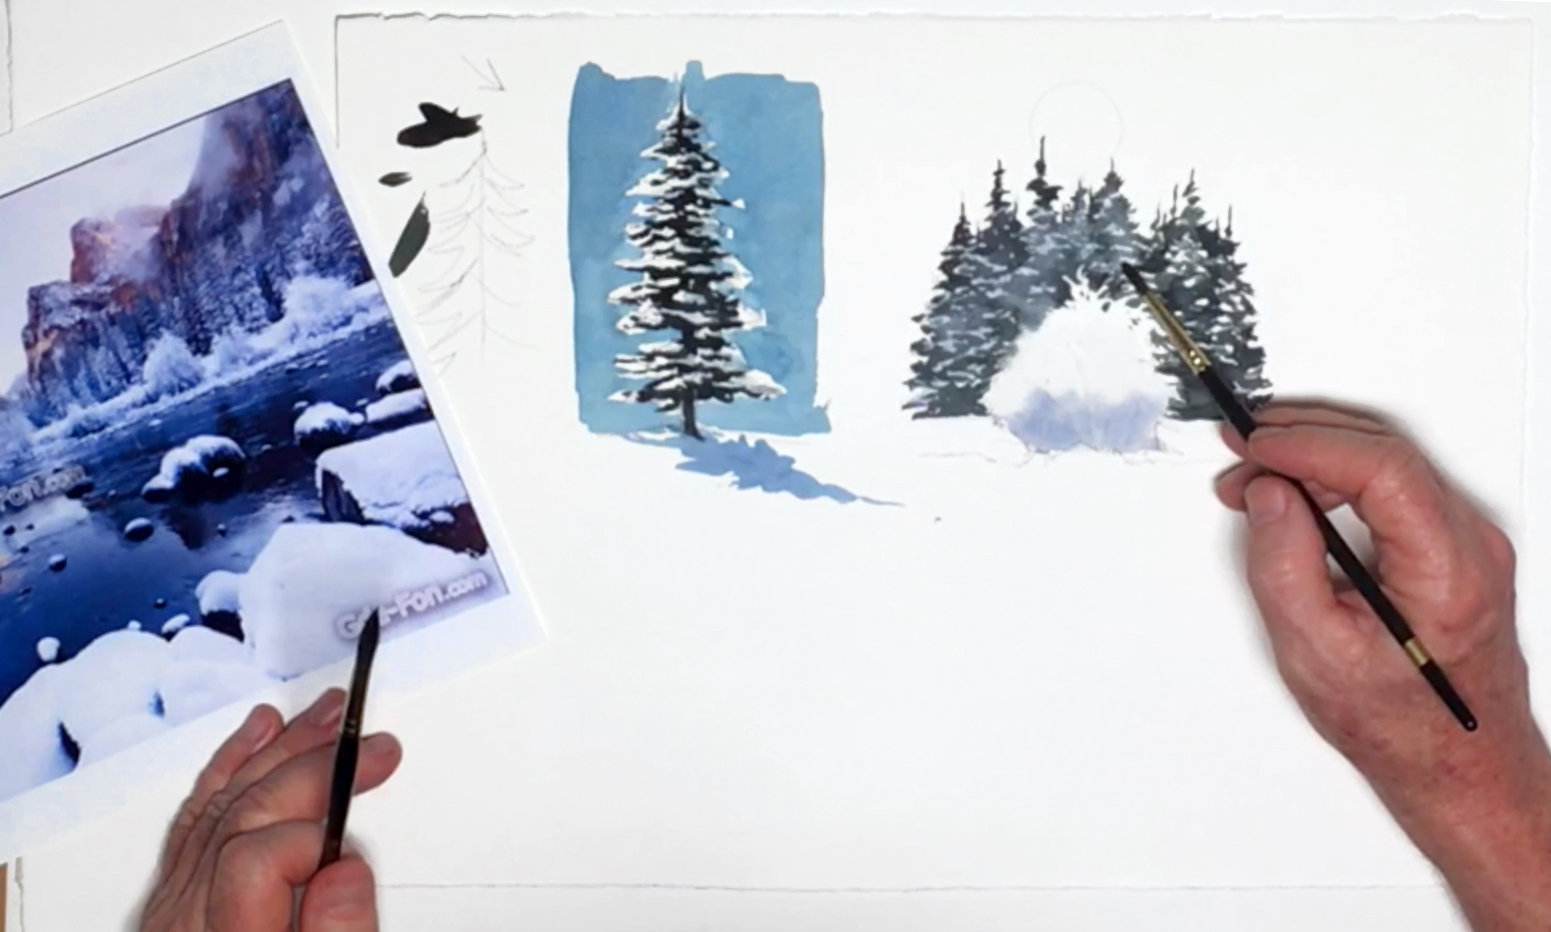
Step 10: Using The "Lost And Found" Technique For Snow

Mix Ultramarine Deep, Burnt Umber, and Payne's Grey to the color used for the branches, then with the size 4 brush, paint the branches inside the bush. You can make the line "skip" to give the impression of snow lying on top, or soften the lines with a clean brush and dabbing excess water with a paper towel. This is what Steve calls the "lost and found" technique, where you place something very dark against something very light to drastically increase the contrast in a painting (something that can also be achieved by painting negatively). When you're satisfied, add any finishing touches to the shadows, such as more intense blue or even a little Opera pink to reflect the color of a sunset sky. Make the painting interesting in your own way, and when you're done, leave the painting to dry.
Congratulations—you did it!


