In around 4 hours, you will create a beautiful watercolor showing an idyllic beach in the Mediterranean, where families are relaxing together in the summer sunshine. In between washes you may use a hair dryer to hasten the drying process for the next stage. Using a hair dryer can be useful. Without one, you'll literally be watching the paint dry for at least the next few minutes. I use a palette with deep wells for mixing my watercolor paints with lots of water. I also use a big water container (like a child’s seaside bucket). I prefer to work with my paper between a 30 and 40 degree angle. You should choose the angle that you are most comfortable with. In addition, be prepared to be flexible and adjust your angle to achieve an effect with a wash, or just for comfort. It is quite common to see a watercolor artist turn his board around during the drying of a wash. Paint what you see not what you think. When you paint, try to paint the light and shadows and not the objects you can see. Concentrate upon shapes, light and dark tones, and the beautiful lost and found edges where objects emerge then disappear again. Try to see shapes, color, and tone, not real world objects. Keep your work free and loose. As it's said, "If you see a jumble, paint a jumble." I have used Arches watercolor paper, but you can use any watercolor paper as long as it's at least 140lb in terms of paper thickness. I have painted this quite small; feel free to work at the size you are most comfortable with.
Materials
Paper
- Arches rough watercolor paper, 140lb (size 18cm x 27cm, or 7" x 10½"). Any good quality watercolor paper will do.
Paint (Winsor & Newton)
- Winsor Yellow
- Raw Sienna
- Cadmium Orange
- Permanent Rose (Alizarin Crimson will do)
- Burnt Sienna
- Burnt Umber
- Winsor Violet
- Cobalt Violet
- Cerulean Blue
- Winsor Blue (green shade)
- French Ultramarine Blue
- Cerulean Blue Cobalt Blue
Brushes
- Large Squirrel Mop
- Sable, size 8, 6,4
- Pro Arte Series 007, size 12, 6
- Pro Arte Sword Liner (small)
- Sable Rigger size 2
Miscellaneous
- Pencil 4B
- Board
- Kitchen roll/tissue
- Palette with deep mixing wells
- Large water container (child’s seaside bucket)
- Masking fluid
Step 1: Initial Drawing
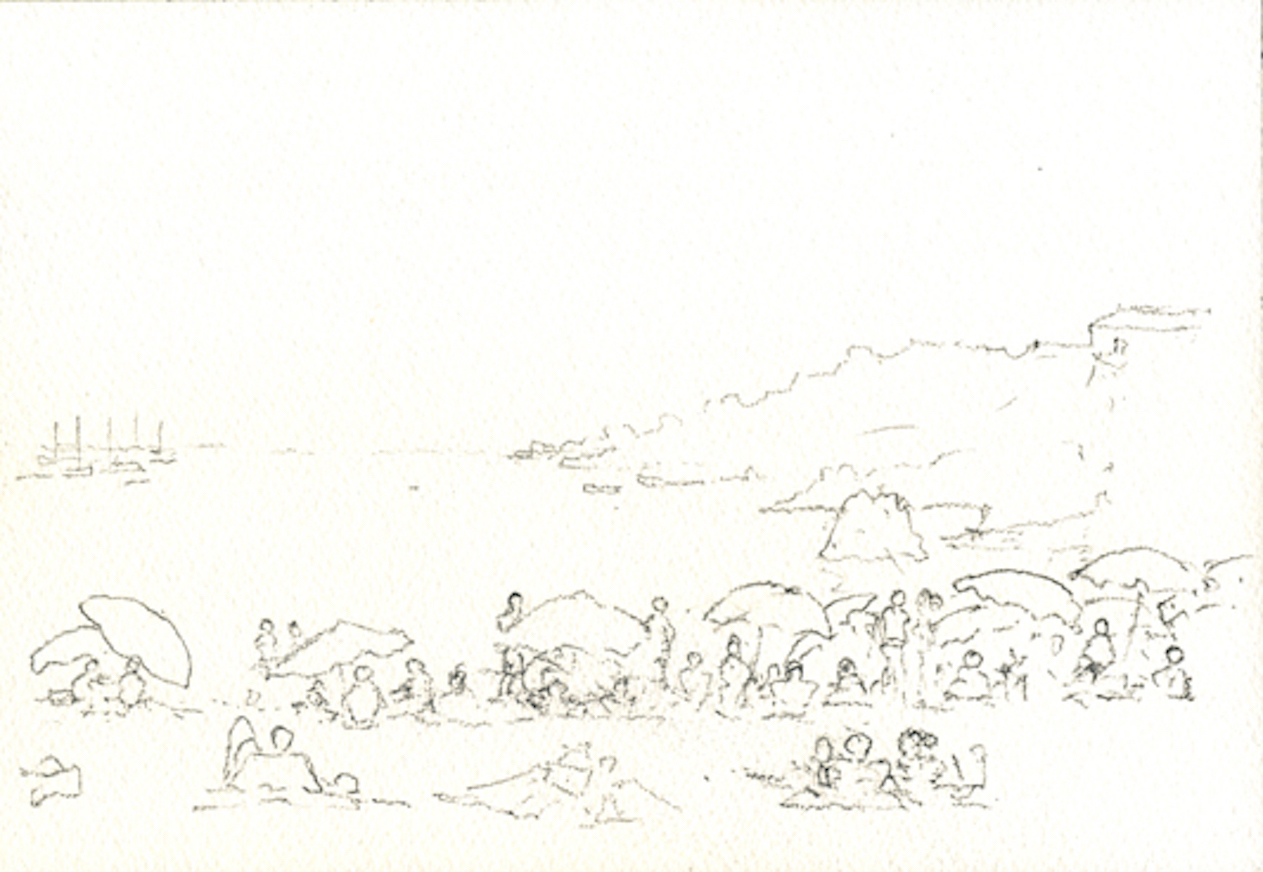 To begin, cut your watercolor paper to size (if it isn't already the right size) and use masking tape to attach it to a board. You can just use an old piece of hardboard as your painting board. Now complete a line drawing using a soft 4B pencil. Keep your drawing loose and concentrate on shapes, not individual objects. I have loosely suggested the jumble of umbrellas and people and I have not drawn any one person completely. A good way to describe the approach is “If you see a jumble, draw a jumble”. My advice for drawing would be just to attack it freely and confidently. Do not worry about mistakes and keep your lines free and loose. When I draw I try to keep the pencil moving at all times. This practice helps keep my drawing free and loose.
Step 2: Masking Fluid
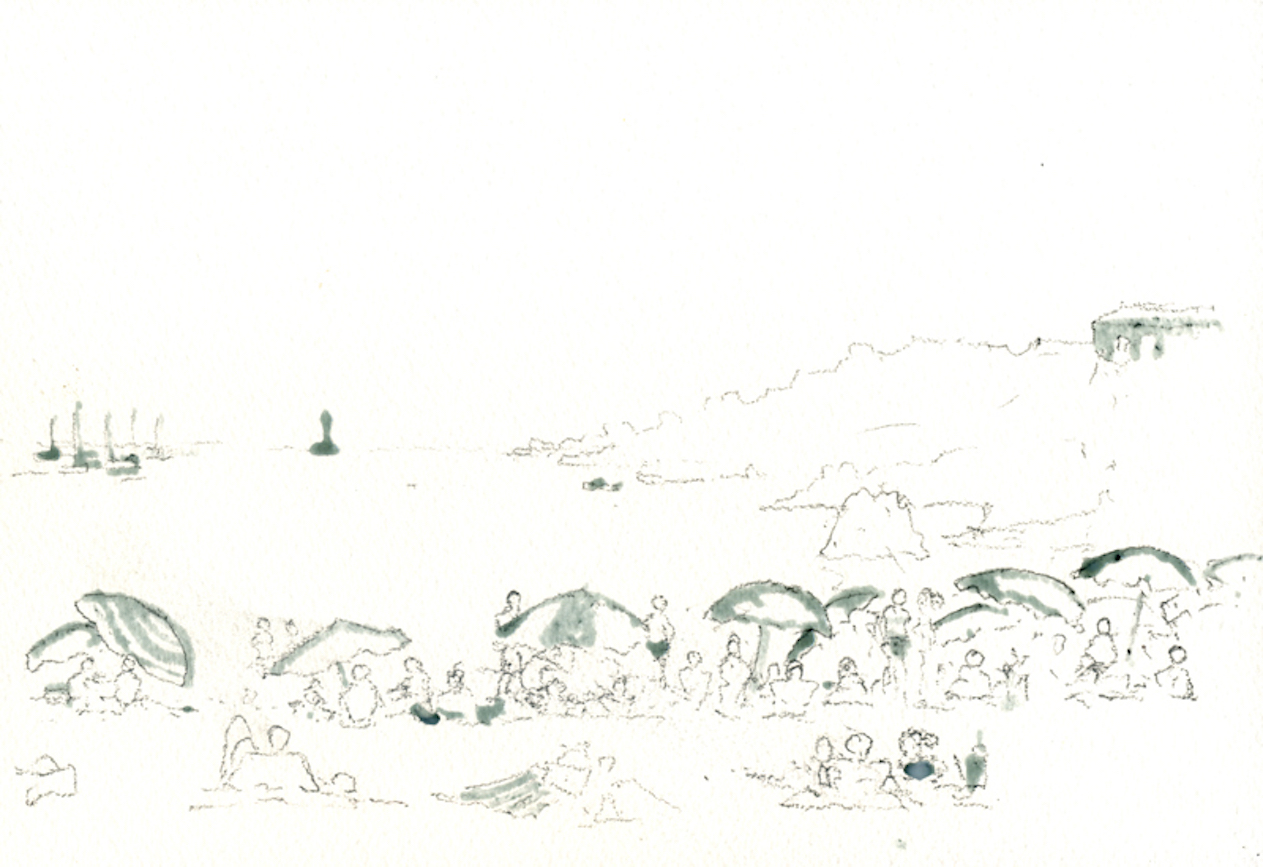 I have used blue masking fluid, which is visible on the drawing. Using an old brush (never a good watercolor brush), apply the masking fluid to the jumble of people, the beach furniture, and the distant edge of the hills. The masking fluid allows you to preserve white paper for sunny highlights.
Step 3: First Wash
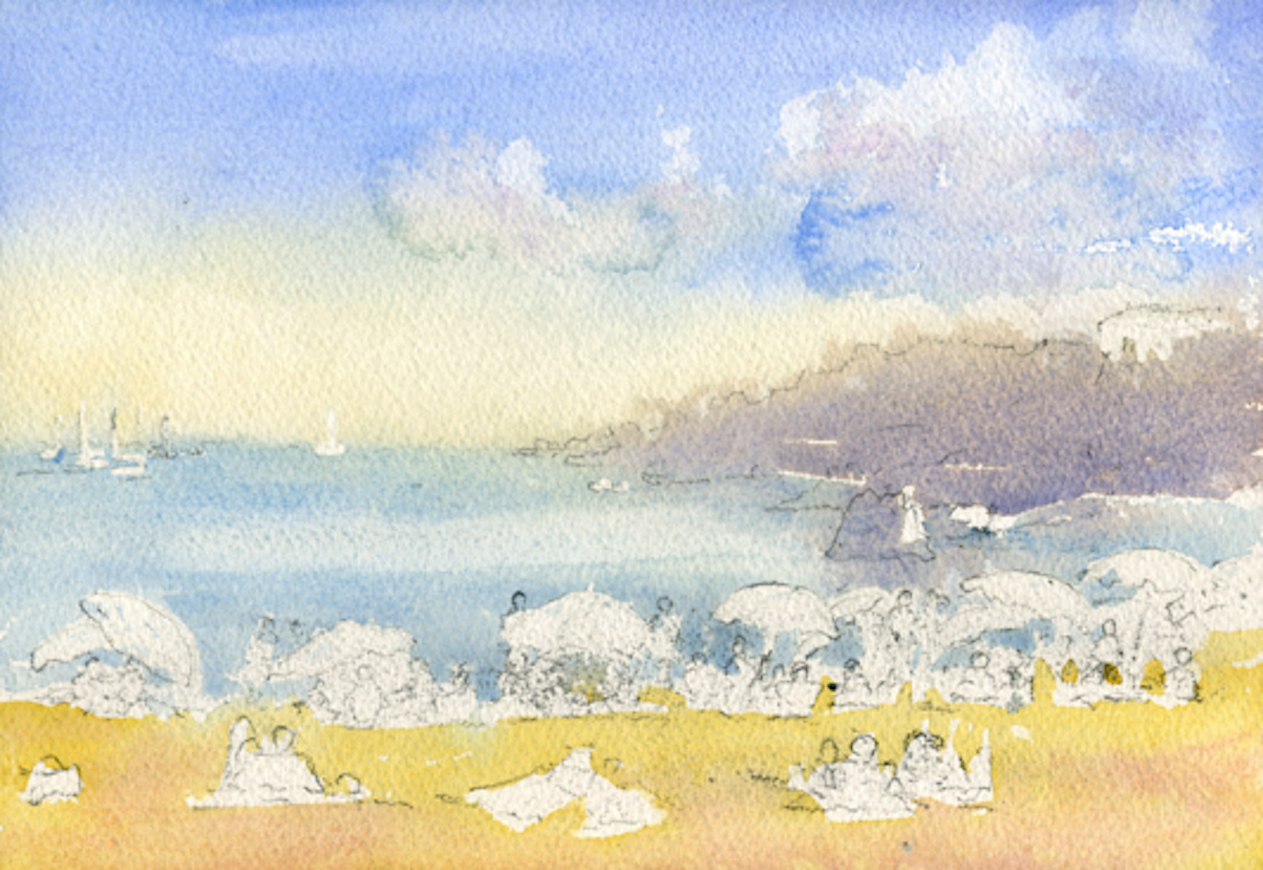 It is a real mistake at this step to try to do too much and define things too clearly. Do not begin this step until the masking fluid is completely dry. Here you will apply a loose and wet first wash to the paper. 1. Do not pre-wet the paper. In this work you will start on dry paper. 2. Prepare colors in the deep mixing wells of your palette. Make sure your mixes have more water than pigment; I think of this mix as the consistency of a cup of tea. Set up wells of 6 basic mixes; Cobalt Blue with a little Winsor Blue, Cerulean Blue, Burnt Sienna, Raw Sienna, Cobalt Violet, and Cadmium Orange. 3. I have used a large (size 5) squirrel mop brush for the first wash. These brushes are ideal when you start on dry paper; they hold a lot of pigment and water and do allow fine work for edges or going round parts of the paper. 4. The sky needs to reflect the heat of the day, and for this reason I have used warmer colors near the horizon. Use your blue mix at the top and as you near the horizon, add a little Cadmium Orange. Let the mixes run, and avoid any hard edges. 5. While the sky is wet, use a tissue to lighten some parts where clouds may be. As you can see from my wash, I got a "cauliflower" in the sky. If this happens, don’t do anything to try to get rid of it right now. We'll deal with it later if it needs attention. 6. The distant hills are a mixture of Burnt Sienna and your blue mix. Apply the two colors separately and let them mix on the paper, and don’t worry about colors running into other washes. Make sure you paint around the light umbrellas and people (the masking fluid will help here). 7. The sea is Cerulean Blue. I painted the Cerulean Blue wash and then added the light strip across the water later using a dry brush. Take a dry brush and use it to soak up the wash in a band across the sea for those rippling waves. 8. The beach is mainly Raw Sienna, but add Cobalt Violet as you near the front edge of the paper. Again paint around the clusters of people, bags and umbrellas.
Step 4: The Shadows
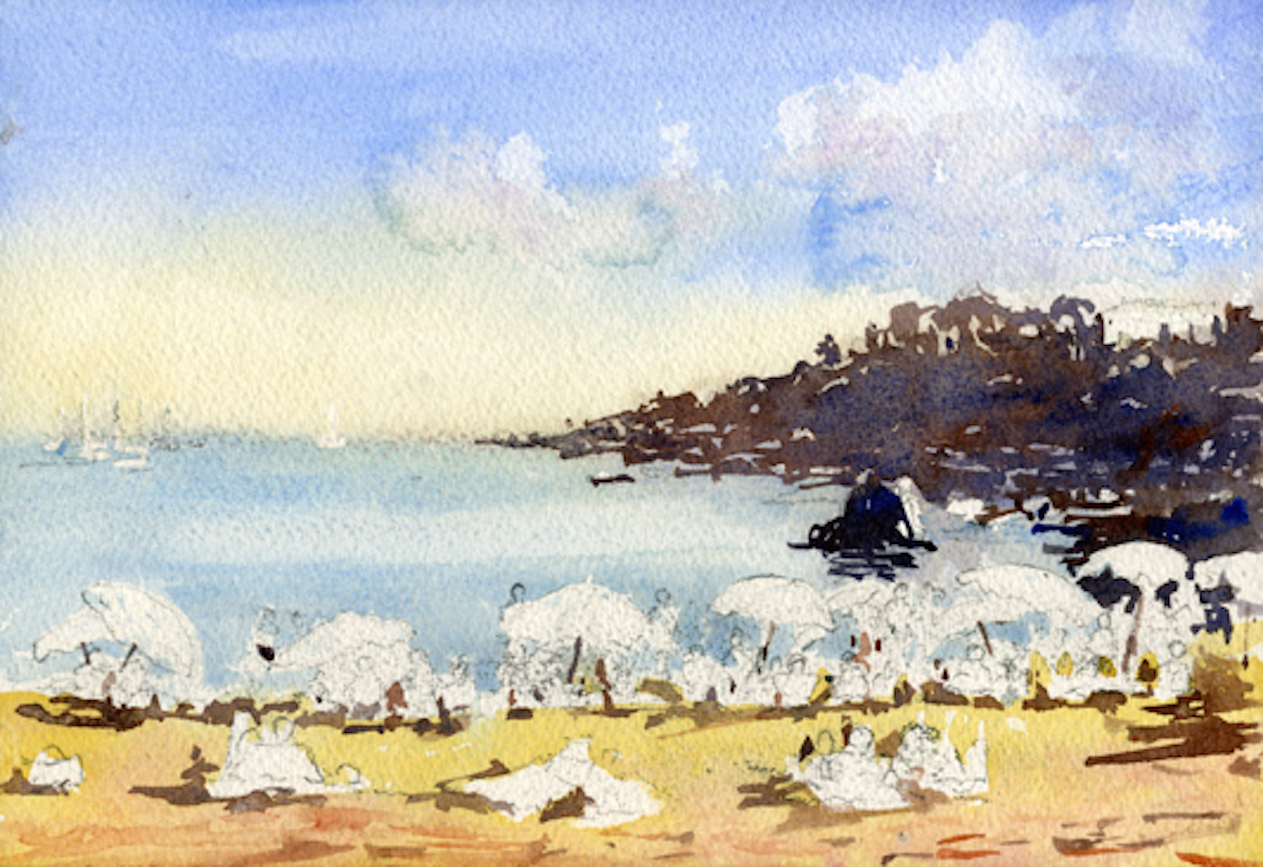 Do not begin this step until the previous wash is completely dry. In this step you will add the darker shades in the painting to help define the structure of the composition. This step will define the people and umbrellas in a “negative” way. 1. Do not pre-wet the paper. For this work you will start on dry paper. 2. Use your existing mixes, and in addition create a dark mix of French Ultramarine Blue, Burnt Sienna, and Winsor Violet. 3. The distant hills are in silhouette, and we need to darken them. Use your dark mix and other colors from your palette to darken the hills. Apply the mixes loosely and let them run together. In parts add pure burnt Sienna or French Ultramarine Blue and let the colors mix together. Keep this process wet and avoid hard edges inside the hills. 4. Add Burnt Sienna to your dark mix so that it is predominantly brown. Use this color to paint the shadows around the people, umbrellas, and on the beach. This way of painting is called "negative painting". By painting around an object, the form of the object appears.
Step 5: Details
 Do not begin this step until the previous wash is completely dry. Here you will apply some of the darker shadows to help define the structure of the composition. In this step we will add the details of the people, boats, umbrellas and even the house roof on the distant hills. Do not think you have to work on one part of the painting and, for example, complete one person or umbrella. This is a mistake. Work all over the painting adding color in bits to umbrellas, boat sails, people’s clothing, and even additional shadows. Approaching the work in this way keeps the painting loose and ensures that your colors are spread throughout the work. 1. Do not pre-wet the paper. In this work you will start on dry paper. 2. Use primary colors; Cobalt Blue, Permanent Rose and Winsor Yellow, and in addition add other vibrant colors; Cadmium Orange and Cobalt Violet. This application of bright colors across the painting defines the hustle and bustle on a sunny beach. Have fun creating umbrellas and boat sails! 3. When your primary colors have dried, create a Permanent Rose and Cadmium Orange mix to indicate the people’s skin tone. 4. When the people have dried, use a dark mix (French Ultramarine and Burnt Sienna) to suggest people’s heads.
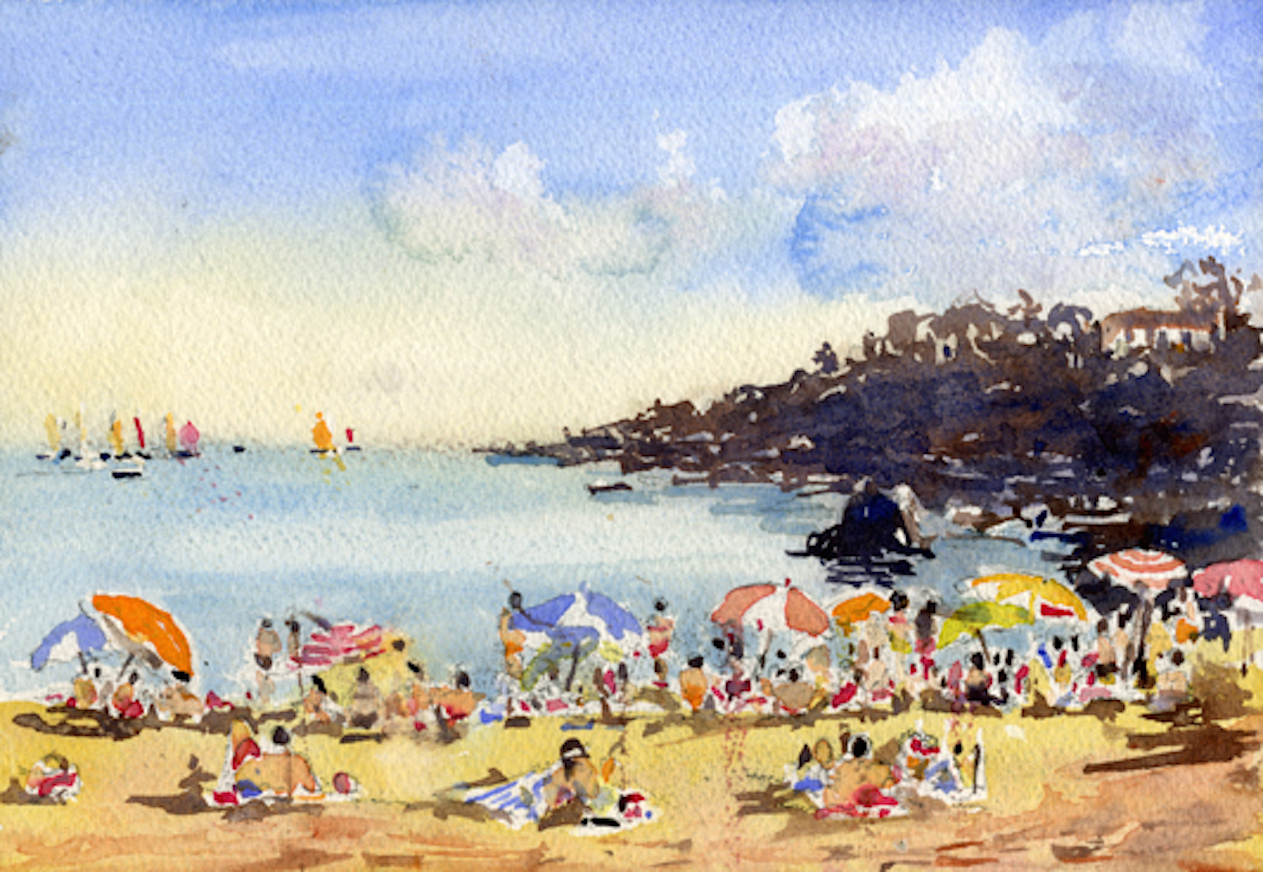
Step 6: Finished!
 You need to review your work carefully. It needs to be loose and free and not rigid, but it should read as a busy beach scene. You may need to add more color to the umbrellas and people; you may have forgotten a few people’s heads. I added a few heads in this step. Looking at my painting, I realised that the "cauliflowers" in the sky from the initial wash were spoiling the work by taking attention away from the main focus of the painting. I took some white gouache paint (Chinese white watercolor would work also). White gouache is an opaque water-based paint that covers watercolor quite well. I used the gouache to add clouds to the sky to remove the "cauliflowers", then declared this piece finished.


